So, I have recently succumbed to the spell of the PJ!
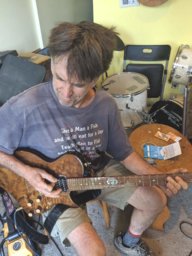
I loved my Jazz...a Warmoth ash body with a Warmoth bubinga/wenge neck, here's a pic of me with it at a recent gig:

As much as I was diggin' the Jazz, I was just happier with the tones I got when I pulled out my PJ bass… a Fender Classic ‘50’s P modded with a Dimarzio Ultra Jazz and Warmoth J wenge neck.
So, as an avid do-it-myselfer, I set out to convert my Jazz to a PJ. I thought it'd be good to share the process with you all.
I just happened to have a Nordstrand NPJ4SE set laying around, so the pickup choice was a no-brainer.
I debated with myself whether to just sell the body and order up a new one but I ultimately decided that for budgetary reasons, modding my current body would be the way to go. I didn’t have the patience to wait for a used one that fit my criteria to come up for sale. It would cost a premium to have a Jazz body with a PJ config made.
Warmoth will do a neck P route for no extra charge on one of their “Showcase” bodies (better price) but I’d just end up with a body with the same ugly dual purpose neck pickup route. I don’t feel bad adulterating this body since I got it out of Warmoth’s “Screaming Deals” section quite cheap and it really is nothing special…just a plain old black Jazz body. Besides, the body and neck have great karma together, so I didn’t really want to break them up.
I don't make my own pickguards, so I figured the next step was to find one that worked with my bass and also cut for the P pickup in the "sweet spot". I found that the standard Jazz pickguard shape does not adequately cover the sweet spot route. Many pickguard manufacturers that will do a P cutout on a jazz guard do not compensate for this, in fact most production Jazzes with a PJ configuration don't have the P pickup in the traditional location.
Warmoth (an obvious favorite supplier of mine) does alter the shape of their J Bass guard with P cutout to keep true to the sweet spot! So I ordered two, a matte black and a vintage pearl. This pic shows the difference in the shape compared to a standard jazz shaped guard:
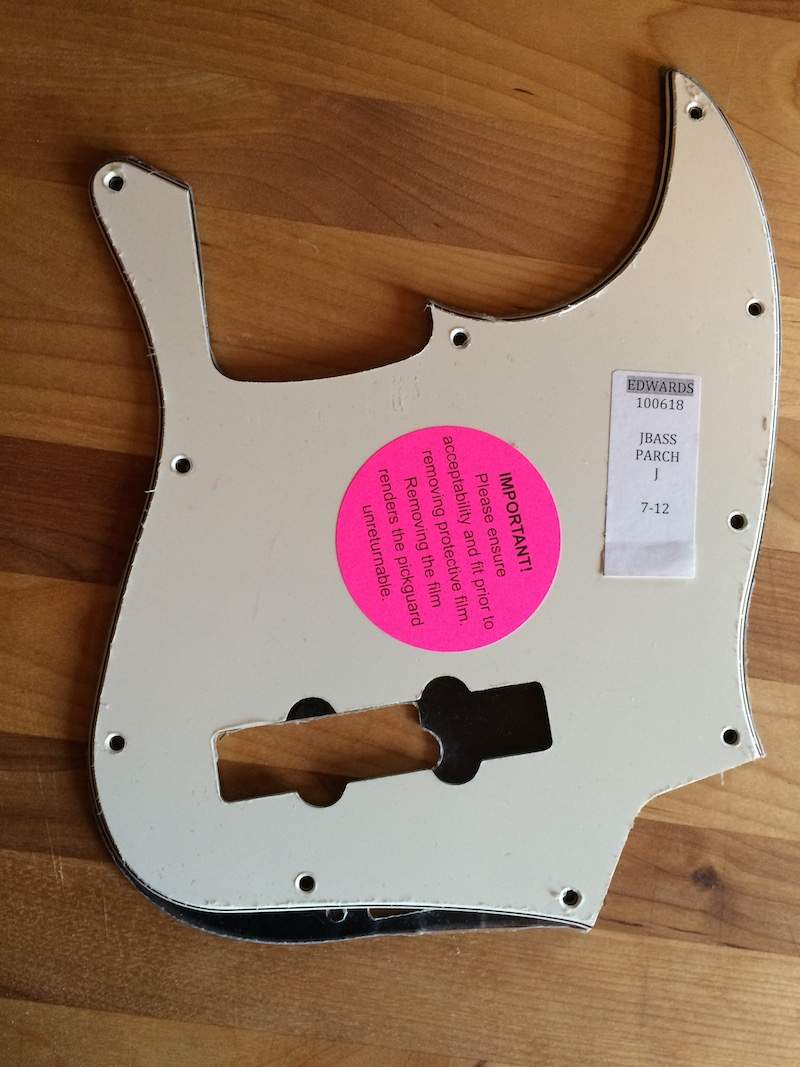
Notice the P cutout peeking out from behind?
I then dialed up Stewart MacDonald in my browser and ordered up a P pickup routing template, double bearing 3/8" router bit and the rest of the screws I’d need to complete the project. I am not a luthier but I am an avid woodworker and pretty handy with a router. IMPOTRANT: If you do not have a good quality router and are not experienced with this tool, you are far better off paying a pro to do something like this for you. It likely doesn’t cost much to have it done, I just happen to enjoy doing this stuff myself.
The key to success in these projects is all in the preparation. The first thing I did was pull out the old pickups and dry-fit the new pickguard. A little re-shaping around the control plate was required. While I had it on, I verified the pickup cutout was well centered, which was pretty easy with the Jazz pickup route already there. The way to do this without an existing route would be to draw a center line between the bridge and the neck pocket, or perhaps just string up the E and G strings and line it up.
Using the pickguard as a template, I took a ball point pen and traced the outline of the cutout on the body, pressing hard to create an indentation that would be easy to see on the black paint. I’d use this as a guide for setting up the template.
Some guys use double sided tape to affix the routing template…with the tape method, there is always the possibility of the template moving or vibrating and causing some rough edges on the route. Plus you have to fight to peel the tape off and clean up any sticky residue left behind. It is always better if you can clamp the thing down (as always IMHO and YMMV).
With a template this size clamping isn’t possible, the clamp would be in the way of the router, so you’d have to use a jig to fit the template into that could be clamped in place outside the radius of the router base.
The template has screw holes with countersinks at the corners to perhaps accommodate installation to a jig…I opted to just use these to just screw it directly to the body. I’m not worried about the couple holes which will be covered up by the pickguard, there is no chance of going pickguardless after this anyway because half the Jazz route will still be wide open.
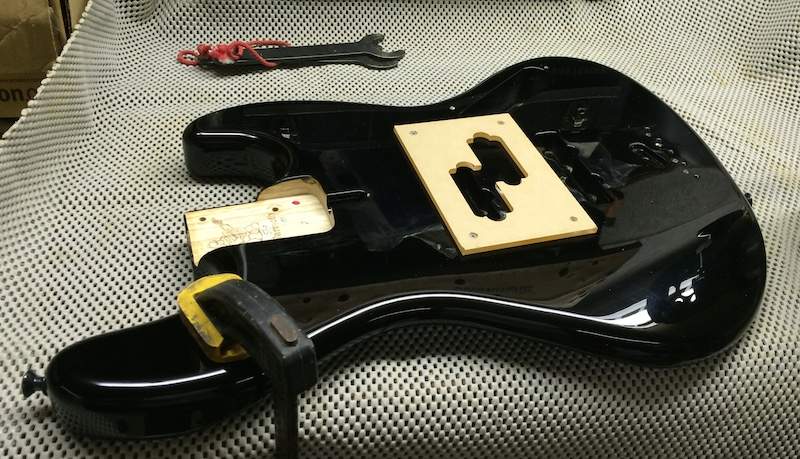
With the template screwed down I carefully adjusted the router for minimal penetration for the first pass while still making good contact between the bearing and the template. Setup was made easier because I was able to actually sight the bit using the existing route.
If I was making a fresh route, I would have took the body to a drill press to remove most of the material with a forstner bit and then just use the router bit to clean up the edges. Since I don’t have my own drill press and I the benefit of the existing route, I decided to go with the router bit the whole way.
I took a test pass with the router to make sure the paint wouldn't chip out. If necessary I would have scored the perimeter of the route with an exacto knife to help eliminate this but the paint was yielding to the bit nicely so I just decided to go at it!
After a few passes, viola! I have room for the NP4!
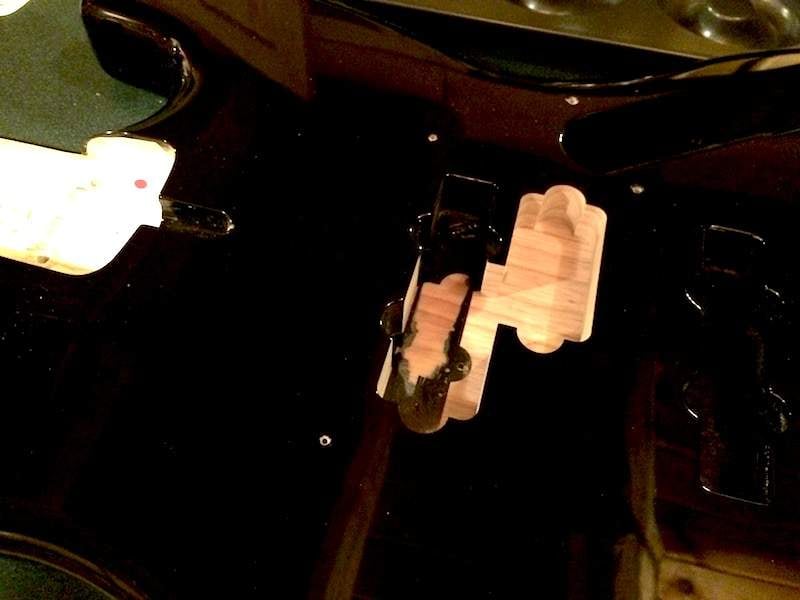
A new hole for the pickup wires was drilled into the control cavity. I won’t bother getting long winded about the final steps since that’s just basic wiring stuff…here is the final product!
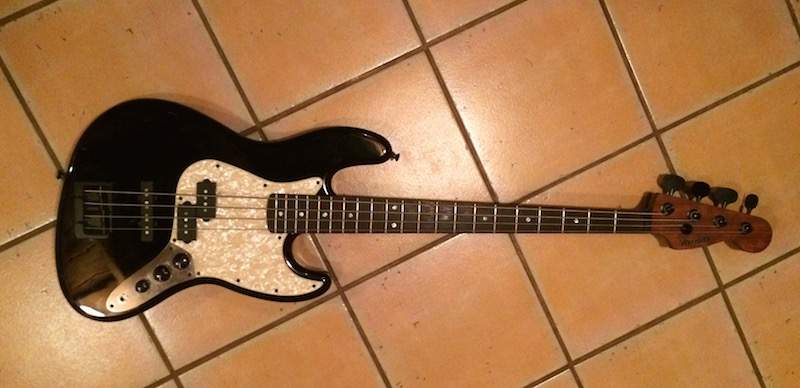
I have gigged this a few times since the mod and all I can say is WOW! It was well worth the effort!
I loved my Jazz...a Warmoth ash body with a Warmoth bubinga/wenge neck, here's a pic of me with it at a recent gig:
As much as I was diggin' the Jazz, I was just happier with the tones I got when I pulled out my PJ bass… a Fender Classic ‘50’s P modded with a Dimarzio Ultra Jazz and Warmoth J wenge neck.
So, as an avid do-it-myselfer, I set out to convert my Jazz to a PJ. I thought it'd be good to share the process with you all.
I just happened to have a Nordstrand NPJ4SE set laying around, so the pickup choice was a no-brainer.
I debated with myself whether to just sell the body and order up a new one but I ultimately decided that for budgetary reasons, modding my current body would be the way to go. I didn’t have the patience to wait for a used one that fit my criteria to come up for sale. It would cost a premium to have a Jazz body with a PJ config made.
Warmoth will do a neck P route for no extra charge on one of their “Showcase” bodies (better price) but I’d just end up with a body with the same ugly dual purpose neck pickup route. I don’t feel bad adulterating this body since I got it out of Warmoth’s “Screaming Deals” section quite cheap and it really is nothing special…just a plain old black Jazz body. Besides, the body and neck have great karma together, so I didn’t really want to break them up.
I don't make my own pickguards, so I figured the next step was to find one that worked with my bass and also cut for the P pickup in the "sweet spot". I found that the standard Jazz pickguard shape does not adequately cover the sweet spot route. Many pickguard manufacturers that will do a P cutout on a jazz guard do not compensate for this, in fact most production Jazzes with a PJ configuration don't have the P pickup in the traditional location.
Warmoth (an obvious favorite supplier of mine) does alter the shape of their J Bass guard with P cutout to keep true to the sweet spot! So I ordered two, a matte black and a vintage pearl. This pic shows the difference in the shape compared to a standard jazz shaped guard:
Notice the P cutout peeking out from behind?
I then dialed up Stewart MacDonald in my browser and ordered up a P pickup routing template, double bearing 3/8" router bit and the rest of the screws I’d need to complete the project. I am not a luthier but I am an avid woodworker and pretty handy with a router. IMPOTRANT: If you do not have a good quality router and are not experienced with this tool, you are far better off paying a pro to do something like this for you. It likely doesn’t cost much to have it done, I just happen to enjoy doing this stuff myself.
The key to success in these projects is all in the preparation. The first thing I did was pull out the old pickups and dry-fit the new pickguard. A little re-shaping around the control plate was required. While I had it on, I verified the pickup cutout was well centered, which was pretty easy with the Jazz pickup route already there. The way to do this without an existing route would be to draw a center line between the bridge and the neck pocket, or perhaps just string up the E and G strings and line it up.
Using the pickguard as a template, I took a ball point pen and traced the outline of the cutout on the body, pressing hard to create an indentation that would be easy to see on the black paint. I’d use this as a guide for setting up the template.
Some guys use double sided tape to affix the routing template…with the tape method, there is always the possibility of the template moving or vibrating and causing some rough edges on the route. Plus you have to fight to peel the tape off and clean up any sticky residue left behind. It is always better if you can clamp the thing down (as always IMHO and YMMV).
With a template this size clamping isn’t possible, the clamp would be in the way of the router, so you’d have to use a jig to fit the template into that could be clamped in place outside the radius of the router base.
The template has screw holes with countersinks at the corners to perhaps accommodate installation to a jig…I opted to just use these to just screw it directly to the body. I’m not worried about the couple holes which will be covered up by the pickguard, there is no chance of going pickguardless after this anyway because half the Jazz route will still be wide open.
With the template screwed down I carefully adjusted the router for minimal penetration for the first pass while still making good contact between the bearing and the template. Setup was made easier because I was able to actually sight the bit using the existing route.
If I was making a fresh route, I would have took the body to a drill press to remove most of the material with a forstner bit and then just use the router bit to clean up the edges. Since I don’t have my own drill press and I the benefit of the existing route, I decided to go with the router bit the whole way.
I took a test pass with the router to make sure the paint wouldn't chip out. If necessary I would have scored the perimeter of the route with an exacto knife to help eliminate this but the paint was yielding to the bit nicely so I just decided to go at it!
After a few passes, viola! I have room for the NP4!
A new hole for the pickup wires was drilled into the control cavity. I won’t bother getting long winded about the final steps since that’s just basic wiring stuff…here is the final product!
I have gigged this a few times since the mod and all I can say is WOW! It was well worth the effort!
Last edited: