• TalkBass has been independent since 1998. Add your voice.
    Create a free account to reply to discussions, view embedded media, and browse with fewer display ads.
    Join freeLog in
    Want zero display ads or expanded classifieds tools? Compare plans.

Lado Six String Repair

scottyd

Commercial User
Nov 17, 2006
2,887
657
Waco Tx
Disclosures
Builder/owner Redeemer Basses
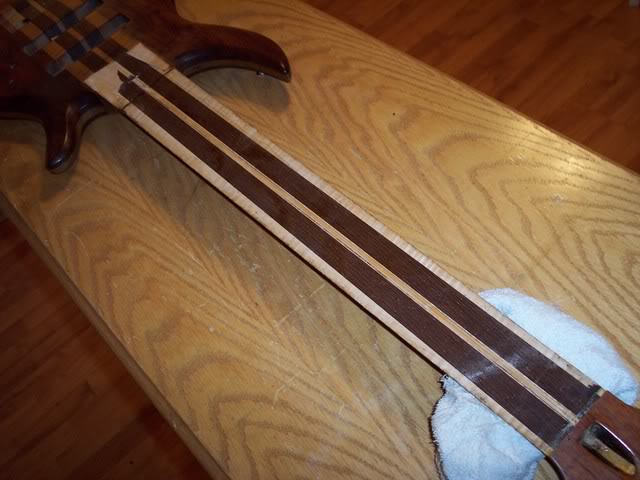
This is a repair job for TB'er Six String Poet. The bass is a studio series Lado that was built in Canada. Its neck is made from Wenge and Flamed Maple. The body looks like it is Bubinga and Flamed Maple. Maybe Six String Poet will chime in to confirm the body wood. The Lado was sent to me to repair the broken truss system. I received the bass today and immediately started working on it.

I removed the old fingerboard which was epoxied on, it was a little bit of a chore but I managed it. I didn’t get any photos of that step, let’s just say I was a little too busy. The board came off in pieces (which was expected :smug: ) so a new one will be required.

I then inspected the truss system to find that the bass was built using a single compression rod. :eek: I’m still somewhat in shock that Lado built this SIX string with just a compression rod. There is way too much neck length and tension for this type of setup. I will admit other than that the craftsmanship on this bass is really nice. I took out the compression rod it was covered with a maple fillet that was about 3/16" thick. The neck also has a thin piece of veneer at the end under the fingerboard for about the last 5 frets down I find this kind of odd I’m guessing the neck may have a low spot here. I will check the level and straightness of the neck for sure.

The compression rod will be replaced with an actual truss rod and two reinforcement rods.

Here are some pictures. So far... :D
snow002.jpg


snow001.jpg
 
cool!! i cant believe i took so long in getting this bass repaired. i thought it would be a bit of a hassle to deal with someone to repair this, but scott is a pretty cool guy. the body top is bubinga. this was made in 1993. i have a audere preamp coming to put into this bass and am contemplating putting a hipshot bridge on it. man, now i feel like it is my birthday :) :hyper:
 
a compression rod actually is sturdier than a dual action rod because less tension is required to do the job. dual actions break more often than compression rods and in most cases you can fix a compression rod that breaks at the adjusting nut without removing the fretboard (see stewmac's new truss rod repair kit). That said, the ability to move the fingerboard backwards or forward is very important to me. Plus a straight channel is easier to rout, too.
 
a compression rod actually is sturdier than a dual action rod because less tension is required to do the job. dual actions break more often than compression rods and in most cases you can fix a compression rod that breaks at the adjusting nut without removing the fretboard (see stewmac's new truss rod repair kit). That said, the ability to move the fingerboard backwards or forward is very important to me. Plus a straight channel is easier to rout, too.

I will be building the new truss, it will be a single action. I’m sure it won’t break any time soon. I’ve seen where most units fail at either the weld/braze or the threads. For the most part it’s because they were not built very solid to start with. I’m not saying compression rods are inferior what I was getting at is that there was only one rod with no reinforcements. The neck is wide and pretty thin too so a better system is required. This is more than likely why the original broke trying to control such a beast of a neck. The rod broke on the headstock end and was just about to let go on the anchor end...:D Rock on Wil, I cant wait to see updates of your latest project!
 
I will be building the new truss, it will be a single action. I’m sure it won’t break any time soon. I’ve seen where most units fail at either the weld/braze or the threads. For the most part it’s because they were not built very solid to start with. I’m not saying compression rods are inferior what I was getting at is that there was only one rod with no reinforcements. The neck is wide and pretty thin too so a better system is required. This is more than likely why the original broke trying to control such a beast of a neck. The rod broke on the headstock end and was just about to let go on the anchor end...:D Rock on Wil, I cant wait to see updates of your latest project!

well, actually I disagree with you there in that more reinforcements are necessary. The purpose of the truss rod is to make the neck adjustable, not reinforce it. A neck that is too stiff is a problem. I have my views on these kinds of things and it may differ from what most manufacturers want their customers to believe ....which, IMHO, is engineered to make them look different or better than the competition. Carbon fiber rods, for example, are great for adding a certain amount of stability and mass to the neck that helps in eliminating dead spots ...as a 'neck stiffening material that helps the neck resist the string pull' I don't see the relationship. Also, this neck is a 5 piece, so it was pretty stable to begin with. Too much voodoo in guitar building ...my views are way more simplistic.
 
Thanks again for your insight Wilser. To be honest I’m pretty sure that stability is a problem with this neck. I say this because I was told that the neck had a bad back-bow and the compression rod broke trying to straighten it. I've inspected the neck and it is dead flat without tension. Also this neck is THIN. The owner also said he never was satisfied with the action of the neck as well. (this can be from a number of different variables.) I’ve built several multi-laminate necks and have tried it both ways. I’m happier with the necks with stiffening rods. I’ve never had one come out too stiff. I use a smaller rod. They hold their shape better through weather changes (wood moves carbon fiber doesn’t) no dead spots, ect. It’s my belief (which I know differs from yours ;)) that anything 6 string and up should have 2 truss rods. Being that this neck is already routed for a single rod it will get 2 smaller in size reinforcement rods. I also agree that there is way too much Voodoo involved with a lot of bass/guitar building, but to me this has been proven and just makes good sense. Any neck five string and up that leaves my shop will be built this way. I’m confident that if the manufacturer of this bass would have done it to start with this never would have happened.. :D
 
I've ordered all the parts for this bass. It will be getting a cocobolo fretboard, refret, ect. The parts are on their way in the mail.

The owner of the bass wanted a narrower neck at the nut. So I narrowed it to 2-1/8" It was somewhat of a squeeze getting it that narrow with the outer maple laminates, but it worked out fine. I have to admit its a heck of alot more comfy feeling now, the original nut string spacing was 12mm :eyebrow: the new spacing will be 9mm (23/64") :D PICS!

This photoshop shows what will be shaved down.
snow005.jpg


After the neck shaving.
snow007.jpg


Back of neck after reshaping.
snow010.jpg


The bass will also be refinished so I started sanding the old finish off.
snow009.jpg
 
Six String Poet purchased this preamp and had it sent to me for installation. This is the nicest preamp I have ever laid my eyes on. The features of this unit are incredible to say the least. It would take awhile to list them all so check it out here. http://www.audereaudio.com/ I cant wait to wire this bad boy up! (what tiny bit that isnt prewired) :bassist:


snow012.jpg
 
Updates, first of all thanks goes to the owner of this bass for being understanding that Im a little behind with this job on account of my family and I moving to our new home :) OK, the cocobolo fingerboard is tapered slotted ect ready to be glued on. The new truss is also installed. Lmi shorted me one graphite rod so I can't glue the board down yet:scowl: . The owner (Six String Poet) bought a Hipshot bridge to put on her. The bass already has a recess routed for a bridge because at one time it was outfitted with a Gotoh piezo unit. The hipshot does not fit this and the route is too deep. I filled the route with a filler piece I made from some scrap bubinga I had laying around (always keep your scrap! :D ) Here are some pics! The new workshop is full of boxed up stuff so until I get it setup I'm forced to work outside.....Which is actually kinda nice until it gets hot.

The new bridge
snow015.jpg


Fingerboard ready to go.
snow016.jpg


Filler piece being glued in
snow019.jpg
 
The last wide fives and sixes I built had flat fingerboards. I looked to buy some radius blocks for ERBs and the only ones I found were way too short and cost way too much. I found a fellow that can build me some longer but again the cost is up there. So I decided to build my own.... I found an article about this Jig that uses a router mounted on its side to cut a block. I built the jig from scrap wood it cost nothing. I cut a 16" radius block that is 10" long and 3 3/4" wide within 45 minutes. I should have done this a long time ago. The jig itself took a couple of hours to build most of that time just getting everything centered and squared up. here is the link of the tutorial I used and here are some PICS!
Invalid Link Removed

Heres the Jig without router. Its setup here for a 16" radius but you can make it any radius you want by simply changing the pivot hole. Instead of using shims to adjust the router angle I used a screw that raises and lowers the backside of the router.
snow006.jpg


The pivot hole. 16" from the hole to the cutting bit.
snow002-3.jpg


In action, fancy block heh? Its laminates of red oak and redwood.
snow003.jpg


Once done routing very little smoothing is needed to finish the block up.
snow005-1.jpg


I went over the top of the block on the router table with a 1/2" roundover to smooth the edges, then I gave it a coat of satin poly. Done deal easy as pie!
snow008.jpg
:D
 
Truss and graphite rods are in, and the fingerboard is glued on.
I have also sanded more and leveled the filler for the bridge.
There's still a little bit of glue to clean up at the bottom of the fingerboard.

lado003.jpg


lado005.jpg