• TalkBass has been independent since 1998. Add your voice.
    Create a free account to reply to discussions, view embedded media, and browse with fewer display ads.
    Join freeLog in
    Want zero display ads or expanded classifieds tools? Compare plans.

LowDown Basses #7,8 and 9. First builds from lumber.

Tslicebass

Commercial User
Jun 12, 2007
1,602
340
Chicago
www.lowdownbass.net
Disclosures
LowDown Bass Guitars
I finally have wrapped up a couple heavy projects I was working on and decided I am ready to tackle a build... or 3, from lumber. I did a ton of research on this forum while preparing for what would no doubt be the most challenging builds I have done yet. I really wouldn't consider my first batch of instruments builds... more like assemblies. I will also continue to be working with my mentor, the chicago bass doctor and former Lakland floor manager Carl Pedigo. Carl has a extremely vast knowledge of building and repair and has been extremely helpful in my past builds.
Pics!
First I had to buy some wood. Thankfully there is an amazing store called Owl Hardwood in suburban Des Plaines. They had a bunch. Maple, Purpleheart and Zebrawood for the neck blanks. Not pictured is a giant African Mahogany board I will use for the bodies.
IMG_0229_zpsqum0jdvl.jpg

Then I went about sketching out the shape and dimensions.
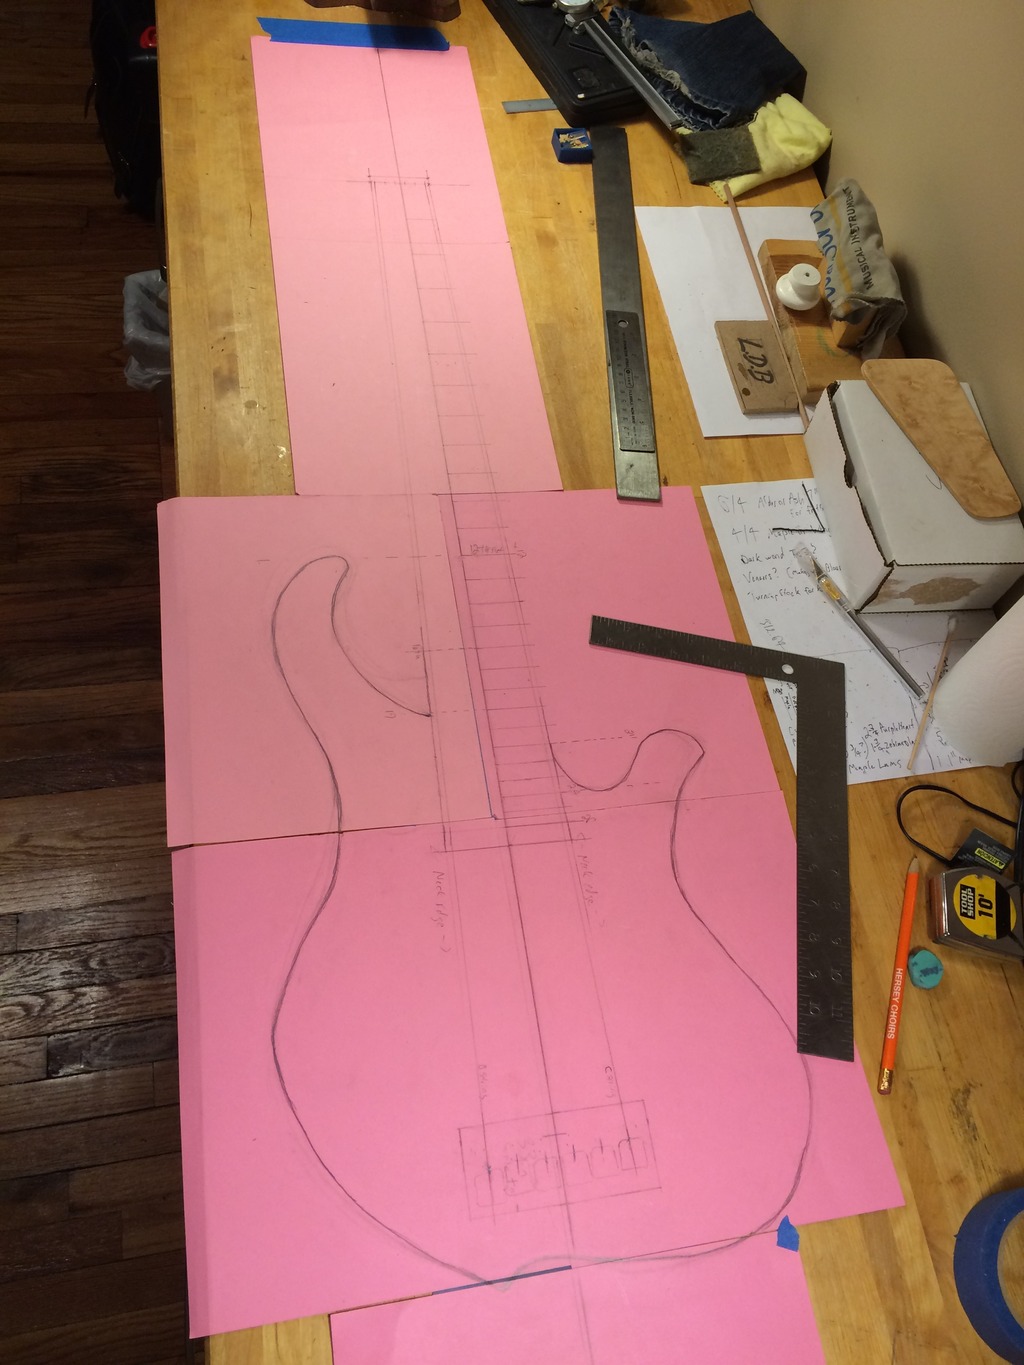
IMG_0321_zpsyreragxp.jpg

I originally planned on building a 6 string 33" scale, 26 fret and a 5 string 34" scale, 24 fretless. Turned out I had enough neck lumber to make a 4 string as well.
I cut up the mahogany to the body blank size. Thought I would have enough for two bodies but turned out I only had enough for a two piece body and a core for the fretless.
Then I took all my wood to Carls shop where we cut everything up and ran it thru the jointer and thickness sander. Here is the Mahogany core for the 6 string being glued up.
IMG_0369_zpsuaasufyd.jpg

Then I cut out my body shape from the drawing and used it to make an MDF template. Finished 1/4 on the left and almost finished 3/4 on the right.
IMG_0334_zpspidhgb9y.jpg

IMG_0395_zpsf7xbyucr.jpg

Template on the pre joined body core for reference.
IMG_0358_zpsggdqajjq.jpg

While I was working on the body templates I cut out and shaped a headstock template as well.
IMG_0356_zpskev1jl2b.jpg
 
Last edited:
Then I went to work on the platens I would be using to glue the tops to my bodies. I found out about this method here on luthiers corner.
Here are the 3 3/4 layers of MDF getting glued together
IMG_0399_zpsm31bwo54.jpg

And here they are out of the clamps. Rough cut to be a little larger than the actual body shape.
IMG_0411_zpskgftbo8c.jpg

The top for the six string is a killer book matched set of Zebrawood from Luthiers Mercantile. I had a real hard time finding zebrawood I liked online in the right size. Here it is getting joined. I used the tent-nail border method.
IMG_0446_zpsvbgp0xie.jpg

Then I went about getting the fretless body put together. I went back to Owl and got some really lightweight bass wood to make wings for the Mahogany core I had leftover. Unfortunately I measured incorrectly when I took it to Carls to get it cut. So I ended up adding some purpleheart stripes in the core. I actually really dig the way it came out... sometimes mistakes can become positives.
With the template for reference
IMG_0374_zpsfzzmvep0.jpg

And getting all glued up.
IMG_0376_zpsmnidnyno.jpg

And here are both the body blanks rough cut to shape. Left a good amount of extra wood in some spots to help with gluing on the veneers and tops.
IMG_0384_zpslgx5wxok.jpg

I decided to take a shot at chambering. I just used some forester bits to remove different areas and make small chamber. I roughed out all the contouring I would end up doing before I started chambering. I decided to play it safe and only chamber out a relatively shallow depth.
IMG_0478_zpsbo4o356a.jpg

Then I rough cut the shape of the zebrawood to match the 2 piece Mahogany body.
IMG_0465_zpspzfv8k5t.jpg

Then I held my breath and got everything into glue up with the platens. I used 1/8th inch dowels in the waste area to help keep everything in place during glue up. I had a black veneer line going in between the top and core so this was essential. I used packing material cut to bigger than the shape of the body to catch squeeze out. But I also used a bunch of wax paper cause nothing frightens me more than ending up with a huge MDF platen glued to your nice wood.
IMG_0482_zps5iw4ccpb.jpg

IMG_0480_zps8ivwlnqc.jpg

And here it is out of the clamping system and with the excess black veneer removed.
IMG_0489_zpshrsk9kkt.jpg

I will be on tour for most of the month so I decided to get my neck blanks glued up asap. I figured it would help to get them glued up and leave them for around a month before shaping. Especially considering it is transitioning from winter to spring here in Chicago which generally means a pretty drastic change in humidity.
Here are the pieces being glued up.
IMG_0461_zpspiwccj6c.jpg

And here are the three necks. Maple/Zebrawood/Purpleheart/Zebrawood/Maple. Except for the 4 string neck which is just maple with a purpleheart core.
IMG_0472_zpsygyqvxxd.jpg

Thankfully I got two days back in Chicago today and yesterday. Was able to get the 6 string body pretty much final shaped and ready for contour.
IMG_0511_zpsv1dyxu7g.jpg

More progress in weeks to come...
 
Got a little bit more done on these builds.
Got the Wenge accent layer for the fretless body thickenessed today at Carl's. This will got in between the redwood top and 5 piece body core for the 5 string fretless. The top was thinner than I expected and all the planing to get the body layers even took off more thickness that I expected. Here is the wenge getting joined. Some really nice wide open grain which will hopefully provide some nice contrast and compliment the Mac Ebony board.
IMG_0568_zpsju9i99se.jpg

I also got the white veneer lines into the Mac ebony fretless board.
Here they are in and rough shaped and then mostly final shaped. I use my fret puller tool to get the veneer cut almost level with the board. I use a little titebond to initially set them in the slots and then I flow CA over the top before radius/leveling the fingerboard.
IMG_0569_zpsgyh93oib.jpg

IMG_0570_zpsuqykckhb.jpg

I received my swamp ash body core for the 4 string the other day from Best Guitar Parts. Its a nice and lightweight two piece core. Unjoined which should make gluing the Claro Walnut top and Bloodwood veneer on easier. I just need to find somewhere with a high enough clearance on the band saw to cut the body core down to 1 1/2 inches thick. Trying to save enough of the leftover ash to possibly make a enhanced grain or torched grain top for the future. Speaking of tops, the Claro Walnut top for the 4 string was also ran thru the jointer to make sure the book match is pretty seamless.
 
More progress on the fretless 5 string
Here are all three layers of the body rough shaped
IMG_0583_zpsbotc796c.jpg

And the Wenge accent layer glued on and chambered
IMG_0586_zpsnot9vtnv.jpg

And then the redwood top glued on and the whole thing trimmed to shape
IMG_0590_zpsfiqnerxb.jpg

IMG_0594_zpsexousxkr.jpg

The spot on the top is some CA glue I flowed into an area where it looked like the top had chipped. The top is going to have to be run thru the thickness sander just to even out the top.
I got a ton of work done on my 3 neck templates yesterday. Hoping to get the necks cut to final thickness so I can let them sit for a couple weeks while I get the bodies carved and the humidity changes.
 
Have gotten a bunch done on these basses in the last couple weeks.
Neck blanks thickened. Turns out I had enough to make 5 necks and a guitar neck blank. Score! Here are three of them
IMG_0599_zpssriastso.jpg

And of course what would a build like this be without jigs and templates. I am really getting tired of jigs and templates.
Neck taper templates finished for the 4 string and 5 strings
IMG_0613_zpss1bsonld.jpg

And progress on my scarf joint jig for a handsaw and router. Hoping to get the scarfs done by the end of this week.
IMG_0667_zpslrglgxgz.jpg

Also, got some progress on the 6 string and 5 string fretless. Carving is AWESOME! It really helps to balance out the tedious process of making jigs and templates.
IMG_0643_zps25kwyhnz.jpg

IMG_0654_zpsipnalddf.jpg

Decided because I have another neck blank to make another fretless. Plus I had some nice Wenge for a top and fingerboard. Bought a nice cherry body the other day for it. More progress on that bass and the 4 string soon.
 
Completed Scarf Joint Jig. This one took a while to perfect... I really wanted the slope to be perfect on the router jig.
IMG_0670_zpsct3ioxdh.jpg

Scarfs pretty much ready to be glued up. 6 necks!
IMG_0683_zpsi915uimk.jpg

Back to bodies!
Fitting the bloodwood venner for the Wenge Top 5 string and Walnut Top 4 string
IMG_0682_zpskf7ynd0s.jpg

Giant Black Limba board from Owl Hardwoods. Got a two piece body and a core for the 6th bass body out of it. They had a piece that was big enough for one piece bodies but it was out of my price range
IMG_0678_zpstvnvpcqs.jpg

Body Blanks ready top be glued up. Unlike last time I decided to glue the tops and veneers to the core before joining the body. This saved me a little bit of time since I didn't have to join the top and rough shape it to fit the body. However, I am an idiot and didn't realize with the veneer lines the two halves of the body needed to stay dead even for the veneer lines to line up once the halves are joined. So even though I can plane off the difference on the top and back I cannot fix the slightly off line veneer at the butt end of the basses. This obviosuly won't be an issue with the Black Limba two piece. I will be gluing the top on joined to the 6th body blank (which will already be glued up because it is a multi piece body). Pretty sure I am gonna go Mango top/Black Veneer/Swamp Ash Accent/5 piece Black Limba/Mahogany body on that one.
IMG_0684_zpsgibyx1ol.jpg

4 phases of body building
IMG_0688_zpstgh8ncl7.jpg

Everything I got so far
IMG_0690_zpspcjadr56.jpg

Going on a mini regional tour for the next two weeks so hopefully I will be able to get back to work on these when I get home.
 
More progress. 4 out of the 6 scarf joints are attached. 2 of them need some more cleaning up on the router jig. Been focusing on bodies mostly lately.
Here are the Walnut/Ash and Black Limba bodies cut to shape and at the correct thickness. Wenge/Cherry body shaped.
IMG_0705_zpss79xjd5m.jpg

I have also since finished shaping all three of these bodies. I have the Black Limba core for the 6th body but need to figure out what wings I want to put on it... may do basswood again. Or possibly walnut. I am ordering a Pistachio top and Fretboard for that one.... its gonna be killer.
Here is me having some fun. A look into the distant future
IMG_0710_zpsafvm7ege.jpg
 
  • Like
Reactions: Means2nEnd
Finished all my scarf joints. Saving up for a Router table to do the truss rod routes. Here is a look at my scarf glue setup. Took me a minute to realize i needed stop blocks to keep the joint from sliding.
IMG_0739_zpsifqfufsr.jpg

And here is another mock up. This is the Wenge top and fingerboard 5 string fretless. The Wenge top is a real pain in the butt. It has some very deep cross grain cracks when I contour it. I am trying to work them out but have done a little more shaping then I want. So I will probably end up filling them with some CA and wood dust and hopingzhey don't show too much.
IMG_0744_zpsxgb3p8qr.jpg
 
  • Like
Reactions: lbridenstine
Dang I haven't posted updates on these in a while.
Moved into a new shop space. The guest bedroom had exhausted its potential as a workshop... plus I didn't want my wife to smother me in my sleep hahaha
IMG_0810_zpsfiycout8.jpg

Here I am working on the control cavity. I thought about just ordering the templates from stewmac but they would have been too long for me to fit the battery box above the control cavity. I don't want to do any routing in the pathway of the neck pocket. I like the idea of keeping as much wood there as possible. So I used a control plate from one of my CB basses as a starting point and changed the shape based on my body design. Here is the actual cavity cover template with the ridges for the cavity route sketched on and on one of the bodies for reference.
IMG_0823_zpslfvjanhl.jpg

Then based on that design I made the templates for routing out the cavity and the cavity cover recess. Made sure the cover template I made fit in there nice and snug but not too snug since that area will tighten up a bit with finish.
IMG_0824_zpsofhjpals.jpg

And here are the cavities routed out on the first batch
IMG_0825_zpsqghb3ths.jpg

Also, here is another preview shot from before I moved into the new space.
IMG_0786_zpspihkcpeo.jpg
 
  • Like
Reactions: Mktrat
Tons more progress lately
Truss rod slots cut
IMG_0861_zpstvmlthnj.jpg

I had some leftover wenge I decided to make some fingerboards out of. Here they are taped to pre slot boards as a reference for size and nut slot/fret positions.
IMG_0860_zpsfzjapqey.jpg

4 string necks tapered (Birdseye maple on the left, Pau Ferro on the right)
IMG_0868_zpspsdp8mmm.jpg

5 string necks tapered (Fretless Mac Ebony with white veneer lines on the left, Pistachio on the right)
IMG_0869_zpsgwubykal.jpg

And another batch of body blanks shaping up. I will be experimenting a lot with veneers and accent layers on the next batch)
IMG_0858_zpscxt0723t.jpg
 
Couple more updates for this batch.
Headstock ears glued on 4 of the 6 necks. One of the other necks had some pretty bad tear out from the router when I was doing my taper so I have to re saw the headstock and add some bigger ears. The other one my bearing on my router bit broke after my last pass with the taper template so I have to finish it by hand. I used Zebrawood on the fretless 5 to match the zebrawood accent in the neck, Bloodwood on one of the 4's to match the bloodwood accent under the fretboard, Purpleheart on the other 4 to match the purpleheart center strip in the neck and wenge on the other fretless to match the wenge top/fingerboard.
IMG_0911_zpshzmq6wdq.jpg

Also, redesigned my headstock shape since I wasn't really happy with the shape and the headstock were a little too short to fit my original design
IMG_0909_zpsdygclmi1.jpg

I also routed the recess in the bodies for the control cavity covers. Now off on a mini tour for a week. Hoping to finish headstocks when I get back. Just picked up an oscillating spindle sander to thickness the headstocks.
In the meantime here is a picture of a P bass I just finished putting together.
IMG_0878_zpswy3p1zq5.jpg
 
More progress on this first batch.
My bearing on my bearing router bit broke right on the last pass of my taper routing so the 6 string neck is shelved for now. One of the 5 string necks is also shelved waiting for the body to catch up.
Headstock time
Started by thickening the back of the headstocks with a spindle sander and fence. Also cleaned up the fronts with my random orbital sander. Then I moved on to selecting all my headstock caps and veneers and rough cutting them.
IMG_0932_zps9xjp2yee.jpg

Then I glued on the caps... here are 3
IMG_0939_zpsg8yhz6ag.jpg

And the rear veneers... had to make a caul to get the right pressure for gluing.
IMG_0944_zpsweyamqr1.jpg

Then got them pretty much final shaped today
IMG_0946_zpsxde9tolc.jpg

Here is a pic of the fretless 5 before headstock carving. Wanted to get an idea of how all the wood was gonna look... pretty happy with it!
IMG_0940_zpsjqnlpbnf.jpg

And here is some really killer maple veneer I used for the back of one of the 4 string headstocks and will also use for the control cavity cover to match
IMG_0931_zpsm8ts5rux.jpg

Feeling pretty good about how these are turning out. Only major steps left I am really worried about are neck carving and neck pocket routing.