
I like using center drills for spot drilling.Back to our discussion of types of drill bits, this is where a long standard Jobber bit can cause a problem.

Enjoy the benefits of a premium membership!
Upgrade Account
-
TalkBass has been independent since 1998. Add your voice.
Create a free account to reply to discussions, view embedded media, and browse with fewer display ads.
Join free Log in
Want zero display ads or expanded classifieds tools? Compare plans.
You are using an out of date browser. It may not display this or other websites correctly.
You should upgrade or use an alternative browser.
You should upgrade or use an alternative browser.
Machine Shop Practice: Making Custom Metal Hardware For Basses
- Thread starter Bruce Johnson
- Start date
More options
Who Replied?

I like using center drills for spot drilling.
Yes, Center Drills can work as Spotting Drills too. For the same reasons; they are short and rigid, with an accurately ground tip.
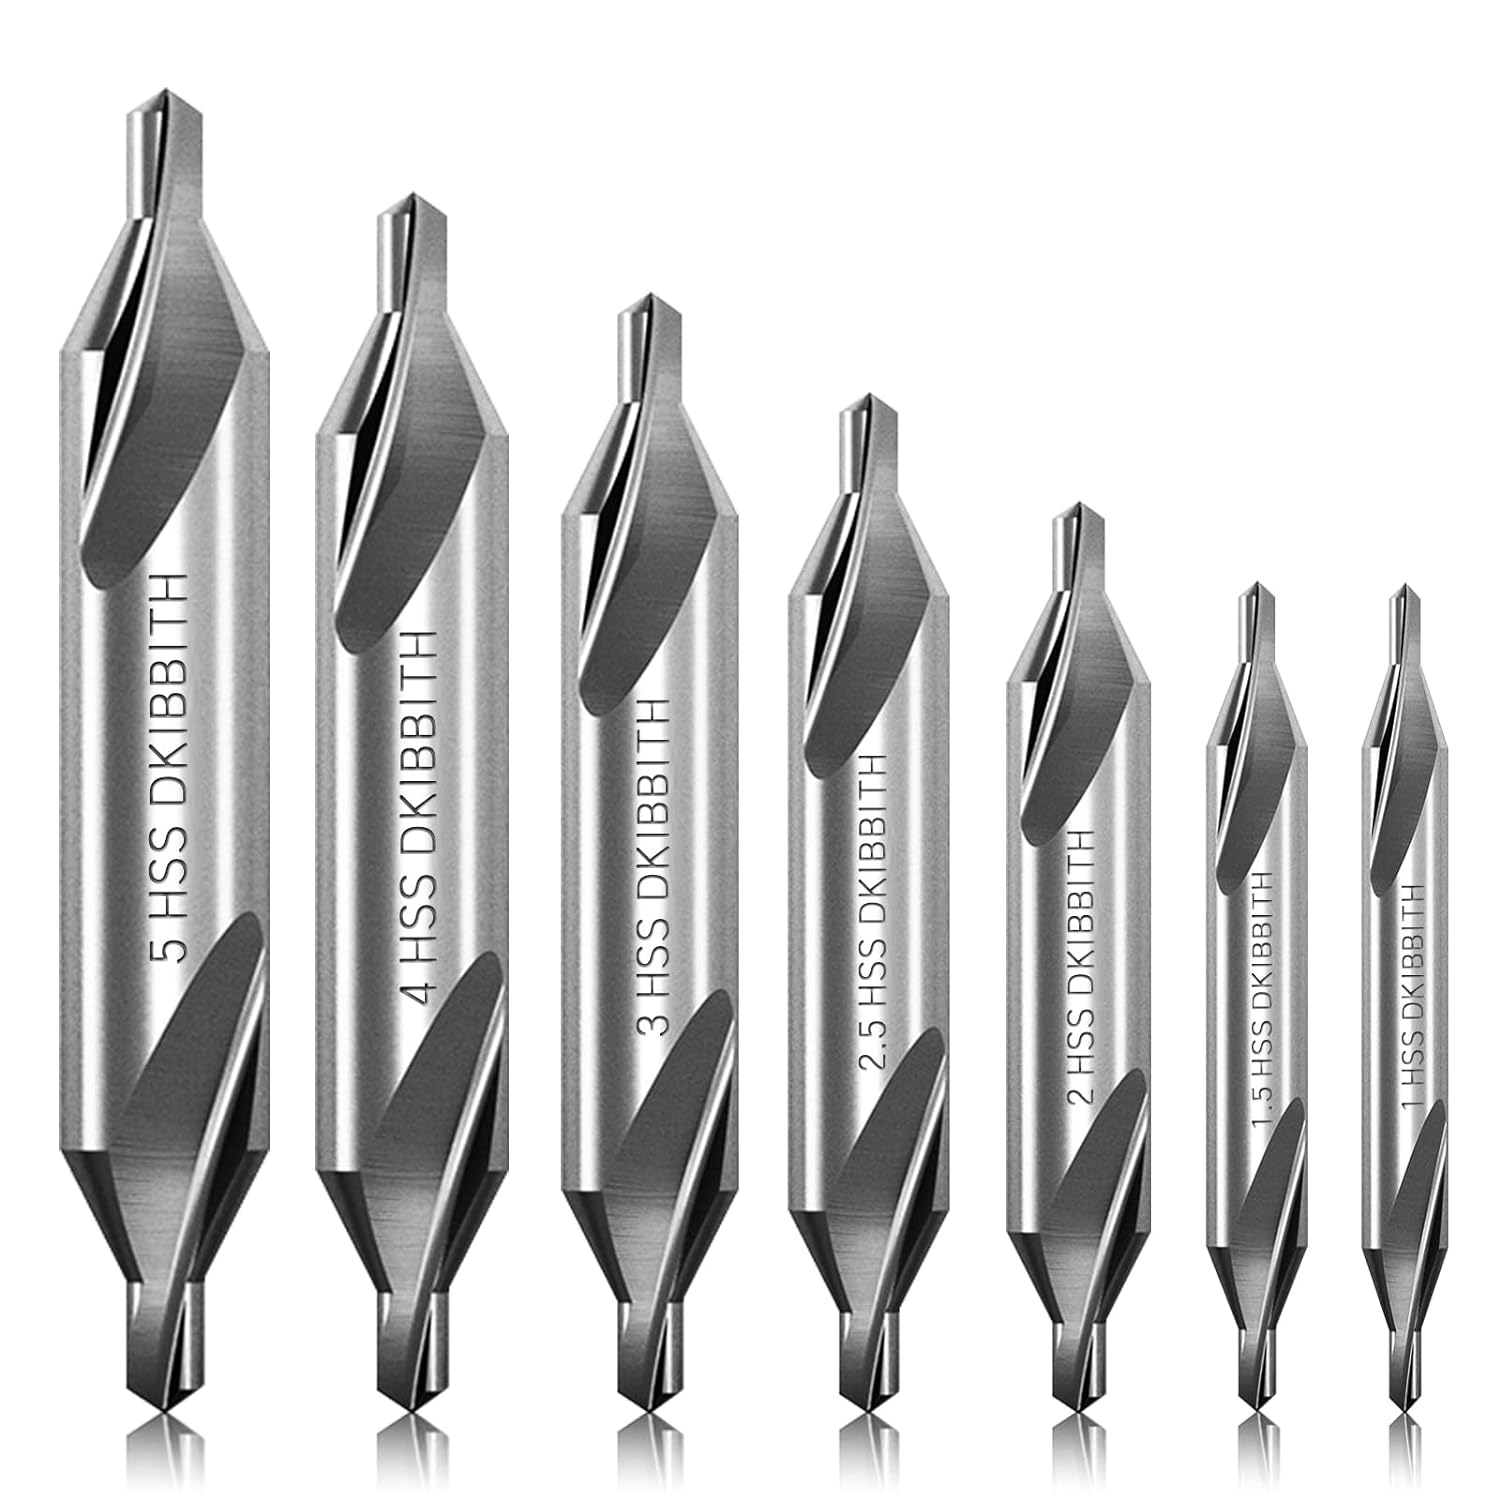
If you aren't familiar with them, Center Drills are special drill bits made for use in the metal lathe. In a lathe, if you are turning a long piece, you often need to support it with a cone-shaped spinning thing in the tailstock. That's called a Center. A Center Drill is used to drill a small cone into the end of the part, for the Center to fit into. And the cone-shaped hole needs a small extra space inside to hold a drop of oil. That's what a Center Drill is for. If you have a lathe, you'll have a few Center Drills lying around.
They come in different sizes. Sets of imported ones are cheap.

Here's what the punch marks look like after Center Punching ... notice how there's a ring of metal raised up around the punch.
What great information! For the raised up area, how about sanding it down (if one doesn't have the proper bits to knock it down properly)?

Speaking of clever shortcuts:
In reference to the technique of using Dividers to scratch an arc, to mark the location of a hole.....
Take a look at your Digital Calipers......
View attachment 5091028
Notice the two pointy things at the top. That you are always stabbing yourself with. They are supposed to be used for doing inside measurements. But they are awfully sharp. Suppose I were to set the calipers to 1.500" (per the job above) and tighten the lock knob.....
View attachment 5091029
...And use them as Dividers! Digital Electronic Dividers! Put one point in the punch mark and gently pivot the calipers to scribe a little arc. Your old grey haired Machine Shop Teacher would be wagging his finger at you for doing this. But who cares? You are alone in your own shop now, with your own tools. And this actually works quite well.
Scribing arcs using the points of your Digital Calipers is a very quick way to lay out the locations of holes. Particularly when you want accurate dimensions between them. Like, most of the time.
I was just doing that last night, although the outside jaws instead of the inside, with my stainless veneer calipers to mark lines on aluminum to make some neck plates.
What great information! For the raised up area, how about sanding it down (if one doesn't have the proper bits to knock it down properly)?
That's a reasonable point. I wouldn't recommend sanding it, but you could take a light swipe over the surface of the part with a fine flat file. That would take off the raised rim and make the center punch spots better.
A touch of a Spotting Drill would be better, but if you don't have one, filing the raised rim down would help.
Last edited:
A few more details about drilling holes in metal, particularly when Spot Drilling:
Pecking and Cutting Oil:
When drilling aluminum, as you get maybe 1/8" deep, you'll find that the chips will start jamming up in the flutes of the drill bit. If you allow them to jam up, they'll pack up solid and the bit will start binding up in the hole. If you continue, you may even bog the drill press's motor down. Squealing, smoke, etc. Keep going, and the drill bit may lock up solidly in the hole. Frustration and profanities. The problem is worse with smaller bits.
The solution is "Pecking" and cutting oil. Pecking is, every few seconds of drilling, lifting the drill bit up out of the hole and letting it fling all the chips off of itself. Continue drilling for a few seconds, lift it up again. Keep doing this all the way through the part.
And, every time you lift the drill bit up out of the hole, put a small drop of Cutting Oil down in the hole. The Cutting Oil cools down the cutting edges of the bit, keeping aluminum from building up there, and it helps the chips slide up the flutes out of the hole.
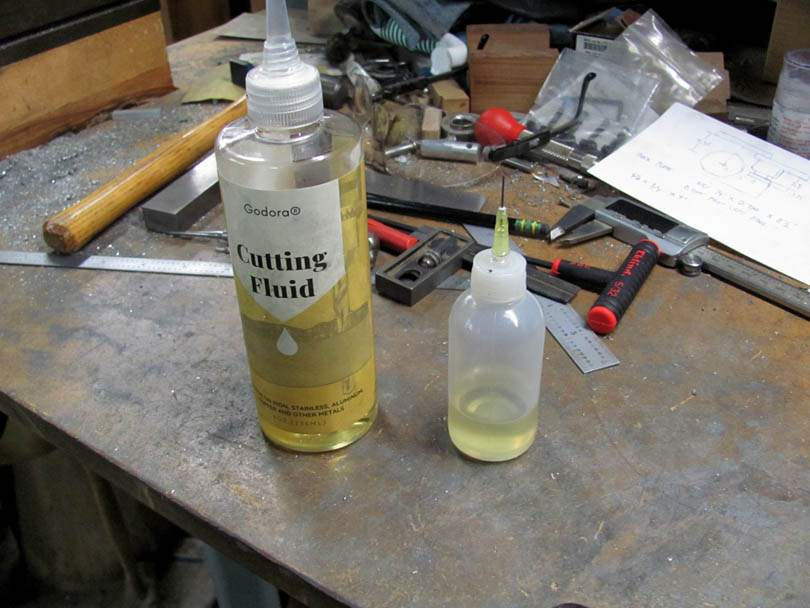
There are many types and formulations of cutting oil available, blends for different metals, environmentally-friendly, environmentally-unfriendly, etc. In my experience, doing this level of metalworking, it doesn't make much difference. Any of them will work.
For years, I'd been using traditional Brown Cutting Oil. They are phasing it out now because of high sulphur content. I bought a gallon jug of it back in the '90's, and only recently used the last of it. These days I'm buying these small bottles of transparent yellow Imported Cutting Fluid. Supposedly more environmentally-friendly, or something. Cheap, on Amazon. And it works fine.
I also get those small syringe-tip squeeze bottles on Amazon and fill them with the yellow cutting oil. I keep one of them around each of my main drill presses.
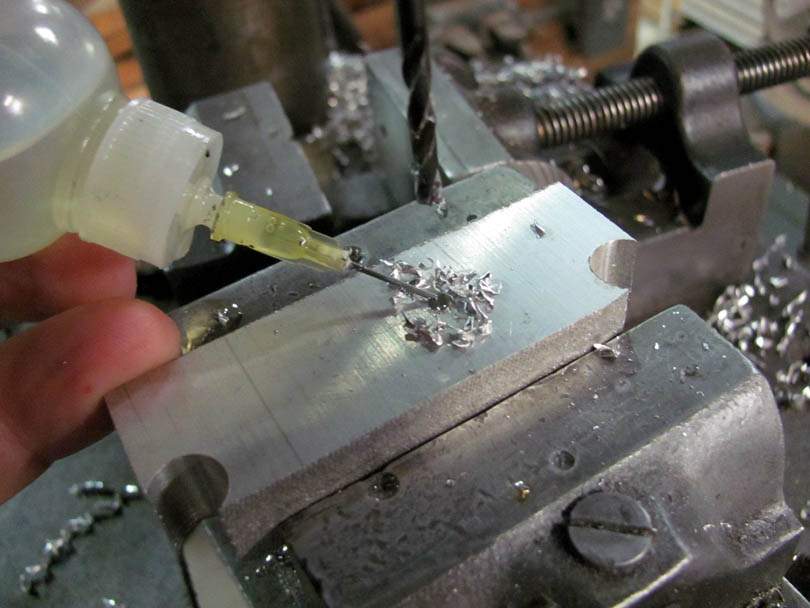
Like this. A drop of cutting oil in the hole, while pecking.
I also use cutting oil when drilling steel and stainless. Brass usually doesn't need cutting oil, just pecking.
Drilling Bigger Holes:
When drilling larger size holes in metal, you generally should drill a pilot hole first. Start with a good Spot, then drill a smaller size hole through the part, or to the full depth that you intend to make the big hole. The pilot hole guides the big drill bit, providing a clear space for the web of the bit to go through.
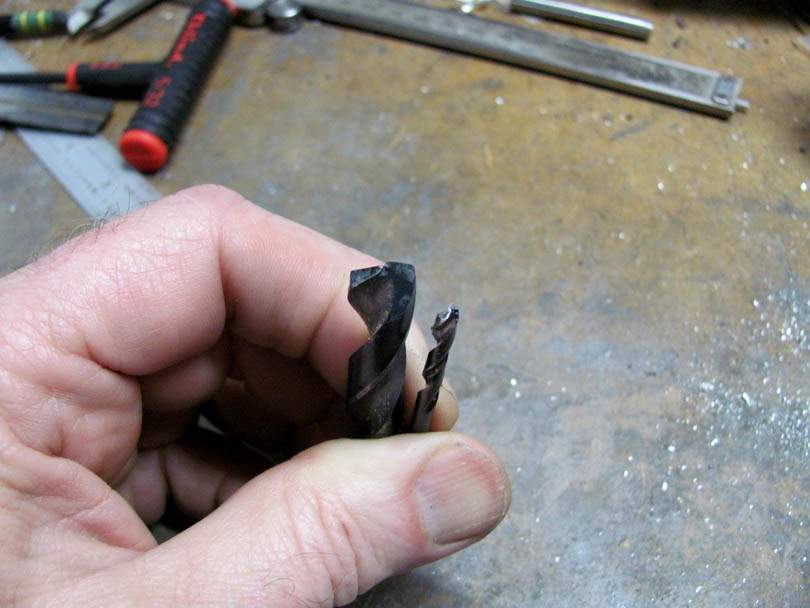
My general rule is to drill a pilot hole for anything larger than 5/16". For 5/16" to 1/2" holes, I usually drill an 1/8" pilot hole. For 1/2" to 1", I use 3/16". For 1" to 2", I use 1/4". I keep 1/8", 3/16" and 1/4" Screw Machine drills handy and ready.
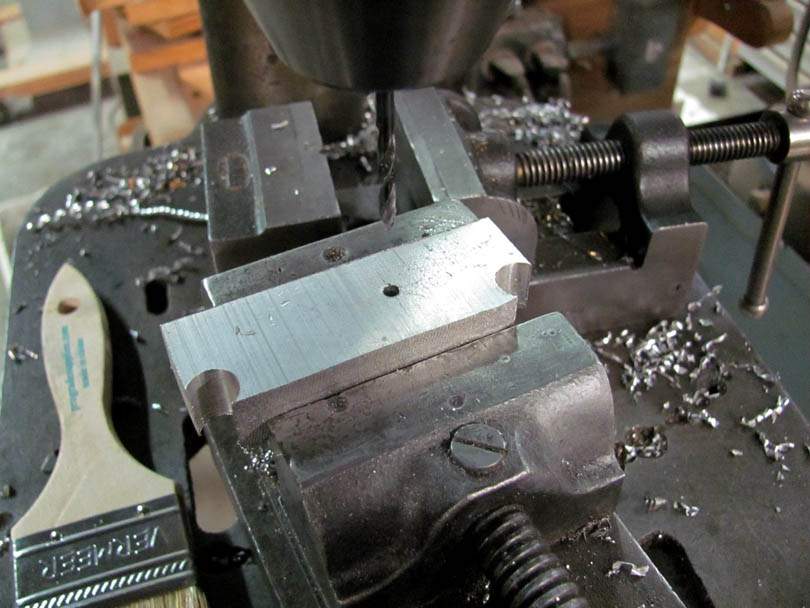
As a quick demonstration, I'll drill a 1/2" hole in this scrap of 1/2" aluminum plate. I made some scribe marks, a small punch mark, a bigger centerpunch mark, and drilled the pilot hole with a 1/8" Screw Machine Drill. Standard Spot Drilling technique. I drill the pilot hole in one of my medium size drill presses, running at about 600 rpm.
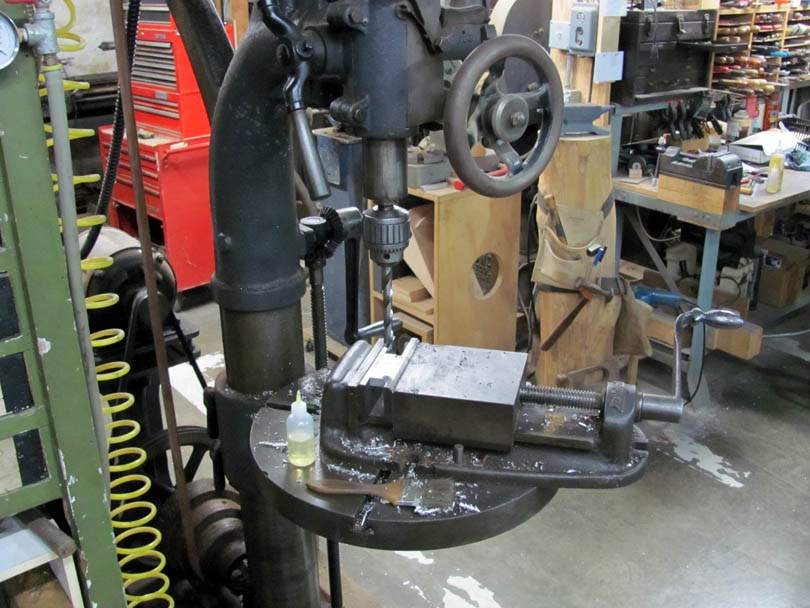
Then I switch over to my bigger Royersford drill press to drill the hole to 1/2". The bigger drill press runs at slower speed, higher torque. I have it running at 180 rpm. It's much safer and more accurate to run bigger drills at slow speeds like this.
That vise, by the way, is a common Bridgeport 6" milling machine vise. It weighs about 90 lbs. When drilling slow speed, high torque, the vise needs to have some size and weight.
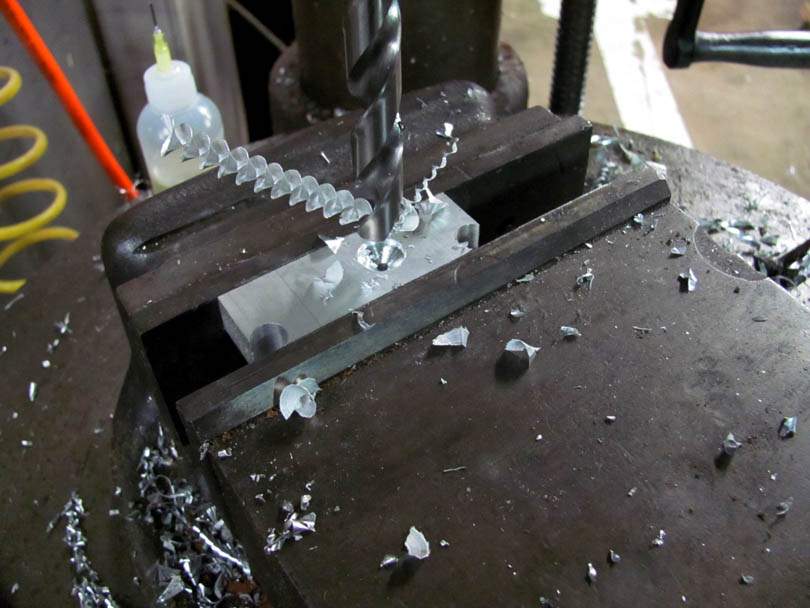
Drilling the 1/2" hole works the same way as Spot Drilling. That vise may be big and heavy, but it is still able to slide around fairly easily on the table of the drill press. When the 1/2" bit engages the 1/8" pilot hole, it does that same small kick, slightly shifting the part and vise in line with the spindle. That's how it follows the pilot hole.
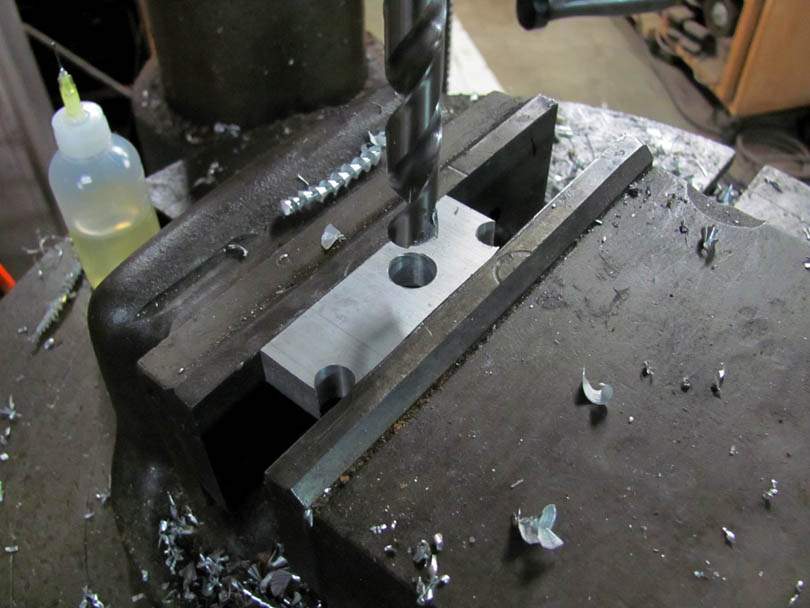
And then I continue drilling all the way down through. The hole is accurately located right on my scribed cross hairs. That's the Spot Drilling technique.
I have twist drills up to 2" diameter. I can use them in the Royersford or in the tailstock of my big LeBlond lathe. I use these large sizes in making parts for machines, not basses.
In the metalworking we're talking about on this thread, making hardware for basses, you rarely need to drill holes larger than 3/8". You can safely drill up to 1/2" holes in aluminum in the standard Medium size drill presses, like most of you have. It's best to shift the belt down to the slowest speed, which is usually around 400 rpm. You should have at least 1/2 HP for 1/2" holes.
The small tabletop drill presses with 1/4 HP motors are good up to 3/8". They will handle most bass hardware projects.
Pecking and Cutting Oil:
When drilling aluminum, as you get maybe 1/8" deep, you'll find that the chips will start jamming up in the flutes of the drill bit. If you allow them to jam up, they'll pack up solid and the bit will start binding up in the hole. If you continue, you may even bog the drill press's motor down. Squealing, smoke, etc. Keep going, and the drill bit may lock up solidly in the hole. Frustration and profanities. The problem is worse with smaller bits.
The solution is "Pecking" and cutting oil. Pecking is, every few seconds of drilling, lifting the drill bit up out of the hole and letting it fling all the chips off of itself. Continue drilling for a few seconds, lift it up again. Keep doing this all the way through the part.
And, every time you lift the drill bit up out of the hole, put a small drop of Cutting Oil down in the hole. The Cutting Oil cools down the cutting edges of the bit, keeping aluminum from building up there, and it helps the chips slide up the flutes out of the hole.
There are many types and formulations of cutting oil available, blends for different metals, environmentally-friendly, environmentally-unfriendly, etc. In my experience, doing this level of metalworking, it doesn't make much difference. Any of them will work.
For years, I'd been using traditional Brown Cutting Oil. They are phasing it out now because of high sulphur content. I bought a gallon jug of it back in the '90's, and only recently used the last of it. These days I'm buying these small bottles of transparent yellow Imported Cutting Fluid. Supposedly more environmentally-friendly, or something. Cheap, on Amazon. And it works fine.
I also get those small syringe-tip squeeze bottles on Amazon and fill them with the yellow cutting oil. I keep one of them around each of my main drill presses.
Like this. A drop of cutting oil in the hole, while pecking.
I also use cutting oil when drilling steel and stainless. Brass usually doesn't need cutting oil, just pecking.
Drilling Bigger Holes:
When drilling larger size holes in metal, you generally should drill a pilot hole first. Start with a good Spot, then drill a smaller size hole through the part, or to the full depth that you intend to make the big hole. The pilot hole guides the big drill bit, providing a clear space for the web of the bit to go through.
My general rule is to drill a pilot hole for anything larger than 5/16". For 5/16" to 1/2" holes, I usually drill an 1/8" pilot hole. For 1/2" to 1", I use 3/16". For 1" to 2", I use 1/4". I keep 1/8", 3/16" and 1/4" Screw Machine drills handy and ready.
As a quick demonstration, I'll drill a 1/2" hole in this scrap of 1/2" aluminum plate. I made some scribe marks, a small punch mark, a bigger centerpunch mark, and drilled the pilot hole with a 1/8" Screw Machine Drill. Standard Spot Drilling technique. I drill the pilot hole in one of my medium size drill presses, running at about 600 rpm.
Then I switch over to my bigger Royersford drill press to drill the hole to 1/2". The bigger drill press runs at slower speed, higher torque. I have it running at 180 rpm. It's much safer and more accurate to run bigger drills at slow speeds like this.
That vise, by the way, is a common Bridgeport 6" milling machine vise. It weighs about 90 lbs. When drilling slow speed, high torque, the vise needs to have some size and weight.
Drilling the 1/2" hole works the same way as Spot Drilling. That vise may be big and heavy, but it is still able to slide around fairly easily on the table of the drill press. When the 1/2" bit engages the 1/8" pilot hole, it does that same small kick, slightly shifting the part and vise in line with the spindle. That's how it follows the pilot hole.
And then I continue drilling all the way down through. The hole is accurately located right on my scribed cross hairs. That's the Spot Drilling technique.
I have twist drills up to 2" diameter. I can use them in the Royersford or in the tailstock of my big LeBlond lathe. I use these large sizes in making parts for machines, not basses.
In the metalworking we're talking about on this thread, making hardware for basses, you rarely need to drill holes larger than 3/8". You can safely drill up to 1/2" holes in aluminum in the standard Medium size drill presses, like most of you have. It's best to shift the belt down to the slowest speed, which is usually around 400 rpm. You should have at least 1/2 HP for 1/2" holes.
The small tabletop drill presses with 1/4 HP motors are good up to 3/8". They will handle most bass hardware projects.
Last edited:
Machine Drilling in a Drill Press:
I introduced the idea of Machine Drilling a few pages back in this thread. In Machine Drilling, no Spot is made on the part. The part is held solidly in a vise in an accurate position in relation to the drill bit, and the drill bit is driven straight into the part by the machine. The machine can be a drill press or a milling machine. There are different ways to get the vise into the accurate position.
I'm starting out showing you how to do Machine Drilling in a standard drill press.

I have this drill press set up specifically for Machine Drilling. It gets almost daily use, drilling holes in batches of simple parts. Nothing special about the drill press itself. It's a nice old Walker-Turner from the 1940's. I bought it from a guy here in Fillmore for $50. It has a cool old patina of brown rust from spending some years in the guy's back yard, but runs and works beautifully. A solid old machine.

Bolted to the table is one of those imported X-Y cross-slide vises. It's a drill press vise with a 2-axis table underneath. You can adjust the position of the vise within about a 4" square by turning the two cranks. There are locks on the two axes.
I've made up custom aluminum jaws for the vise, like what I described a few pages back on other vises. I have several sets of jaws for this vise, made to do particular regular jobs. They swap in and out quickly.
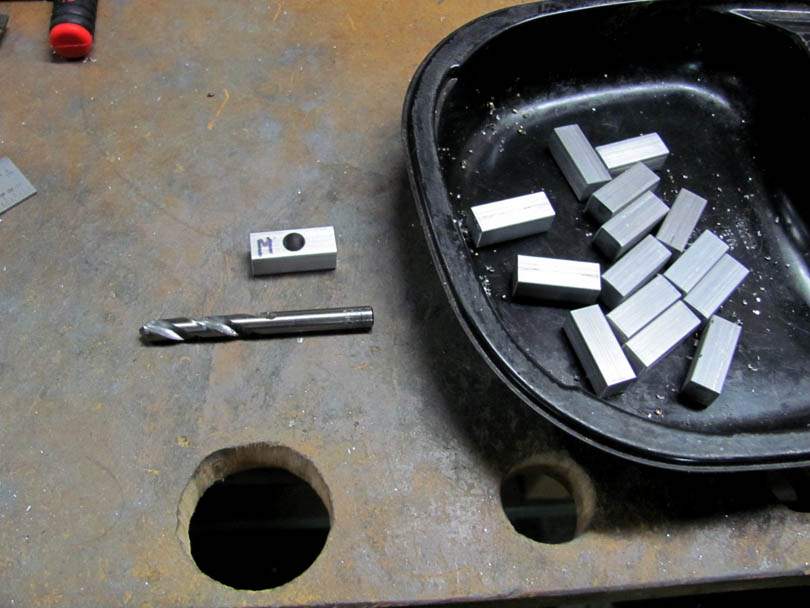
And here's a good example of a job for Machine Drilling. I did this two days ago. The part is an aluminum cross-bar for the adjusting head of one of my special truss rod assemblies. The customer ordered a batch of 14 of them. It's a simple part; a 1" long slug of 3/8" square of 6061 aluminum, with a single 1/4" hole in the middle. The hole needs to be pretty accurately centered in the slug, and square through it.
In the tray are 14 slugs, sawn off to accurate length in the Barker, and the ends are deburred.
That's a 1/4" Screw Machine drill bit. These drill bits are designed specifically for Machine Drilling. They are short length with thicker webs, and precision ground points. They are intended to be driven straight into the metal, with no Spot needed. They are mostly used in automated machines that spit out parts all day. From old-school cam-driven Screw Machines to modern CNC machines. And they are perfect for Machine Drilling in a drill press.
The part marked M is the Master. It's basically a sample part, with the hole already drilled in it. Usually, I make up the Master by Spot Drilling. Hand layout, scribed lines, center punch, spot drill, etc. Same process that I described above for making a one-off part. It's checked for accuracy, marked with an M, and put away in a safe place. The Master is the gauge that's used to set up a drill press for a Machine Drilling operation. Here's how it works:
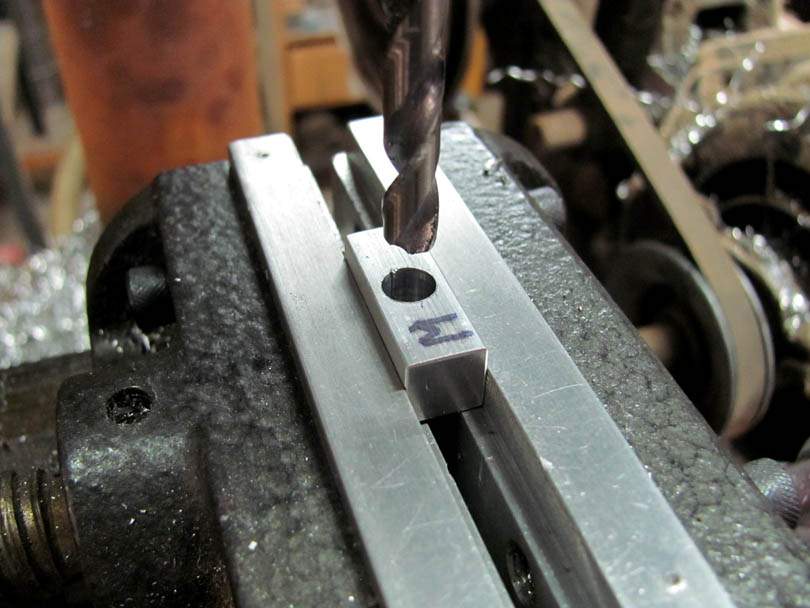
The Master is clamped in the vise, in the special stepped jaws. You can't see it here, but the left jaw has a little 4-40 screw in it which acts as a Stop. The Master is seated back against the Stop, and down in the steps of the jaws.
Put the Screw Machine drill bit in the chuck, and adjust the X and Y axes bring the hole visually lined up under the drill bit.
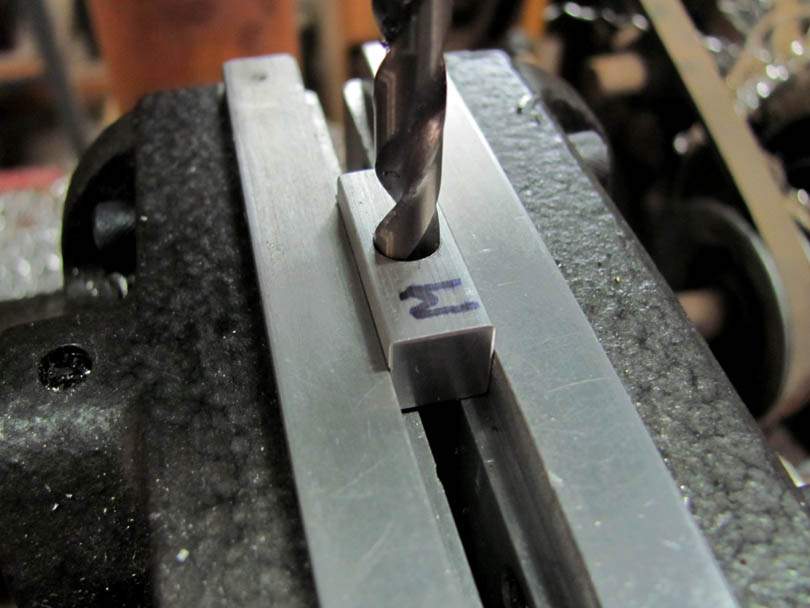
With the drill shut off, bring the drill bit gently down into the hole. Watch closely in both directions to see if it deflects a small amount as it tries to go in the hole. Make fine adjustments to the X and Y, so that the bit slips in with no deflection. Tighten the locks on the X and Y axes, and check it again.
That's the setup. It's ready to use. Take the Master out of the vise and put it away in a safe place, where you can find it the next time you need to make up some of these parts.
Using a Master like this, as a setup gauge, is a fast and accurate way to set up a drill press for Machine Drilling. I usually see accuracy of +/- 0.002" in the location of the holes in parts made like this.
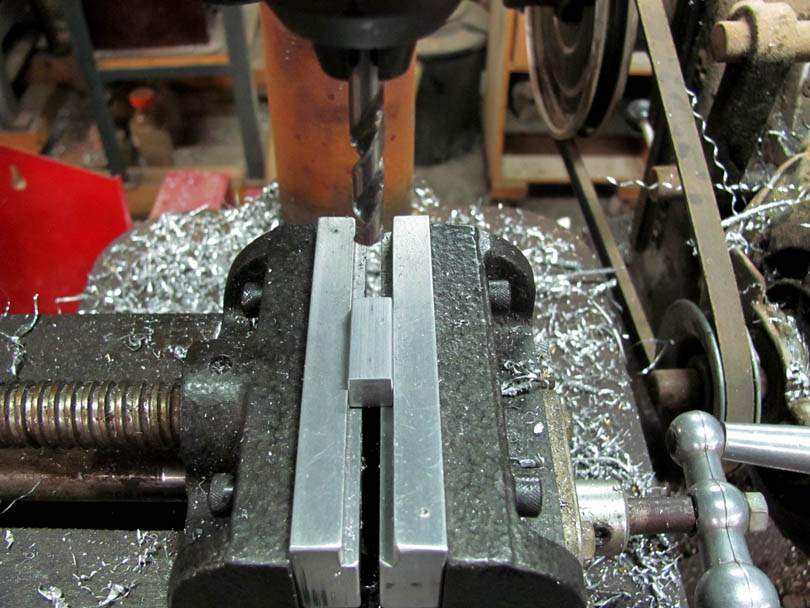
Ready to start production! Pop the first slug in the vise, seating it against the stop and down in the stepped jaws. A half turn of the vise handle to clamp it.
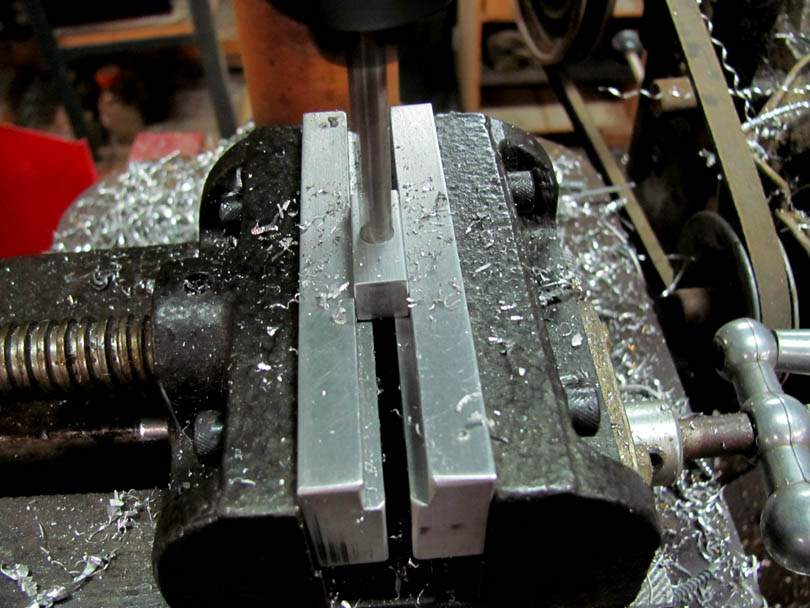
Fire up the spindle, and drill the hole! The Screw Machine bit goes straight in, right where you point it. On this part, I do 2 or 3 "pecks" with drops of cutting oil, as I described in the post above.
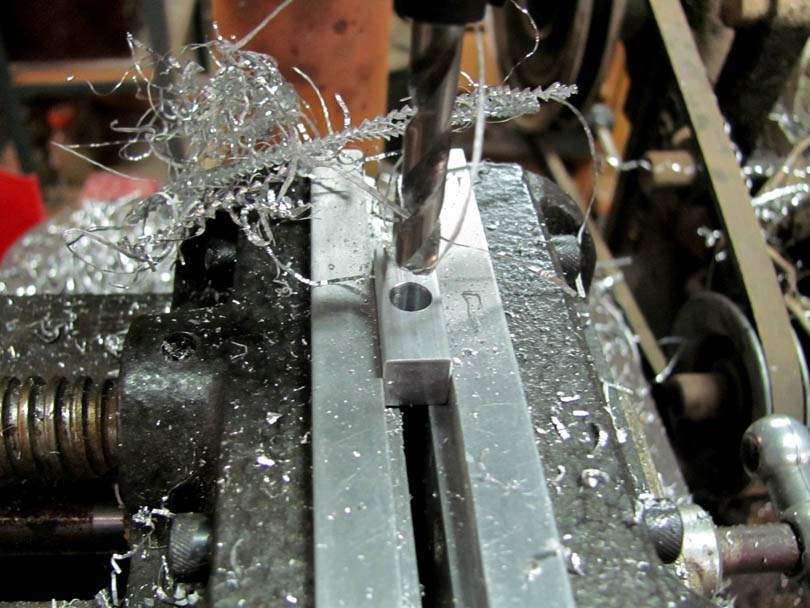
And there's the hole. A quick swipe of a chip brush to clear away the debris. A half turn of the vise handle to unclamp it. Drop this part in the tray, pick up the next one. Repeat, repeat, 14 times, with the spindle running the whole time.
If I hadn't been stopping to take pictures, this job would have taken me maybe 4 minutes to set up the drill press with the Master. Then less than 10 seconds per part to drill them. In a bigger batch, it would be down to under 5 seconds per part.
That's what Machine Drilling is all about: Production and consistent accuracy.
Coming up, I'll go over Machine Drilling parts with multiple holes, in the drill press. And then, Machine Drilling in the Milling Machine. And a few other variants.
I introduced the idea of Machine Drilling a few pages back in this thread. In Machine Drilling, no Spot is made on the part. The part is held solidly in a vise in an accurate position in relation to the drill bit, and the drill bit is driven straight into the part by the machine. The machine can be a drill press or a milling machine. There are different ways to get the vise into the accurate position.
I'm starting out showing you how to do Machine Drilling in a standard drill press.
I have this drill press set up specifically for Machine Drilling. It gets almost daily use, drilling holes in batches of simple parts. Nothing special about the drill press itself. It's a nice old Walker-Turner from the 1940's. I bought it from a guy here in Fillmore for $50. It has a cool old patina of brown rust from spending some years in the guy's back yard, but runs and works beautifully. A solid old machine.
Bolted to the table is one of those imported X-Y cross-slide vises. It's a drill press vise with a 2-axis table underneath. You can adjust the position of the vise within about a 4" square by turning the two cranks. There are locks on the two axes.
I've made up custom aluminum jaws for the vise, like what I described a few pages back on other vises. I have several sets of jaws for this vise, made to do particular regular jobs. They swap in and out quickly.
And here's a good example of a job for Machine Drilling. I did this two days ago. The part is an aluminum cross-bar for the adjusting head of one of my special truss rod assemblies. The customer ordered a batch of 14 of them. It's a simple part; a 1" long slug of 3/8" square of 6061 aluminum, with a single 1/4" hole in the middle. The hole needs to be pretty accurately centered in the slug, and square through it.
In the tray are 14 slugs, sawn off to accurate length in the Barker, and the ends are deburred.
That's a 1/4" Screw Machine drill bit. These drill bits are designed specifically for Machine Drilling. They are short length with thicker webs, and precision ground points. They are intended to be driven straight into the metal, with no Spot needed. They are mostly used in automated machines that spit out parts all day. From old-school cam-driven Screw Machines to modern CNC machines. And they are perfect for Machine Drilling in a drill press.
The part marked M is the Master. It's basically a sample part, with the hole already drilled in it. Usually, I make up the Master by Spot Drilling. Hand layout, scribed lines, center punch, spot drill, etc. Same process that I described above for making a one-off part. It's checked for accuracy, marked with an M, and put away in a safe place. The Master is the gauge that's used to set up a drill press for a Machine Drilling operation. Here's how it works:
The Master is clamped in the vise, in the special stepped jaws. You can't see it here, but the left jaw has a little 4-40 screw in it which acts as a Stop. The Master is seated back against the Stop, and down in the steps of the jaws.
Put the Screw Machine drill bit in the chuck, and adjust the X and Y axes bring the hole visually lined up under the drill bit.
With the drill shut off, bring the drill bit gently down into the hole. Watch closely in both directions to see if it deflects a small amount as it tries to go in the hole. Make fine adjustments to the X and Y, so that the bit slips in with no deflection. Tighten the locks on the X and Y axes, and check it again.
That's the setup. It's ready to use. Take the Master out of the vise and put it away in a safe place, where you can find it the next time you need to make up some of these parts.
Using a Master like this, as a setup gauge, is a fast and accurate way to set up a drill press for Machine Drilling. I usually see accuracy of +/- 0.002" in the location of the holes in parts made like this.
Ready to start production! Pop the first slug in the vise, seating it against the stop and down in the stepped jaws. A half turn of the vise handle to clamp it.
Fire up the spindle, and drill the hole! The Screw Machine bit goes straight in, right where you point it. On this part, I do 2 or 3 "pecks" with drops of cutting oil, as I described in the post above.
And there's the hole. A quick swipe of a chip brush to clear away the debris. A half turn of the vise handle to unclamp it. Drop this part in the tray, pick up the next one. Repeat, repeat, 14 times, with the spindle running the whole time.
If I hadn't been stopping to take pictures, this job would have taken me maybe 4 minutes to set up the drill press with the Master. Then less than 10 seconds per part to drill them. In a bigger batch, it would be down to under 5 seconds per part.
That's what Machine Drilling is all about: Production and consistent accuracy.
Coming up, I'll go over Machine Drilling parts with multiple holes, in the drill press. And then, Machine Drilling in the Milling Machine. And a few other variants.
Here's another example of Machine Drilling a batch of parts in the drill press with the X-Y vise:

Here's the part. It's the Body Bar for my AMB-2 model Scroll Basses. Two of them get embedded in the body, as the top and back are glued together, in routed slots. The jacking screws of the bridge plug into them, and the tailpiece bolts to the threaded holes. Yep, one of those secret Tone things. But we won't talk about that here.
I originally made them from 1/2" square brass, but I switched to aluminum when I introduced the Walnut models. The part has four holes; a 1/4" dia x 3/8" deep socket at the front, 10-32 threaded holes thru at the 2nd & 4th locations, and a 4-40 threaded hole thru at the 3rd position. The holes need to be accurately spaced and centered on the bars, or the bridge and tailpiece won't line up correctly on the body. I know this from experience.
And I need batches of these parts, to go into batches of Scroll Basses! This calls for Machine Drilling.
Yep, that's the Master, in the front. The M is stamped on it. I made it using the green milling machine, to get the spacing of the holes just right. The threaded holes aren't tapped; they are only drilled to the correct size for tapping.
Between batches, the Master gets stored carefully in the AMB-2 Body Bars box. I've been building AMB-2's for 12 years now, and I'm working on a batch of 20 of them right now. These pictures are from a batch of Body Bars that I made up a few years back. I'll be making more soon. This is what Machine Drilling is all about.
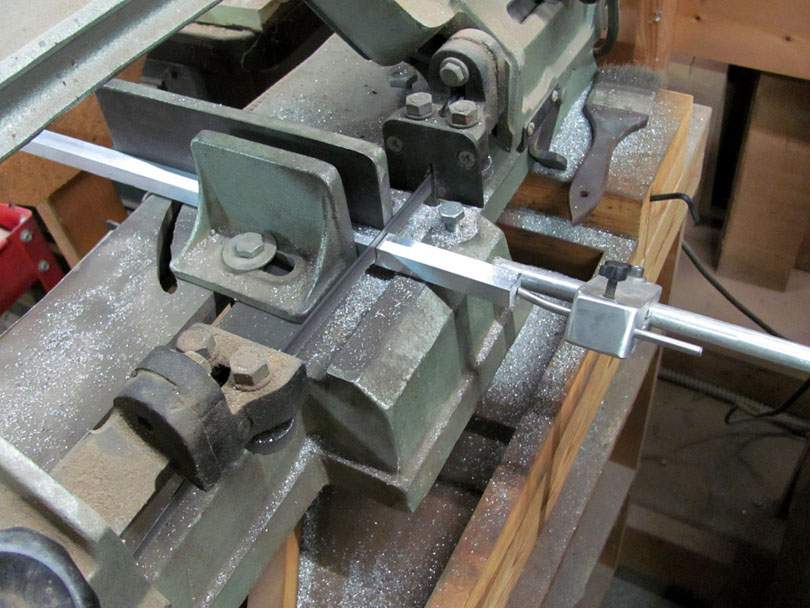
The first step, as usual, is to saw off a batch of slugs from 1/2" square aluminum bar stock, using my trusty small cutoff bandsaw and the stop. Then deburr the ends. The slugs can stay rough-sawn on the ends for now, while doing the drilling.
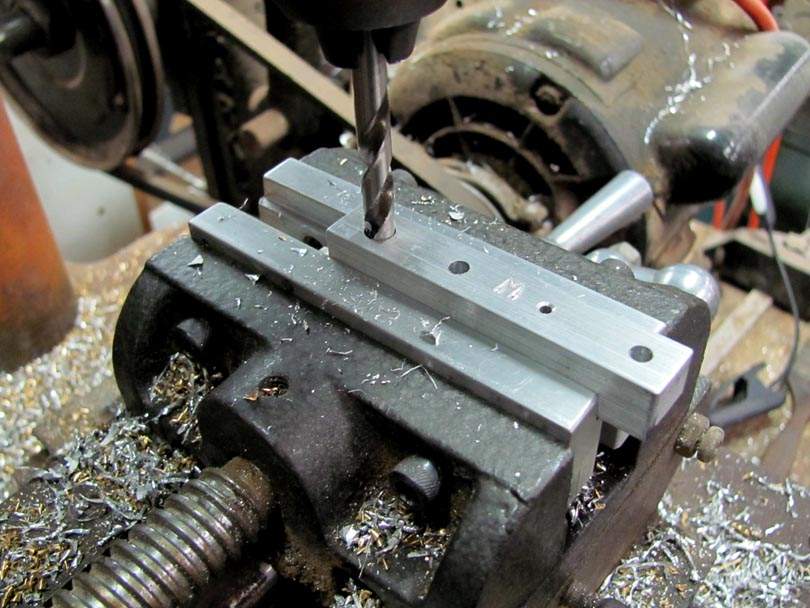
And here's the first setup with the Master. The procedure is to set up to drill one of the four holes. Drill that hole in all of the parts in the batch. Then set up with the Master to drill the second hole, and drill the second hole in all the parts. Etc.
The setup is the same as I showed in the post above. The Master is in the vise jaws, resting on the shoulders and seated against the stop in the back. A 1/4" Screw Machine drill bit in the chuck, motor shut off. Adjust the X and Y axes so the drill slips easily into the hole in the master, with no deflection.
This hole is supposed to be only 3/8" deep, so the hole in the Master is drilled to exactly 3/8" deep. The Master is also used for setting the depth stop on the drill press. After aligning the drill bit to the hole, pull it down until it contacts the bottom, and adjust the depth stop to that point.
That's it; all set up for the first hole.
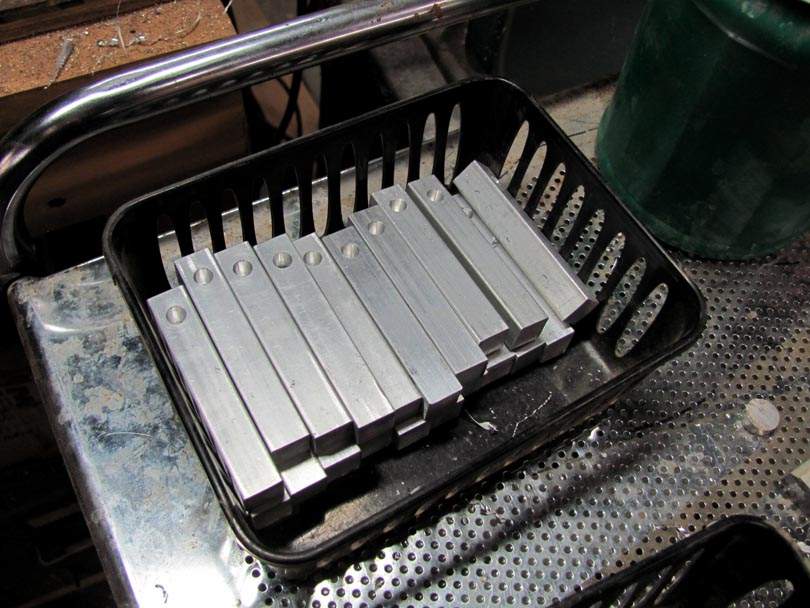
And a few minutes later, literally, there's the batch of parts, all with the first hole drilled in them.
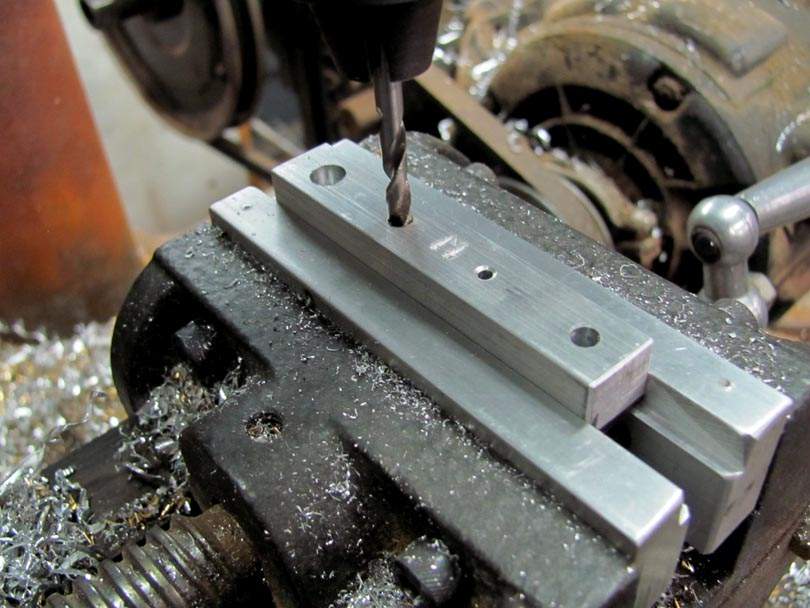
Setup for the 2nd hole. Switch to a #21 Screw Machine drill bit, realign, reset the depth stop.....Drill.
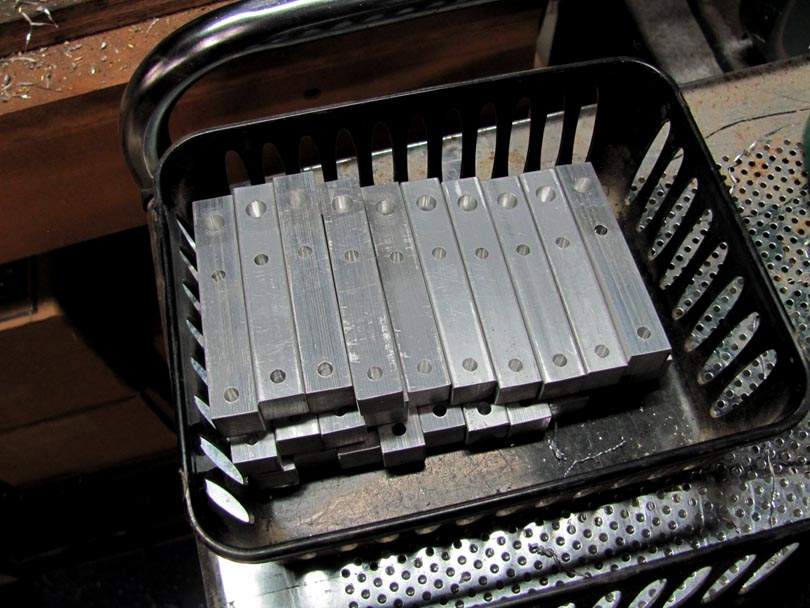
Here they are after drilling the 1st, 2nd & 4th holes. I did the 4th after the 2nd because it's the same #21 drill size. The 3rd hole is drilled #42, and only goes in half of the parts. I only need that threaded hole on the treble side Body Bar. It's for the wire that grounds the tailpiece and strings
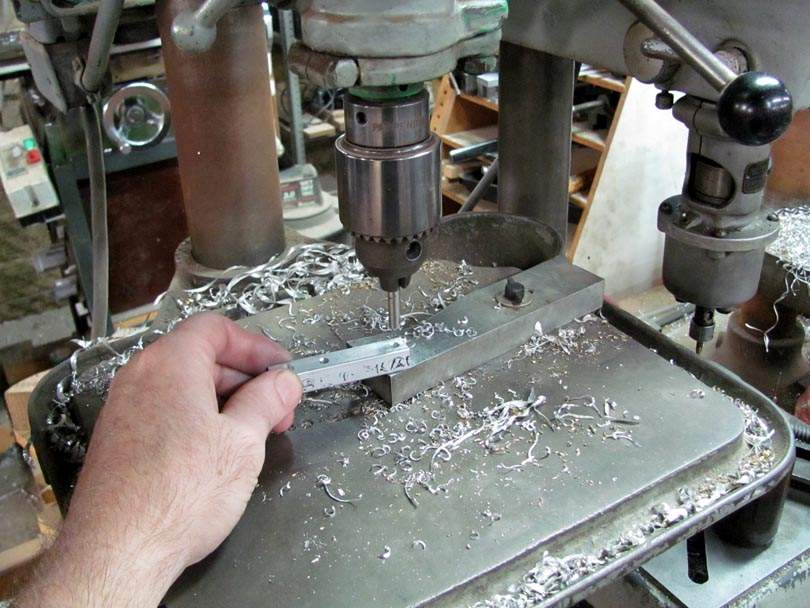
After all the holes are drilled, they all get a light countersink. Mostly to remove the burrs at the top of the holes.
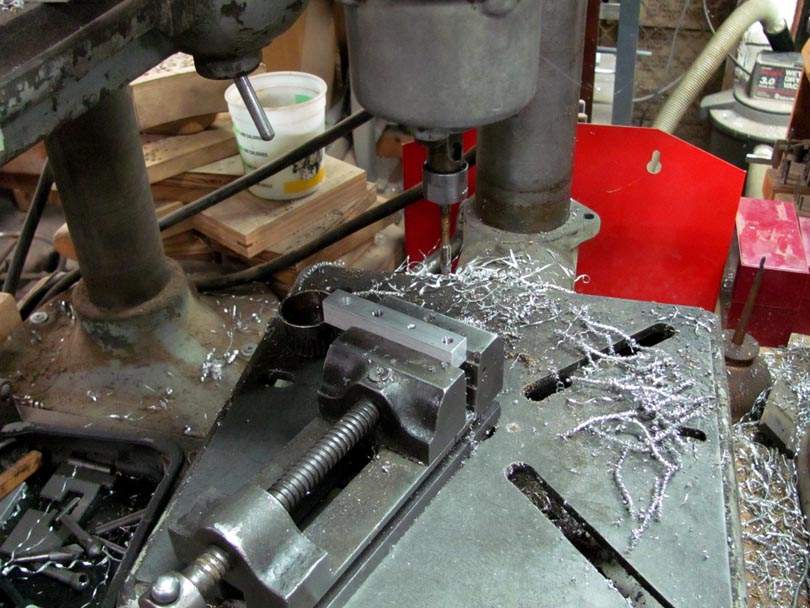
Then over to the power tapping drill press to thread the holes. I use the large tapping drill press to do the 10-32 holes, and my smaller one for the 4-40's. I'll talk more about tapping holes and power tapping later.
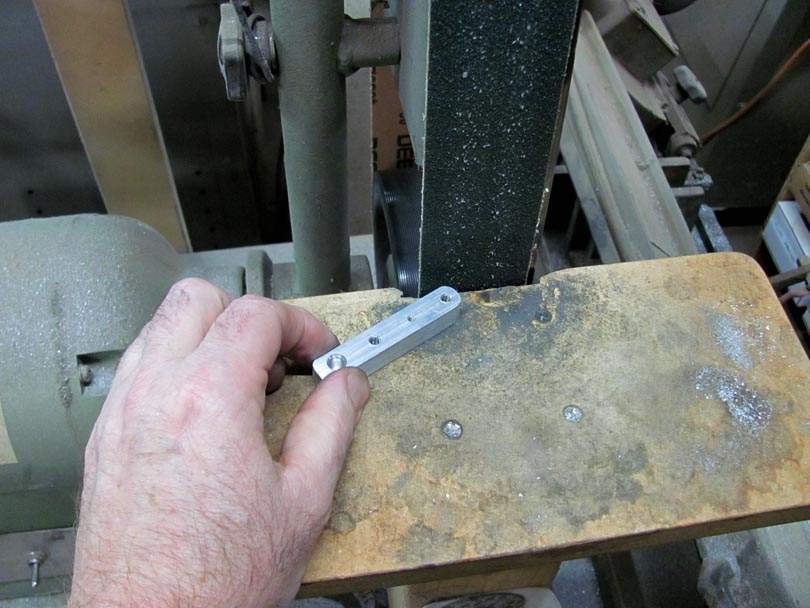
Finally, the ends of the bars get rounded off with the 80 grit belt on the Knife Belt Sander. This is a rough round-off, nothing fancy or accurate. These Body Bars set into routed slots in the body, surrounded by epoxy. Never to be seen again. They don't have to be pretty to do their job. But their holes need to be accurately positioned.
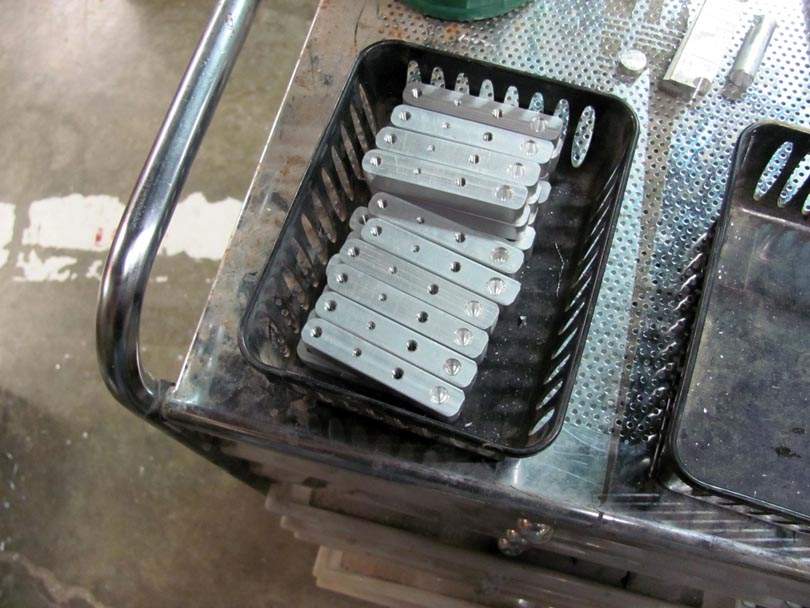
And there's the whole batch of completed Body Bars.
According to my logbook records these Body Bars take me right about 15 minutes total per pair. So, my cost in labor and materials is $12 per Scroll Bass. That's reasonable. I doubt any regular machine shop service could beat that, in this small quantity.
Here's the part. It's the Body Bar for my AMB-2 model Scroll Basses. Two of them get embedded in the body, as the top and back are glued together, in routed slots. The jacking screws of the bridge plug into them, and the tailpiece bolts to the threaded holes. Yep, one of those secret Tone things. But we won't talk about that here.
I originally made them from 1/2" square brass, but I switched to aluminum when I introduced the Walnut models. The part has four holes; a 1/4" dia x 3/8" deep socket at the front, 10-32 threaded holes thru at the 2nd & 4th locations, and a 4-40 threaded hole thru at the 3rd position. The holes need to be accurately spaced and centered on the bars, or the bridge and tailpiece won't line up correctly on the body. I know this from experience.
And I need batches of these parts, to go into batches of Scroll Basses! This calls for Machine Drilling.
Yep, that's the Master, in the front. The M is stamped on it. I made it using the green milling machine, to get the spacing of the holes just right. The threaded holes aren't tapped; they are only drilled to the correct size for tapping.
Between batches, the Master gets stored carefully in the AMB-2 Body Bars box. I've been building AMB-2's for 12 years now, and I'm working on a batch of 20 of them right now. These pictures are from a batch of Body Bars that I made up a few years back. I'll be making more soon. This is what Machine Drilling is all about.
The first step, as usual, is to saw off a batch of slugs from 1/2" square aluminum bar stock, using my trusty small cutoff bandsaw and the stop. Then deburr the ends. The slugs can stay rough-sawn on the ends for now, while doing the drilling.
And here's the first setup with the Master. The procedure is to set up to drill one of the four holes. Drill that hole in all of the parts in the batch. Then set up with the Master to drill the second hole, and drill the second hole in all the parts. Etc.
The setup is the same as I showed in the post above. The Master is in the vise jaws, resting on the shoulders and seated against the stop in the back. A 1/4" Screw Machine drill bit in the chuck, motor shut off. Adjust the X and Y axes so the drill slips easily into the hole in the master, with no deflection.
This hole is supposed to be only 3/8" deep, so the hole in the Master is drilled to exactly 3/8" deep. The Master is also used for setting the depth stop on the drill press. After aligning the drill bit to the hole, pull it down until it contacts the bottom, and adjust the depth stop to that point.
That's it; all set up for the first hole.
And a few minutes later, literally, there's the batch of parts, all with the first hole drilled in them.
Setup for the 2nd hole. Switch to a #21 Screw Machine drill bit, realign, reset the depth stop.....Drill.
Here they are after drilling the 1st, 2nd & 4th holes. I did the 4th after the 2nd because it's the same #21 drill size. The 3rd hole is drilled #42, and only goes in half of the parts. I only need that threaded hole on the treble side Body Bar. It's for the wire that grounds the tailpiece and strings
After all the holes are drilled, they all get a light countersink. Mostly to remove the burrs at the top of the holes.
Then over to the power tapping drill press to thread the holes. I use the large tapping drill press to do the 10-32 holes, and my smaller one for the 4-40's. I'll talk more about tapping holes and power tapping later.
Finally, the ends of the bars get rounded off with the 80 grit belt on the Knife Belt Sander. This is a rough round-off, nothing fancy or accurate. These Body Bars set into routed slots in the body, surrounded by epoxy. Never to be seen again. They don't have to be pretty to do their job. But their holes need to be accurately positioned.
And there's the whole batch of completed Body Bars.
According to my logbook records these Body Bars take me right about 15 minutes total per pair. So, my cost in labor and materials is $12 per Scroll Bass. That's reasonable. I doubt any regular machine shop service could beat that, in this small quantity.
Last edited:
Here's another example of the Machine Drilling technique, in the drill press, with the X-Y vise. But this time, the Master is a special custom vise jaw.
Here's the job:
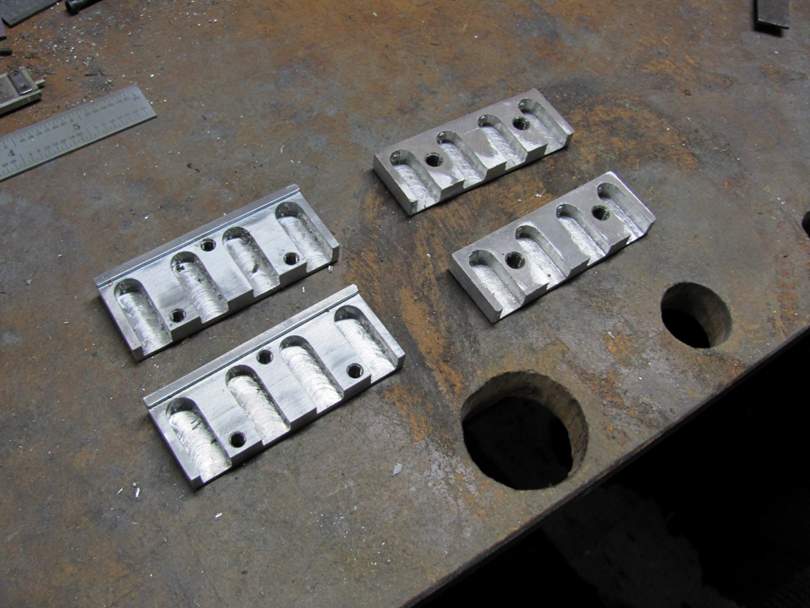
These are some of the bridges that I make up. These four are replacements for vintage Ampegs, but the ones I make for my new Scroll Basses are similar design. Aluminum blocks with those milled slots for the saddles to slide in. Note that the slots are milled at different heights in the block to follow the fingerboard radius. I make this style of bridges for different model basses, with different radiuses. And different style saddles. But they all use that same style of milled 3/8" wide slot for the saddle to fit in.
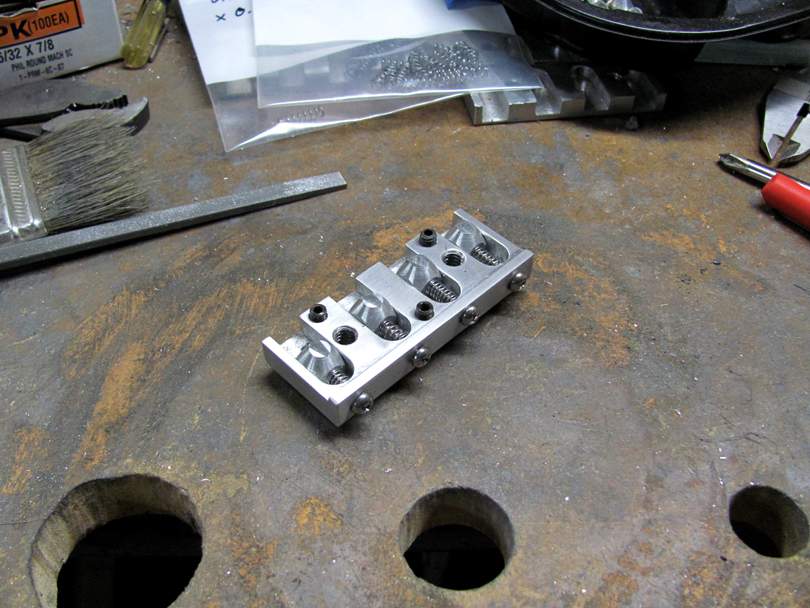
Here's one of those bridges all assembled. The intonation screws are 6-32, going straight back into the saddles. The difficult part is that the holes on the front surface for the intonation screws need to be accurately aligned in relation to the slots. They need to be centered and a specific distance above the floor of the slot. If those holes are misaligned, even a little bit, the saddles will bind up in the slots, or tip and not seat solidly.
In the past, I used to drill those front holes in the milling machine, to charts of dimensions. It was time-consuming and frustrating. More than once, I had to scrap bridges because of small errors.
So I came up with this:

This is a special custom jaw that bolts into one side of the X-Y vise on the trusty Walker-Turner drill press. It has a raised lump, which is milled and filed to be a nice fit into one of the bridge slots. Then I accurately measured and drilled a hole, centered on the lump, and at the correct distance from the outer end of the lump. The hole size is a #26 drill. You can see that I stamped 26 on the jaw, so I will always remember what size drill to use.
Note that this custom jaw goes on the fixed, non-moving side of the vise. The other jaw on the left is just a smooth aluminum bar.
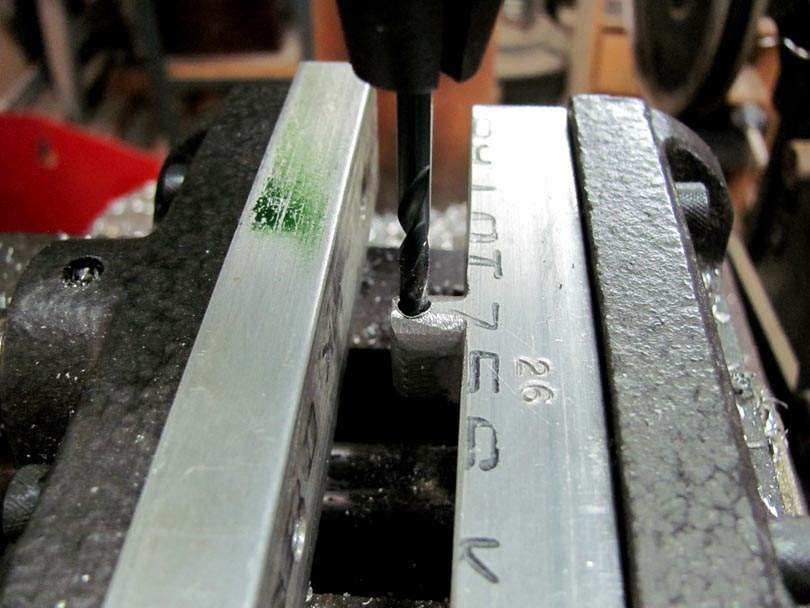
The lump serves as the Master, to set the location of the drill. Same principle as the jobs in the previous posts. I put a #26 Screw Machine drill bit in the chuck. With it shut off, I finely adjust the X and Y axes of the vise to the point where the drill bit slides down into the hole with no deflection or drag. Lock down both axes.
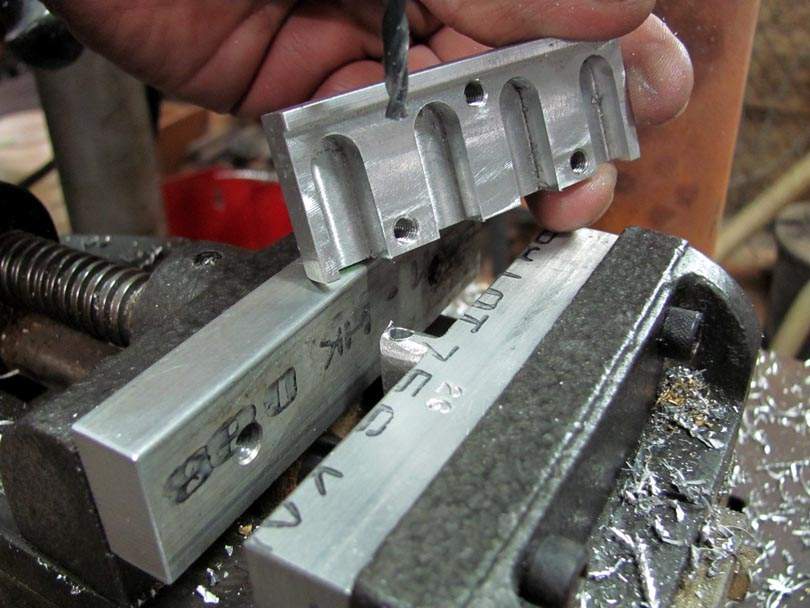
Here's the drilling process: Pick any slot on the bridge.
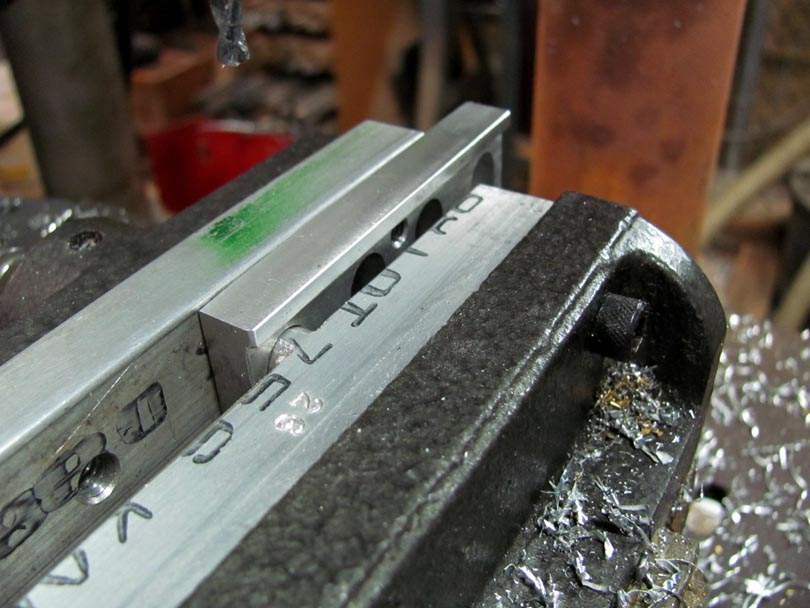
It fits down over the lump. Tightening the vise clamps the floor of the slot between the end of the lump and the back surface. It doesn't matter what the depth of the slot is. The drilled hole will always be positioned accurately in relation to the floor of the slot, and centered sideways in the slot. That's what this special jaw/tool does.
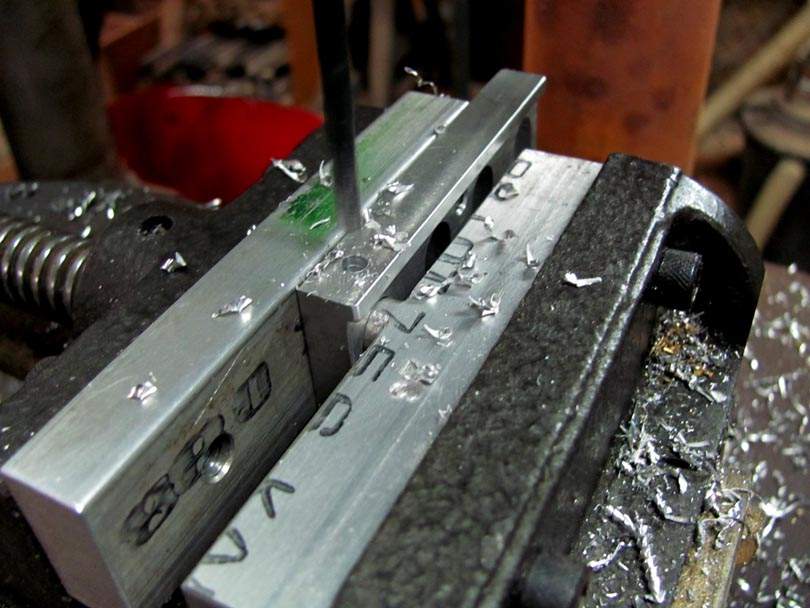
Then the drilling is a breeze. Right down the row of the four slots, only a few seconds each. Loosen the vise a half turn, slip the bridge over to the next slot, tighten, drill. Fast and easy, and every hole is accurately where it needs to be.
This is a good example of custom tooling in metalworking. It took me less than a half hour to make up that special jaw, and it will save me many, many hours over the years.
You should be thinking about tooling like this when you are making up metal hardware for your basses. Design your parts so that you can use variations on future instruments. And think of ways to do each operation efficiently.
You can do a lot of efficient metalworking like this with just hand tools, a decent drill press and an X-Y vise. Make up custom vise jaws. Make Masters by hand layout and Spot Drilling. Make batches of parts by Machine Drilling. These things I'm showing you all go together.
Here's the job:
These are some of the bridges that I make up. These four are replacements for vintage Ampegs, but the ones I make for my new Scroll Basses are similar design. Aluminum blocks with those milled slots for the saddles to slide in. Note that the slots are milled at different heights in the block to follow the fingerboard radius. I make this style of bridges for different model basses, with different radiuses. And different style saddles. But they all use that same style of milled 3/8" wide slot for the saddle to fit in.
Here's one of those bridges all assembled. The intonation screws are 6-32, going straight back into the saddles. The difficult part is that the holes on the front surface for the intonation screws need to be accurately aligned in relation to the slots. They need to be centered and a specific distance above the floor of the slot. If those holes are misaligned, even a little bit, the saddles will bind up in the slots, or tip and not seat solidly.
In the past, I used to drill those front holes in the milling machine, to charts of dimensions. It was time-consuming and frustrating. More than once, I had to scrap bridges because of small errors.
So I came up with this:
This is a special custom jaw that bolts into one side of the X-Y vise on the trusty Walker-Turner drill press. It has a raised lump, which is milled and filed to be a nice fit into one of the bridge slots. Then I accurately measured and drilled a hole, centered on the lump, and at the correct distance from the outer end of the lump. The hole size is a #26 drill. You can see that I stamped 26 on the jaw, so I will always remember what size drill to use.
Note that this custom jaw goes on the fixed, non-moving side of the vise. The other jaw on the left is just a smooth aluminum bar.
The lump serves as the Master, to set the location of the drill. Same principle as the jobs in the previous posts. I put a #26 Screw Machine drill bit in the chuck. With it shut off, I finely adjust the X and Y axes of the vise to the point where the drill bit slides down into the hole with no deflection or drag. Lock down both axes.
Here's the drilling process: Pick any slot on the bridge.
It fits down over the lump. Tightening the vise clamps the floor of the slot between the end of the lump and the back surface. It doesn't matter what the depth of the slot is. The drilled hole will always be positioned accurately in relation to the floor of the slot, and centered sideways in the slot. That's what this special jaw/tool does.
Then the drilling is a breeze. Right down the row of the four slots, only a few seconds each. Loosen the vise a half turn, slip the bridge over to the next slot, tighten, drill. Fast and easy, and every hole is accurately where it needs to be.
This is a good example of custom tooling in metalworking. It took me less than a half hour to make up that special jaw, and it will save me many, many hours over the years.
You should be thinking about tooling like this when you are making up metal hardware for your basses. Design your parts so that you can use variations on future instruments. And think of ways to do each operation efficiently.
You can do a lot of efficient metalworking like this with just hand tools, a decent drill press and an X-Y vise. Make up custom vise jaws. Make Masters by hand layout and Spot Drilling. Make batches of parts by Machine Drilling. These things I'm showing you all go together.
Last edited:

Is there a particular reason for this? E.g. is there a problem with using brass with Walnut?I originally made them from 1/2" square brass, but I switched to aluminum when I introduced the Walnut models.
Last edited:
Is there a particular reason for this?
Mostly weight. I usually like to use brass for embedded blocks that machine screws thread into, for the durability of the threads. I use brass for the neck heel bars. But it seemed excessive for these Body Bars. Unnecessary weight and cost. Brass is about 4X the price of aluminum.

New center finder/square, based on Bruce's recommendation:
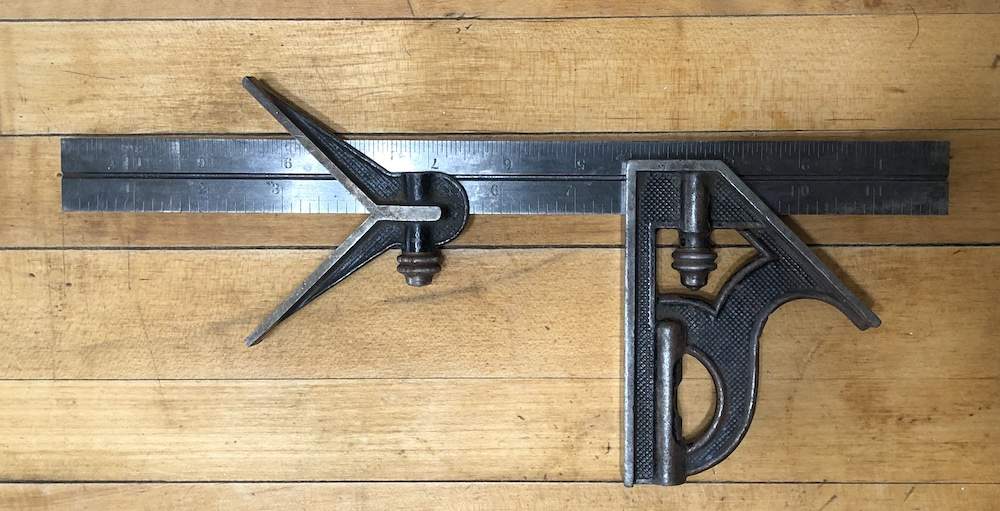
$48 on the bay.
$48 on the bay.
Cool! That's a lifetime tool. I believe that is an older Starrett, like from the 1940's. It's probably already been a lifetime tool several times. You are just the current owner. Treasure it and use it in good spirit!
Correction:
Your square isn't a Starrett, it's a Brown & Sharpe! I happened to be looking around my bench for something, and I discovered that I have one of them, too. Browne & Sharpe is the other classic American precision tool maker. Equal in quality and prestige to Starrett.
Last edited:

I have several newer, slightly crappy squares, always wanted a Starret one. Nothing like mid century American tools. I was still using my Granfathers old polished aluminum case Craftsman jigsaw until it finally died. Can't bring myself to throw it out.

Question: What bit and drilling technique should I use to countersink #3 holes in 0.059" mild steel?
Background: I have pickup rings and control plates laser cut and sent to me. I currently countersink the mounting holes using the "spot drill" technique with a 2x4 holding jig set in an import drill press vise and Westward 1 flute 82 degree bit. The depth stop on my drill press is plastic and has a lot of play, so it's not very useful for this kind of work. I haven't used cutting oil and I'm eyeballing the depth and diameter of each countersink. Once this operation is finished I ship the parts to Advanced Plating in TN to be polished and chrome plated.
I don't believe I have any photos of this process, so I'll add them here when I receive my next batch of parts.
@Bruce Johnson As always, thank you!
Background: I have pickup rings and control plates laser cut and sent to me. I currently countersink the mounting holes using the "spot drill" technique with a 2x4 holding jig set in an import drill press vise and Westward 1 flute 82 degree bit. The depth stop on my drill press is plastic and has a lot of play, so it's not very useful for this kind of work. I haven't used cutting oil and I'm eyeballing the depth and diameter of each countersink. Once this operation is finished I ship the parts to Advanced Plating in TN to be polished and chrome plated.
I don't believe I have any photos of this process, so I'll add them here when I receive my next batch of parts.
@Bruce Johnson As always, thank you!
Last edited:
Question: What bit and drilling technique should I use to countersink #3 holes in 0.059" mild steel?
Background: I have pickup rings and control plates laser cut and sent to me. I currently countersink the mounting holes using the "spot drill" technique with a 2x4 holding jig set in an import drill press vise and Westward 1 flute 82 degree bit. The depth stop on my drill press is plastic and has a lot of play, so it's not very useful for this kind of work. I haven't used cutting oil and I'm eyeballing the depth and diameter of each countersink. Once this operation is finished I ship the parts to Advanced Plating in TN to be polished and chrome plated.
I don't believe I have any photos of this process, so I'll add them here when I receive my next batch of parts.
@Bruce Johnson As always, thank you!
My favorite countersinks for metal are the Weldon style; the type with the round hole that goes diagonally through it. I don't know why, but they just work better. Cleaner cut, no chatter.
For countersinking screw holes in steel plates, you need a good sturdy stop on your drill press. Maybe you can improve the one on yours with a bolt and nut?
For small holes like that, I probably wouldn't use any cutting oil.
Thanks!My favorite countersinks for metal are the Weldon style; the type with the round hole that goes diagonally through it. I don't know why, but they just work better. Cleaner cut, no chatter.
For countersinking screw holes in steel plates, you need a good sturdy stop on your drill press. Maybe you can improve the one on yours with a bolt and nut?
For small holes like that, I probably wouldn't use any cutting oil.
The single-flute bit I have was recommended by Hipshot when I needed to countersink holes in a handful of stainless plates they sent to me in error without countersinking, but those days are long gone. It looks like this Weldon bit might be just the ticket to countersink for #3 wood screws into mild steel. Agreed, or is there something better I should be looking at?
Invalid Link Removed
I just double-checked the depth stop on my drill press and it's heavy black plastic that's held in place with two machine screws that were loose. As long as I make sure the stop is locked down tight at it's bottom-most point before I set the depth-stop, I should be good to go for my "spot-drilling" purposes. I'll post pics when I get the next batch of rings in.
Thanks again!
Last edited:
Thanks!
The single-flute bit I have was recommended by Hipshot when I needed to countersink holes in a handful of stainless plates they sent to me without countersinking in error, but those days are long gone. It looks like this Weldon bit might be just the ticket to countersink for #3 wood screws into mild steel. Agreed, or is there something better I should be looking at?
Invalid Link Removed
I just double-checked the depth stop on my drill press and it's heavy black plastic that's held in place with two machine screws that were loose. As long as I make sure the stop is locked down tight at it's bottom-most point before I set the depth-stop, I should be good to go for my "spot-drilling" purposes. I'll post pics when I get the next batch of rings in.
Thanks again!
Yes, that's exactly the countersink bit I recommend. That's a genuine Weldon company bit, not an import copy. And that's the right size. It'll countersink many thousands of holes before it gets dull.
Take a look at that plastic part on your drill press. Could you make up a replica of it from aluminum? Maybe you could stiffen up the plastic part by, for example, putting some thick epoxy down in those screw holes, and assembling it with the screws waxed. Or something like that. You want to make sure the stop is solid and doesn't move or flex during the heat of drilling.
When cutting countersinks, you need to stop the depth very accurately and consistently to get the countersinks all the same diameter. And, unfortunately, neat countersinks around your screw heads are an important part of the visual appearance of bass hardware. Just like pickguards. You can ruin a pickguard with one badly countersunk hole.
Last edited:
@BeeTL if you have a cheap drill press like I do (hopefully you don't), make sure that the drill isn't deflected off of center when you hit the stop. I didn't realize mine did that. Now I don't depend on the stop for any "precision" drilling.
Yes, that's exactly the countersink bit I recommend. That's a genuine Weldon company bit, not an import copy. And that's the right size. It'll countersink many thousands of holes before it gets dull.
Take a look at that plastic part on your drill press. Could you make up a replica of it from aluminum? Maybe you could stiffen up the plastic part by, for example, putting some thick epoxy down in those screw holes, and assembling it with the screws waxed. Or something like that. You want to make sure the stop is solid and doesn't move or flex during the heat of drilling.
When cutting countersinks, you need to stop the depth very accurately and consistently to get the countersinks all the same diameter. And, unfortunately, neat countersinks around your screw heads are an important part of the visual appearance of bass hardware. Just like pickguards. You can ruin a pickguard with one badly countersunk hole.
Thanks for the countersinking advice!
The stop block is a rather substantial piece of solid black plastic and it does not flex at all. The problem is that the screws that hold it in place were loose. The block acts as a stop in both directions so with every cycle of the press the block would move a little in either direction.
I'm going to pull the machine screws out, put some thread lock on them, and reinstall nice and snug. I think I'll be good to go. Thanks again!
@BeeTL if you have a cheap drill press like I do (hopefully you don't), make sure that the drill isn't deflected off of center when you hit the stop. I didn't realize mine did that. Now I don't depend on the stop for any "precision" drilling.
My drill press is a Jet JDP-17DX, plenty for anything I'll ever need. It looks like the bit referenced above will be perfect for the task at hand, so I think I'm on the right path.

Last edited:


