Those that know me are aware of a few things.
1: I am constantly changing my bass gear. I buy, sell, trade, modify, and build a lot of basses.
2: I buy a lot of parts, even if I don't need them at that time. I buy them because they are at a good deal, and I am pretty sure that I will eventually use them.
3: Nearly every instrument I get, I believe I can make better. My friends think I'm nuts because I'll buy a bass and then dismantle it within minutes of getting it home.
With those things in mind, I bring you our victim.
Yesterday I felt I needed a project. Sure, there were other things I should have been doing, but there was playoff Hockey on and when I watch games I like to keep my hands busy. I don't know why...it's just how I am. Anyway, a while back I had bought a Seymour Duncan Antiquity II Tele Bass pickup here in the Classified (Thanks Jefenator !) for a great price. I didn't need it then, but I knew that "somewhere down the road" it would come in handy. I had also recently acquired a great feeling MIJ 51 Precision Bass neck, complete with tuners, nut, and tree (Thanks Doug !). I think you can see where this is going.
I formulated a plan, and off to Bass Emporium I went ! After a few minutes of talking to Chuck and Kyle, I loaded up my new victim and headed on home !
THE VICTIM:
[Invalid or Expired Link Removed]
Now I think I should mention that this is a really nice bass right out of the box. It really doesn't require any modding or upgrading, but leaving things "stock" just isn't in my nature.
So, time to dismantle it completely !
Now normally at this stage I would take a bunch of photos, documenting the whole process....BUT....my girlfriend was off visiting her parents in Houston yesterday and she had the camera, so I'll just need to describe things to you instead...sorry.
After dismantling the bass I could get started on rebuilding it with the changes I wanted.
The first thing is that I didn't want a white pickguard. Unfortunately a new pickguard for this would need to be custom cut, and I'm simply not that patient. Besides, it would cost a lot of money, and I'm cheap ! So with pickguard in hand, I headed outside, grabbing a handy can of Satin Black Krylon Fusion on the way. Krylon Fusion is formulated specifically for painting on plastic, so no priming is necessary, and adhesion is excellent. I sprayed the pickguard with a nice coat of black and headed back inside, leaving the paint to dry while I made further changes to the bass.
The next goal was to fit the neck. Let me tell you, the MIJ neck slid right into the neck pocket nice and tight... PERFECT FIT ! Well, things are not always that easy, and when I checked to see if the mounting holes lined up, I found out that they did not, and new holes would need to be drilled. Well, I kind of expected this, but it would have been nice to bolt it right up. Anyway, I marked the new hole locations, and off to the drill press I went. With the new holes drilled, I did the test fit again - everything lined up perfectly ! I didn't want to mount the neck just yet though, as I had some work to do on the electronics.
One thing I do to most basses is change out the electronics. Not necessarily the pickup(s), like I did in this bass, but the pots, switch, cap, and wiring. Sure, it only makes a incremental difference typically, but it doesn't cost much to do, and I feel better about having nice, sturdy CTS pots, a Switchcraft jack, and a top notch capacitor in there. I also like the look of cloth wiring. Anyway, my fear was that this Squier Classic Vibe wouldn't have room in the control cavity for the full size CTS pots. The Squier comes with mini pots, and some manufacturers don't leave enough room in the cavity for the "bigguns". First things first though: The control plate would also need to have the holes enlarged to accommodate the larger pots. So back to the drill press I went. A few seconds later, and voila ...I had my CTS pots mounted to the plate !!! Now I was expecting to have to use a Forstner bit in my drill press to enlarge the cavity a bit (for the pots), but I was pleasantly surprised to find out the that CTS pots fit right in the cavity ! One less thing to do....woo hoo ! I then mounted the SD Antiquity pickup in place, and soldered up the controls. I chose a nice old Sangamo .047uF "Vitamin Q" style cap...they sound great, and I was smart enough to buy a couple dozen a while back before prices soared.
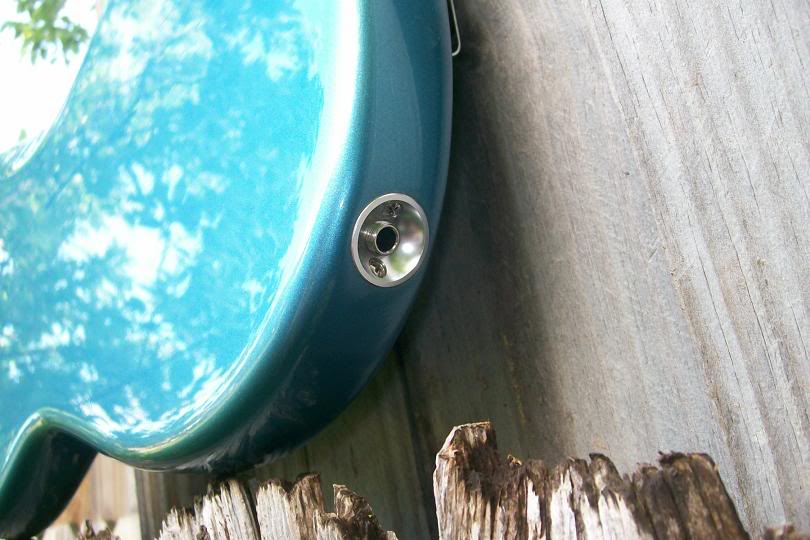
I also didn't want to use the stock Tele style jack cup, as they can eventually work themselves loose...usually in the middle of a show...so I chose to use a Electrosocket jack cup. These are great because they retain the clean look of a Tele cup, but screw directly into the body so they stay secure. Additionally, the Switchcraft jack screws directly into the threads on the Electrosocket, so you don't need a washer and nut. The less things to loosen up, the better ! Oh, and with the Electrosocket you can also use a right angle plug... something you cannot do with the traditional Tele cup.
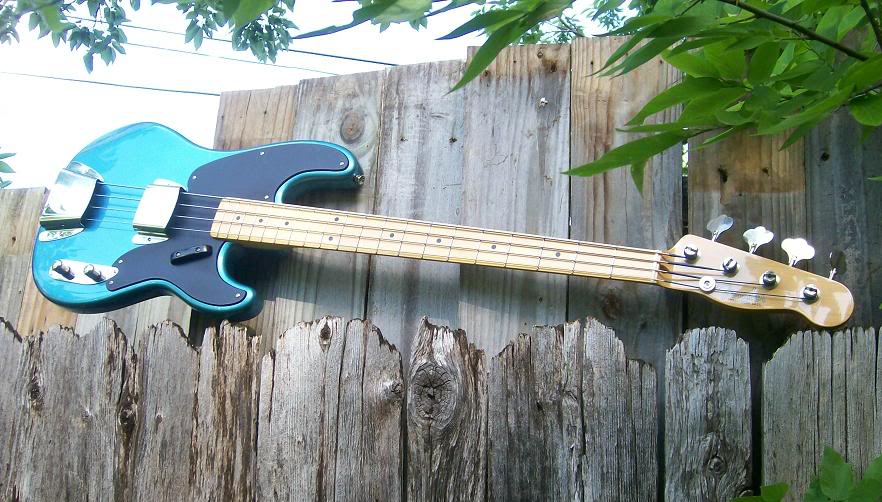
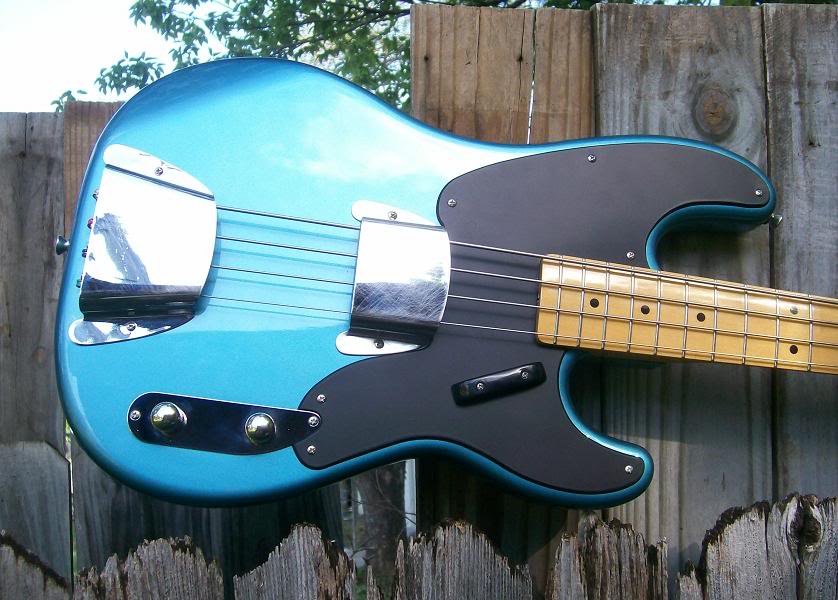
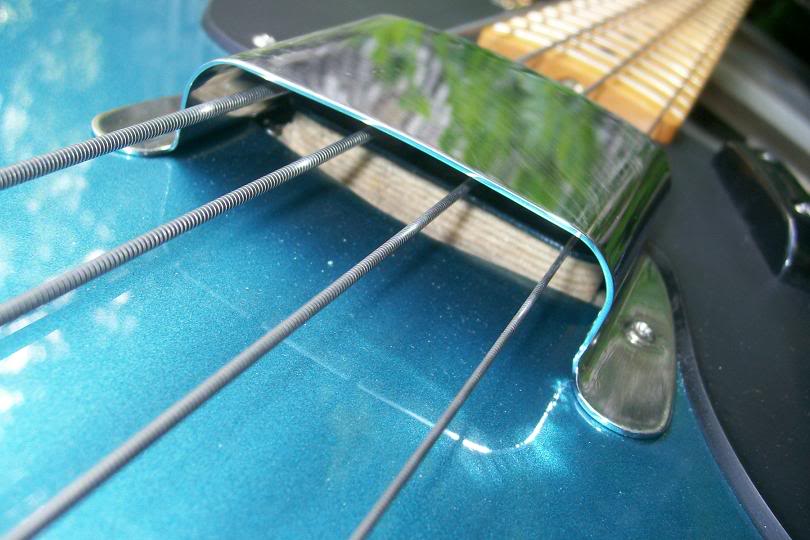
Controls, pickup, etc are now all soldered up, so it is time to start the reassembly process. I mounted the neck, bridge, newly sprayed pickguard, etc up and put on a fresh set of D'Addario Chromes. After a quick setup, I decided the bass was still missing something, so off I went to dig through my parts pile. I knew I had them somewhere, but the question was where ! Finally, success....but they were a bit scratched up. I had found my set of pickup and bridge covers ! I would need to order a "fresh" set, but for now I will use the ones I have. Measured, mounted, and man, they look good. The black pickguard, chrome covers, and darker tint of the neck really set this bass off. In addition, the new pickups and electronics really bring it up to being a "pro level" bass...one that I can gig and use in sessions with no hesitation whatsoever. Also, with the upgraded pots, tuners, Electrosocket, etc, I had increased the instruments reliability !
So in the time it took to watch the Boston Bruins play the Buffalo Sabres (great game, BTW), I was able to make the bass look better, sound better, and increase reliability !
Now that my girlfriend has returned, I have the camera again, so I'll add some "completed" photos.
But first, to remind you, here is what the bass looked like when I got it:
[Invalid or Expired Link Removed]
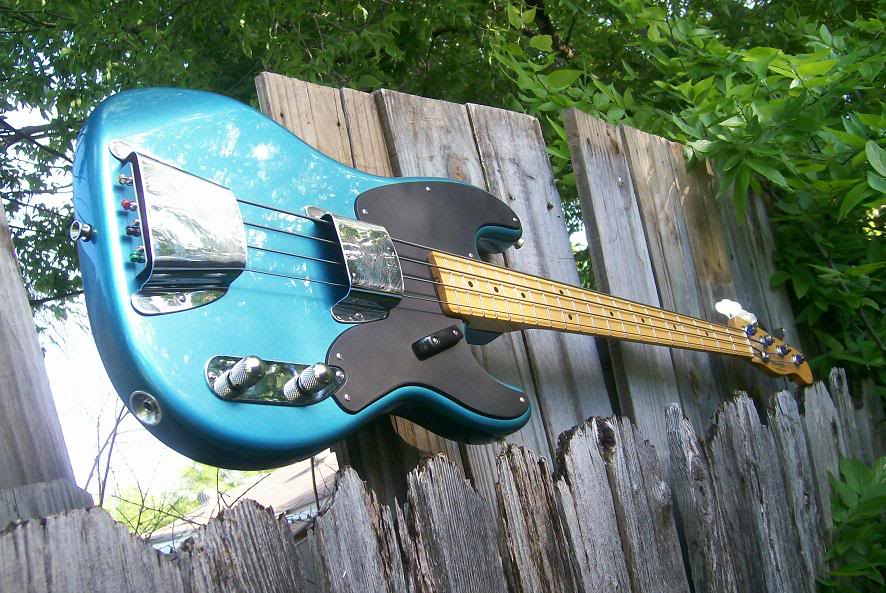
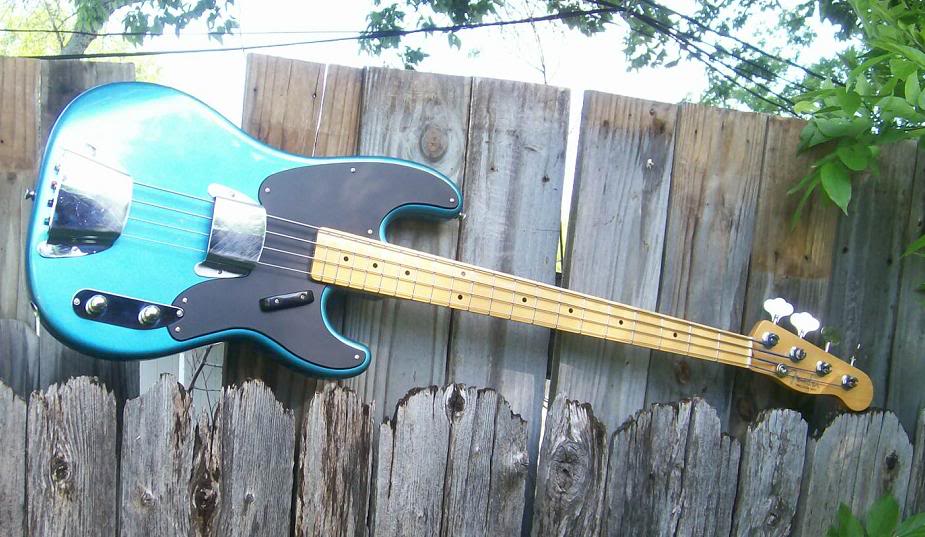
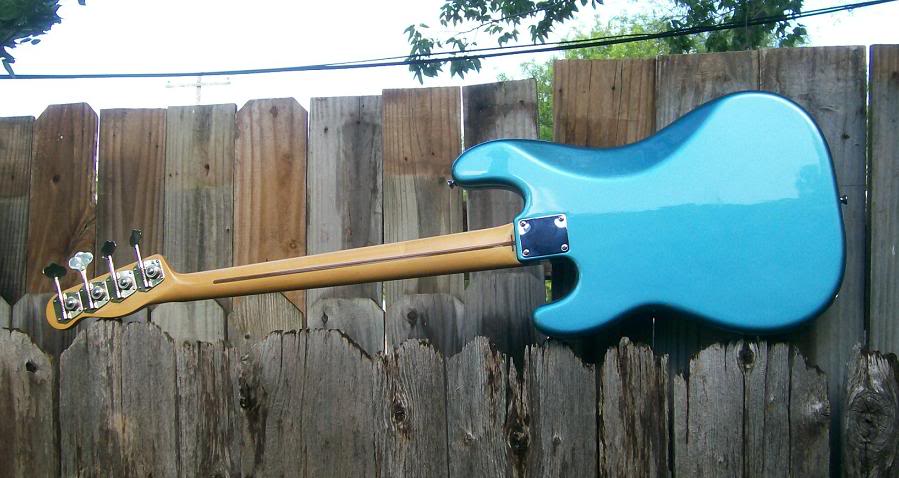
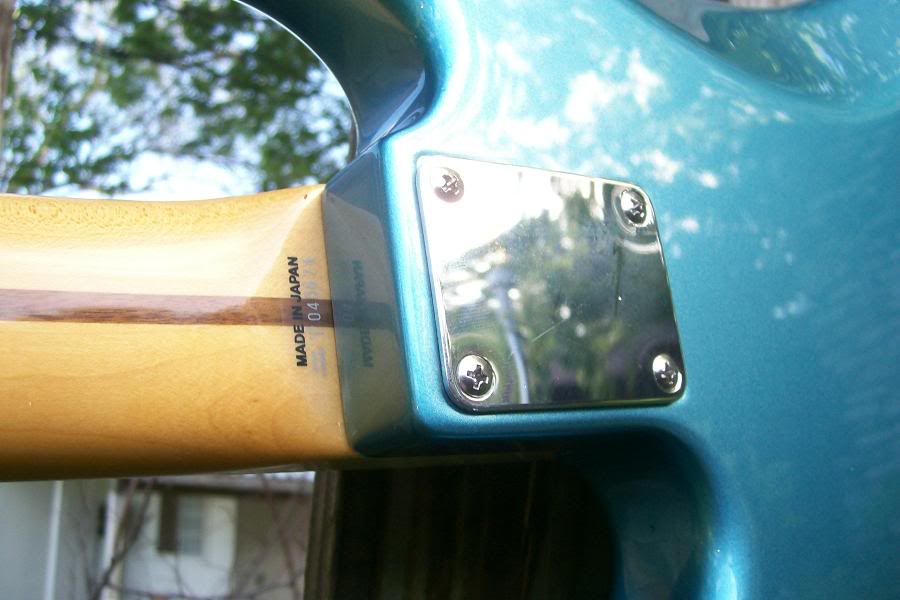
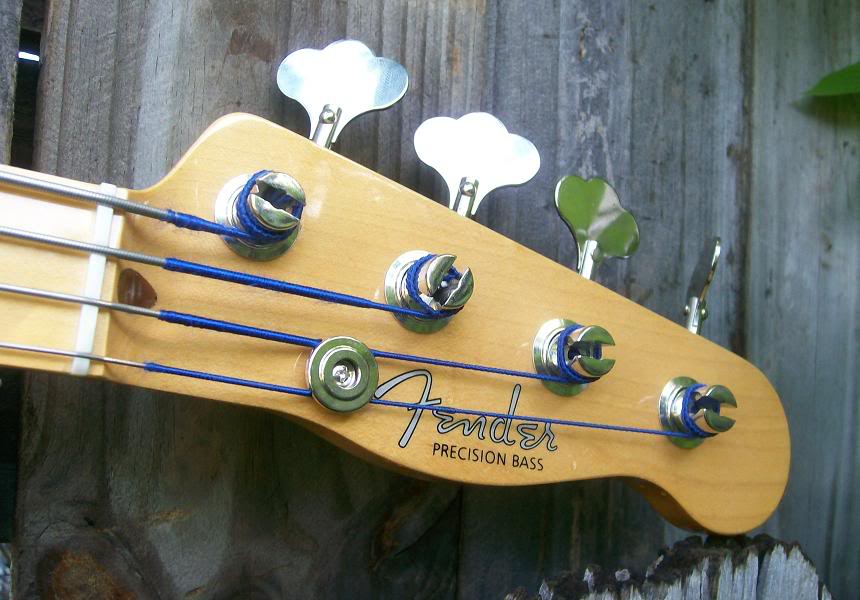
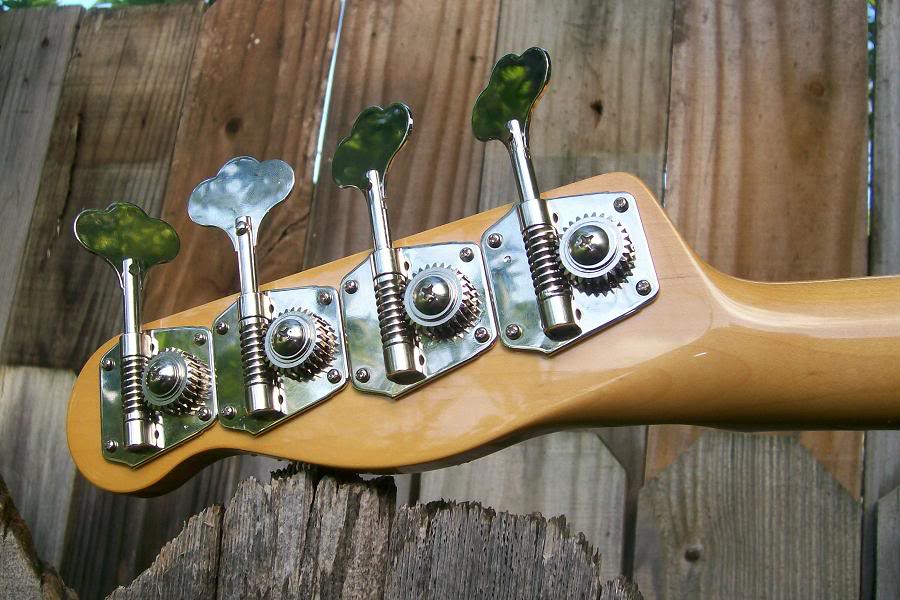
And here is the bass completed ! I will add the new covers when they arrive, but I'm sure you can see what a difference they make:
[/Man vs. Bass: Episode One]
1: I am constantly changing my bass gear. I buy, sell, trade, modify, and build a lot of basses.
2: I buy a lot of parts, even if I don't need them at that time. I buy them because they are at a good deal, and I am pretty sure that I will eventually use them.
3: Nearly every instrument I get, I believe I can make better. My friends think I'm nuts because I'll buy a bass and then dismantle it within minutes of getting it home.
With those things in mind, I bring you our victim.
Yesterday I felt I needed a project. Sure, there were other things I should have been doing, but there was playoff Hockey on and when I watch games I like to keep my hands busy. I don't know why...it's just how I am. Anyway, a while back I had bought a Seymour Duncan Antiquity II Tele Bass pickup here in the Classified (Thanks Jefenator !) for a great price. I didn't need it then, but I knew that "somewhere down the road" it would come in handy. I had also recently acquired a great feeling MIJ 51 Precision Bass neck, complete with tuners, nut, and tree (Thanks Doug !). I think you can see where this is going.
I formulated a plan, and off to Bass Emporium I went ! After a few minutes of talking to Chuck and Kyle, I loaded up my new victim and headed on home !
THE VICTIM:
[Invalid or Expired Link Removed]
Now I think I should mention that this is a really nice bass right out of the box. It really doesn't require any modding or upgrading, but leaving things "stock" just isn't in my nature.
So, time to dismantle it completely !
Now normally at this stage I would take a bunch of photos, documenting the whole process....BUT....my girlfriend was off visiting her parents in Houston yesterday and she had the camera, so I'll just need to describe things to you instead...sorry.
After dismantling the bass I could get started on rebuilding it with the changes I wanted.
The first thing is that I didn't want a white pickguard. Unfortunately a new pickguard for this would need to be custom cut, and I'm simply not that patient. Besides, it would cost a lot of money, and I'm cheap ! So with pickguard in hand, I headed outside, grabbing a handy can of Satin Black Krylon Fusion on the way. Krylon Fusion is formulated specifically for painting on plastic, so no priming is necessary, and adhesion is excellent. I sprayed the pickguard with a nice coat of black and headed back inside, leaving the paint to dry while I made further changes to the bass.
The next goal was to fit the neck. Let me tell you, the MIJ neck slid right into the neck pocket nice and tight... PERFECT FIT ! Well, things are not always that easy, and when I checked to see if the mounting holes lined up, I found out that they did not, and new holes would need to be drilled. Well, I kind of expected this, but it would have been nice to bolt it right up. Anyway, I marked the new hole locations, and off to the drill press I went. With the new holes drilled, I did the test fit again - everything lined up perfectly ! I didn't want to mount the neck just yet though, as I had some work to do on the electronics.
One thing I do to most basses is change out the electronics. Not necessarily the pickup(s), like I did in this bass, but the pots, switch, cap, and wiring. Sure, it only makes a incremental difference typically, but it doesn't cost much to do, and I feel better about having nice, sturdy CTS pots, a Switchcraft jack, and a top notch capacitor in there. I also like the look of cloth wiring. Anyway, my fear was that this Squier Classic Vibe wouldn't have room in the control cavity for the full size CTS pots. The Squier comes with mini pots, and some manufacturers don't leave enough room in the cavity for the "bigguns". First things first though: The control plate would also need to have the holes enlarged to accommodate the larger pots. So back to the drill press I went. A few seconds later, and voila ...I had my CTS pots mounted to the plate !!! Now I was expecting to have to use a Forstner bit in my drill press to enlarge the cavity a bit (for the pots), but I was pleasantly surprised to find out the that CTS pots fit right in the cavity ! One less thing to do....woo hoo ! I then mounted the SD Antiquity pickup in place, and soldered up the controls. I chose a nice old Sangamo .047uF "Vitamin Q" style cap...they sound great, and I was smart enough to buy a couple dozen a while back before prices soared.
I also didn't want to use the stock Tele style jack cup, as they can eventually work themselves loose...usually in the middle of a show...so I chose to use a Electrosocket jack cup. These are great because they retain the clean look of a Tele cup, but screw directly into the body so they stay secure. Additionally, the Switchcraft jack screws directly into the threads on the Electrosocket, so you don't need a washer and nut. The less things to loosen up, the better ! Oh, and with the Electrosocket you can also use a right angle plug... something you cannot do with the traditional Tele cup.
Controls, pickup, etc are now all soldered up, so it is time to start the reassembly process. I mounted the neck, bridge, newly sprayed pickguard, etc up and put on a fresh set of D'Addario Chromes. After a quick setup, I decided the bass was still missing something, so off I went to dig through my parts pile. I knew I had them somewhere, but the question was where ! Finally, success....but they were a bit scratched up. I had found my set of pickup and bridge covers ! I would need to order a "fresh" set, but for now I will use the ones I have. Measured, mounted, and man, they look good. The black pickguard, chrome covers, and darker tint of the neck really set this bass off. In addition, the new pickups and electronics really bring it up to being a "pro level" bass...one that I can gig and use in sessions with no hesitation whatsoever. Also, with the upgraded pots, tuners, Electrosocket, etc, I had increased the instruments reliability !
So in the time it took to watch the Boston Bruins play the Buffalo Sabres (great game, BTW), I was able to make the bass look better, sound better, and increase reliability !
Now that my girlfriend has returned, I have the camera again, so I'll add some "completed" photos.
But first, to remind you, here is what the bass looked like when I got it:
[Invalid or Expired Link Removed]
And here is the bass completed ! I will add the new covers when they arrive, but I'm sure you can see what a difference they make:
[/Man vs. Bass: Episode One]