• TalkBass has been independent since 1998. Add your voice.
    Create a free account to reply to discussions, view embedded media, and browse with fewer display ads.
    Join freeLog in
    Want zero display ads or expanded classifieds tools? Compare plans.

My Custom, DIY Bass Rig - Meet 'Enceladus' & 'Hyperion'

Hello to all. :)

As much as I like a lot of commercially available amplifiers and cabinets, I always wanted to use my knowledge on electronics (I am an electrical and computer engineer, currently working towards a PhD in microelectronics) and my love to create things to design and build my own bass rig, head and cabinet.

After many back-and-forths, the project is almost complete - little details remain to be done, but the rig is fully functional since late 2019, making me smile everytime I play. :)

I hope this thread will enjoy many DIY enthusiasts, inspire many who are on the verge of doing something similar to jump on it, or just be a nice reading in the time of quarantine. :thumbsup:

Bass Cabinet - 'Enceladus'
Enceladus was one of the Giants in Greek Mythology, and was thought to cause earthquakes and volcanic eruptions; even today, its name is used to refer to an earthquake event.

With the utmost help and recommendations from TalkBass member @Arjank, whom I kindly thank for his involvement in the cabinet design, the 1x15", 120lt bass cabinet was given the giant's name due to its low-frequency and power potential. It features an Oberton 15MB500 driver, 18mm birch plywood with 22mm pitch pine bracings, and three ports.

Bass Head - 'Hyperion'
Hyperion was one of the Titans in Greek Mythology, and was the father of Helios, the god and personification of the Sun.

The bass head is a hybrid one, featuring a tube preamplifier and a solid-state, high-end power amplifier. The preamplifier is essentially the Alembic F-2B tube preamp, followed by a MOSFET buffer. The BJT Class-B power amplifier is inspired by the "Blameless Amplifier" design approaches of Douglas Self. 'Hyperion' is rated at 200W (RMS) under an 8Ω load.

I will start with the cabinet design documentation, and proceed with the documentation of the head.

Before we begin, I believe that an artistic sneak peek is in order. :smug:
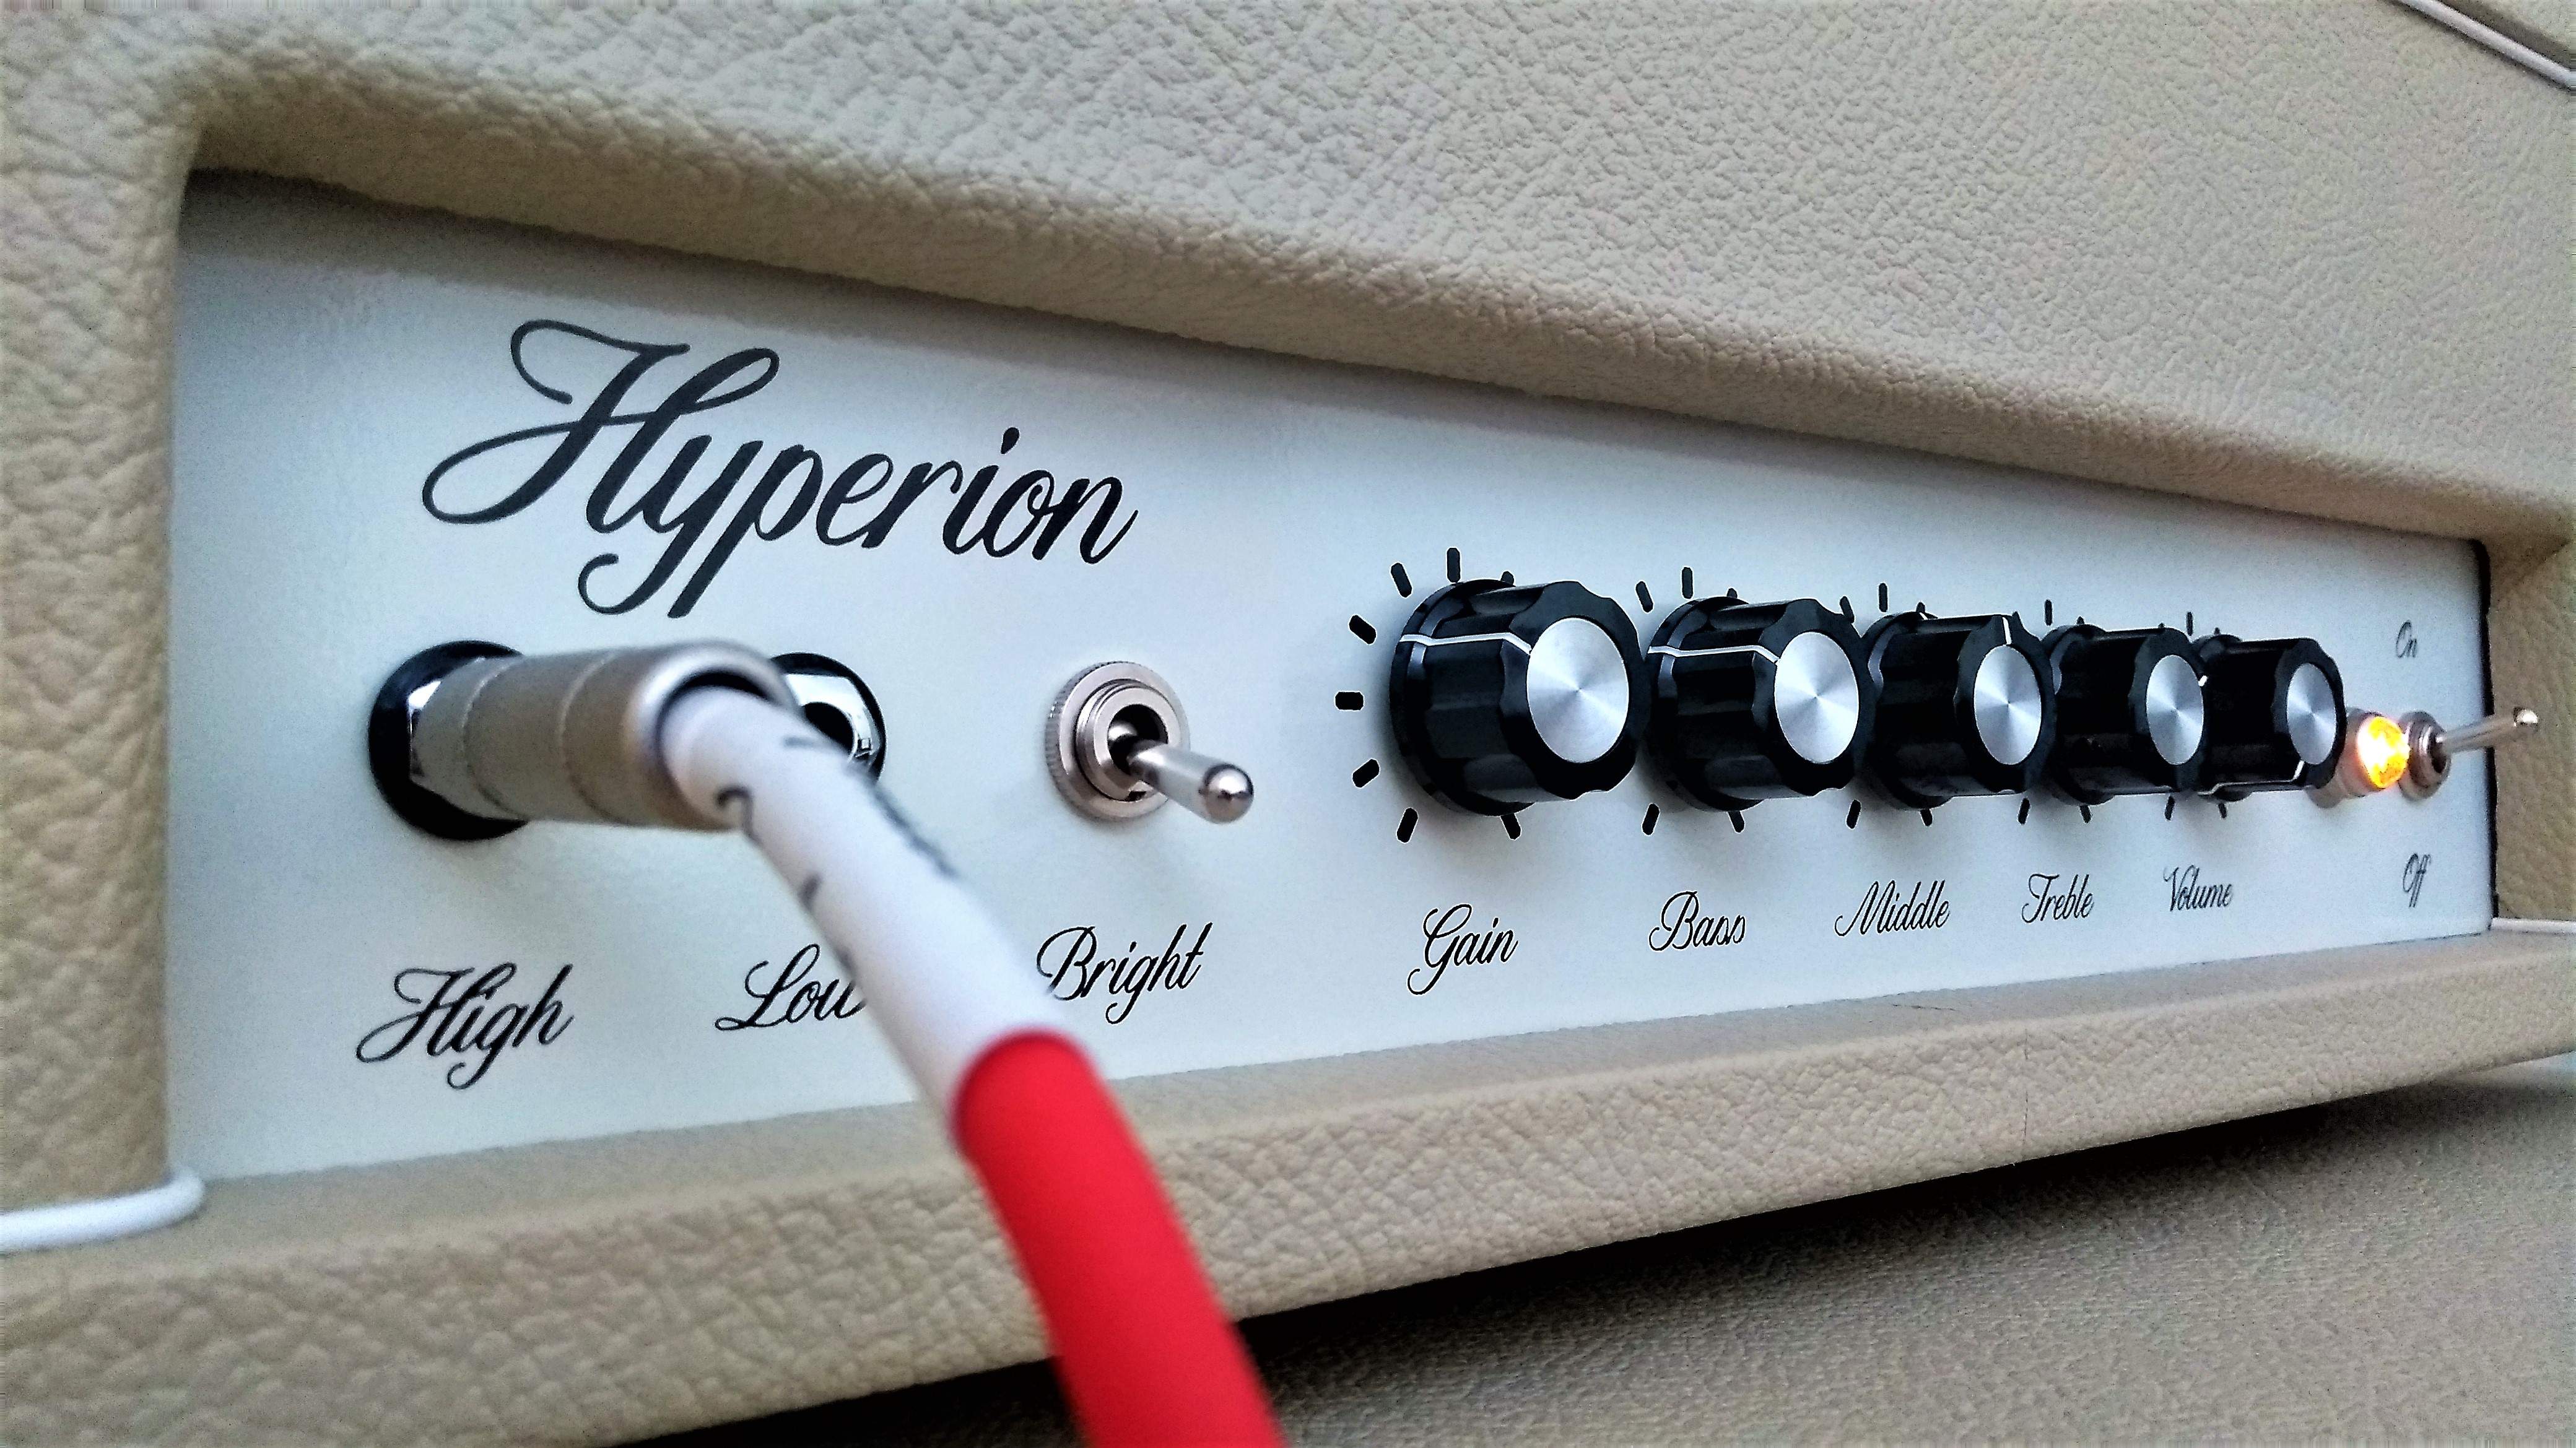
Hyperion_Bass_Head.jpg
 
Last edited:
The 'Enceladus' - Overview

The cabinet is made out of 18mm birch plywood to ensure a high level of rigidity, and measures outer dimensions of 68.6x55.6x43.6 (HxWxD), all in cm. The inner dimensions are 65x52x37, giving a total volume of 120lt (excluding the volume occupied by the bracings and the speaker). An inner layer is also used, to further enhance rigidity of the structure. Inner bracing is provided by 22x22 (mm) pieces of pitch pine. 'Enceladus' is going to be heavy, but its purpose alongside 'Hyperion' is to be a reference rig; no frequently moving is involved.

The cabinet is tuned by means of 3 HP100 bass reflex ports, placed in the lower compartment of the cabinet. At the time of the writing, the cabinet is tuned to around 43Hz, with no extra damping inside. The higher compartment features the Oberton 15MB500.

01_Oberton_15MB500.jpg

The soul of 'Enceladus' - Oberton 15MB500.
 
Last edited:
The 'Enceladus' - Cutting Wood

The cabinet parts were professionally cut when purchased, from a plywood plank with a surface of 1.25x2.5 (all in m). The initial plan was to drive 'Enceladus' with the head of my Gallien-Krueger Backline 115 Combo, so the original cutting featured additional parts for its wooden enclosure. Down the road this idea was dropped in favor of designing and building 'Hyperion', whose housing was made from the leftover parts of two plywood planks: mine, and my brother's, who was building his own custom guitar head and cabinet at the time - which, by the way, turned great. :)

Given the cabinet parts, home woodworking begins.

02_Back_Side.jpg

Back cabinet side, with terminal cut marked.

03_Back_Side_Cut.jpg

Back cabinet side, with terminal cut.

04_Back_Side_Cut_Jacks.jpg

Back cabinet side, with terminal placed.

05_Sides.jpg

Cabinet sides, with handle cuts marked.


06_Sides_Cut.jpg

Cabinet sides, with handle cuts and the required drilling for mounting.

20160412_181214.jpg

Bottom side, drilled for wheels.


The inner layer originally featured 3 round holes for the communication of the two cabinet compartments, but a design with 4 rectangle cuts with rounded corners was ultimately preferred.

07_Inner_Layer.jpg
Inner layer, marked for cut - observe the 4 additional cuts for the height bracings.

08_Inner_Layer_Cut.jpg

Inner layer.

Next comes the cutting of the pine bracings, that came in as 2.7m-long pieces, with a square cross-section of 22x22 (all in mm). They were cut to the dimensions of the cabinet's interior and drilled for screws to lock the cabinet.

IMG_20160105_101623.jpg

Height bracings, drilled.

20160412_161507.jpg

Side bracings, drilled.

20160412_161650.jpg

Front and back bracings, drilled.

20160412_161901.jpg

Additional bracings for the front of the inner layer.
 
Last edited:
The 'Enceladus' - Assembling

The cabinet took 2-3 days to be assembled, for the wood glue to completely dry during the different phases of the assembly. Extra amounts of glue was used after the structured was solid in order to completely seal it.

14_Height_Bracings.jpg

Height bracings in place.

15_Bottom_Bracings.jpg
Bottom side with bracings.


16_Layer_Bracings.jpg

Inner layer with bracings.

17_Assembly_1.jpg
Assembly begins.

19_Assembly_3.jpg

Left side positioned in place.

20_Assembly_4.jpg

Right side placed.

21_Assembly_5.jpg

Top bracings added.

22_Assembly_7.jpg

Back side and top bracing positioned.

Forgive the quality of some of the photographs, I was obviously not paying that much of attention during this phase. :rolleyes:

23_Glue_Screws.jpg

More glue.

24_Glue_Screws.jpg

Screws awaiting the cabinet's top.

25_Assembly_9.jpg

Top placed.

And, this is it. After a few hours of waiting, 'Enceladus' has taken his primal form, revealing his size. Even though I don't have a picture, it was funny to see it side by side with its counterpart, the GK combo; both 1x15'' enclosures, but 'Enceladus' is way bigger.

26_Assembled_1.jpg


27_Assembled_2.jpg


28_Assembled_3.jpg

'Enceladus' assembled.

The whole procedure went smoothly, and the final result was well worth the effort. The cabinet is rock solid, with a surprisingly high level of quality for a first ever attempt in building a cabinet (or any wooden structure, for that matter). All it takes is to work with passion, patience, and attention to detail; the availability of all the needed tools was a plus, too (thanks, dad! :)).

Meanwhile, the baffle was sent to a professional for CNC cutting of the round openings for the speaker and the 3 ports. Unfortunately, I had no tool to achieve such fine cuts and didn't want to spoil the overall result with the unavoidable imperfections of a hand-guided cut. What is more, the diameter of the ports (13.8cm) resulted in a perimeter too small to adequately follow by hand. Needless to say, it turned out perfect.

29_Baffle.jpg

Baffle.

30_Baffle_Drilled.jpg

Baffle, drilled.

The final step included routing all edges of the cabinet and sanding it down for a smooth, nice to touch feel. This took 3 repetitions, going from rough to medium to fine sandpaper.

31_Sanded.jpg

Routed- and sanded-ready.
 
The 'Enceladus' - Parallel Working: 'Hyperion' Housing

During the sanding of 'Enceladus', a parallel assembly was performed: that of the housing of the bass head, 'Hyperion'. The timing of the decision to build 'Hyperion' forced me to a very specific volume for the housing, and thus, the available space for the amplifier. At the time I was building it with hope (and determination) to be able to finally fit everything inside; which was eventually the case. :thumbsup:

The head housing measures 49.6x33.6x19.6 (all in cm, outer dimensions), and is built with the same structural philosophy of the cabinet.

32_Top.jpg

Top of 'Hyperion' housing, with bracings placed.

33_Bottom.jpg

Bottom with bracings.

34_Front.jpg

Front side with bracings - the back is open.

35_Sides_Assembly.jpg

Housing assembly.

36_Assembled_Head.jpg

Top placed.

Obviously, the head's housing was quite an easier task, due to its simpler structure and the knowledge gained by the cabinet; 'been there, done that'! The rig starts to take its final form.

37_Rig.jpg

The rig.

38_Rig_Sanded.jpg

Head's housing routed and sanded - all ready.

P.S.: I did have a (blur) picture of 'Enceladus' next to my GK combo! Voilà!

39_Enceladus_and GK.jpg

Welcome, big brother!
 
The 'Enceladus' - Painted Brown, to be Tolexed Cream

My original intention was to have the rig painted dark brown, and the wood grain to be visible. So, I used a rosewood-colored wood preserver for the cabinet and the head enclosure. The procedure was quite entertaining.

40_Cabinet.jpg

Cabinet's exterior.

41_Head_Baffle.jpg

Head and baffle hanging out. What more appropriate than an old bass combo supporting them?

42_Cabinet_Interior.jpg

Cabinet's interior.

43_All_Drying.jpg

Drying family time.

And so, the rig was brown...
Until almost half a year ago, where nostalgia for old Fender cream tolex amps happened. But more on that later.
 
The 'Enceladus' - The Last Few Bits

All in all, the time has come for the final assembly. Requirements? Well, mostly patience for placing and screwing everything.

44_Interior.jpg

Adhesive tape for the baffle...

45_Baffle.jpg

... and adhesive tape for the speaker.

46_Handels_Terminal.jpg

Terminal and handles in place. Oh! And the wheels, too!

47_Speaker_Ports.jpg

All round things in their holes.

48_Locked.jpg

Measures have been taken for the speaker to reconsider a possible escape.

49_All_Ready.jpg

And... ready! :)

50_Rig.jpg

The rig in brown.
 
Last edited:
The 'Hyperion' - Overview

And now it's high-time for the bass amplifier. As I already said, 'Hyperion' is a hybrid head. Its preamplifier is all-tube, with a solid-state power amplifier. I am a huge Pink Floyd fan, so I opted to go for the Alembic F-2B tube preamp design; no thrills here. The only addition was to include a buffer stage to drive the power amplifier. Even though this was my plan from the beginning of the design, I originally opted to just add a passive voltage divider; I was afraid that the overall gain would be too high referred to the output of my bass. This was not the case however (I overestimated the bass output ratings), so I modified 'Hyperion' to the initial plan; this also calmed the voice inside my head that kept saying "add the buffer, the buffer". :smug:

The buffer and the power amplifier are solid-state circuits, and are the parts that I designed myself. Aside from the satisfaction itself, another bonus is the fact that no compromises were made. The power amplifier is inspired by the "Blameless Amplifier" concept of Douglas Self in his book "Audio Power Amplifier Design", and features a Class-B output stage. Fun fact: the buffer is a MOSFET design, while the power amplifier is a BJT one; as such, 'Hyperion' has three distinct stages, all comprised entirely of a different active device type: tubes, MOSFETs and BJTs. The amplifier also features the necessary soft-start and speaker-protection circuitry.

'Hyperion' is rated at 200W (RMS) under an 8Ω load, and matches the size and weight of 'Enceladus'. I don't remember the exact value, but it weights around 22kg. Not a problem though, it is not designed for frequent movement. :smug: ('Enceladus' is somewhere in the 20kg-30kg range if I remember correctly; more like 25kg-30kg.)

01_Hyperion_MkI.jpg

'Hyperion' - MkI.
 
Last edited:
The 'Hyperion' - Preamplifier

We start the building progress with the preamplifier. Here, we have two turret boards, one for the preamplifier itself and one for its power supply. This was the fastest layout and build, as it is susceptible to on-the-fly modifications because of the nature of turret boards.

02_Preamp_Board.jpg
Preamplifier's turret boards.

03_Preamp_Assembled.jpg

Populated boards.

I was sad to interrupt an ongoing meeting the capacitors had in order to complete the boards, but it seemed like it was going to last as long as Entmoot. Oh, well...

04_Capacitors_Meeting.jpg

The capacitors' (interrupted) meeting.
 
Last edited:
Nice project! Building your own amplifier, including the power stage, isn't something many folks undertake.

Had to click for the (slightly bombastic but fun) old Greek names (dig the Tolkien reference, too). Subbed for the project itself and the detailed and entertaining way in which it is being recounted.

Thanks for sharing!

EDIT: Just noticed that you're in Athens, Greece -- that might explain some of the affinity for and conversancy with the characters from Greek mythology -- not that being Greek would be a prerequisite for that, considering how widespread and influential that mythology is!
 
  • Like
Reactions: Midak
You are very welcome, thank you and all previous members who posted for the kind words.
Really happy you got the Tolkien reference, too! :)
Yes! I had to think about it for a second, but the Hobbit and the Lord of the Rings books were huge favorites of mine in childhood and adolescence (I think that I read the Hobbit straight-through in a day... two at most -- if only I had that sustained focus now!) and I still esteem them very highly.
 
  • Like
Reactions: Midak
The 'Hyperion' - Soft-Starting the Mains & Protecting 'Enceladus'

Next come the two modules responsible for protection. A soft-start circuitry for the supply of the power amplifier, and a speaker-delay and dc-protection board. The first is a slightly modified version of one of Rod Elliott's designs (you can find them, alongside with useful information on calculations and operation, here), and the latter is the available solution from diyAudio. Both boards feature custom PCB layout, tailored for the available space I had for the head. In black boards, of course.

05_Soft-Start_Speaker-Protection.jpg

Assembled soft-start and speaker-protection PCB boards. Ok, minus a transistor and a diode.

06_4_Boards_1.jpg

07_4_Boards_2.jpg

Together with the preamp's turrets.
 
Last edited:
The 'Hyperion' - The Big Money: Power Amplifier

The main amplifier business. The power amplifier. The design. My design. The pinnacle of... ok, ok, you get it, the part I enjoyed the most. :D

The power amplifier required a lot of reading, search, thought and planning. Ultimately, you come to realize that there is no unique combination of topology and components to end up with a truly high-end device; and definitely there are a lot of personal opinions and preferences. Thus, as long as you have justified knowledge on the matter, go on with what you like. In the end, it is a personal creation, so first and foremost you have to enjoy it and smile with the final result. :thumbsup:

Moving forward to January 2019, the design was ready, the simulations complete, the PCB designs sent for manufacturing, and the components ordered. Then, everything started to arrive.
08_PCBs.jpg

PCB boards.

09_LEGO.jpg

The reservoir capacitors. LEGO figure (Dr. Kilroy) for scaling.

10_Heatsink.jpg

Power stage heatsink.

With all of the ingredients at the ready, board population begins!

11_Musical_PCB.jpg

Even this capacitor is musical!

12_Halfway_There.jpg

Hmm, it will definitely look the part when finished...

13_Powerfull_Eight.jpg

The powerful eight on place...

14_Locked_On.jpg

... and locked onto the heatsink.

16_Forgotten_Mica_Wafer.jpg

I am sorry little one for forgetting you; you now have your mica wafer, too!

I ordered multiple of the quantities of all transistors needed, so as to be able to pick the best matches. I measured and characterized all, and kept the ones that behaved the closest. This is most important for the differential pairs and the output devices, but was happy to have a better image of all semiconductors' characteristics and place the one that fitted the best to every place. Of course, you end up with a lot of transistors left, but you can always use them for feature builds or as spare parts. ;)

15_Zobel.jpg

A happy zobel inductance just formed!