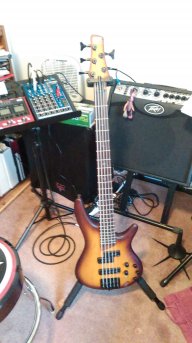
Back in 2011 as a freshman in college I bought my first (and so far only) bass. Over the years it has developed some nicks and scratches but it got some especially deep gouges when I started to slap. The matte finish developed some shiny spots as well. Right around Christmas I decided enough was enough and soon as it got warmer I would refinish the bass myself (still in college, still just as poor). This is what the bass looked like at the outset.


A quick search on ebay yields a couple of other SR500s with similarly dinged up finishes.


My SR500 bass has treated me very well and is quite versatile. It is light and the neck is thin which I like. I've been able to get the action pretty low without too much fret buzz so all in all I've been very pleased. While I'd like a new bass I simply don't have the budget so fixing the finish, the only obvious weakness, seemed like the best course of action.
Dis-assembly was rather straightforward except a couple of wires needed to be cut and the wires to the input jack needed to be desoldered from the jack in order to remove it. The wires to the pickups needed to be cut because they were soldered to terminals with many other wires attached. At the pickups the wires actually went inside and could not be disconnected. Pictures and wire labels were invaluable for putting it all back together smoothly.

I sanded the original finish off using 120 grit paper. By hand it took about two hours. I then prepped for stain using 220 grit paper followed by a vacuum and wipedown.

I taped off recess where I didn't want any stain or polyurethane getting into.

I did a couple of layers of "Red Sedona" stain using a staining pad.

After a complete 6 hour dry I taped off some stripes and scored the lines using a razor blade to stain a simple design. Scoring with the razor was absolutely necessary to minimize bleed. When in doubt use a piece of test wood.

Now comes the fun part. I used a polyurethane finish for ease of application, speed of dry, and durability of finish. I brushed on medium to medium light layers. let dry for 4-6 hours till there was no tack, then lightly sanded with 220 grit. This was repeated for 3 coats. I then started brushing on medium light to light coats, let dry for 4-5 hours and wetsanded with 400 grit. This was repeated for 3 more coats for 6 coats total. The final coat was not sanded. I'm trying to figure a way to do a final polish. Please comment if you have a suggestion. I also applied a couple of coats to the surface of the headstock. Pictured is after the 3rd coat and sanding.


I let a final 10 hour dry before reassembly.
During reassembly I realized that the pickup wire which I had cut actually was two wires running coaxially. I still maintain that cutting this wire was the only way to remove the pickup from the body as one end went inside of the pickup (could not be pulled out) and the other end was soldered to a potentiometer terminal with 4-6 other wires soldered to it. To reconnect this pickup wire I stripped and soldered each separately, making use of electrical tape and shrinkwrap to keep the two insulated from one another.

Final product:


Up close you can certainly tell that the job isn't professional but as they say in the automotive industry it is certainly a "3 foot job". The tone didn't change at all and I'm very pleased with the result! I let the finish cure 48 hours before playing and I'll probably wait a week before slapping.
Shopping list:
8oz Minwax Fast Drying Polyurethane clear gloss
8oz Minwax Wood Finish Sedona Red stain
8oz Minwax Wood Finish Jacobean stain
3M 4 pack of 120 grit
3M 4 pack of 220 grit
3m 4 pack of 400 grit
Natural bristle brush
Total cost was less than $30 dollars and I've got enough material left over do another guitar.
Total labor time was probably about 6 hours but this spanned almost 3 days due to dry time between coats. Take your time with this sort of project, the result is much better when you're not rushed.
If I were to do the project again I would do more coats of poly with more sanding in between. I also would have taped off and scored the stripes more carefully and slower to get sharper stain lines. Finally I'm looking for some tips and advice on doing a final polish to the poly. Please let me know if you have any ideas!
A quick search on ebay yields a couple of other SR500s with similarly dinged up finishes.
My SR500 bass has treated me very well and is quite versatile. It is light and the neck is thin which I like. I've been able to get the action pretty low without too much fret buzz so all in all I've been very pleased. While I'd like a new bass I simply don't have the budget so fixing the finish, the only obvious weakness, seemed like the best course of action.
Dis-assembly was rather straightforward except a couple of wires needed to be cut and the wires to the input jack needed to be desoldered from the jack in order to remove it. The wires to the pickups needed to be cut because they were soldered to terminals with many other wires attached. At the pickups the wires actually went inside and could not be disconnected. Pictures and wire labels were invaluable for putting it all back together smoothly.
I sanded the original finish off using 120 grit paper. By hand it took about two hours. I then prepped for stain using 220 grit paper followed by a vacuum and wipedown.
I taped off recess where I didn't want any stain or polyurethane getting into.
I did a couple of layers of "Red Sedona" stain using a staining pad.
After a complete 6 hour dry I taped off some stripes and scored the lines using a razor blade to stain a simple design. Scoring with the razor was absolutely necessary to minimize bleed. When in doubt use a piece of test wood.
Now comes the fun part. I used a polyurethane finish for ease of application, speed of dry, and durability of finish. I brushed on medium to medium light layers. let dry for 4-6 hours till there was no tack, then lightly sanded with 220 grit. This was repeated for 3 coats. I then started brushing on medium light to light coats, let dry for 4-5 hours and wetsanded with 400 grit. This was repeated for 3 more coats for 6 coats total. The final coat was not sanded. I'm trying to figure a way to do a final polish. Please comment if you have a suggestion. I also applied a couple of coats to the surface of the headstock. Pictured is after the 3rd coat and sanding.
I let a final 10 hour dry before reassembly.
During reassembly I realized that the pickup wire which I had cut actually was two wires running coaxially. I still maintain that cutting this wire was the only way to remove the pickup from the body as one end went inside of the pickup (could not be pulled out) and the other end was soldered to a potentiometer terminal with 4-6 other wires soldered to it. To reconnect this pickup wire I stripped and soldered each separately, making use of electrical tape and shrinkwrap to keep the two insulated from one another.
Final product:
Up close you can certainly tell that the job isn't professional but as they say in the automotive industry it is certainly a "3 foot job". The tone didn't change at all and I'm very pleased with the result! I let the finish cure 48 hours before playing and I'll probably wait a week before slapping.
Shopping list:
8oz Minwax Fast Drying Polyurethane clear gloss
8oz Minwax Wood Finish Sedona Red stain
8oz Minwax Wood Finish Jacobean stain
3M 4 pack of 120 grit
3M 4 pack of 220 grit
3m 4 pack of 400 grit
Natural bristle brush
Total cost was less than $30 dollars and I've got enough material left over do another guitar.
Total labor time was probably about 6 hours but this spanned almost 3 days due to dry time between coats. Take your time with this sort of project, the result is much better when you're not rushed.
If I were to do the project again I would do more coats of poly with more sanding in between. I also would have taped off and scored the stripes more carefully and slower to get sharper stain lines. Finally I'm looking for some tips and advice on doing a final polish to the poly. Please let me know if you have any ideas!