• TalkBass has been independent since 1998. Add your voice.
    Create a free account to reply to discussions, view embedded media, and browse with fewer display ads.
    Join freeLog in
    Want zero display ads or expanded classifieds tools? Compare plans.

New Build - Five String single cutaway fretless

The fretboard glue up went just ok. I think using a caul was not the right thing to do when the board already had a radius on it. I have a few gaps that I will have to fill, not a big deal, but I think with a different clamping strategy there would have been none/less. I didn't see any gaps when test fitting. Oh well, it should look ok after I fix the gaps. I did a bunch of sanding to bring the edge of the neck blank in with the edge of the fretboard. I didn't take any pictures of that, but there's not much to see there. Although the side markers are now crisp, even though the side is still mottled and not quite the contrast I was hoping for.

Plan A was to take that maple/cocobolo tower and mount it in my dad's lathe to make some knobs. I was impatient and I cut off the excess with my fret saw an hour or so after I glued it up. Obviously not enough time for it to dry and the tower broke in half as I was cutting it - but it broke in a good way so I still had two knobs on each stick.

Plan B: I drilled out a hole for the pot in the bottom of the lower knob, I figured I could stick a dowel in there and sand it into a circle in the drill press or maybe on the lathe. My dad wasn't home and the lathe had a different chuck in it. I am not sure how to change it, rather than figuring it out I figured I'd sand it in the drill press. It turns out that didn't work very well with these hard woods. The sandpaper really wasn't taking much off, and even if it was, the holding the sandpaper in my hand meant it wasn't sanding off material evenly.

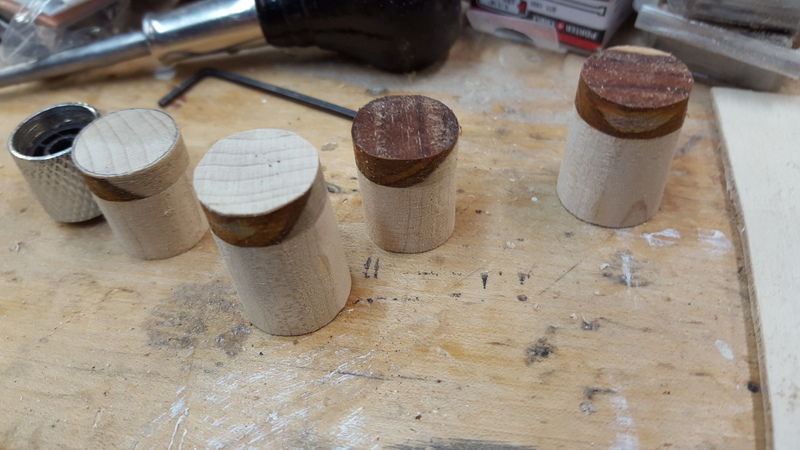
Plan C: I cut the knob blanks up so I had four individual knobs
20160313_143804_zpstr2fbbka.jpg


I drew the outline of a knob on the top then I used the oscillating drum sander to get them close and finished them off by hand. They are not perfect, but they look pretty cool with the cocobolo on top. I'll see how they look mounted and decide if I keep them or not. I think they will look good.
20160313_151034_zpsheelyw3z.jpg
 
I plan on coating this fretboard with CA, so I wanted to make sure there were no high spots before I coated the board. I remounted the bridge with all the screws in this time and strung up all five strings to tension. I found one minor high spot around the octave on the E string, I took care of it with some light sanding.
20160316_134111_zpsbe2cw13o.jpg


The neck is as thin as I dared make it - with about 3/16" behind the truss rod and a relatively flat profile, there isn't much in the way of material on the shoulders. It's looked so thin before I put the fretboard on, really kind of freaky, I was a bit worried about the string tension just destroying the neck (I know irrational, but I have those thoughts!). After mounting the fretboard it looks relatively normal from a thickness perspective, but I wasn't sure how strong it would be - with the strings up to tension it barely has any bow to it at all - I didn't do it now, but I might have to induce some bow with the truss rod, of course that might change as it settles in.

I need to do a bit of sanding overall on the fingerboard to remove some scratches from the radiusing effort, I fixed some of the small gaps between the fretboard and the neck as well. I'll spend the rest of the week assessing, marking and fixing minor issues then hopefully CA this weekend and the beginning of the finishing process probably next weekend.
 
The head is a bit bulky for me but it's ok.

Yeah, I'm staring at that headstock too. I am trying to come up with a logo that is both interesting and easily replicated, that real estate up top is where the logo would go, if I had one. I don't know if that would make it look better or not. I hate to stop this build so I can make a logo, but I may have to do that. I am considering what to do up there though (including the idea of doing nothing).

Thanks for the feedback.
 
I guess not a complete waste of time, but close. I have drawn this out many times thinking it would look cool. It looks ok, but I'm not going to inlay it into this instrument. I built it all with CA glue, quite a pain, but I managed to not stick my fingers together too many times, so that's a plus.

20160318_192010_zpsmq9eizst.jpg
 
I'm really struggling to find something I like for a "logo". I want something that is simple and easy to replicate, and looks cool. I seem to be in the "pick any two" area. I thought this would look really cool, it doesn't. Back to the drawing board. I'm going to try an inlay using laminates in a circle next. After going around and around with initials, I don't see anything that makes sense in that area either.

20160320_151551_zpswvw9xuzm.jpg


20160320_151607_zps6dink4w8.jpg
 
I guess not a complete waste of time, but close. I have drawn this out many times thinking it would look cool. It looks ok, but I'm not going to inlay it into this instrument. I built it all with CA glue, quite a pain, but I managed to not stick my fingers together too many times, so that's a plus.

20160318_192010_zpsmq9eizst.jpg

I like this one much better than what you just posted.
 
CA-ing the fretboard was incredibly easy to do. I procrastinated doing this, worried it wouldn't come out good. It looks awesome. I know I could polish this to a lot higher sheen (I have a 2x4 I used as a test that I polished to glass-like levels), but I think I'm going to leave it at this luster for now. There are a few minor "pits" in the finish, I think I might just go over those spots with glue and then sand it down again. Dried CA sands really nicely. I did 4-5 thin coats then I did two very thick coats, I hit each coat with the activator, which made the surface rock hard almost immediately. I sanded between coats with 220 sandpaper. The fumes weren't nearly as bad as I thought they would be - but I was operating in a cool garage with lots of air volume. I finished it sanding with 320 then 0000 steel wool and finally a piece of jean material. The glass-like finish on the 2x4 was done with a final round of 1500 grit.

20160328_122655_zpswmfmbsbe.jpg


I guess I can move on to the tung oil finish.
 

Latest posts