
Enjoy the benefits of a premium membership!
Upgrade Account
-
TalkBass has been independent since 1998. Add your voice.
Create a free account to reply to discussions, view embedded media, and browse with fewer display ads.
Join free Log in
Want zero display ads or expanded classifieds tools? Compare plans.
You are using an out of date browser. It may not display this or other websites correctly.
You should upgrade or use an alternative browser.
You should upgrade or use an alternative browser.
New Build - Five String single cutaway fretless
- Thread starter Jisch
- Start date
More options
Who Replied?

I was having trouble getting pictures up from my phone, back at the computer now.
Pickup routes marked out - I ended up drilling them then using a chisel to finish them off, some work needed, but it came out decent.

Control cavity, I probably didn't go deep enough, will need to adjust:

Pickups with wires run through the body, some adjustment needed (edit - I know these pickups look crooked in the picture, it's the camera angle. I was trying to figure out how to fix this (before checking the bass) and after looking and measuring they aren't crooked):

And headstock laminate glued on, surprise reveal later tonight :-D

Pickup routes marked out - I ended up drilling them then using a chisel to finish them off, some work needed, but it came out decent.
Control cavity, I probably didn't go deep enough, will need to adjust:
Pickups with wires run through the body, some adjustment needed (edit - I know these pickups look crooked in the picture, it's the camera angle. I was trying to figure out how to fix this (before checking the bass) and after looking and measuring they aren't crooked):
And headstock laminate glued on, surprise reveal later tonight :-D
Last edited:
Side dots installed, I'll do a final clean up once it's glued to the neck. I kinda wish the white part of this fretboard was really white, it's pretty mottled.

I was able to sand away the skip in the control cavity (I forgot to mention that before).
I got the headstock laminate glued up. Cutting this piece of cocobolo out of the board I had means that it's going to be tough to get another neck out of it, but you only live once, you might as well have a matching headstock.

I got the headstock laminate glued up. Cutting this piece of cocobolo out of the board I had means that it's going to be tough to get another neck out of it, but you only live once, you might as well have a matching headstock.

Mostly clean up today.
I cleaned up the pickup holes and drilled new wireways to the control cavity. I had run a router down the wing to create a wireway before glue up, but it ends up that it's in a bad spot for where the wires come out of these pickups. I also cleaned up the neck to body transition a bit (no pics)
I added a little more curve to and took out a bunch of material from the body indent with a scraper (my favorite tool on this build). I might take a bit more, the more I take out, the more the woods dance around with each other - this is the beauty of a laminate bass like this, I might as well accentuate it:

I cleaned out the control cavity and routed it to the proper depth.

Partially due to miscalculation and partially because the body is really small, I had to cram the to lowest potentiometers under the cavity route. I actually didn't know it looked this rough until looking at the picture, I'll clean it up a bit. Right now both pots fit in there fine, it just looks kind of janky.

And finally I cleaned up the headstock veneer, the glue up looks good with no gaps. I think I will try making the nut out of this same wood (soaked in CA) so that line between the dark and light is not interrupted.

I guess that will be it for this weekend, I need to get some honey do's knocked off the list.
I cleaned up the pickup holes and drilled new wireways to the control cavity. I had run a router down the wing to create a wireway before glue up, but it ends up that it's in a bad spot for where the wires come out of these pickups. I also cleaned up the neck to body transition a bit (no pics)
I added a little more curve to and took out a bunch of material from the body indent with a scraper (my favorite tool on this build). I might take a bit more, the more I take out, the more the woods dance around with each other - this is the beauty of a laminate bass like this, I might as well accentuate it:
I cleaned out the control cavity and routed it to the proper depth.
Partially due to miscalculation and partially because the body is really small, I had to cram the to lowest potentiometers under the cavity route. I actually didn't know it looked this rough until looking at the picture, I'll clean it up a bit. Right now both pots fit in there fine, it just looks kind of janky.
And finally I cleaned up the headstock veneer, the glue up looks good with no gaps. I think I will try making the nut out of this same wood (soaked in CA) so that line between the dark and light is not interrupted.
I guess that will be it for this weekend, I need to get some honey do's knocked off the list.
I basscrastinated what I should have been doing and finished up the control cavity cover.
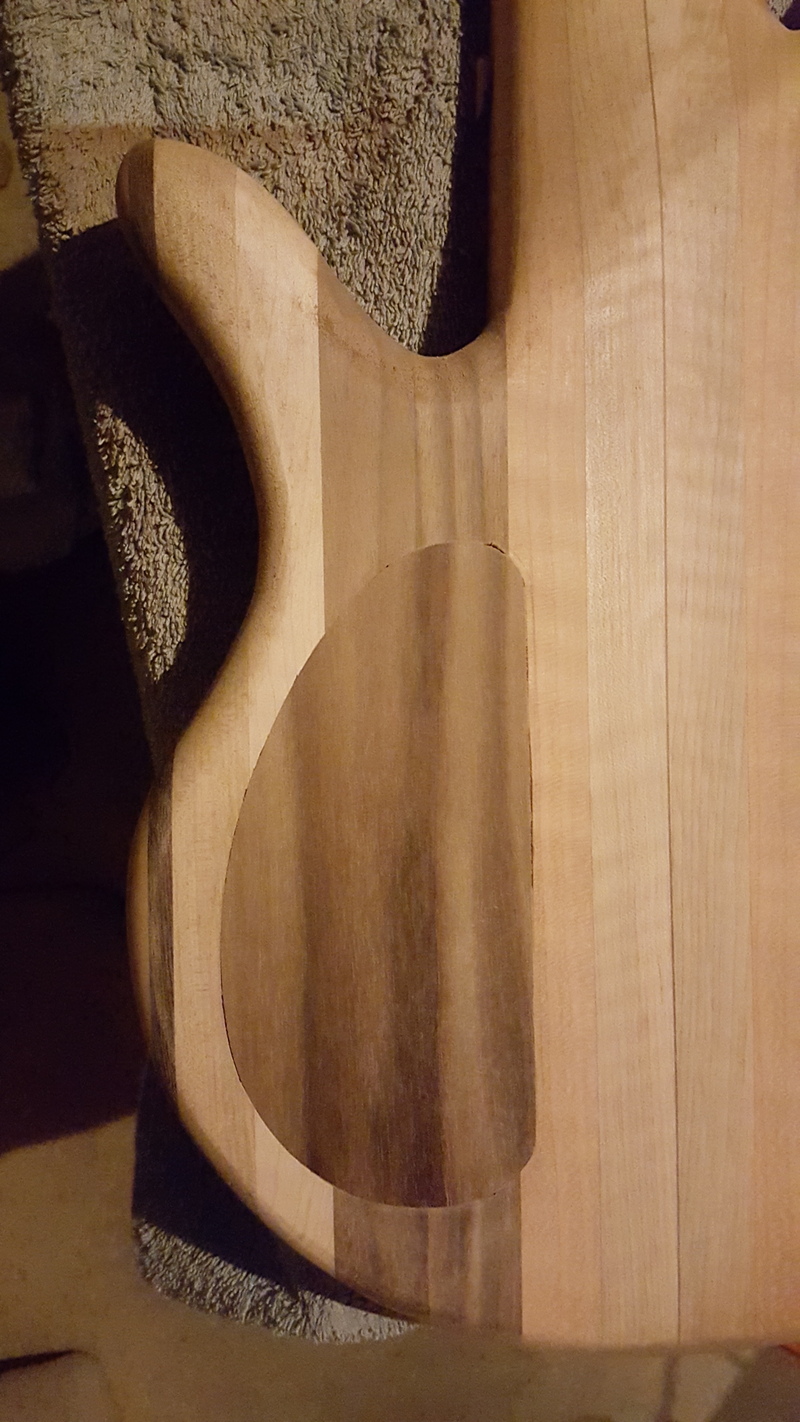
I think I will try making the nut out of this same wood (soaked in CA) so that line between the dark and light is not interrupted.
Great idea!
This morning I was idly fiddling with the new bass and picked up a tuner for some reason. I quickly came to the conclusion that the headstock was too thick. I can't explain this really, except that I can never remember measuring anything for the headstock. Lapse in judgement? Assumption? I don't know.
I considered using the orbital sander to thickness plane, knowing that would give me a less than perfect outcome that I would have to fix using a scraper, which made my hands ache (I've been using scrapers a lot lately).
I decided that a router sled was the best option, despite the potential pitfalls.
I rested the body of the bass on my workbench and clamped the neck down against the workmate, leaving the headstock flush against the top of the workmate.

I clamped two pieces of wood (nice ash!) to the sides. I was ready to go, but then as I did a test run with the bit up off the surface, I realized that there was a good chance of the base of the router dipping in as I went across if I wasn't careful, it's too late in the game for those chances. I saw the template for my pickup cover on the workbench and employed that as the sled under the router base. I worked really well, although I had to readjust the template a few times to get to the whole headstock.


I've got a lot more scraping to do, and now I have to reshape that transition into the volute, but it's getting there.
I considered using the orbital sander to thickness plane, knowing that would give me a less than perfect outcome that I would have to fix using a scraper, which made my hands ache (I've been using scrapers a lot lately).
I decided that a router sled was the best option, despite the potential pitfalls.
I rested the body of the bass on my workbench and clamped the neck down against the workmate, leaving the headstock flush against the top of the workmate.
I clamped two pieces of wood (nice ash!) to the sides. I was ready to go, but then as I did a test run with the bit up off the surface, I realized that there was a good chance of the base of the router dipping in as I went across if I wasn't careful, it's too late in the game for those chances. I saw the template for my pickup cover on the workbench and employed that as the sled under the router base. I worked really well, although I had to readjust the template a few times to get to the whole headstock.
I've got a lot more scraping to do, and now I have to reshape that transition into the volute, but it's getting there.
I've struggled with this volute, I have drawn, erased and redrawn it many times. Once I got the lines right I started carving only to lose my direction once the lines were gone. I haven't really pushed it figuring it would come eventually. This morning I suddenly saw exactly what I wanted to do and the execution went pretty quick. I used a combination of dremel with a sanding cylinder and the ever present scrapers. I still have more work to do, but at least it's more than a blob.

This is probably harder to see, but I've been working on the curves everywhere on this bass - most prominently on the body indent. It's getting really swoopy. I don't know where I'll stop here (maybe when I hit the chambering :-D).

This is probably harder to see, but I've been working on the curves everywhere on this bass - most prominently on the body indent. It's getting really swoopy. I don't know where I'll stop here (maybe when I hit the chambering :-D).
I started working on the nut, I want to get the slots cut before I mark the holes for the tuners, just to be sure everything lands in the right place. Unfortunately the line between the two colors of wood is at a pretty severe angle when you look at it from the side, I might have to stack wood instead to get a cleaner line, but the truss rod cover should work in my favor. I'll make a stacked one and see how that looks.


thanks! I think I will be coating it with CA glue to protect it, a friend just did that with a maple finger board, it looks and feels great. He didn't buff it out (which I wouldn't do either).
I got the bridge mounted and I put some strings on the two outside and middle positions to check the spacing, height and make sure the adjustment of the saddles was within range (I've had issues with bottoming out bridges before). I also wanted to make sure the pickups holes were routed deep enough. The instructions with the pickups say they have to be within a few millimeters of the strings when a string is fretted at the 21st fret.
All systems go.

A black nut doesn't look half bad, I might go this route (it's a bit skewed in the picture).

All systems go.
A black nut doesn't look half bad, I might go this route (it's a bit skewed in the picture).
I hate to comment on my own post, but just looking at those pictures has me excited to finish this beast. I have some work travel this week, so things will slow down a bit, but I should have it ready to play in 2-3 weeks or so.

Understandable, this is coming out *really* nice. That fingerboard is amazing.
Latest posts
-

-
 Bleeding/Crosstalk of a Soundcraft UI24r digital mixing console?
- Latest: kittywithabanjo
-

-

-