• TalkBass has been independent since 1998. Add your voice.
    Create a free account to reply to discussions, view embedded media, and browse with fewer display ads.
    Join freeLog in
    Want zero display ads or expanded classifieds tools? Compare plans.

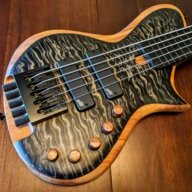
Off with its head! 6-string headless conversion/parts build

I applaud your effort to color match. I probably would have painted it black and called it good.
Yeah, I know it's a risky choice for a number of reasons. With the quality of the maple top, I wouldn't ever go solid color, just feels sacrilegious :D. I did some Photoshop mock-ups with the spot on the body black and didn't like it.

I was gonna (and still might have to :nailbiting:) take the whole thing back to bare wood and refinish with an amber. I decided to try to patch it up cause the existing finish is really nice, and cause I've never done it before. It seemed like an opportunity to learn and if it went horribly wrong I can always bail and blast it all off :rolleyes:
 
A little more sanding and I'm trying again. First a light undercoat of orange.
Polish_20201007_174227195.jpg


Then red

Polish_20201007_174251679.jpg


And its matching well (though it did that the first time...:D)

Flattened the head out and shot some more aerosol clear.

Polish_20201007_174336699.jpg


And things are looking promising...
 
I pulled the masking off this morning and I once again have a spot that, if I can get it to stick, should blend pretty well with gloss over it...

Polish_20201008_081316252.jpg


I think I'm gonna re-tape and leave 1/4" around the finish patch. I'll lightly sand it to add texture and hopefully promote adhesion. Not now though, gotta do the adulting thing and make sure my bills are paid :smug:
 
The wipe-on is sticking really well, but after multiple coats it's clear (pun intended :smug:) that I won't get the build I need to match the thickness of the origin finish. This morning I scuffed it up in preparation for spraying to start this afternoon. I think/hope it will work out this time. All color is sealed, there is a decent texture for new coats to stick to, and I won't be adding anything but clear poly from here on out. I will also take more care and score around the edges when next I pull the tape.

Polish_20201009_074253441.jpg


Color still looks good :thumbsup:
 
Last edited:
The neck is out of masking and looking pretty good :thumbsup:

There were some tiny issues but I was able to pretty easily address them. Pulling the tape pulled up a tiny bit of poly under the bass side edge of the nut. I just took a tiny brush and put a drop of wipe on gloss and it filled it right it. There was also a little ledge of poly around the edges so I very carefully scraped it off with a razor blade (which was nerve racking but worked well). The finish on the back is still good too so its ready to sit until it doesn't smell like poly anymore and can get the final polish.

Polish_20201011_114305763.jpg
Polish_20201011_114329165.jpg


The body continues to get clear built up. It's getting close to the same thickness as the original. There will be a tiny outline around the spot, it's unavoidable. Its the amber under the red from the burst. If this were solid trans red (or amber) I think I could make this invisible. It will be really minor and only noticeable up close so I'm just gonna accept it (this is all contingent on this 2nd round of clear adhering of course :D)

Polish_20201011_114355870.jpg
 
Despite my inability to not think about (and buy stuff :smug:) for the next project, I am still working on this one :thumbsup:

I had an issue with a can of clear that started spitting. Instead of stopping, letting it cure, flattening, and using the other can, I tried to just lay a bit more on right then...

... and got a big run :banghead:

Polish_20201018_110440299.jpg


This is totally my fault, and I'm fixing it.

The neck is still in good shape and probably needs another week of curing before polish.
 
Although it's highly tempting... I recommend you not take tips from @Fat Freddy 's 'Fficial Fated Finishing Folio. :smug:
I know impatience was the cause if the issue, so I'm forcing myself to not make the same mistake while fixing it :D

I got the run mostly taken care of without burning through. Some of the thickest spots still need cure time so I have to give it a few day before the final touches and spraying again.
 
Despite my inability to not think about (and buy stuff :smug:) for the next project, I am still working on this one :thumbsup:

I had an issue with a can of clear that started spitting. Instead of stopping, letting it cure, flattening, and using the other can, I tried to just lay a bit more on right then...

... and got a big run :banghead:

View attachment 4022028

This is totally my fault, and I'm fixing it.

The neck is still in good shape and probably needs another week of curing before polish.
Brush on formula Solarez "I can't believe it's not lacquer" would solve the rattlecan issue.
And you can build up many coats in hours rather than weeks.
I'm just saying...
Also don't feel bad, I have 5 projects started...
 
Brush on formula Solarez "I can't believe it's not lacquer" would solve the rattlecan issue.
And you can build up many coats in hours rather than weeks.
I'm just saying...
Also don't feel bad, I have 5 projects started...
I've been looking at that. Including your P-bass project (which was super helpful BTW). If I had any concern for this application its that there is going to be an unavoidable overlap with the existing finish, any insights if the solarez can go on over a polyurethane or polyester finish? If I have to backpedal on this again I might go that way. A bottle would leave plenty for future projects.
 
  • Like
Reactions: /\/\3phist0
I've been looking at that. Including your P-bass project (which was super helpful BTW). If I had any concern for this application its that there is going to be an unavoidable overlap with the existing finish, any insights if the solarez can go on over a polyurethane or polyester finish? If I have to backpedal on this again I might go that way. A bottle would leave plenty for future projects.
I don't yet know about long term. But is sticks to enamel, and poly that I had as a test piece, like any over cover the more surface area to cling to, the better. In other words scuff down with no higher that 320 .
Give it enough time to Settle inside I would not forsee issues. Assuming that substrate is fully cured and solidified itself , and shrinkage is always still a possibility.
 
Last edited:
  • Like
Reactions: Reedt2000
Quick update (or non-update as it happens to be... :rolleyes:)

A surprise hot water heater failure has put the breaks on any plans I had to work on bass projects, of which there are now several built up. Gotta polish the neck on this one and pick back up shooting the body, bought a preamp and piezo for my bass uke, got a great deal on a set of gold Gotoh tuners which will be replacing the black ones on my Ken Smith (why they were changed to black while the bridge is gold I'll never know, thankfully the bridge is original. If it had a non-smith bridge I probably wouldn't have bought it, or at least not for as much as I did :D). The black tuners work fine and will be put in the pile for my next build project... which I still have to finish designing :cool:

After the week's excitement (put a new heater in, but couldn't skip work much so it had to be in my spare time) I'm in no frame of mind to do anything other than finishing the cleanup from the heater install.

I did get to gig last night which was cool, a nice distraction from recent stressors.

122337514_1751489445003326_1563015281890940657_o.jpg


Hopefully this week will be more mellow and progress can get going again :D
 
Last edited:
I am a fan of your thread! Would you mind letting me know where did you buy those tuner locks? They look great!

Thanks!

They came from Technology for Musicians:

Technology for Musicians, CNC liutherie, designs electric guitar and manufactures aluminum bridges and accessories for headless guitars.

I found out about them from @FretsAreFor

He used them in this build and did a review thread:

Special Edition Build-Off: Azshara

T4M (Technology for Musicians) headless hardware review

They are cool, were immediately available, and were a little less expensive than other options.

Having to use two wood screws (one holding the base plate down, then one through the string clamp and the plate) seems to defeat the purpose of the design a bit. I wish both screws held the clamp itself to the head, but indications are it should function just fine (gotta ask FretsAreFor, his have been under tension for quite a while now, mine have yet to see functional strings :D)
 
Last edited:
Having to use two wood screws (one holding the base plate down, then one through the string clamp and the plate) seems to defeat the purpose of the design a bit. I wish both screws held the clamp itself to the head, but indications are it should function just fine (gotta ask FretsAreFor, his have been under tension for quite a while now, mine have yet to see functional strings :D)

Agreed, the string retainers are not perfect, but even the design flaw is trivial in practice. You're not really abusing the headpieces, just adapting.

I've been using the bass daily for months now, and am still a huge fan of the T4M hardware. They hold tuning just as well as any other tuner, and are a delight to use and adjust. I will be using them exclusively on new projects until something significantly better comes along. My other two basses -- one Hipshot headless, one clover-style headstock-mounted tuners -- feel like downgrades.
 
I did get to gig last night which was cool, a nice distraction from recent stressors.
Neat for a gig.
Though, I saw the top of the Gazebo while reading your post about the water heater replacement and thought the picture was going to be a neat home you built around your new water tank. :(

Still neat gig and good luck on the rest of the building. :thumbsup:

My expectations on all you builders adding flair to things is too high I guess. :sorry:

:D
 
Started what I hope is the home stretch with this project today. Gave the body touch up spot a light level/scuff and got back to spraying clear. It's my expectation that the coats I put on today will be the final ones. (Though I've expected that before... :smug:). In between todays 1st and 2nd coats I leveled and buffed the head-nub

Polish_20201121_132601801.jpg


Happily this has gone from a process that once scared the living poppie outta me :nailbiting:, to one that now just gives me a mild case of the heebie-jeebies :D after successfully completing it a few times :cool:
 
Got the tape off pretty successfully!

It doesn't seem to have the adhesion issue it did the first time either :D

Polish_20201123_183035557.jpg


There is an area around the cut out where the new clear gloss is proud of the original surface. The plan is to carefully wet sand that away, blending the two and smoothing away the hard delineation between them. Gotta wait probably a couple weeks for it to fully cure before the attempt. If I can make that work, the color match is pretty good, should look cool :thumbsup:

If not, well... let's not think about that :smug:
 
Last edited: