• TalkBass has been independent since 1998. Add your voice.
    Create a free account to reply to discussions, view embedded media, and browse with fewer display ads.
    Join freeLog in
    Want zero display ads or expanded classifieds tools? Compare plans.

"Painted With Fire" Finish?

Finally decided to take the plunge and work on my own guitar, using a cheap $60 eBay kit as a starting point.

I have very little experience with woodwork or anything like that aside from some DIY stuff around the house.

First thing I noticed is that the wood felt "fuzzy," and I picked up some sandpaper. I took off most of it with some 220 grit, did some filler, and I then sanded with 320...feel really smooth now, but there a few places where the grain sort of shifts (in the cutaway) where I've into a little issue...mostly remedied.

In any case, I really liked the "painted with fire" finish used by Copeland Guitars. I've seen a few burned finishes, but he just gets a real deep, satin look I haven't seen anyone else replicate. Given the wear in the 3rd pic, I'd imagine it's burned/stained and then oil-finished.

The telecaster body I have is mahogany, so I thought its tighter grain pattern might work well for this, but I am concerned that the 3-piece body might separate with the heat of a blowtorch, and that the filler might burn a bit too much.

Any recommendations on how I could go about this or get a similar look? I really like the way the finish wears and develops its patina.
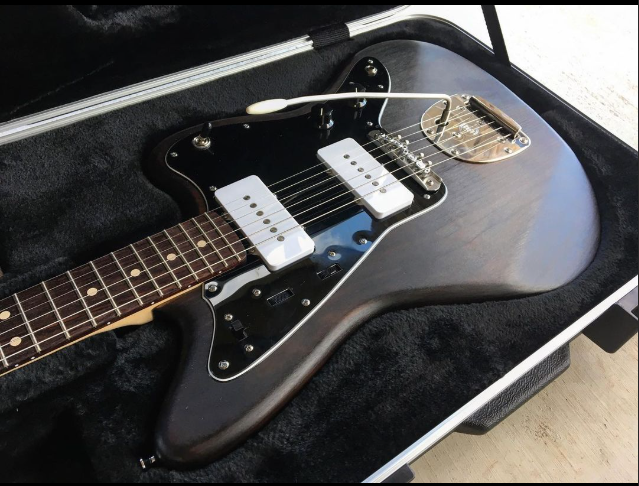
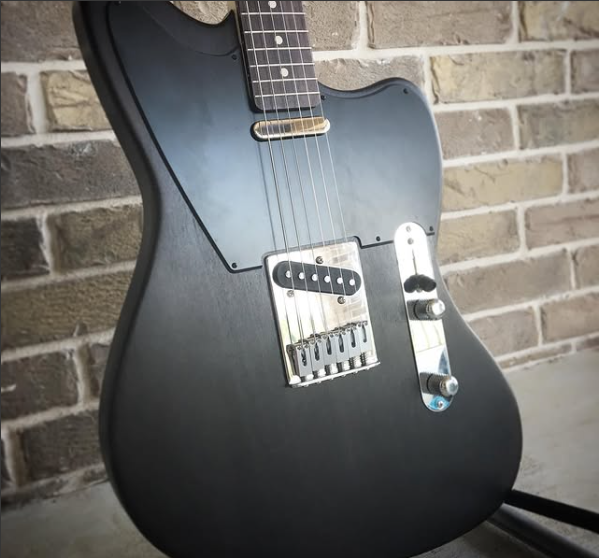
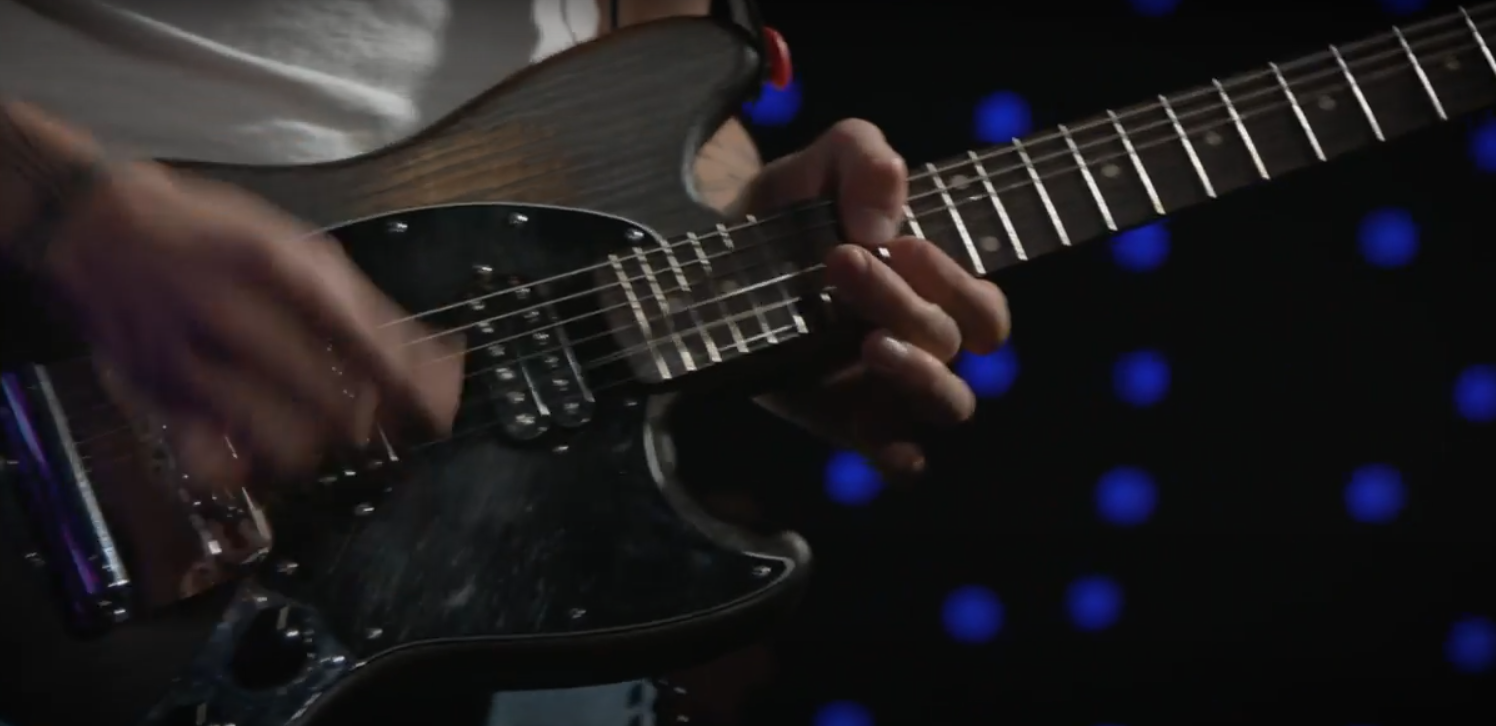
Burnt Finish.PNG


gtr3.PNG
gtr2.PNG
 
Well, step zero would be to get some wood, any wood and practice.

Step one would be to get some mahogany, glue it up, sand and filler, and practice.

Step two would be repeat until you are happy with the results.

Only then move on to your bass.

Be aware that flame processing tends to be a bit of nothing happening followed by things happening too fast, so go cautiously.
 
Finally decided to take the plunge and work on my own guitar, using a cheap $60 eBay kit as a starting point.

I have very little experience with woodwork or anything like that aside from some DIY stuff around the house.

First thing I noticed is that the wood felt "fuzzy," and I picked up some sandpaper. I took off most of it with some 220 grit, did some filler, and I then sanded with 320...feel really smooth now, but there a few places where the grain sort of shifts (in the cutaway) where I've into a little issue...mostly remedied.

In any case, I really liked the "painted with fire" finish used by Copeland Guitars. I've seen a few burned finishes, but he just gets a real deep, satin look I haven't seen anyone else replicate. Given the wear in the 3rd pic, I'd imagine it's burned/stained and then oil-finished.

The telecaster body I have is mahogany, so I thought its tighter grain pattern might work well for this, but I am concerned that the 3-piece body might separate with the heat of a blowtorch, and that the filler might burn a bit too much.

Any recommendations on how I could go about this or get a similar look? I really like the way the finish wears and develops its patina.



View attachment 7122648

View attachment 7122649View attachment 7122650

I've used India Ink, directly on bare Fijian/Honduras Mahogany, with pretty good results.
After a couple years, it's wearing slightly in the heavy contact areas, but I kinda like that look;

20240715_165614.jpg
 
I've used India Ink, directly on bare Fijian/Honduras Mahogany, with pretty good results.
After a couple years, it's wearing slightly in the heavy contact areas, but I kinda like that look;

View attachment 7122740

That's pretty close to what I would be after. That looks great.

What was your process with that, if you don't mind my asking? Did you finish with any oils? Any issues with the ink coming off onto other things? The application is all really clean as well.

A lot of this whole thing seems to be as much science as it is art.
 
That's pretty close to what I would be after. That looks great.

What was your process with that, if you don't mind my asking? Did you finish with any oils? Any issues with the ink coming off onto other things? The application is all really clean as well.

A lot of this whole thing seems to be as much science as it is art.

Thanks! :)
I haven't noticed it wearing off on my hands or arms, so what has worn away, happened very gradually.
The bare body had only been sanded with 220, about a year before I applied the ink.
I originally wanted to have a bare mahogany guitar, but....
It was showing signs of skin contact, which I didn't like, basically where the worn areas are now, so I'm not sure if that was a prep issue, or just the wear and tear.
I applied the ink just like a stain, liberally, and then wiping it off quickly. I did the edge perimeter in sections, then the back, and the front last,
working as quick as I could before it began to dry...and it dries pretty quick.
I did have to re-wet a couple spots that looked splotchy, and blend it back in, very similar to some PITA stains, if you know what I mean.
That's it, just one coat of ink on mahogany. It does seem to have sealed it a little bit.

I used Speedball Super Black, because I had read it was the best. It took about 3/4 of 2 oz. bottle.
And you'll probably want to wear some latex gloves ;)

I did learn that a bare wood body is very difficult to keep looking clean and sharp,
no chips, no fries, no hamburgers, no BBQ, no anything! Just lots of hand washing :woot:
 
Finally decided to take the plunge and work on my own guitar, using a cheap $60 eBay kit as a starting point.

I have very little experience with woodwork or anything like that aside from some DIY stuff around the house.

First thing I noticed is that the wood felt "fuzzy," and I picked up some sandpaper. I took off most of it with some 220 grit, did some filler, and I then sanded with 320...feel really smooth now, but there a few places where the grain sort of shifts (in the cutaway) where I've into a little issue...mostly remedied.

In any case, I really liked the "painted with fire" finish used by Copeland Guitars. I've seen a few burned finishes, but he just gets a real deep, satin look I haven't seen anyone else replicate. Given the wear in the 3rd pic, I'd imagine it's burned/stained and then oil-finished.

The telecaster body I have is mahogany, so I thought its tighter grain pattern might work well for this, but I am concerned that the 3-piece body might separate with the heat of a blowtorch, and that the filler might burn a bit too much.

Any recommendations on how I could go about this or get a similar look? I really like the way the finish wears and develops its patina.


View attachment 7122648

View attachment 7122649View attachment 7122650

Is that really done with actual fire? I don't think so. It looks like what I call a "rub through" finish, not difficult to do. It's a multi-layer finish, starting with a dark grain fill, and then several shades of transparent color coats. The different layers are hand sanded partially through, making them uneven and blotchy. The overall effect is to make the wood look old and distressed, or even burned. Then it's got a few clear coats on top, which are scrubbed to a satin sheen. The technique can be done by spraying or brushing or wiping.

Here's one of my Scroll Basses that I finished last year in Tobacco Sunburst, using that same general technique of rubbing through the layers. This is a poplar body.

IMG_0425B.jpg


I filled the grain of the poplar by brushing on a coat of West Systems epoxy, tinted with a reddish-brown pigment.......

IMG_0439B.jpg


Then the epoxy is sanded back, but not fully. It leaves patches and streaks of various shades of brown, which adds that old distressed look.....

IMG_0672B.jpg


Then I sprayed on five coats of polyurethane, tinted lightly with a light golden-tan pigment. These are transparent color coats. I also sanded them a little bit between coats, to add a little more patchiness......

IMG_0675B.jpg


After I got the surfaces to the look I wanted, I sprayed opaque black poly around the perimeter, for that classic Tobacco Sunburst look.....

IMG_0722B.jpg


Then it got about 6 coats of clear, and was level-sanded and buffed out to a full gloss.

You could use a process similar to this to get that "Burnt" look. Darker overall in the transparent coats, and scrubbing the clear top coats to a satin sheen with #0000 steel wool.
 
Shou sugi ban is a really cool technique. Good luck.

Is Copeland still building? He did some cool guitars.

I don't think so, unfortunately, or at least not currently. I had e-mailed him, but I never got a reply. I ended up reaching out to the singer/guitarist from PAWS that Copeland had built the above-pictured Mustang for just to learn more about it and he linked me to Copeland.

He built a really nice Tele with a Bigsby for Scott Hutchison of Frightened Rabbit, as well as some cool Jazzmasters.
 
  • Like
Reactions: Killing Floor
Looks pretty straightforward---like the dude above said, " practice on a piece first."


Thanks for sharing that, and practice would be a given!

The only thing giving me pause is the 3-piece body, as I have no idea which types of adhesives were used and how they may react to the heat of the blowtorch. I may just risk it with a second build since the kit I purchased is very cheap, but I really want to make this first build work and learn from the overall process.

With this in mind, I'm leaning towards trying the technique with India ink that @eddybuzzard used, as it looks to provide the type of outcome I'm looking for without the potential of causing the body to separate at its seams.

Hardest part is having patience. I'm enjoying the process, but difficult to stay away from it due to a 9-5 and outside responsibilities.
 
Last edited:
  • Like
Reactions: Pyrrho Epoche
I did this to an ash body with some pretty cool results but it took A LOT of back and forth to make it look even and a couple thin spots like the corners of the neck pocket actually caught fire (which didn’t happen on the practice body.. it’s always something..) so a lot of cleanup happened afterwards.. the only thing that made it worth it for me was the way it made the grain look once I used a wire brush to clean the “char” out of the grain
IMG_3830.jpeg
IMG_4561.jpeg
IMG_4560.jpeg
IMG_4676.jpeg
the grain just got really pronounced but outside of that I didn’t really see much else and too much more it would have been fire wood.. guitar isn’t done yet but you get the idea
 
If anyone's interested in the correct pronunciation of the Japanese technique.


The kanji「焼」or yaki by the indigenous Japanese pronunciation is read as shou in the Japanese pronunciation of the original Chinese pronunciation, also written as xiao in modern Mandarin Pinyin. Then「板」or ita by the indigenous Japanese pronunciation is read as ban in the Japanese pronunciation of the original Chinese pronunciation, similar to ban in modern Mandarin Pinyin. So somewhere along the line, most likely an academic (due to the less-often used compound 3-kanji word) mistakenly read 「焼杉板」 as shousugiban instead of the correct yakisugi-ita, or more commonly used yakisugi. In other words the mistake a foreigner made was to read the compound kanji with a mixture of Chinese and Japanese pronunciations, instead of only the Japanese pronunciation that every Japanese person is familiar with.