• TalkBass has been independent since 1998. Add your voice.
    Create a free account to reply to discussions, view embedded media, and browse with fewer display ads.
    Join freeLog in
    Want zero display ads or expanded classifieds tools? Compare plans.

Pin Routers: The Old-School Production Workhorses

I'm sure Bruce will cover this very thoroughly. But, templates and fixtures can be attached by various methods. Double stick tape works just fine for most hobbyists, but that is slow in a production setting. Many production shops use a vacuum pump along with vacuum gasket tape. The part is simply "sucked" to the template and held very securely. Often times, handles will be mounted to give a firm grip and to keep hands well away from danger. :D

Roscoe basses has a number of videos posted which show some of their fixtures which use vacuum.


Yes, thank you for posting that! You saved me a whole lot of writing. That's great quick video showing a pin router in action, using a good production-level fixture. He's routing the perimeter of a body with a straight cut, in three passes of depth.

See how he works the spindle with the foot pedal, as I described a couple of posts above. Pressing the pedal pneumatically lowers the spindle to a depth set by the indexing depth stop up on the head. He routs all the way around, hits the pedal again, and the spindle raises up. Clicks the depth stop to the next position, taps the pedal, spindle goes down to the next depth. Repeat. That's the basic operating sequence of a pin router.

Notice how the fixture is big and flat and the operator is sliding it around on the table using the handles at the outer edges. It slides around easily, but you have to be careful. Making the fixture somewhat heavy with outboard handles helps him keep it under control and resist the torque of the cutting. There's some serious horsepower turning that bit. If it grabs and digs in, it's going to try to spin the fixture around. And maybe take you with it. That's where things go flying and people get hurt.

He doesn't show the details of how the fixture is made, but the top surface has routed grooves and seals in the shape of the body, along with some kind of marks or pins to align it. The red rubber hose connected to the back of the fixture goes to a vacuum pump, and he has a switch somewhere to turn it on and off. If the fixture is made well, the vacuum will hold the body blank in place very tightly. It will release and re-clamp in a couple of seconds. Vacuum hold-down systems are very popular with pin routers and CNC machines. My buddy Rob Allen, right down the hall, uses vacuum fixtures for most hold-down operations in his CNC machine.

There are many other ways to clamp down the workpiece. A classic in factories 50 years ago is to use De-Sta-Co style toggle clamps. These are made in many designs and sizes. The lever snaps it closed or opens it up in a second. They are commonly used on industrial fixtures. I have several boxes of them that I picked up at surplus stores for cheap.

You can also make your own wooden hold-down clamps with bolts and wing-nuts. And there's always screws and pins. Most of my collar-routing fixtures and templates are aligned on the workpieces with 1/8" steel dowel pins. In some places, I use flat-head machine screws going down through extra waste areas of the workpiece, threading into T-nuts in the fixture.

And, yes, you can use double-sided tape for one-off jobs. But you need to be careful. Use good tape, plenty, and widely spaced. There's a lot of torque trying to kick that workpiece around in all directions. Tape can creep out of position under side load, which can ruin your part.

That's the top side of the fixture. You need to figure out some way to clamp the blank down, solidly and repeatably.

The bottom side of the fixture, which you can't see in the video, has the pattern. It's probably 3/4" MDF, cut to the actual size and shape of the body outline. It has to be aligned accurately to the workpiece above. The pin rides around it as he slides the fixture around the table.

It looks like the fixture has a "skirt" around the outside of the pattern on the bottom. This keeps the bulk of the wood chips out from underneath, so they don't get jammed between the pin and the pattern. That would create a lump on the perimeter of the body.

Obviously, on an inverse pin router, it's all inverted. The pattern goes on top and the blank is on the bottom.

You can see that dust and wood chips are a real problem that you have to deal with in these machines. The overhead pin routers in particular, with no guards, throw a big arc of chips. When Mike would rout a couple of bodies on the big green machine, it would make a circle of wood chips on the floor about 15' diameter. You can see the mess in that video.

The Onsrud inverted pin routers are somewhat neater. They have a dust collection chute built in, and will pull most of the chips down into it.

I plan to fit the big green machine with some kind of a hood hooked up to my big dust collector. That's going to take some experimenting.
 
Last edited:
My buddy Rob Allen, right down the hall, uses vacuum fixtures for most hold-down operations in his CNC machine.

Somehow, despite reading countless pages of your writing on here, I've missed the fact that Rob Allen is in your building. I've never met him but he's one of my favorite builders. I get a lot of inspiration from his designs and the way he executes them. Really cool stuff!

Also I'm excited about this thread. Pin routers are just great machines. What an accomplishment they are in terms production speed and accuracy, and from my favorite (pre-CNC) era of machinery, when everything was truly mechanical in nature.
 
Somehow, despite reading countless pages of your writing on here, I've missed the fact that Rob Allen is in your building. I've never met him but he's one of my favorite builders. I get a lot of inspiration from his designs and the way he executes them. Really cool stuff!

Yes, Rob's big shop is here in the Secret Underground Lab, down the hall from me. His shop is about half the size of mine, but beautifully laid out and spotlessly clean. He also has a nice shop behind his house in Ventura, where he does the assembly and detail work on his basses. He comes into the shop here only a couple of times a week, for a few hours, to the heavy cutting. I know he's here when I hear the humming of his Fadal CNC.

Rob's kind of shy about his shop and operations. Maybe I'll eventually get him to let me do a quick photo documentation thread here on TB. Here's a quick shot of me giving some Cub Scouts a tour through his shop. That's his Fadal.

scouts-02-07-18-3.jpg
 
Would be great to see more of his shop if there is the opportunity!

Back on topic - are pin routers typically only used for straight cuts? Or do people do other shaping on them? even basic things like radiused corners? It seems like their main limitation compared to a fancy CNC machine would be the fact that they're just 2-D. I can't really picture how you'd profile a neck or carve a body relief on a pin router.
 
Would be great to see more of his shop if there is the opportunity!

Back on topic - are pin routers typically only used for straight cuts? Or do people do other shaping on them? even basic things like radiused corners? It seems like their main limitation compared to a fancy CNC machine would be the fact that they're just 2-D. I can't really picture how you'd profile a neck or carve a body relief on a pin router.

A pin router cuts any curve or shape you want in 2-D. Look at that video of him cutting out the whole perimeter of the body. That's being done with a straight bit, because that's what they want, I guess. A flat-edged body that gets binding, probably.

After cutting out the perimeter of the body with the straight bit, you can put in a radius (roundover) bit with the bearing in the center. Run the body around, with the perimeter riding on the bearing, to round off the top and back edges, just like you would with a hand router. You don't even have to use a holding fixture for that. But a fixture is safer.

Likewise, to rough shape the backs of necks, you use the radius (roundover) bit of the right size. The neck is clamped in a holding fixture at the desired angles. The fixture either rides on the bearing on the bit, or on the pin. However you want to set it up.

Pin routers are particularly fast for routing cavities, like neck pockets, control cavities, pickup cavities, etc. The body gets clamped accurately onto the top of the fixture, the pattern lined up on the bottom side. Because of the raw horsepower, the bigger machines can rout pickup cavities in one depth pass. Even a big hand router would require 3-4 passes.

Remember that the Fender guitar/bass was designed to be made almost completely on pin routers. Back in Leo's day, they were the fastest, most efficient way to cut funny-shaped wood parts. Fender's factory had rows of them. And rows of sweating guys running them. Not a particularly fun job.

A pin router won't directly do 3-D contours, but there are some tricks you can do with fixtures to get you partway there. For example, if you want to do a contoured-top body, you can cut the shape in a series of shallow steps, like a topographic map. The fixture has a series of patterns that snap on and off the bottom.

Some folks have made more complex neck-holding fixtures, where the neck rolls about some shape templates while it passes along the pin router's bit.

There are many things you can do with a pin router, but full 3-D shapes are where CNC machines take over.
 
On the CNC topic; I have this copy router in my possession that Steve Azola made... aptly named CNSteve. :thumbsup: It will manually make a copy of nearly any 3D pattern. Carved tops (inside and out), body contours, necks... you name it. It is basically a manually operated X/Y table with gravity fed Z (vertical) cutterhead. A cheap alternative to a fully a automated CNC although... they are becoming pretty affordable these days!


Anyhow last month, I took it out of storage and scrapped the entire base of the table because I plan to mount it to an 80/20 frame instead. This way, it will become modular, and will attach to my Festool MFT table when in use. I also have a slab flattening/router planing jig planned (made from 80/20 as well) that will similarly attach to the MFT.

Here’s a picture of CNSteve (when I received it;not in operation mode) and some tops that were carved on it:

IMG_9634.JPG

Carved BugBass.JPG
 
On the CNC topic; I have this copy router in my possession that Steve Azola made... aptly named CNSteve. :thumbsup: It will manually make a copy of nearly any 3D pattern. Carved tops (inside and out), body contours, necks... you name it. It is basically a manually operated X/Y table with gravity fed Z (vertical) cutterhead. A cheap alternative to a fully a automated CNC although... they are becoming pretty affordable these days!

Anyhow last month, I took it out of storage and scrapped the entire base of the table because I plan to mount it to an 80/20 frame instead. This way, it will become modular, and will attach to my Festool MFT table when in use. I also have a slab flattening/router planing jig planned (made from 80/20 as well) that will similarly attach to the MFT.

Here’s a picture of CNSteve (when I received it;not in operation mode) and some tops that were carved on it:

View attachment 3431731
View attachment 3431724

Ah, that brings back memories! Yes, the CNSteve machine is legendary. 3-D Router/Carver machines are a whole 'nother subject. I have an original Dupli-Carver stored here, plus I've built several various Router/Carvers over the years. I'll try to dig up the thread we had here on TB a few years ago about these machines, including the monstrous one I built back in the '90's which was a failure.
 
  • Like
Reactions: speyer
Thanks a ton for the write up. I'd been curious about these mythological beasts.

Saf-t-planer is a spooky tool. I'm a kinda big guy yet I don't think I'm man enough to try to run maple or mahogany through it. I've got one new-ish in its box and have used it a few times on pine 2x12, the back of pine strutted fiberglass molds, and semi-cured plastic molds; I definitely prefer working the plain pine boards on a big disc sander and manualling the molds through a box CNC with a fly cutter or shell mill (more preference to the fly cutter as it's less grabby).


Bridgeport must've also made pin routers too, yeah? The thing we've got that had the STP mounted in it seems like it just needs a pin and it would function as one minus the foot actuated z movements (it's like an xy-neutered knee mill)

I'm not sure what I'm going to do with this machine, especially now that I have the big green one. One thought was to slow the spindle down and fit it with a Saf-T-Planer cutting head. Make it into a dedicated planing machine...

Another thought is to make up a 2-axis X-Y table for it, driven by leadscrews and servo motors, and a computer. Convert it into a simple 2-axis CNC router.
both- but again, I'd probably use something other than the STP- a shell mill or fly cutter.
 
Coming up, I'll be building my first pin router fixture. I've picked out one operation in my process of building Scroll Bass bodies that I'm going to use as the test; routing the inside F-hole recesses into the top and back. Right now (and for the last 20+ years), I rout the recesses with a big Porter Cable 7518 router with a special collar base and offset template. It works fine, but it's tedious and annoying to do. I want to see if the big green pin router can take over that operation, speed it up, and make it more fun!

If that works out well, I'll look at switching over some of the other body routing operations like pockets and cavities. I don't know if I'll really gain much speed (reduce labor) over my current collar routing methods, but it will be interesting to see.

I don't think I'll be doing any operations on my Scroll Bass necks on the pin router. The fixtures would be trickier, and I don't think there'd be any real time savings.
 
On the CNC topic; I have this copy router in my possession that Steve Azola made... aptly named CNSteve. :thumbsup: It will manually make a copy of nearly any 3D pattern. Carved tops (inside and out), body contours, necks... you name it. It is basically a manually operated X/Y table with gravity fed Z (vertical) cutterhead. A cheap alternative to a fully a automated CNC although... they are becoming pretty affordable these days!

Anyhow last month, I took it out of storage and scrapped the entire base of the table because I plan to mount it to an 80/20 frame instead. This way, it will become modular, and will attach to my Festool MFT table when in use. I also have a slab flattening/router planing jig planned (made from 80/20 as well) that will similarly attach to the MFT.

Here’s a picture of CNSteve (when I received it;not in operation mode) and some tops that were carved on it:

If you want to dig into the subject of 3-D router carver machines, check out this old thread:

Stewmac/Matt Vinson Style Neck Jig

The thread is mostly about neck tensioning fixtures, but on Post #18, I show my old neck shaping router/carver that I built in 1997. If I remember right, Steve had CNSteve up and running at that time, and we compared notes and ideas.
 
  • Like
Reactions: speyer
That is old-skool kool beyond belief. Of course, I could never justify the space or expense of such a glorious machine, but just seeing one in action makes me want one. Aaaaarrreggfbglblglbhhllgghhh....
 
  • Like
Reactions: Beej
I spent some quality time with the big green machine yesterday; adjusting it; getting used to it. I greased its spindle bearings, which it needed. Switched the belt over to 10,000 rpm. I'll probably keep it there most of the time. Started and stopped it a bunch of times. Let it run for several minutes, working the pedal, raising and lowering the spindle. I love big machines, but I have to admit that this one is intimidating. I'm making friends with it. Getting familiar with all its controls, what they do, and when things sound right, or not.

The electrical seems to be okay so far. It turns out that the motor is capable of drawing 28 amps at full load. I've got it wired with 12 ga and a 20 amp breaker. I wondered whether startup surge might trip it, but so far, no problem. It's not unsafe; the wires are protected by the breaker. But, if I load it up to the full horsepower, it may trip. I doubt that I'll ever get close to using 10 horsepower in anything I do.

I'm planning out mods that I'm going to make to it, to make it safe and cleaner, and easy to set up. I think I'm going to machine up a better depth stop turret assembly for the front. I've got a hood/guard worked out to capture most of the chips in a dust collector, and be a physical block to keep my fingers out of the cutter. A Lexan window on the front and some LED lights inside. Nylon brushes surrounding it to reasonably seal it against the fixture.
 
Of course, I could never justify the space or expense of such a glorious machine

Yes, you can, if you put your mind to it! :smug:

These days the big pin routers are getting literally thrown in the scrap yard. Over the last decade, I've seen several of the Onsrud overhead pin routers, like my disassembled one, go up for sale/auction here in the LA area. They never sell for more than $400. Basically, scrap metal price. If I had tried to sell the big green machine, the scrap metal dealers would have given me about $400-$500 for it. It's very unlikely that anyone would have bought it to use. With its long history in the guitar business, and my long friendship with Mike, I couldn't let it get scrapped. What could I do? I cleared some space in my shop and gave it a new home. It'll soon be happily carving out guitars and basses again.
 
Nice little "upgrade" I did for my pin router since it didn't come with any pins... machined a threaded table insert where the pin goes and I use a cam follower bearing instead of stock pin (which can be hard to find but easy to make). I can't confirm if the cam follower is an "upgrade" or not but I like to think it is! :)

cam-followers

Sure, that makes a lot of sense. No harm in having a pin that rolls easily.

In my case, I currently do most of my routing with collar bases. So, the collar is larger diameter than the router bit, and the template has an offset to match. When I switch the operation over to the pin router, I want to be able to use the existing template, plugging it onto the underside of the big fixture. No harm to the template, so I can always go back to the collar router if I need to.

But this means I'll need "pins" of 1" and 1 1/2" diameter to work with those templates. The pin socket of the big green machine is, I believe, 18 mm dia. Over the years, Mike had me make up several pins for him that were 18 mm on the shank and American dimensions at the tip; 3/4", 1/2", 3/8". For the big ones I need, the obvious answer is turn up an 18 mm arbor and press a 1" or 1 1/2" OD ball bearing on the end. It won't be able to retract down into the table, but it should work fine as a pin.
 
  • Like
Reactions: tbrannon
Keith and I were talking about the pin router today, and what jobs we want to start doing on it first. We decided that the thing we both need most is heavy planer routing; quickly bringing body boards down to a precise thickness. A big heavy pin router is really good at that. It has the horsepower and the rigid frame to hold the thickness.

Over on the Router Planing Fixtures thread, you've seen this setup. This is how I currently bring the tops and backs of my Scroll Bass bodies down to thickness and make them dead flat for gluing. I've developed that fixture and method over the years and it works well. But it's a messy and tiring operation.

IMG_4702B.jpg


So, I'm going to build a fixture to see how well the big pin router will do this job. Basically a big rigid sliding platform, with an array of threaded inserts on the top. The boards will be pre-drilled and fasten down to the fixture with machine screws, just like I do now. All the same process of shimming for cupping, etc. The underside of the fixture will have straight slots, cut on the tablesaw, that the pin will ride in. Down one slot, shift over, back on the next. Just like I do with this rig.

I may be able to find a 2" dia planer bit, which would significantly reduce the number of passes and speed things up. If I can get the dust collection hood working well to minimize cleanup, doing this operation on the pin router could save an hour per Scroll Bass. That's the justification for messing with big machines: cutting down the labor hours on every instrument.

Likewise, Keith says that this could save him a lot of hours trimming guitar body blanks down from 1 3/4 to 1".

Mike used the pin router for thicknessing a lot too, but he didn't use a fixture. He just retracted the pin and hand fed the body between the router bit and the table. That's way too dangerous for me and my shop. Fixtures and guards here.
 
Last edited:
Mods to my Onsrud.

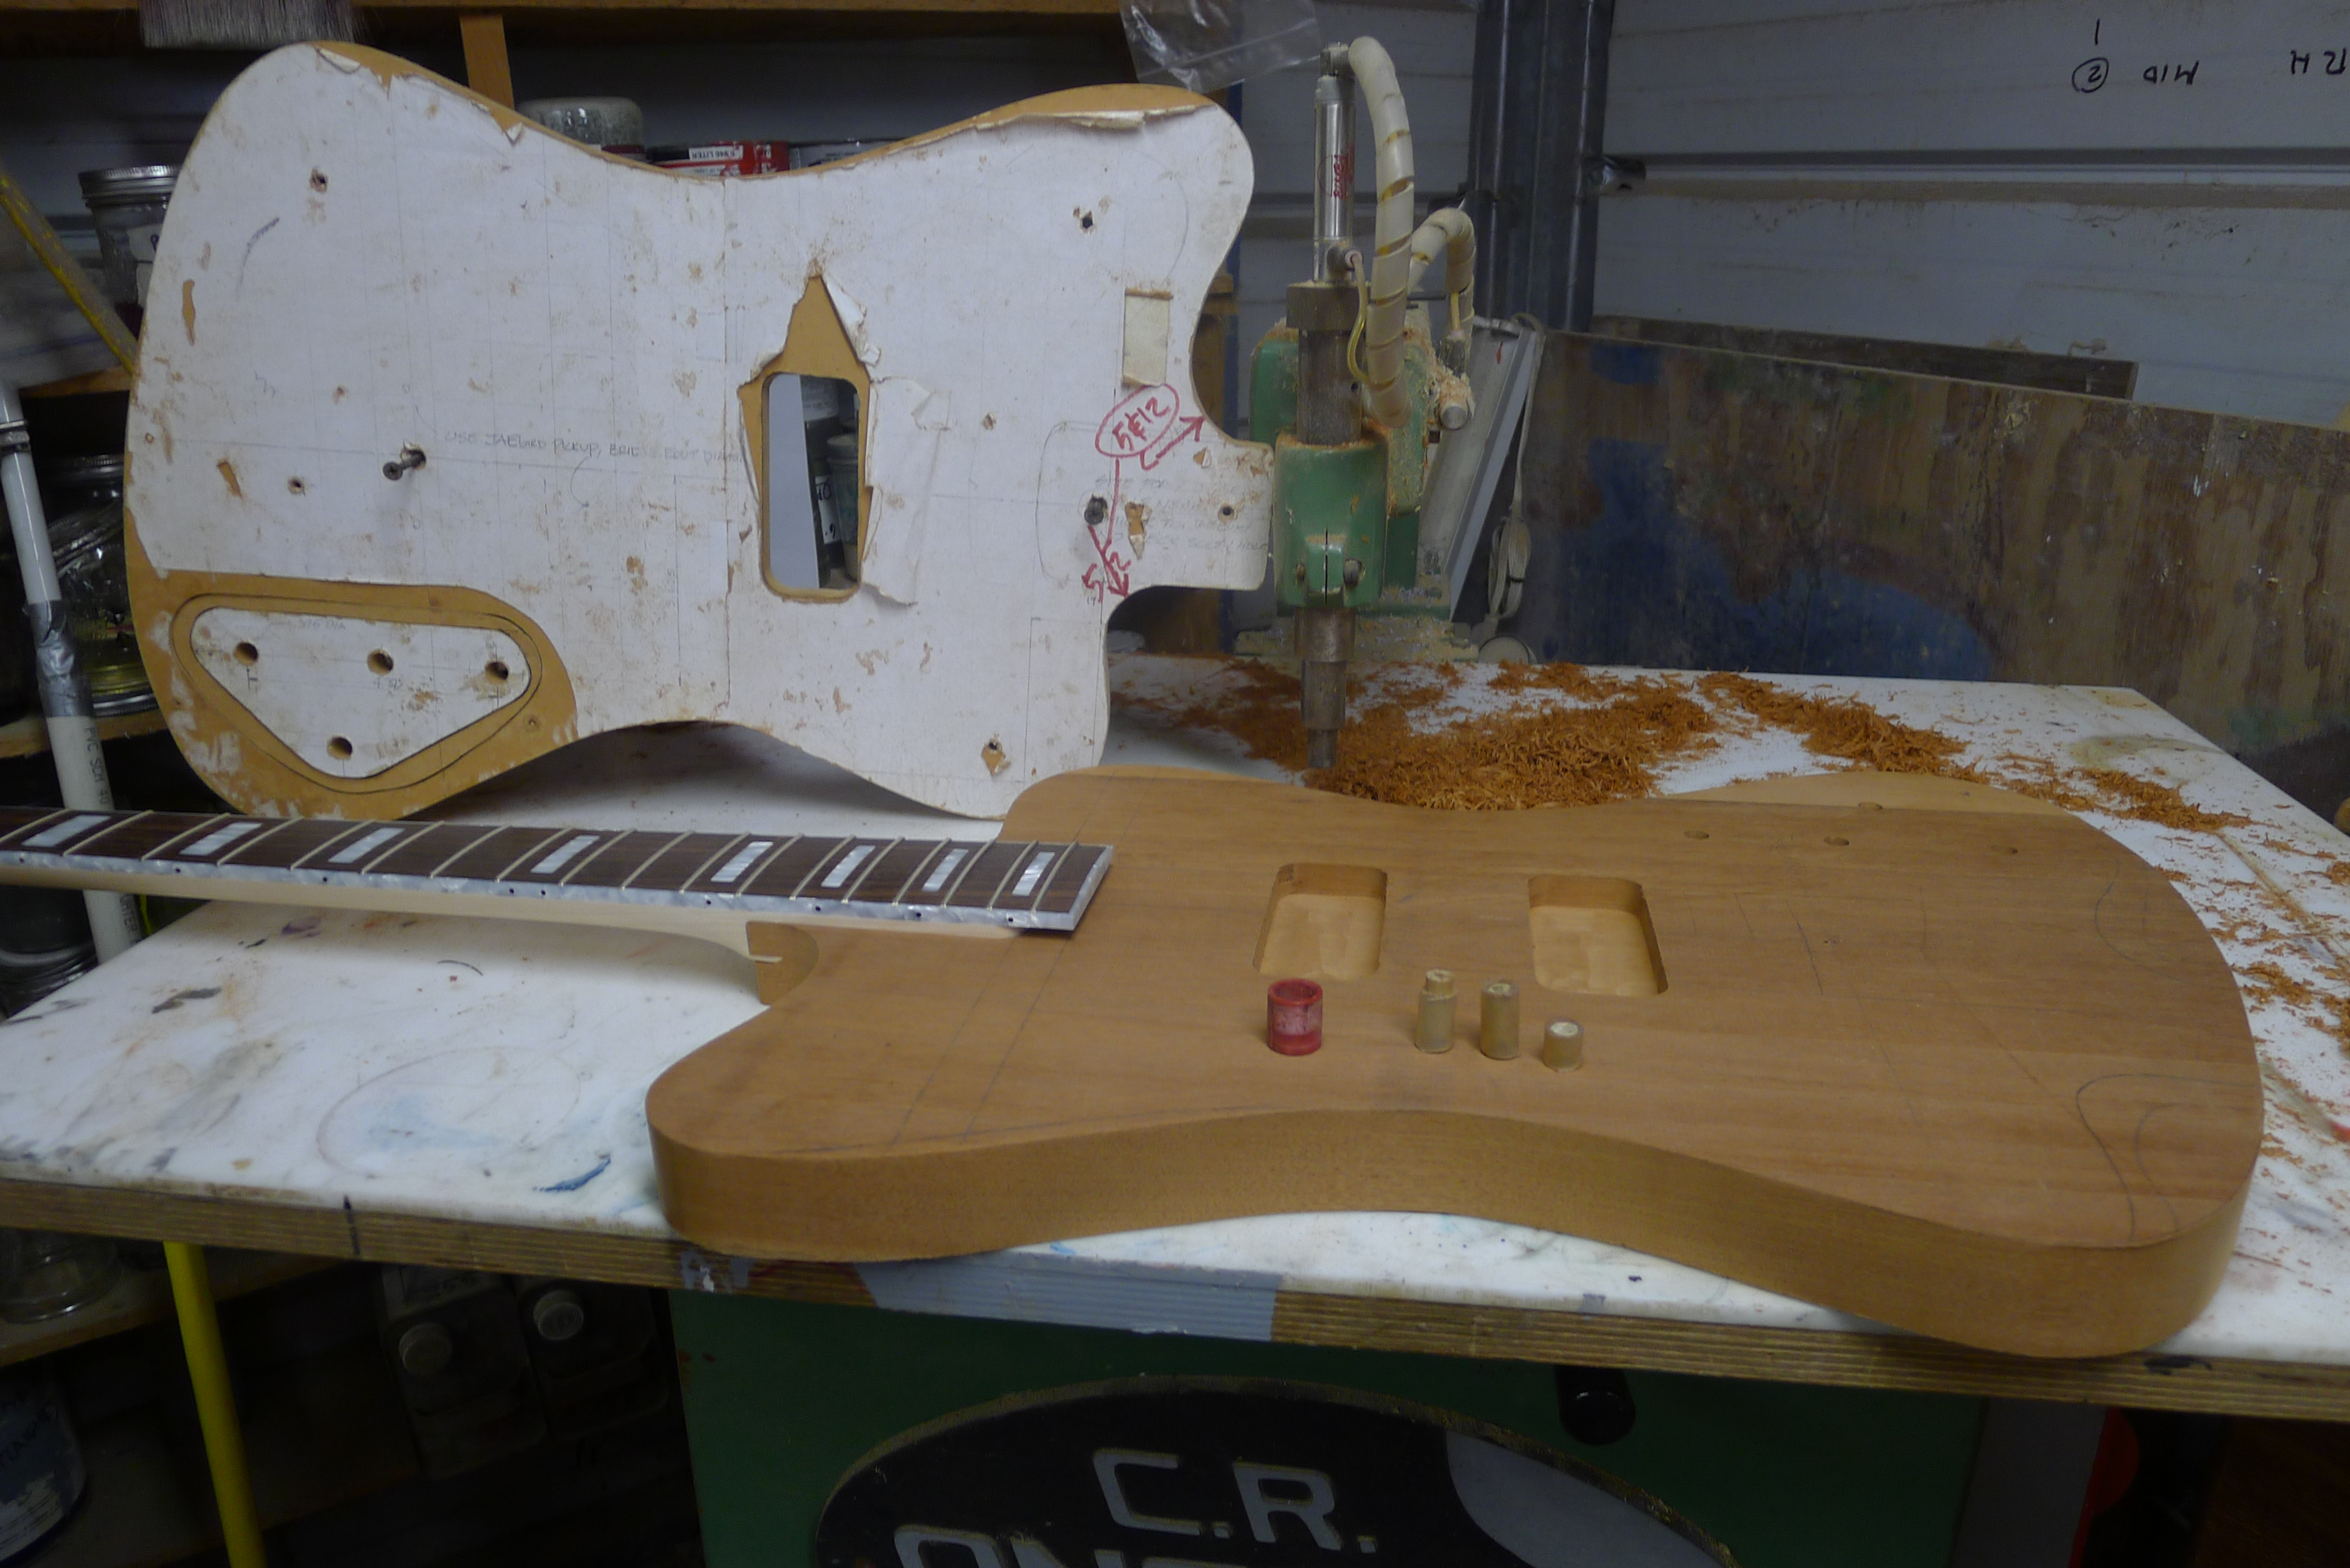
Red collar is 5/8" O.D. and 1/2" I.D. It slips over the 1/2" pin to give a full height "rough cut" with the 1/2"x 2-1/2" upcut spiral bit. Blank gets bandsawn with template attached to ~1/8" from the edge.

L5v69lH.jpg


Using "step" router cuts means you're using the same small part of the cutter over and over. Full height passes give a lot cleaner cut . That makes a very easy second pass with the collar removed. 1/16" gets shaved and leaves a smooth perimeter that only requires 180 grit to get it ready for primer.

Those three cylinders are vinyl tubing "sleeves' with dowels of different heights that slip over the the end of the plunge height adjuster that make it an easier task.YMMV
 
Last edited:
Mods to my Onsrud.

Red collar is 5/8" O.D. and 1/2" I.D. It slips over the 1/2" pin to give a full height "rough cut" with the 1/2"x 2-1/2" upcut spiral bit. Blank gets bandsawn with template attached to ~1/8" from the edge.

L5v69lH.jpg


Using "step" router cuts means you're using the same small part of the cutter over and over. Full height passes give a lot cleaner cut . That makes a very easy second pass with the collar
removed. 1/16" gets shaved and leaves a smooth perimeter that only requires 180 grit to get it ready for primer.

Those three cylinders are vinyl tubing "sleeves' with dowels of different heights that slip over the the end of the plunge height adjuster that make it an easier task.YMMV

Yep, I'm working out a kit of parts like that for my big green monster. A couple of standard size pins, and some sleeves that pop on quickly to adjust the horizontal depth of cut. Plus, I'm machining up a better vertical depth stop turret, with more positions.

All this is about making really quick setups when switching from one cutting job to the next. I'm not making pallet-load batches of parts. I'll be typically cutting 4-8 parts in one setup, before switching to the next setup. Constantly changing fixtures and setups. I don't want to be messing with fussy adjustments on each setup.
 
  • Like
Reactions: wraub and Dadagoboi

Latest posts