• TalkBass has been independent since 1998. Add your voice.
    Create a free account to reply to discussions, view embedded media, and browse with fewer display ads.
    Join freeLog in
    Want zero display ads or expanded classifieds tools? Compare plans.

Double Bass Repeated neck heel repairs

I have another very broken school teaching bass (1960 Kay M-3 1/4 size) with another "new" problem for me and zero budget.

It had a broken bass bar (now replaced), one chipped volute, various veneer problems and a broken neck heel. The neck seems to have been repaired twice already with screws and both repairs failed over time (no surprise there). I had to remove the finger board and cut two steel screws. Maybe I should have worked harder getting them out from the top but failed on that part.
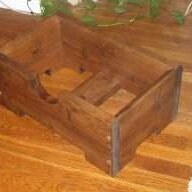
The middle hole in the picture had a corresponding plugged hole in the finger board but no screw (just a drilled out mess from a first repair?).

With a lot of effort I got the heel removed and one screw end extracted (bored around it). The break is very clean, so, I aligned it in a little clamp jig, glued, drilled with Forstner bits and then added 6 dowels (but one is just filling half a screw hole).

Two questions before I put it back together:

- Does this dowel repair have a chance of holding with the break that "high" on the neck heel? I did read the threads concerning this type of problem but was considering routing a rather deep spline at the bottom.

- The tapered dovetail only matches on the two sides of the neck block socket (does not touch the bottom part of the block). If I understand some other threads correctly, that was typical of Kay. Should I shim the bottom so it fits like a regular wood working dovetail? That seems related to the failure point to me.

It also had this hopeless sanding job over the old split and is partly refinished in the picture (actually looks perfect now).
The rest of the neck is fine and the new finger board plug matches well too.

Thanks for any suggestions again.
 

Attachments

  • Neck_Small.jpg
    Neck_Small.jpg
    28.4 KB · Views: 787
shim & glue, or if you use a heavy epoxy the squeeze out may fill the void. any subsequent repairs to the neck, (and there will be) may be a little trying to clean up,but nothing like what you have already been through. bear in mind it's a 1/4...and a whippin' post for the young.
keep them rolling ;)

.02
 
Actually, the gap under the front of the neck joint is a big contributor to Kay necks breaking. I have seen perhaps 100 or more of these basses, and most of the time, when there is a gap, there is also a split in the neck heel. The downward force (toward the bridge) at the front of the joint can cause the (badly designed) neck joint to bend there, which also pulls it out at the rear, and/ or splits the wood in the heel. This is a common ailment with Kays, which were designed for ease of construction, not longevity.
 
I stand corrected :) I had thought that the lip at the top and at either sides of the mortise would provide the same support. I have only seen a few dovetail neck joints.

I think you made a logical conclusion. But there just aren't that many of these beasts on your island. Kay necks were made wrong, and the neck joints were made wrong, and nearly every Kay has a broken neck heel or busted neck joint as a result. Not to mention breaks at the pegbox (because the wood is too thin and not quarter-sawn).
 
When you buy an Englehardt neck as a replacement, it will not fit the Kay exactly, as the dovetail is considerably smaller on the replacement neck than it is on the neck block in the Kay. I had to add a good deal of wood to both sides of the tenon, and to the bottom of the mortise, before I had a good fit. Even so, I don't think much of that design.
 
Well, I looked at the neck block a bit more closely. I'm not sure on the wood type. It could very well be poplar but it looks to be a decent grade. Bad: It does have a small crack in the front side of the dovetail (one side). I don't think I caused that crack taking it apart and if that edge was flexing, with nothing under the dovetail, I think the neck heel would have to twist or snap. I will create a snug shim for the bottom.

> which were designed for ease of construction, not longevity
I think there is another strange construction "feature" which I noticed earlier but didn't completely grasp. This is actually the 5th one of these Kay 1/4 size the school gave me to repair. Someone must have liked them.

Every one had the dovetail "triangle" shape cut right into the top. In other words, the top is shaped exactly like the neck block. The front fits under the neck and is effectively locked there by the neck half of the dovetail. If you look carefully at the picture, the dark finish line is not the edge of the top material.

This is the only one that still had both of those little tabs present because the neck came off leaving them intact. On the others, someone had to hack away at the little tabs/ears under the neck in order to remove the front for some inside repair. Some had just been broken away by pulling on the front.
Given that dovetail construction, it seems to me those tabs should have been cut straight so the top could be slid down to get off when required. Maybe it was some fast alignment method.

Did they do that on all models or just these small ones?


Thank you for the help and most interesting comments.
I will post the result but it will be a bit before I can spend much time on it again.

-S
 
Before you glue the neck in you could try repairing the crack in the neck block at the corner of the dovetail. The neck takes a sideways blow and the dovetail cracks. With these public school Kays, I'll use one or two nylon strap clamps around the ribs all around the bass. Place the ratchet at the C bout. And along with shaped cauls, you can apply pressure down to close the crack after applying glue. Don't crank the clamps too much or with a big crack you'll push dovetail out of shape. If you've fit the neck joint already this might require a re work.

I've used new Engelhardt necks for Kays. The neck can be a little thinner than a Kay depending on how crazy they get with the shaper, but they work as long as you use a new, thick ebony fingerboard. Ask for one without the dovetail already cut so you can get the fit right and customize the neck over stand. I rough it out with a 14 degree cutter in a router.
 
Every one had the dovetail "triangle" shape cut right into the top. In other words, the top is shaped exactly like the neck block. The front fits under the neck and is effectively locked there by the neck half of the dovetail. If you look carefully at the picture, the dark finish line is not the edge of the top material.

This is the only one that still had both of those little tabs present because the neck came off leaving them intact. On the others, someone had to hack away at the little tabs/ears under the neck in order to remove the front for some inside repair. Some had just been broken away by pulling on the front.
Given that dovetail construction, it seems to me those tabs should have been cut straight so the top could be slid down to get off when required. Maybe it was some fast alignment method.

Did they do that on all models or just these small ones?

Chuck Traeger mentions those in his book, and they were present on my 3/4 Kay. Mine had a cracked neck block too, which I repaired while the bass was open for repairing the bass bar. The good news is that the repair has held up for almost 30 years.
 
I'm slowly moving along on this little bass but every turn seems to have a twist.

The picture is of the inside front repair (laminate layer was gone most of the way around) and the broken bass bar replaced.
The kaybass.com site says basswood and birch was used on the ply layers. This looks greenish on the inner layer and I used basswood (easy). Does this matter? Could it be poplar?

So, now I have it dry fit and clamped with the neck in the dovetail but no new shim added under the dovetail yet. Pushing the neck down all the way onto the top little front "ears", the heel seems to be about 1/8 inch short now (a gap at the end of the heel). I probably took out a 1/32 sanding the break clean and an initial picture shows a additional small gap at the break. I would think at most 1/16 inch total - the gap seems unexpectedly large. I messed up somewhere.

My feeling is to add a 1/8 spacer at the back of the neck to fill the gap. It seems to nearly bottom out snug in the tapered dovetail anyway. Still, I'm not sure there.
 

Attachments

  • inside_front_small.jpg
    inside_front_small.jpg
    25.5 KB · Views: 315
Kay neck joints were never fit very well, that's why they are prone to failure. I doubt that you caused the gap you describe. I would add some extra wood to all of the mating surfaces and then chalk fit the net mortice. If you do that well, the neck joint will not give you any more trouble.
 
Finally glued the neck on again.

This is the order I used:

- Repaired all the lamination problems, front and back
- reset the bad glue job on the lower back bout
- replaced the front
- shim the problem neck block
- chalk fit the neck, didn't expect the amount of work, even with care the dovetail had a slight arch after putting the heel back earlier
- glued the neck on without the fingerboard

If that's not optimal, what should I have done?
Not sure if it is best to put the fingerboard back after or first.

Tried to keep it tight against the neck block with straps.
 

Attachments

  • neck_glueup_small.jpg
    neck_glueup_small.jpg
    38 KB · Views: 282
you got it..
with the FB on you can use it for leverage to make adjustments and it also provides a space to wedge a block between the FB and the top to stabilze while the glue sets up.

normal disclaimer: with the FB is off it's easier to work the joint and you can use it to slightly tweak the neck back to plumb if it moved during the curing.
 
you got it..
with the FB on you can use it for leverage to make adjustments and it also provides a space to wedge a block between the FB and the top to stabilze while the glue sets up.

normal disclaimer: with the FB is off it's easier to work the joint and you can use it to slightly tweak the neck back to plumb if it moved during the curing.

Hey SUBIEDOO, the French dovetail on a Kay doesn't allow for any movement. If there's movement, you need to add some wood in there. If you've fitted the neck correctly, you only need one clamp.

When I'm resetting Martin guitar necks, which use the same dovetail, I'll trial string them with the neck joint dry to test the geometry. The neck joint goes together with a tap and stays there. ;)
 
Originally, it must have been very misfit. I certainly did not get it tight enough to lock in place.

Are you saying these normally would fit tight between the dovetail sides and the neck block top as it pushed "down" (it is significantly tapered)?

I shimmed only the bottom of the dovetail ~1/8 gap between the triangle base and the neck block. Got that very close but it would still lift a bit if pulled upward - hence the straps. It had very little side to side rock when against the bottom.

Seems to me the force vectors are down and frontwards.
What seems odd about this design is the bottom gap along the direction of the highest force.
 
Originally, it must have been very misfit. I certainly did not get it tight enough to lock in place.

Are you saying these normally would fit tight between the dovetail sides and the neck block top as it pushed "down" (it is significantly tapered)?

I shimmed only the bottom of the dovetail ~1/8 gap between the triangle base and the neck block. Got that very close but it would still lift a bit if pulled upward - hence the straps. It had very little side to side rock when against the bottom.

Seems to me the force vectors are down and frontwards.
What seems odd about this design is the bottom gap along the direction of the highest force.

I've never really questioned the French dovetail method of neck/body installation as I'm not really a builder. As a repairman my job is to maintain existing structures.

I can see Arnold's point on the gap at the front being ass backwards and I can see what you're saying about the tapered dovetail - the string force is arranged so as to open the joint rather than close it.

I suppose you could shim and re-cut things so as to create a straight ahead mortise and tenon joint more in keeping with the violin family tradition. I might try that on Kay with a badly damaged dovetail sometime, but I'm going to keep on shimming Martin necks with mahogany and fitting them as completely as I can ie touching all the way up on both sides. ;)
 

Latest posts