
Enjoy the benefits of a premium membership!
Upgrade Account
-
TalkBass has been independent since 1998. Add your voice.
Create a free account to reply to discussions, view embedded media, and browse with fewer display ads.
Join free Log in
Want zero display ads or expanded classifieds tools? Compare plans.
You are using an out of date browser. It may not display this or other websites correctly.
You should upgrade or use an alternative browser.
You should upgrade or use an alternative browser.
More options
Who Replied?



Well, since so many SG and EB Bass Clubians put on a Supertone bridge, I thought I'd post a mini-tutorial here.
First off, let me say that 've gotten to play my bass for a few hours now after putting on the new bridge and I can report that I finally have the action much more to my liking, the intonation is finally properly set (though I did have to go to the rearmost limit of the D string saddle adjustment) and I've gotten used to the looks. Perhaps unfortunately, I simultaneously made a pickup change, so I can't really say if the bridge had any affect on tone.
First off, let me say that 've gotten to play my bass for a few hours now after putting on the new bridge and I can report that I finally have the action much more to my liking, the intonation is finally properly set (though I did have to go to the rearmost limit of the D string saddle adjustment) and I've gotten used to the looks. Perhaps unfortunately, I simultaneously made a pickup change, so I can't really say if the bridge had any affect on tone.
First, removing the stock bridge.
For some, it might just fall off when loosening the strings, but mine was mounted a bit nose high so I had to shimmy it off a bit (could have just lowered the nose stud, lol, but I wasn't that smart. Anyway, it was simple and easy enough).
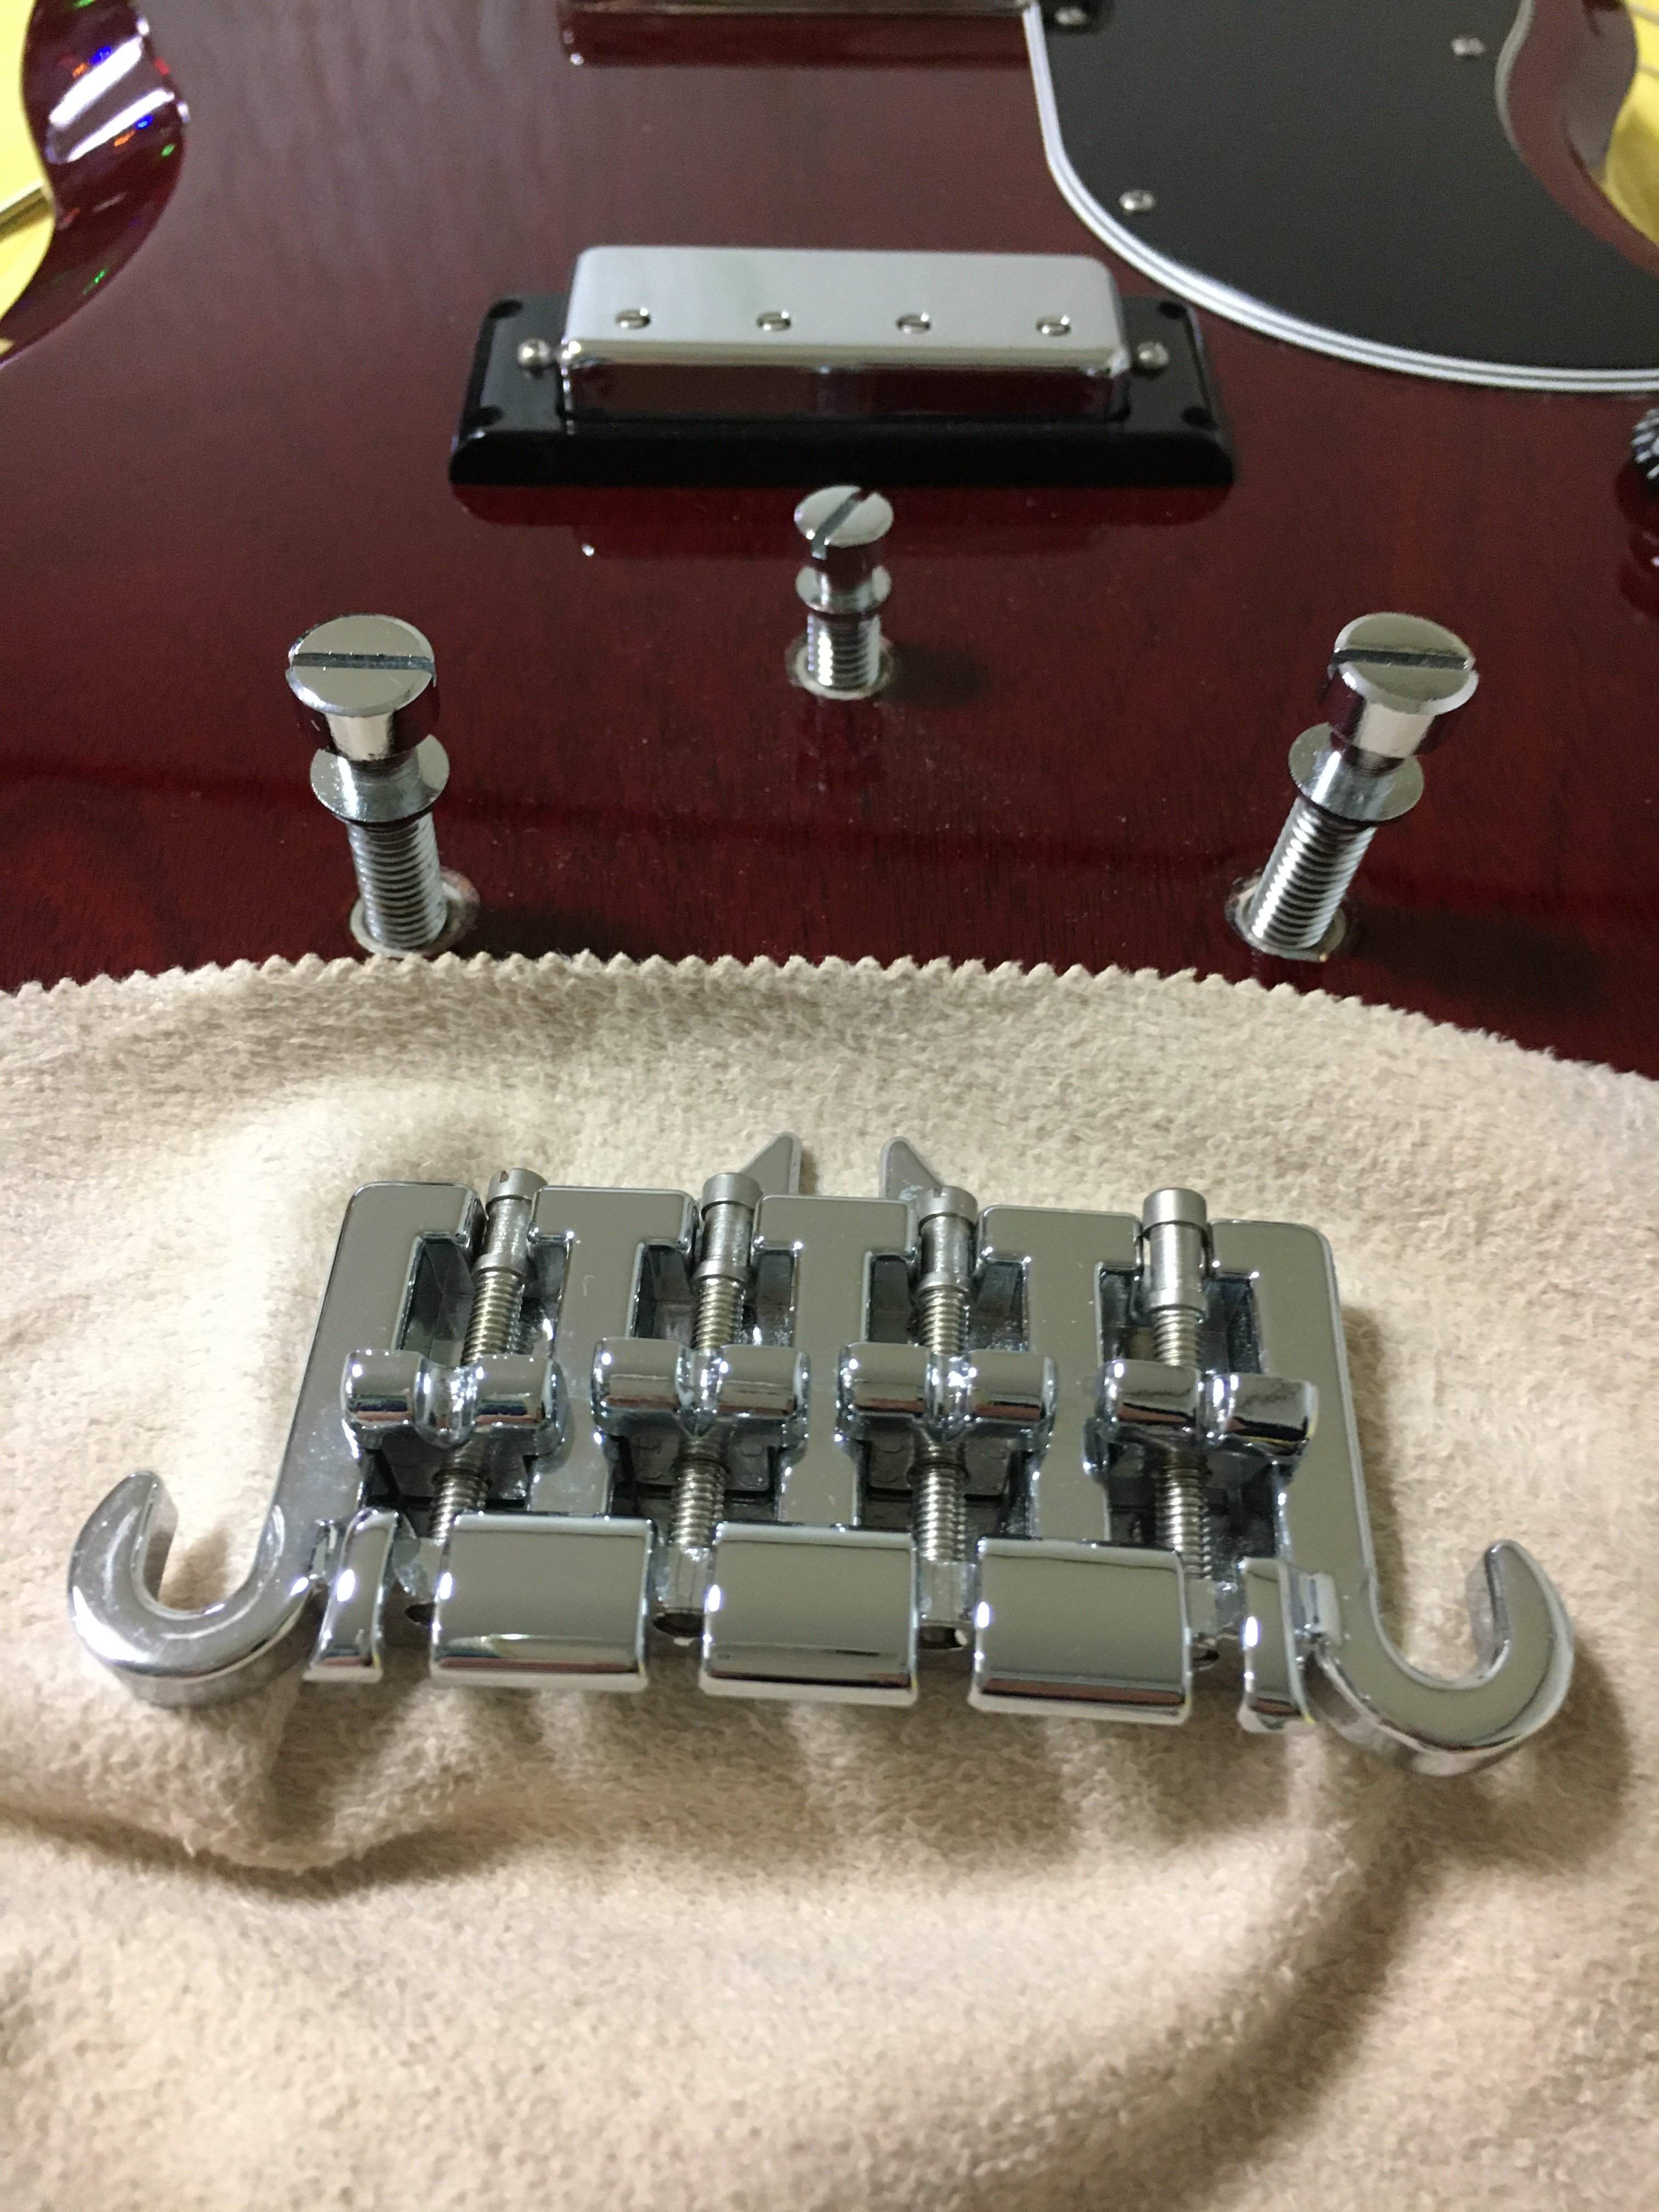
Next, remove all three mounting studs. There might be a bit of cornfusion as there's a recess on the bottom of the SuperTone that looks like it's to slide over the nose stud, but you'll quickly see the clearance isn't close - the nose stud has to come out too.
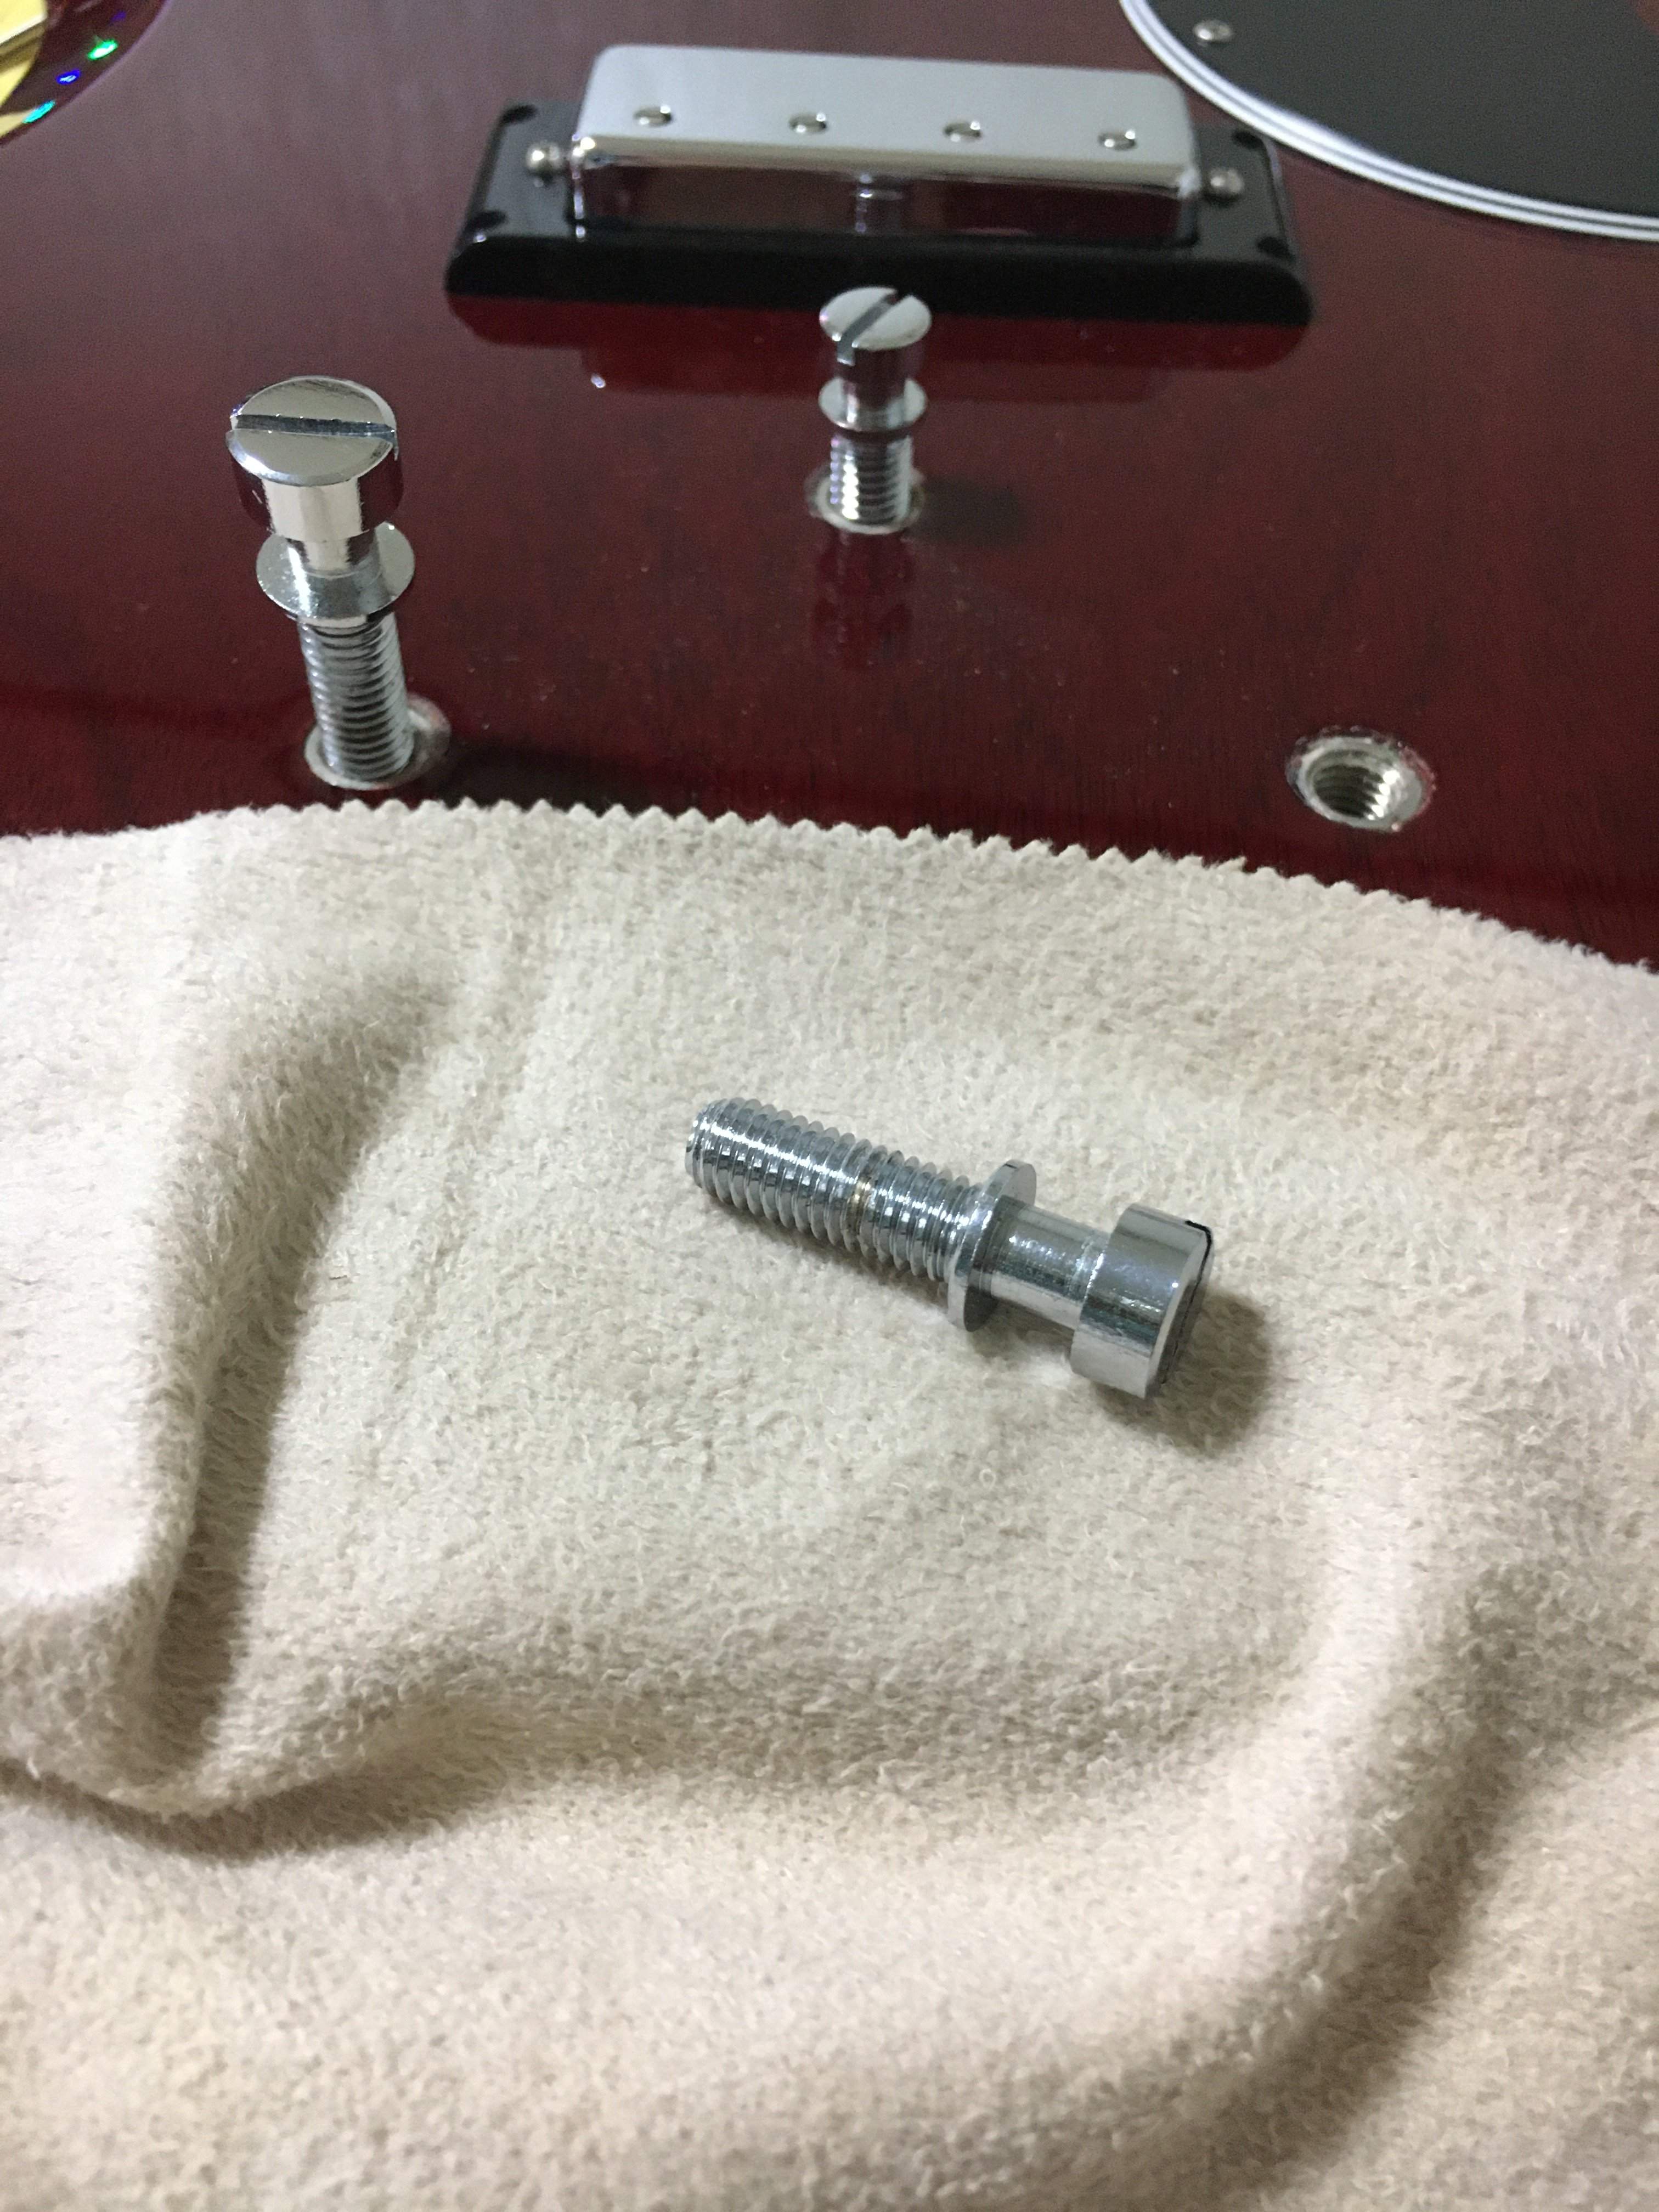
As can be seen, like Craig4003, Nebula24, and ghostinthemach also found, in my case the anchor inserts were firmly in the bass' body. Accordingly, there was no need to superglue them in or shim them with a toothpick, etc., as has previously been mentioned elsewhere
For some, it might just fall off when loosening the strings, but mine was mounted a bit nose high so I had to shimmy it off a bit (could have just lowered the nose stud, lol, but I wasn't that smart. Anyway, it was simple and easy enough).
Next, remove all three mounting studs. There might be a bit of cornfusion as there's a recess on the bottom of the SuperTone that looks like it's to slide over the nose stud, but you'll quickly see the clearance isn't close - the nose stud has to come out too.
As can be seen, like Craig4003, Nebula24, and ghostinthemach also found, in my case the anchor inserts were firmly in the bass' body. Accordingly, there was no need to superglue them in or shim them with a toothpick, etc., as has previously been mentioned elsewhere
Next, just place the SuperTone on, line up the holes over the anchor inserts, place the mounting screws in the holes and screw them in (but not tight) using the included hex wrench. One trick is you get 2 sets of screws, one metric, one US measure, but the ones that fitted my inserts (in my 2014 Gibson) were the screws in the bag labeled "M" (as opposed to the ones in the bag labeled SAE). Anyway..
I left some play in the bridge so it was loosely held down in place but could still slide position with a little push so that the tension from the strings would be able to pull it into its final resting position.
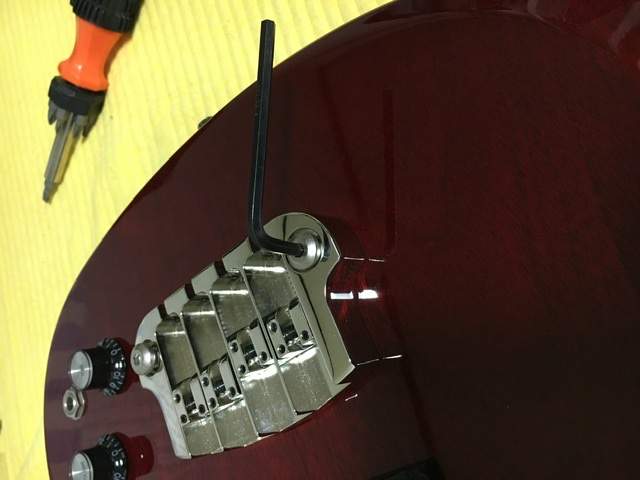
Then I strung it up. After initially tightening it down further so as to have it firmly locked in one place so it would perfectly hold my later intonation settings, I ended up going back to having the mounting screws ever so slightly loose in the hopes of not applying unnecessary pressure to the body wood underneath (and so hopefully avoiding or minimizing leaving an impression in case I ever want to remove the bridge someday)
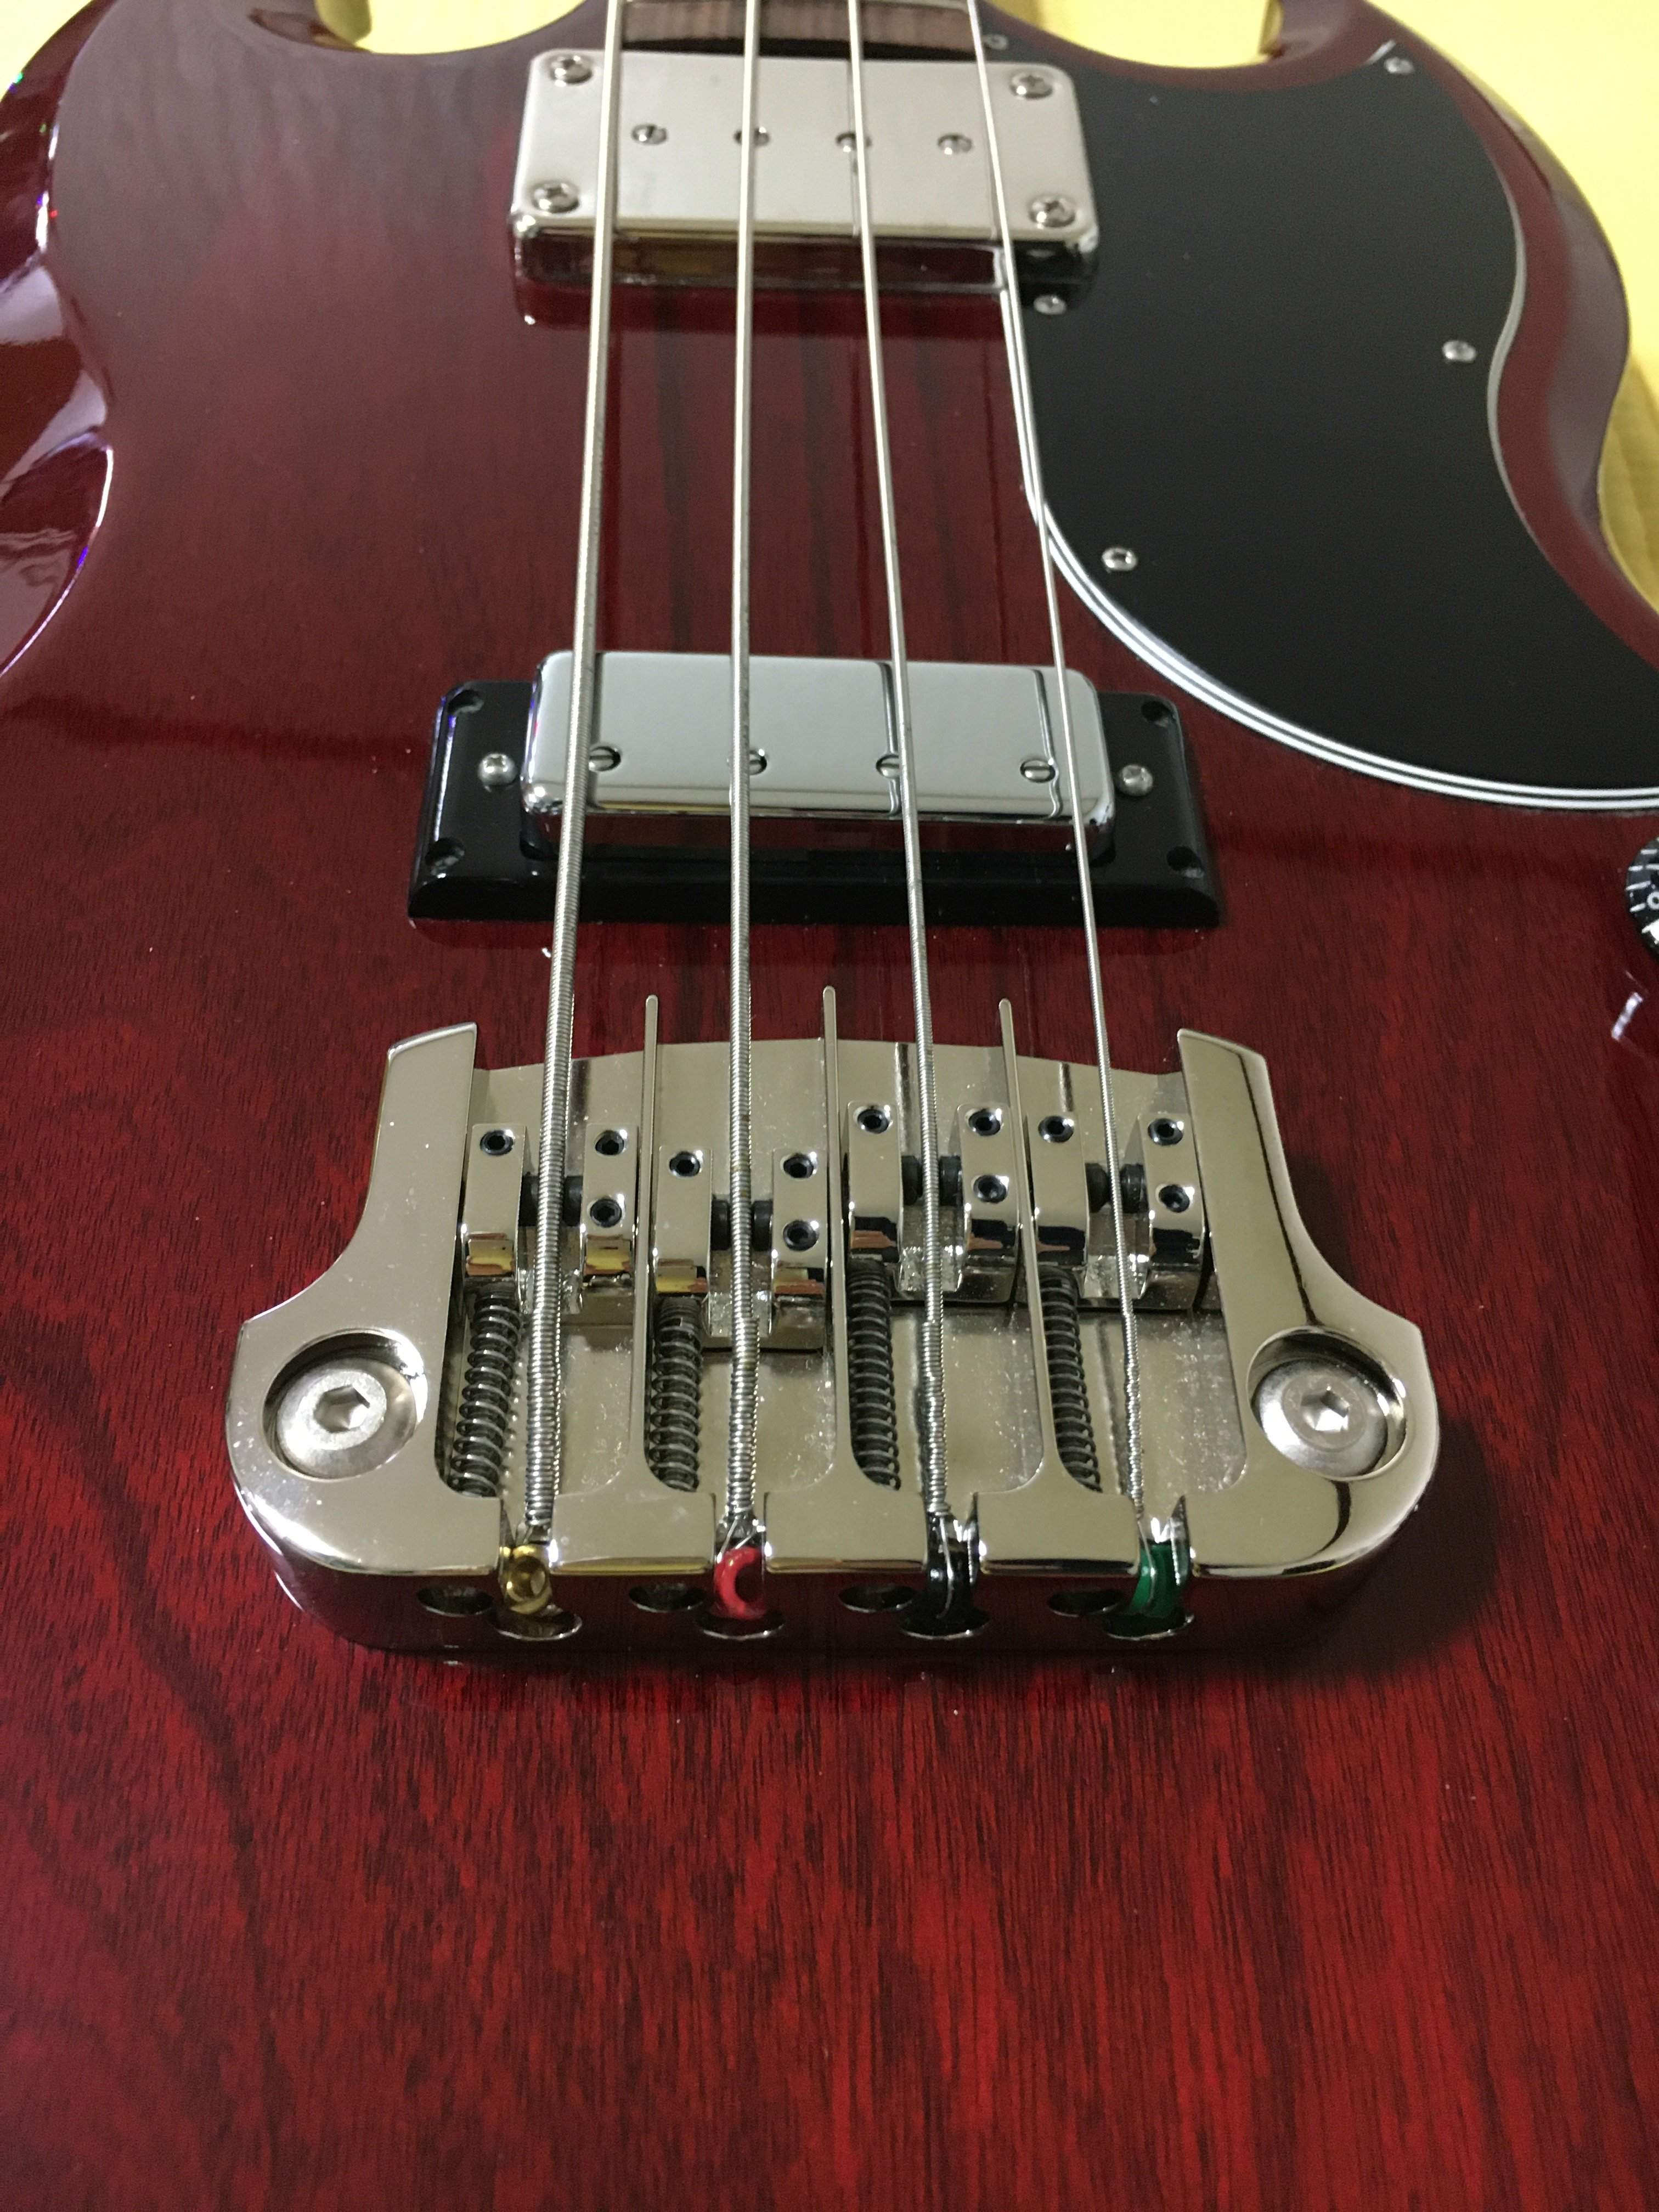
I left some play in the bridge so it was loosely held down in place but could still slide position with a little push so that the tension from the strings would be able to pull it into its final resting position.
Then I strung it up. After initially tightening it down further so as to have it firmly locked in one place so it would perfectly hold my later intonation settings, I ended up going back to having the mounting screws ever so slightly loose in the hopes of not applying unnecessary pressure to the body wood underneath (and so hopefully avoiding or minimizing leaving an impression in case I ever want to remove the bridge someday)
Okay, so then the adjustments. You can set the bridge saddle positions forward and back for intonation, the string height and, I guess, the string spacing (I never did try to adjust the spacing yet as the strings are spot on over the pole pieces of the neck pickup, but I might try tweaking the spacing later as a compromise for lining up better with the bridge pickup - but really, it's close enough as is, so I've left it).
It's best to set the action first before intonation, but first I made a rough approximation of the intonation saddle positions by just looking at the fixed angle of the straight plastic saddle on my acoustic bass and starting from how far back the saddle was on the E string on my original bridge (compared to the mounting hole). Amazingly to me, just by eyeballing it like that, I later found my intonation to be almost exactly right! Mainly I just ended up having to move the G string saddle a bit farther back to get everything perfect.
First I layed down a polishing cloth behind the bridge so as not to inadvertently end op marring the body with an untimely slip of a screwdriver, then I loosened the string I was going to adjust the saddle position on. Use a Phillips head screwdriver with a long enough shank so as to not have the handle, etc. banging up too much against the bass's body, insert it in the hole in the back of the bridge to the left of the target string's ball end, and turn clockwise (iirc!) to start bringing the saddle back to the estimated correct position. Repeat for each string
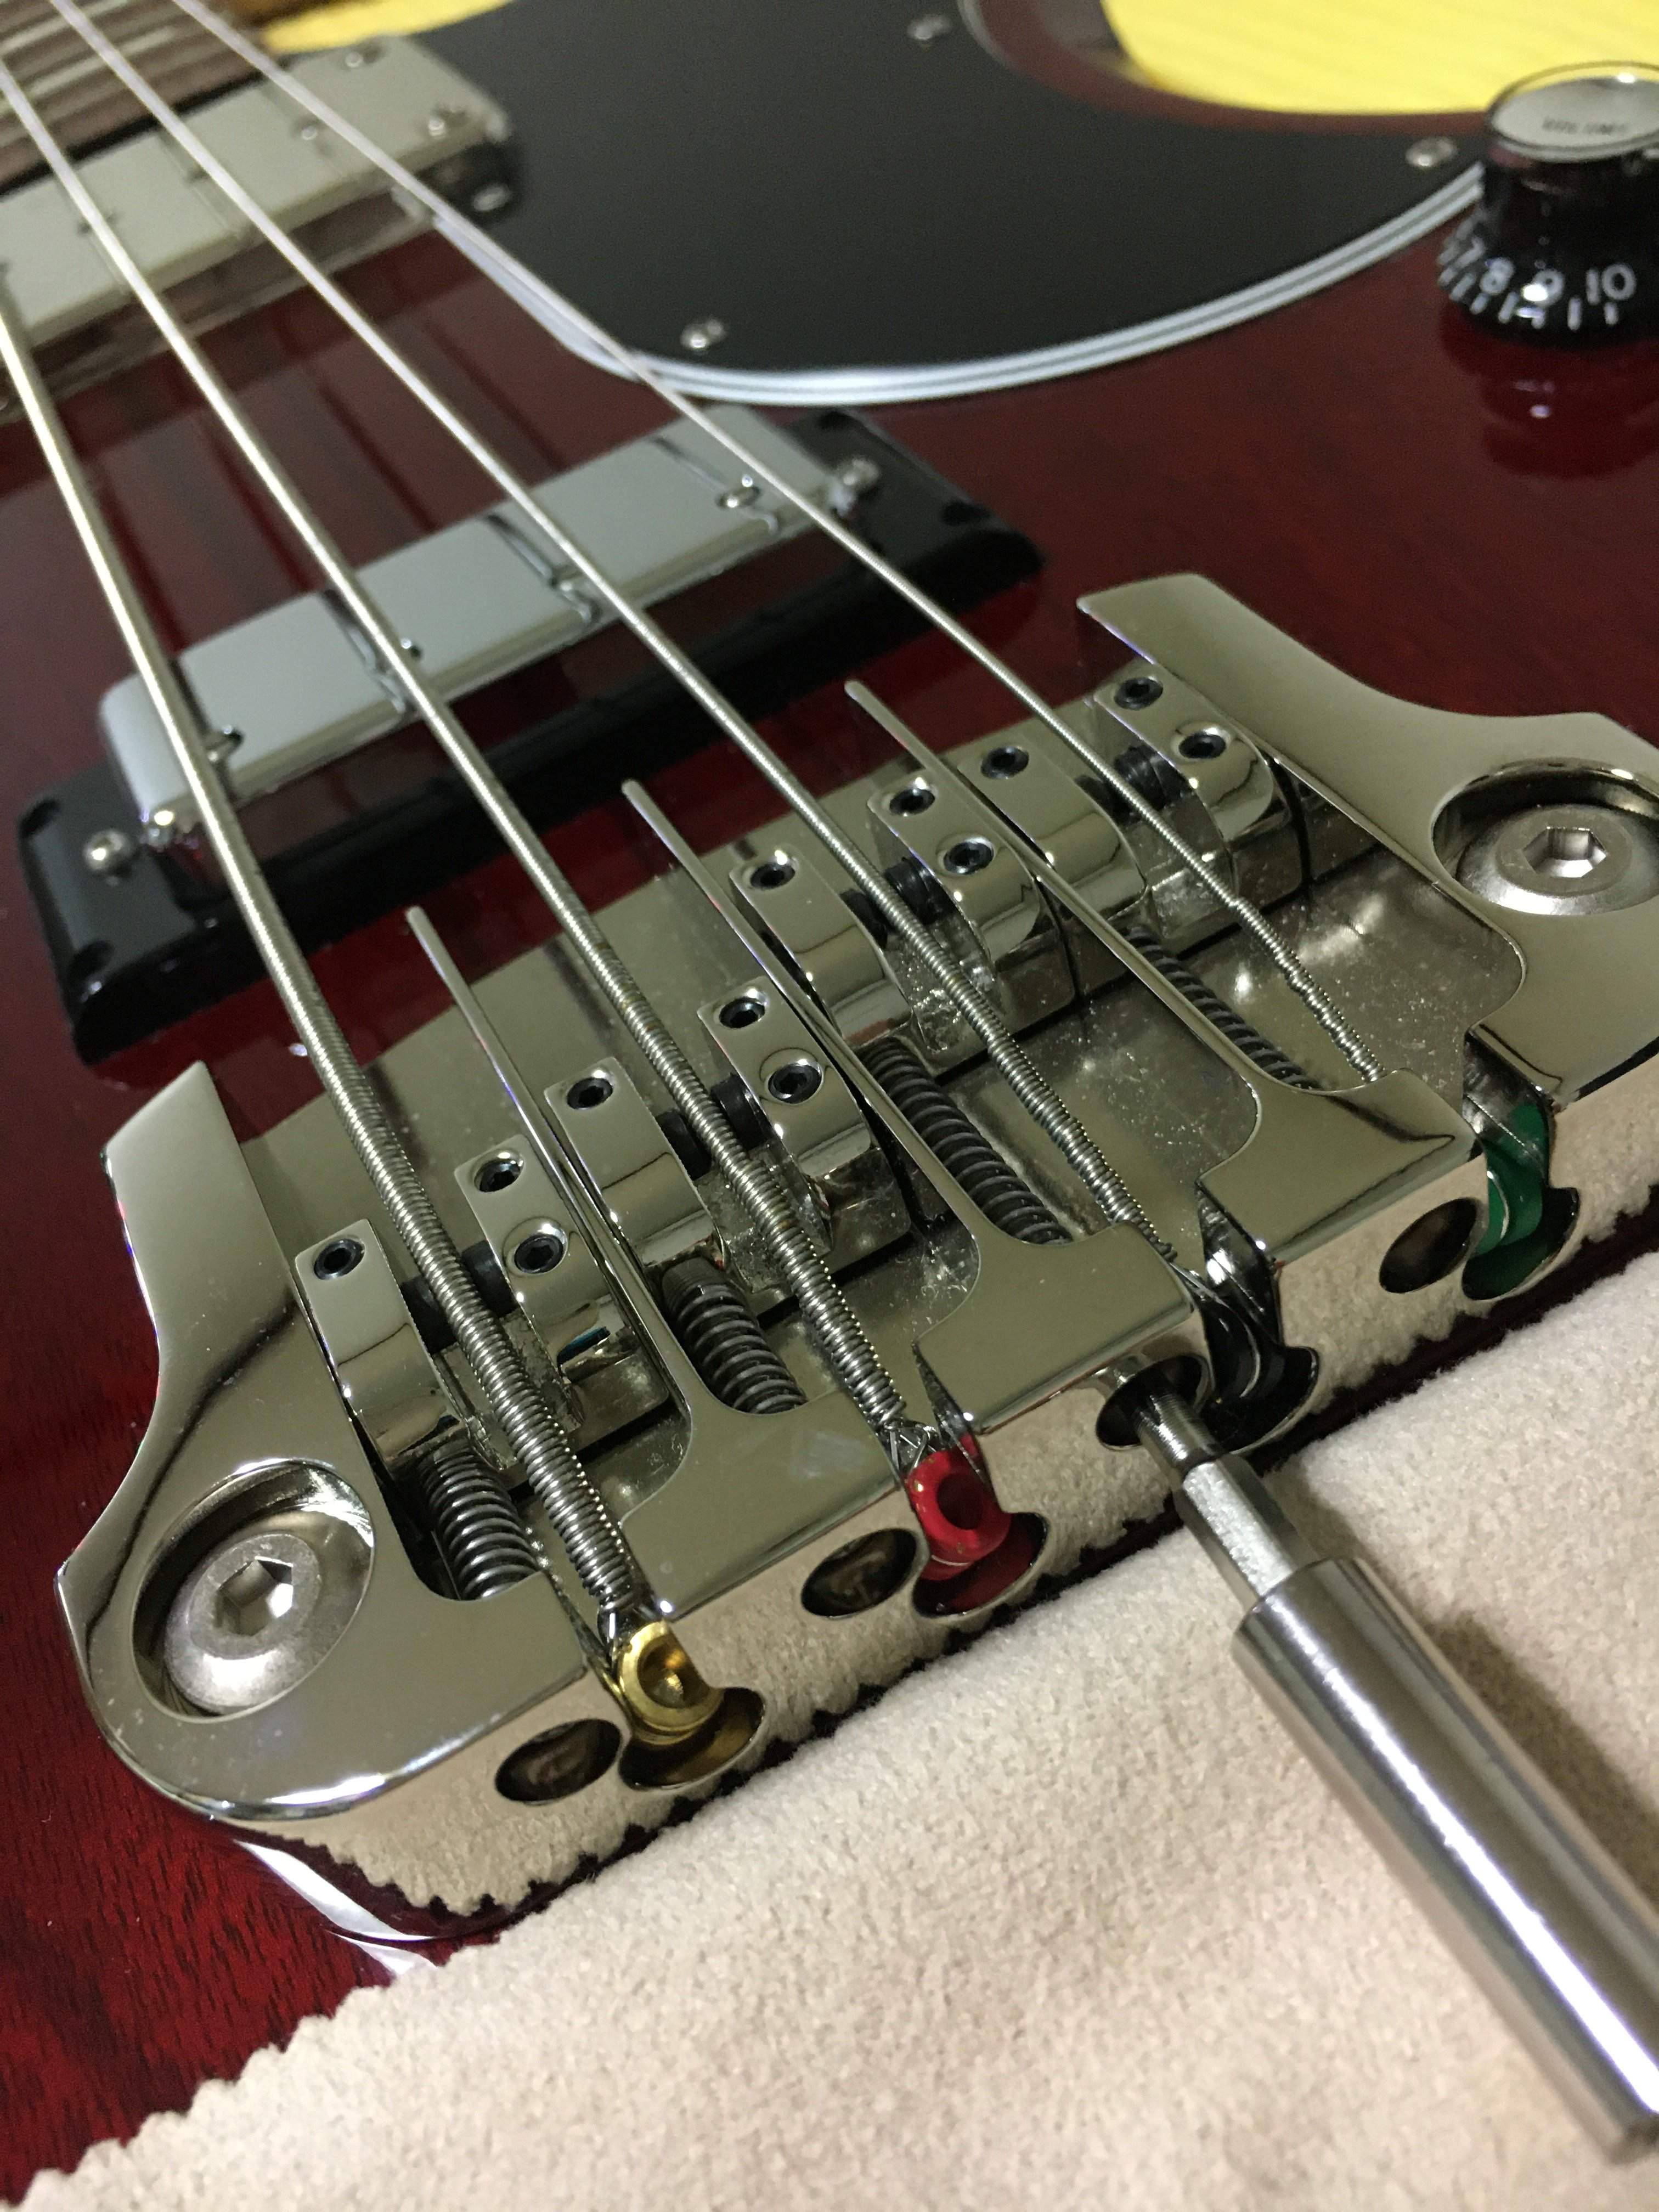
Final eyeballed positions (which, like I said, turned out to be pretty much spot on):
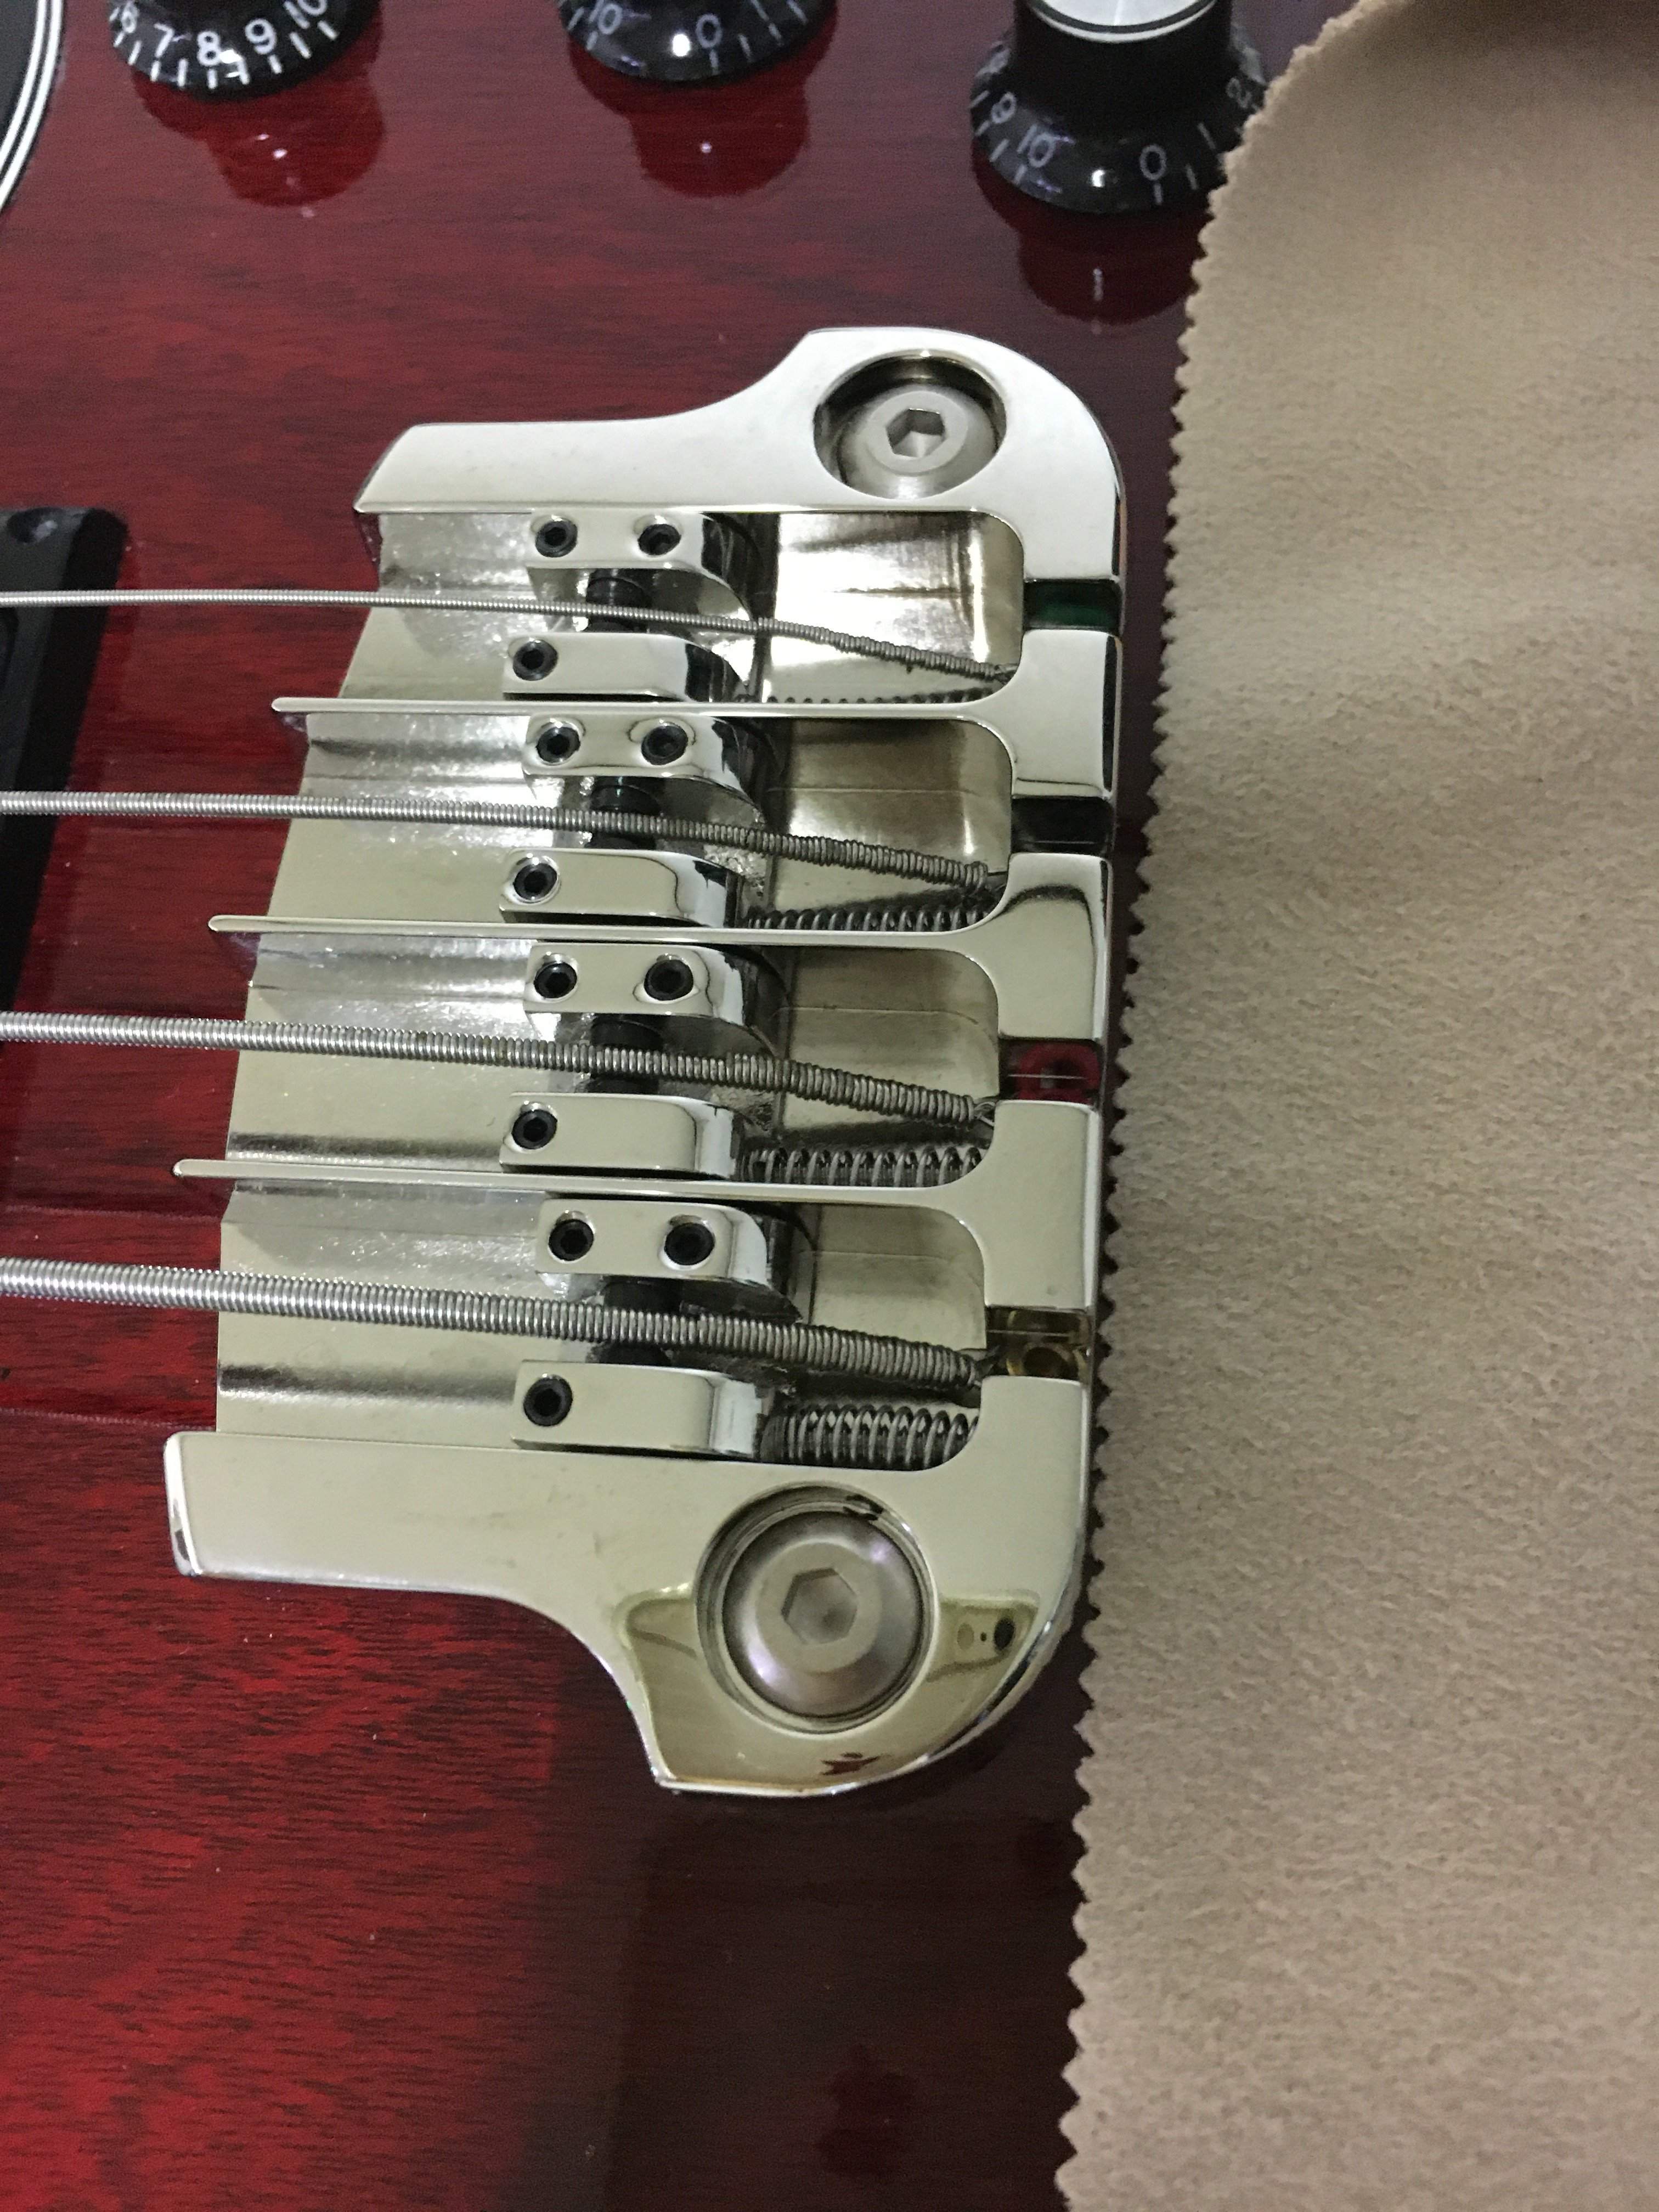
It's best to set the action first before intonation, but first I made a rough approximation of the intonation saddle positions by just looking at the fixed angle of the straight plastic saddle on my acoustic bass and starting from how far back the saddle was on the E string on my original bridge (compared to the mounting hole). Amazingly to me, just by eyeballing it like that, I later found my intonation to be almost exactly right! Mainly I just ended up having to move the G string saddle a bit farther back to get everything perfect.
First I layed down a polishing cloth behind the bridge so as not to inadvertently end op marring the body with an untimely slip of a screwdriver, then I loosened the string I was going to adjust the saddle position on. Use a Phillips head screwdriver with a long enough shank so as to not have the handle, etc. banging up too much against the bass's body, insert it in the hole in the back of the bridge to the left of the target string's ball end, and turn clockwise (iirc!) to start bringing the saddle back to the estimated correct position. Repeat for each string
Final eyeballed positions (which, like I said, turned out to be pretty much spot on):
Then you can adjust the string height. I just raised each string until it stopped buzzing (or was barely buzzing) when plucked with my typical plucking force.
Loosen the string you'll be raising and use the included Allen wrench to raise each side of the saddle's base (one screw per side, so 2 screws per saddle). The trick here is getting the base of the saddle even. After trying a few saddle adjustments, you'll get the hang of it, but the idea is to try rocking the saddle side to side with your finger - if it doesn't rock, the base is even. Then tighten the string back up to pitch and see if you're getting any buzzing. If it's still buzzing, loosen the string and try raising the saddle a little more, and so on. The two nutward most screws are the ones that raise the saddle. The sole rearward screw is, I assume, for string spacing

The picture below shows the height between the bottom of the saddle and the bridge base plate. You can also kinda eyeball whether the two sides of the bottom of the saddle are even, but you'll have to try rocking the saddle with your finger to be sure
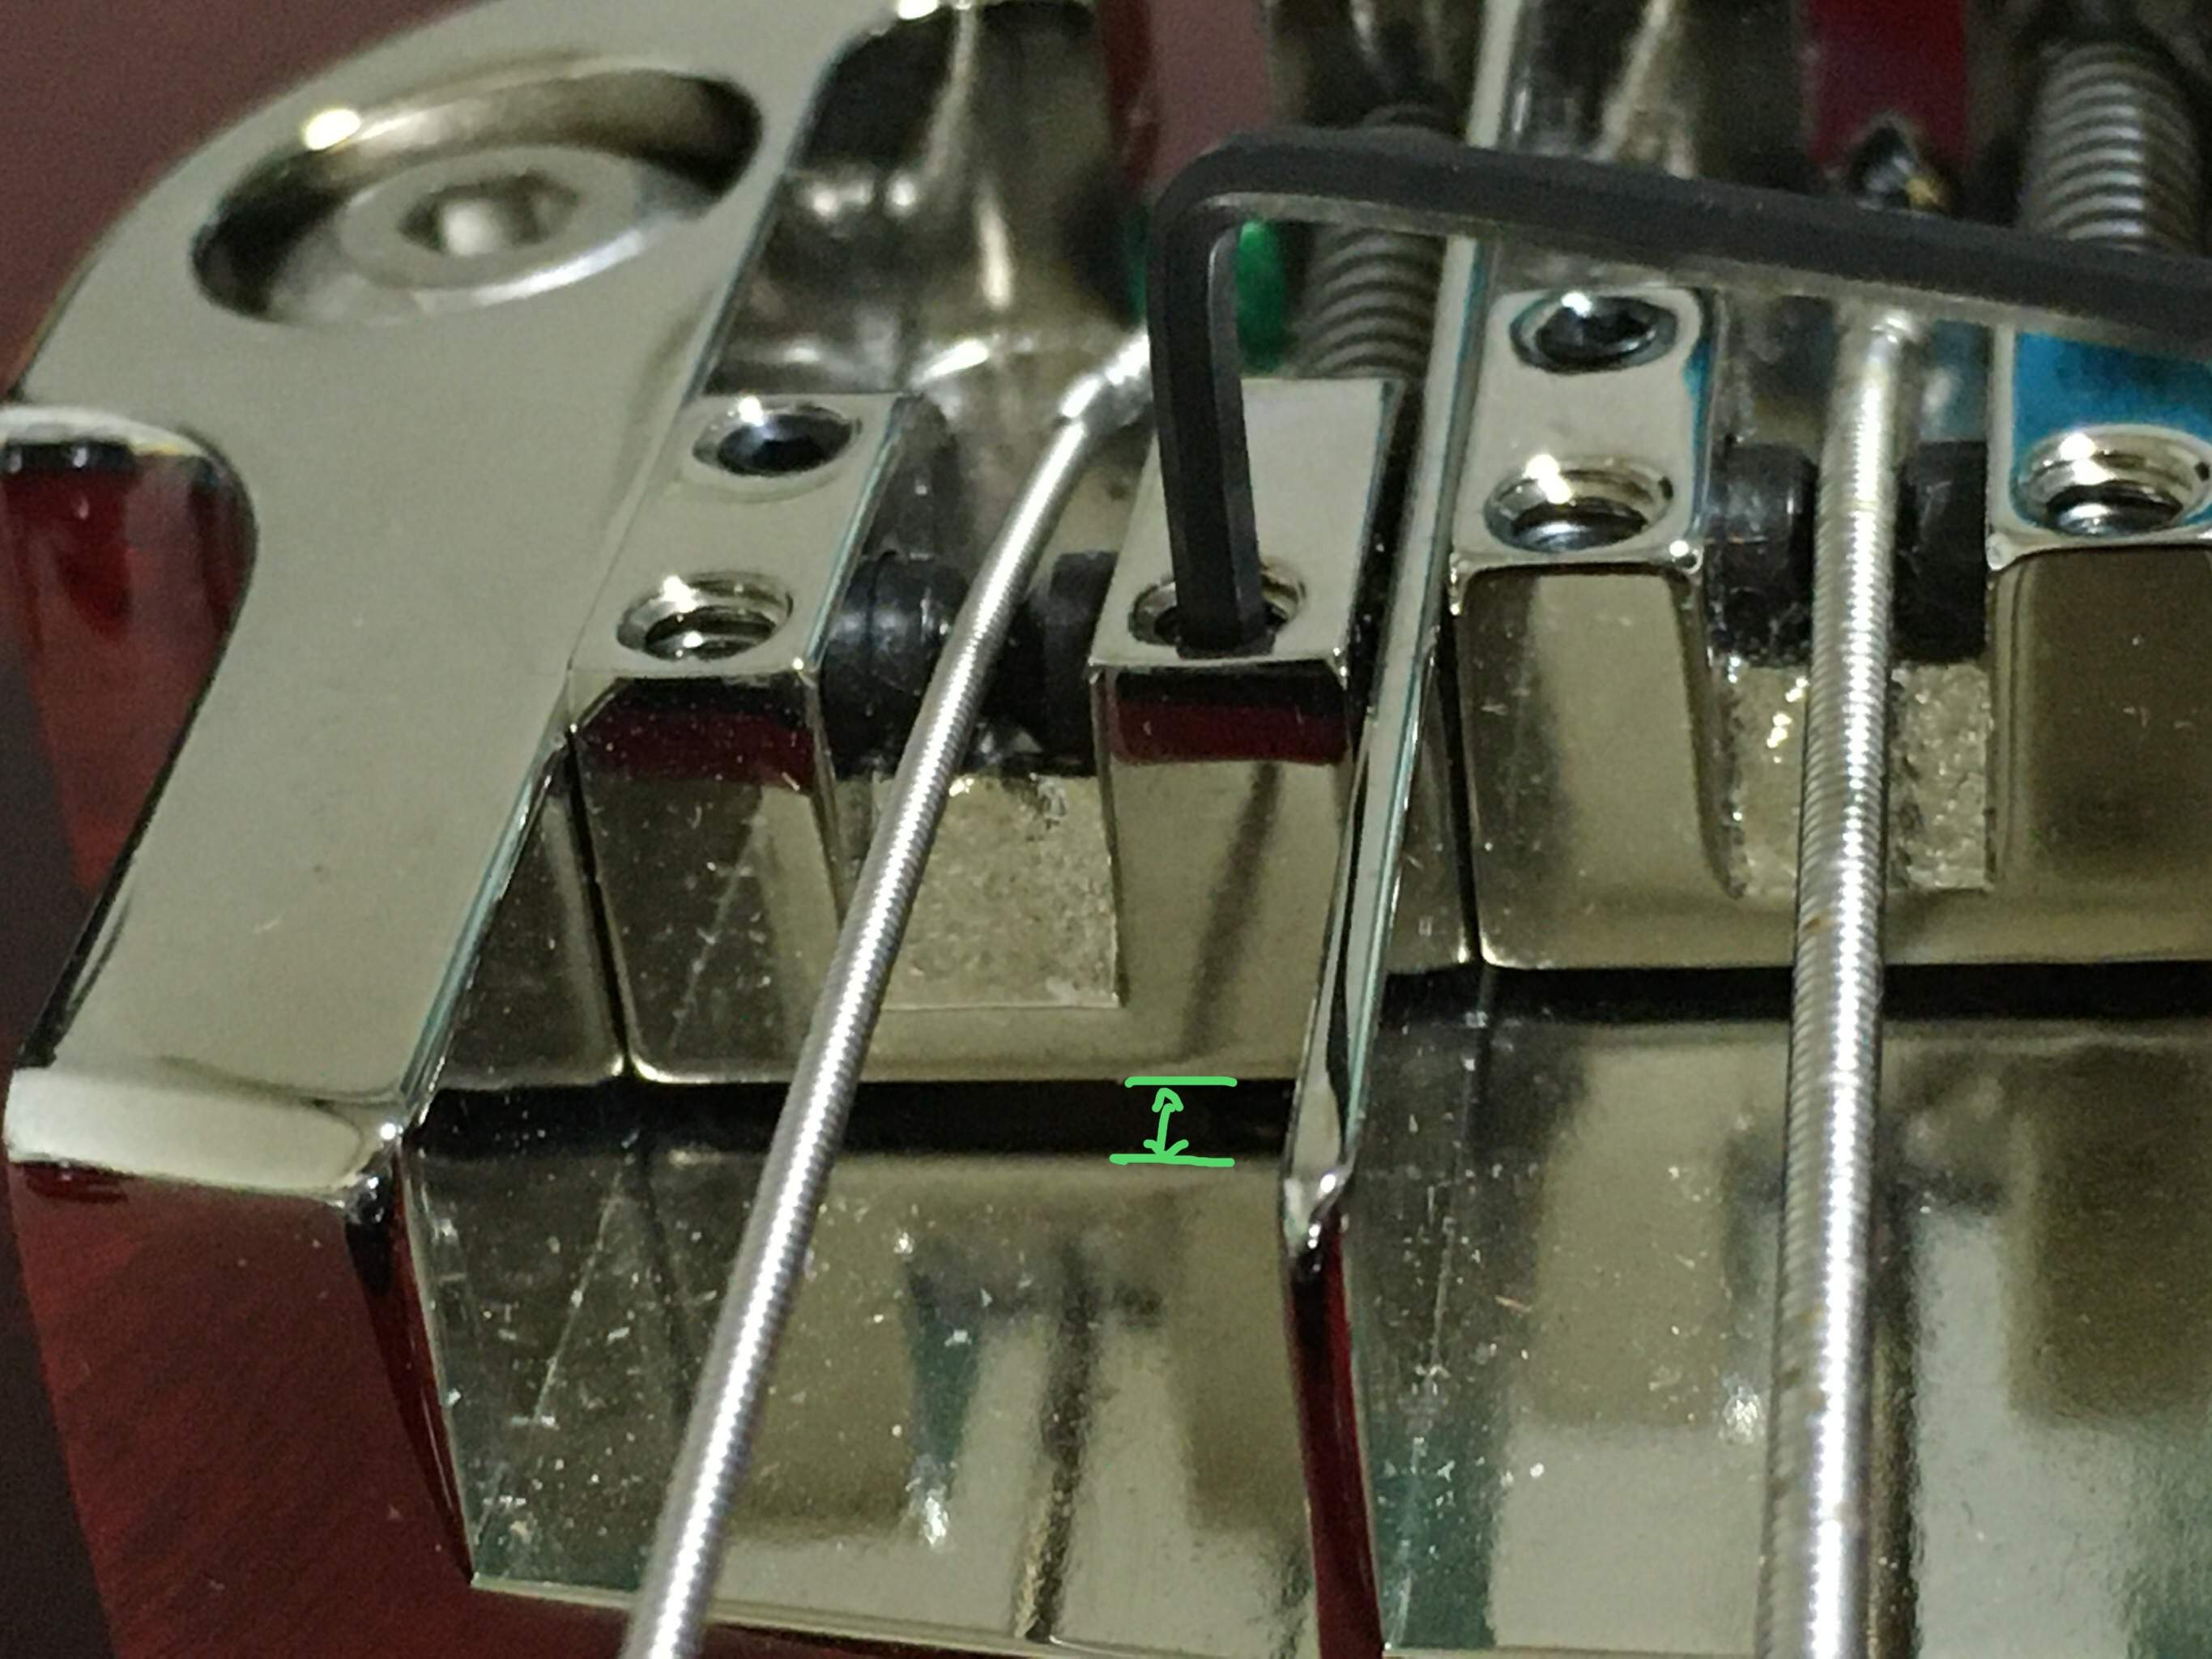
Loosen the string you'll be raising and use the included Allen wrench to raise each side of the saddle's base (one screw per side, so 2 screws per saddle). The trick here is getting the base of the saddle even. After trying a few saddle adjustments, you'll get the hang of it, but the idea is to try rocking the saddle side to side with your finger - if it doesn't rock, the base is even. Then tighten the string back up to pitch and see if you're getting any buzzing. If it's still buzzing, loosen the string and try raising the saddle a little more, and so on. The two nutward most screws are the ones that raise the saddle. The sole rearward screw is, I assume, for string spacing
The picture below shows the height between the bottom of the saddle and the bridge base plate. You can also kinda eyeball whether the two sides of the bottom of the saddle are even, but you'll have to try rocking the saddle with your finger to be sure
Once the action is set to your satisfaction, you can fine tune the intonation. Of course, mess around a bit and also put it on a stand and admire your handiwork  I then let it sit a day and re-tweaked a little the next evening. That's pretty much it. I may make some further adjustments for string balance (even-ing out the volume between strings), but we'll see.
Hopefully the above mini-tutorial can be of some help to someone.
It took me a little while to get used to the look of the SuperTone, but I'm used to it well enough now and the bass plays so much better that there's no way I'm going back. YMMV!
I then let it sit a day and re-tweaked a little the next evening. That's pretty much it. I may make some further adjustments for string balance (even-ing out the volume between strings), but we'll see.Hopefully the above mini-tutorial can be of some help to someone.
It took me a little while to get used to the look of the SuperTone, but I'm used to it well enough now and the bass plays so much better that there's no way I'm going back. YMMV!
Last edited:
D
DMT
it seems (at least to my touch) that that rear set screw on the saddle seems to lock/loosen the travel of the rolling saddle? there doesnt seem to be any real measurable room for string spacing to move, perhaps 1mm of glide between the saddles and the walls between them... can anyone confirm?
it seems (at least to my touch) that that rear set screw on the saddle seems to lock/loosen the travel of the rolling saddle? there doesnt seem to be any real measurable room for string spacing to move, perhaps 1mm of glide between the saddles and the walls between them... can anyone confirm?

DMT
it seems (at least to my touch) that that rear set screw on the saddle seems to lock/loosen the travel of the rolling saddle?
What I do is loosen the rolling saddle using that screw, then move it it where I want it by gliding the string (along with the rolling saddle) in its desired position and lock it there. The process can be finicky on occasion.
And you're correct, there is no way to move the actual saddle/wall.
What I do is loosen the rolling saddle using that screw, then move it it where I want it by gliding the string (along with the rolling saddle
Unfortunately, I don't have the bass with me to check - it's at my practice room and that's a long ***-freezing walk across a section of town, lol; I'll revisit it sometime during the week.DMT
it seems (at least to my touch) that that rear set screw on the saddle seems to lock/loosen the travel of the rolling saddle? there doesnt seem to be any real measurable room for string spacing to move, perhaps 1mm of glide between the saddles and the walls between them... can anyone confirm?
All I can say is, I'm so glad I threw in a few disclaimers with my mentions of "string spacing adjustment' above! Man, I wish I could go back and edit the whole thing, but anyways...like I said, I didn't actually try adjusting the rear screw and only assumed it was for string spacing.
From a combination of ajkula66's post and c-level's post, I guess it allows for a very slight repositioning of the saddle side to side? If so, that's all the adjustment I'd personally need, if any. The 2 outer strings are just a bit off the pole pieces on my bridge pickup, but right over the neck pickup pole pieces, so all I might want to do is perhaps slide them halfway between as a compromise. But really, on my bass it isn't important I'm thinking - it's close enough and I'm mainly using my new neck pickup anyway.
But now I do want to see for myself what that adjustment screw does and how it does it...

Unfortunately, I don't have the bass with me to check - it's at my practice room and that's a long ***-freezing walk across a section of town, lol; I'll revisit it sometime during the week.
All I can say is, I'm so glad I threw in a few disclaimers with my mentions of "string spacing adjustment' above! Man, I wish I could go back and edit the whole thing, but anyways...like I said, I didn't actually try adjusting the rear screw and only assumed it was for string spacing.
From a combination of ajkula66's post and c-level's post, I guess it allows for a very slight repositioning of the saddle side to side? If so, that's all the adjustment I'd personally need, if any. The 2 outer strings are just a bit off the pole pieces on my bridge pickup, but right over the neck pickup pole pieces, so all I might want to do is perhaps slide them halfway between as a compromise. But really, on my bass it isn't important I'm thinking - it's close enough and I'm mainly using my new neck pickup anyway.
But now I do want to see for myself what that adjustment screw does and how it does it...
Alright, before I put my 2 cents worth in on this bridge I need a little clarification on one point. On the underneath side of the bridge in the center is what as refered to as a center stud recess. They even give dimensions for it. Was the center stud to be left in during intallation? If the stud is meant to be left in it removes the flush mount aspect of the bridge which was one of the bigger selling points to me. I did not leave the center pole in when I installed the Supertone on my SG but my confusion remains. Can someone clear this up for me as Hipshot will not address the issue. Review forthcoming.
Thanks all
Bob
Alright, before I put my 2 cents worth in on this bridge I need a little clarification on one point. On the underneath side of the bridge in the center is what as refered to as a center stud recess. They even give dimensions for it. Was the center stud to be left in during intallation? If the stud is meant to be left in it removes the flush mount aspect of the bridge which was one of the bigger selling points to me. I did not leave the center pole in when I installed the Supertone on my SG but my confusion remains. Can someone clear this up for me as Hipshot will not address the issue. Review forthcoming.
Thanks all
Bob
It's been quite a while since I installed my Hipshot bridge, but as I recall, the center stud recess is rather shallow. The corresponding bushing or anchor insert stuck up a little from the body, and the recess allowed the bridge to rest flat against the body without removing the insert. I assumed that was all the recess was for.
It's been quite a while since I installed my Hipshot bridge, but as I recall, the center stud recess is rather shallow. The corresponding bushing or anchor insert stuck up a little from the body, and the recess allowed the bridge to rest flat against the body without removing the insert. I assumed that was all the recess was for.
That makes sense. I had not heard about that issue until just recently and my insert was flush. But I can see where it could be a problem. Thank you for clearing that up for me.
Bob

Left my stud in and mine is flush to body (epi eb0).
I apologize it was my terminology. I was speaking to the center bolt not the stud it threaded into. Sorry for the confusion.
Bob
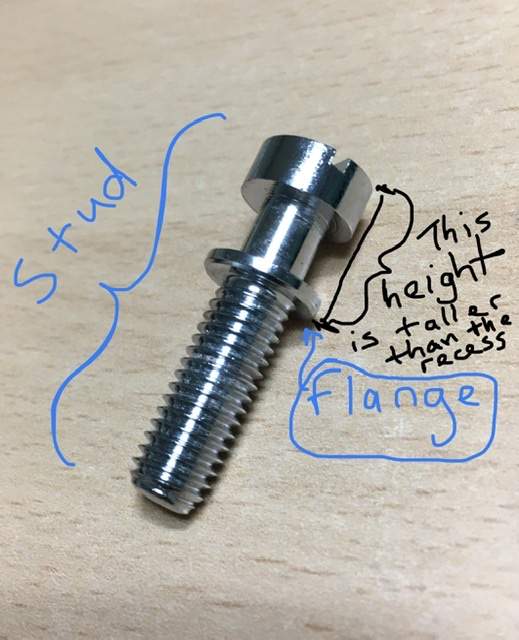
On my SG bass, to install the SuperTone, there's simply no way you could leave the front stud in its insert. Due to a flange at the top of the threaded part of the stud, the stud can only be screwed so far down into the insert, and at that point the top of the stud is still left sticking up way too high to lay the SuperTone over it. The stud must come out.
It was a little puzzling to me too why the recess is there, but it seems Craig4003 has it - if the top of one's front insert weren't perfectly flush with or sunk into the body, the bridge would then have to ride up on the part that stood proud. So, Hipshot apparently molded that little recess into the bottom of its bridge to account for minor variations in front insert height
It was a little puzzling to me too why the recess is there, but it seems Craig4003 has it - if the top of one's front insert weren't perfectly flush with or sunk into the body, the bridge would then have to ride up on the part that stood proud. So, Hipshot apparently molded that little recess into the bottom of its bridge to account for minor variations in front insert height
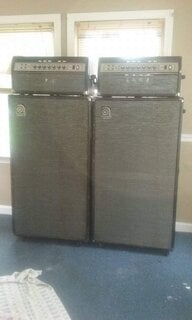
My 65 EB-3 played flat as you went up the neck, I put a Supertone on it and it's perfect, doesn't look anywhere near as good as the original but love the ability to move the strings from side to side and also the ability to intonate it properly. My 66 EB-2 intonates perfectly with the stock bridge. Those two basses have the old style two point bridge.

That must be a lot of fun, having those two bassesMy 65 EB-3 played flat as you went up the neck, I put a Supertone on it and it's perfect, doesn't look anywhere near as good as the original but love the ability to move the strings from side to side and also the ability to intonate it properly. My 66 EB-2 intonates perfectly with the stock bridge. Those two basses have the old style two point bridge.
View attachment 3624097
 And you play them through Ampeg stacks (looks like from your avatar photo)?
Funny how the EB-2 intonates well with the stock bridge and the EB-3 didn't. The Curse of Jack Bruce maybe...
Last edited:
Funny how the EB-2 intonates well we'll with the stock bridge and the EB-3 didn't. The Curse of Jack Bruce maybe...
My experience with older Gibson and Guild basses is that intonation depends to a large extent on how much the neck angle has moved over the past 50 years or so. Most of the ones that I've seen have intonation issues past 14th fret.
Latest posts
-
 Double Bass Yamaha slb300: can you play it on a stand?
- Latest: uprightbass.com
-

-


