• TalkBass has been independent since 1998. Add your voice.
    Create a free account to reply to discussions, view embedded media, and browse with fewer display ads.
    Join freeLog in
    Want zero display ads or expanded classifieds tools? Compare plans.

Thanks A Lot!!!

Thanks to a few visits to this forum I have been sucked into building my own bass:rollno:....not too sure if I am grateful yet....:eyebrow:

Here it is, well, what is being done. It is based on an Esp F-series. Mahogany body with an Imbuia top. The neck is Ash and Mahogany laminated.

Project 1.jpg

Lining up and checking fitting.jpg

The cool thing about the neckthrough is that I can do the scale layout without too much fuss...the ruler to the right is a piece of rubbish...took me a whole day to figure out it measured about 5mm long on the 35" scale:bawl:....it did make my fingerboard look like a dartboard:scowl:. in the end I got it right, but thankfully I had not sanded the fingerboard yet, so all the little hole will vanish. I am glad that I listened to the advice of a wise man on this forum...measure twice before the saw comes out....I measured about 10 times.


More pics to follow....
 
Here is the templete, whic someone here also suggested should be made first....It did help me discover that a few of my ideas are not too practical, and also the I was trying to use a 35" scale bass (my Ibanez) as a rough measuement guide, but had downloaded the measurements for a 34" bass....the project has now move into a 35" scale.

Template.jpg


My truss rod was copy of the Martin style, but with a bass trussrod from a local supplier (Stewmac was the better option, but not at twice the cost of the trussrod just for shipping). I cut the upper half of the alu tube off to turn it into a channel. It works the way it does. One of my friends does carbon fibre work for AMG Mercedes, and has offered to make me two stiffening rods.

Truss rod.jpg

I am going for a fretless lined ( I do need the training lines, sorry to the purists) so I do not want the neck to move at all. Fo rthe finish I will use a poly sealer, and then take it to the local bodyshop for a clearcoat, (which is what they do all day long). I needs to be a useable bass, so I do not really want to attempt the finish. I have tried about six or seven finishes on scrap, and was not happy with my ability to do any of them.
 
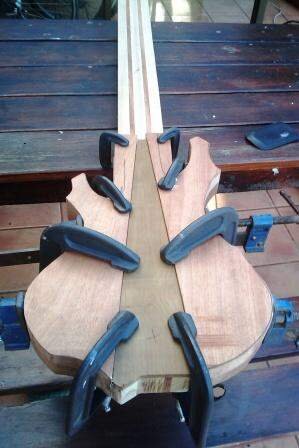
So, I have finally glued the wings on. This is a view from the back. I decided to forgo the traditional neckthrough look at the back and rather use a wedge of imbuia, which also allowed me to make a ledge at the bottom of the wings for the neck to rest on, giving me a larger glueing surface.:smug:

IMAG0133.jpg


I am also making myself some buttons, courtesy of another thread here. I used a 19mm holesaw without the pilot drill (lots of clamping recommended). I then drilled a small hole in the back and put a long woodscrew into the hole. The screw was long enough for the head to rest on the top of the chuck "clamps" which minimized the wobble and also stoped any chance of a button going ballistic into my face. Note that I do not think the setup can handle a lot of lateral pressure, so patience is the word. This then went into the chuck of my drill, turning it into a basic lathe for sanding and rounding. :hyper:

IMAG0134.jpg

Tonight I hope to make the finishing inlays to tidy up all the joints. They do need tidying as I mostly used handtools, and have almost no woodworking experience.

Everything I have achieved has been gleaned from this forum.

I have also decided on a polyurethane varnish, which started coming out very nicely after the third sanding and coating. It is almost at buffing level, but two more coats should do the trick. I might still take it for a clear lacquer coat (also poly based) as the varnish seems to be quite soft, I made quite a scratch using my fingernail :rollno:

With mother of pearl products being very closely scrutinized in South Africa, they are very scarce and very pricey. I found a sheet of paper in a hobby shop the has a very pearlescent finish to it. I made a cutout for an inlay, put the paper in it and then covered it with resin to see the effect. Although it is not the same, it does give a very nice effect. I made my enfaving too deep though, which made the side walls very evident. With a shallower engraving it will definitely be a very neat solution to my problem....no MOP available, even for import.
 
Here is the templete, whic someone here also suggested should be made first....It did help me discover that a few of my ideas are not too practical, and also the I was trying to use a 35" scale bass (my Ibanez) as a rough measuement guide, but had downloaded the measurements for a 34" bass....the project has now move into a 35" scale.

My F-204 is 35" and the only advantage is a tight B string or detuned tree. Wish I stuck with my plan instead of going out and buying one :hmm: You dont look far off from the real thing!
Photoon2010-06-25at19383.jpg
 
So, I took a power planer to my bass to shave off about 6mm opn the wings. It was a rental tool, and managed to plane only on the one side. :mad: I looked at the first pass and it was all gouged....it took about 3mm on the righthand side of the planer, and zilch on the left.:crying: If it was my planer I would have fixed it percussively....

I turned to my trusty Stanley no.4 and spent the next two hours getting much needed exercise.....should have just done that from the start:eyebrow:

After some orbital sander action it is now within my acceptance levels:smug:

Thing I have learnt:
1. Do not trust hired tools
2. A dremel router will track grain if you push too hard, so keep extra inlays
3. Power tools get you into trouble very quickly.....especially hired tools
4. TB has some great info to recover from my mistakes
5. Hired tools have a mind of their own...
6. Do not get smitten by the hot girl working at the hire tool company, check the tool.

More to follow.....
 
So, I have done the cavities, but not to full depth yet. I tried using the dremel with the router attachment, but it kept grabbing (thankfully I started well within the lines) so I then decided to go at it the old fashioned way, with a chisel. I actually enjoyed that part a lot, even though it was very tedious.

IMAG0152.jpg

Preamp cavity.jpg

The preamp cavity ended up going into the chamfer, so I decided to get a nice thick lump of timber and recess it properly. This allowed me to chamfer the cover to fit the shape properly. I might sand the cover down on the inside to make it thinner...but it is not really an issue.

I am going to line the sides of the PU cavities with a veneer matching the top, just to tidy up the sides a bit.

This weekend the neck will be rough cut and I suppose I should finalise the headstock design. I am thinking of a design similar to a classical gtr, but not sure if the wood will handle the stress if there is a great big gap in the middle of the headstock. I might inlay an aluminium strip and cove it with a veneer from the top, through which the tuners will fasten, which help with the strength issue.
 
I am also still debating if I want a 35" or a 34". 34" will allow me to look at a string through body idea. (we do not have a large great variety of strings available in South Africa,:bawl: so longer strings are import only, which adds about $30 just for shipping). i am assumiong thatI woul need at least 2" of extra string to go through the body...which is now about 47mm.

Any ideas would be very welcome.

And, thanks for the compliments guys :bassist:
 
I decided to bring it back to a 34" for various construction reasons like not leaving enough wood to get the 35" neck sorted...But by moving the bridge I might get it to work again as a 35". So it is still an undecided issue for me.

The bigger mess I had to deal with last night was a router that grabbed whilst I was routing the trussrod channel.:mad::mad::mad::mad:

Damn Router2.jpg
:crying::crying::crying:

Thankfully through recent experiences with power tools I had anticipated such a @!%$-up, so I used a bit that was 2mm smaller than the actual needed width, which meant I could recover somewhat. I used my trusty 6mm chisel to get the channel to size. There is still some evidence, but only those who can see through fingerboards will notice;)

I used a bit with a shank bearing, but the problem I think was that I had to make too deep a cut on the first pass as the two scrap pieces of wood I used were only 22mm thick ( the first cut was 10mm deep with an 8mm bit). the fence did not move, the bearing jumped the slot, which caused all the heartache. Tonight I will redesign my router jig, as I still need to rout the channels for the stiffener strips.

I will post some pics tommorrow of my covered pickups.

Thoughts....any input welcome.

I shaved a 10mm thick strip of the back of my neck laminate, and I am thinking of turning that into my fingerboard...obviously well coated. i am just concerned with the structural strength

I also have a very nicely figured piece of rosewood for the fretboard...

Any thoughts on which to use.:help::help:
 
Looking great!

As long as you end up with a good fit on the truss rod you should be fine. My first one had a rattle so I would recommend shimming at least a few places and carving them back with your chisel to get a snug fit on that rod.


Can't wait to see more :)
 

Latest posts