
When I do pore filling i use Z-poxy without thinning. I just use a plastic card or squeegeto distibute the epoxy. On curved surfaces I my hands (With thin rubber gloves!) instead of a card. I usually have to do two coats, though.

Enjoy the benefits of a premium membership!
Upgrade Account
-
TalkBass has been independent since 1998. Add your voice.
Create a free account to reply to discussions, view embedded media, and browse with fewer display ads.
Join free Log in
Want zero display ads or expanded classifieds tools? Compare plans.
You are using an out of date browser. It may not display this or other websites correctly.
You should upgrade or use an alternative browser.
You should upgrade or use an alternative browser.
There's another storm brewing!
- Thread starter pilotjones
- Start date
More options
Who Replied?

Pore fill update
Between a lot of work, my daughter's wedding, starting in a new band, getting a new workstation synth, and some disappointments with the pore fill, there had been not a lot of progress on this lately. If this had been for a client I would have kept on it, but since I'm the client, I can adjust.
One thing that didn't work is the heat gun thing. What it did was drive out a seemingly unlimited supply of pinpoint air bubbles from the wood grain, small enough not to pop. So it created a foam problem. That ended up being wiped off before curing, and re-coated.
I've been working this on my test piece. I've done a two-coat fill, then sanded it back and tried again with different mixes and technique. I've also needed to fill in two wormholes on the body - actually one hole, split between the two wings with the bookmatch. Unfortunately on the last go, I must have miscalculated my resin/hardener/thinner ratio, because I got something that did not harden. I had to wipe down the holes in the body, and then irrigate with acetone. On the test piece I wiped down with acetone-soaked paper towels. Then I tried to raise out the last uncured epoxy with the heat gun, and managed to scorch the bass body. So, more sanding and shaping.
Currently I have the test piece with a new first coat on it,
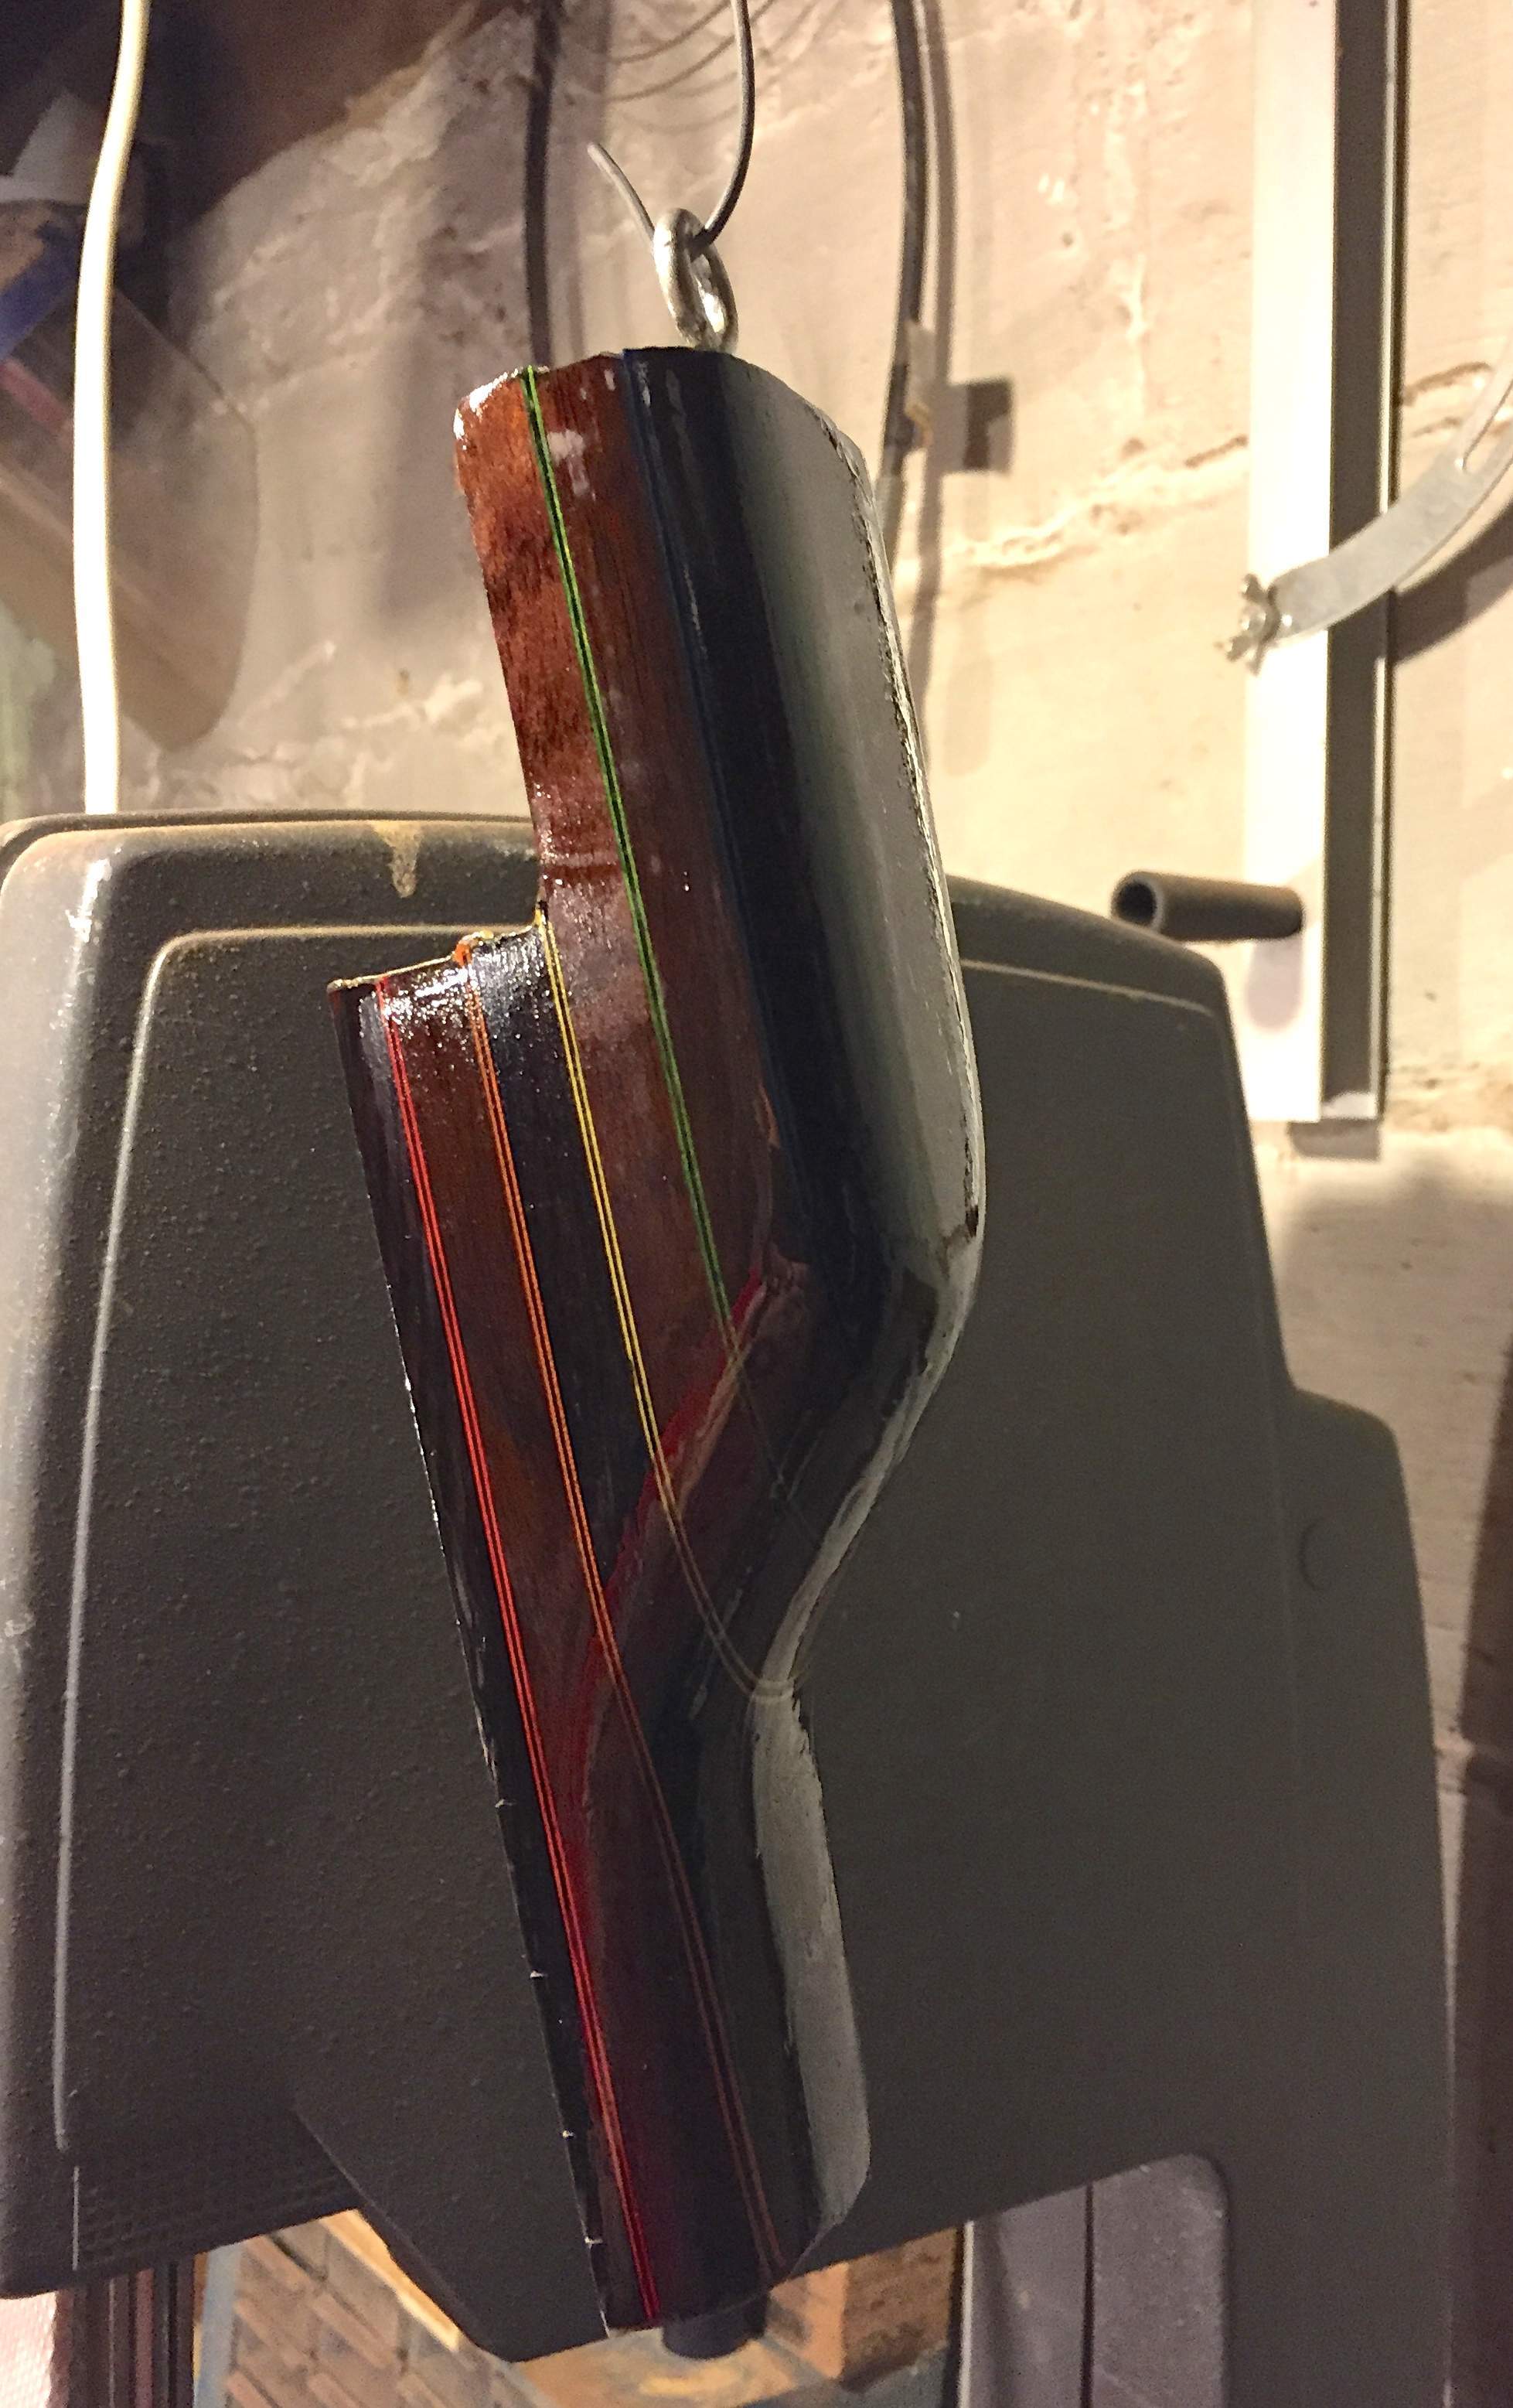
and the holes in the body filled again.
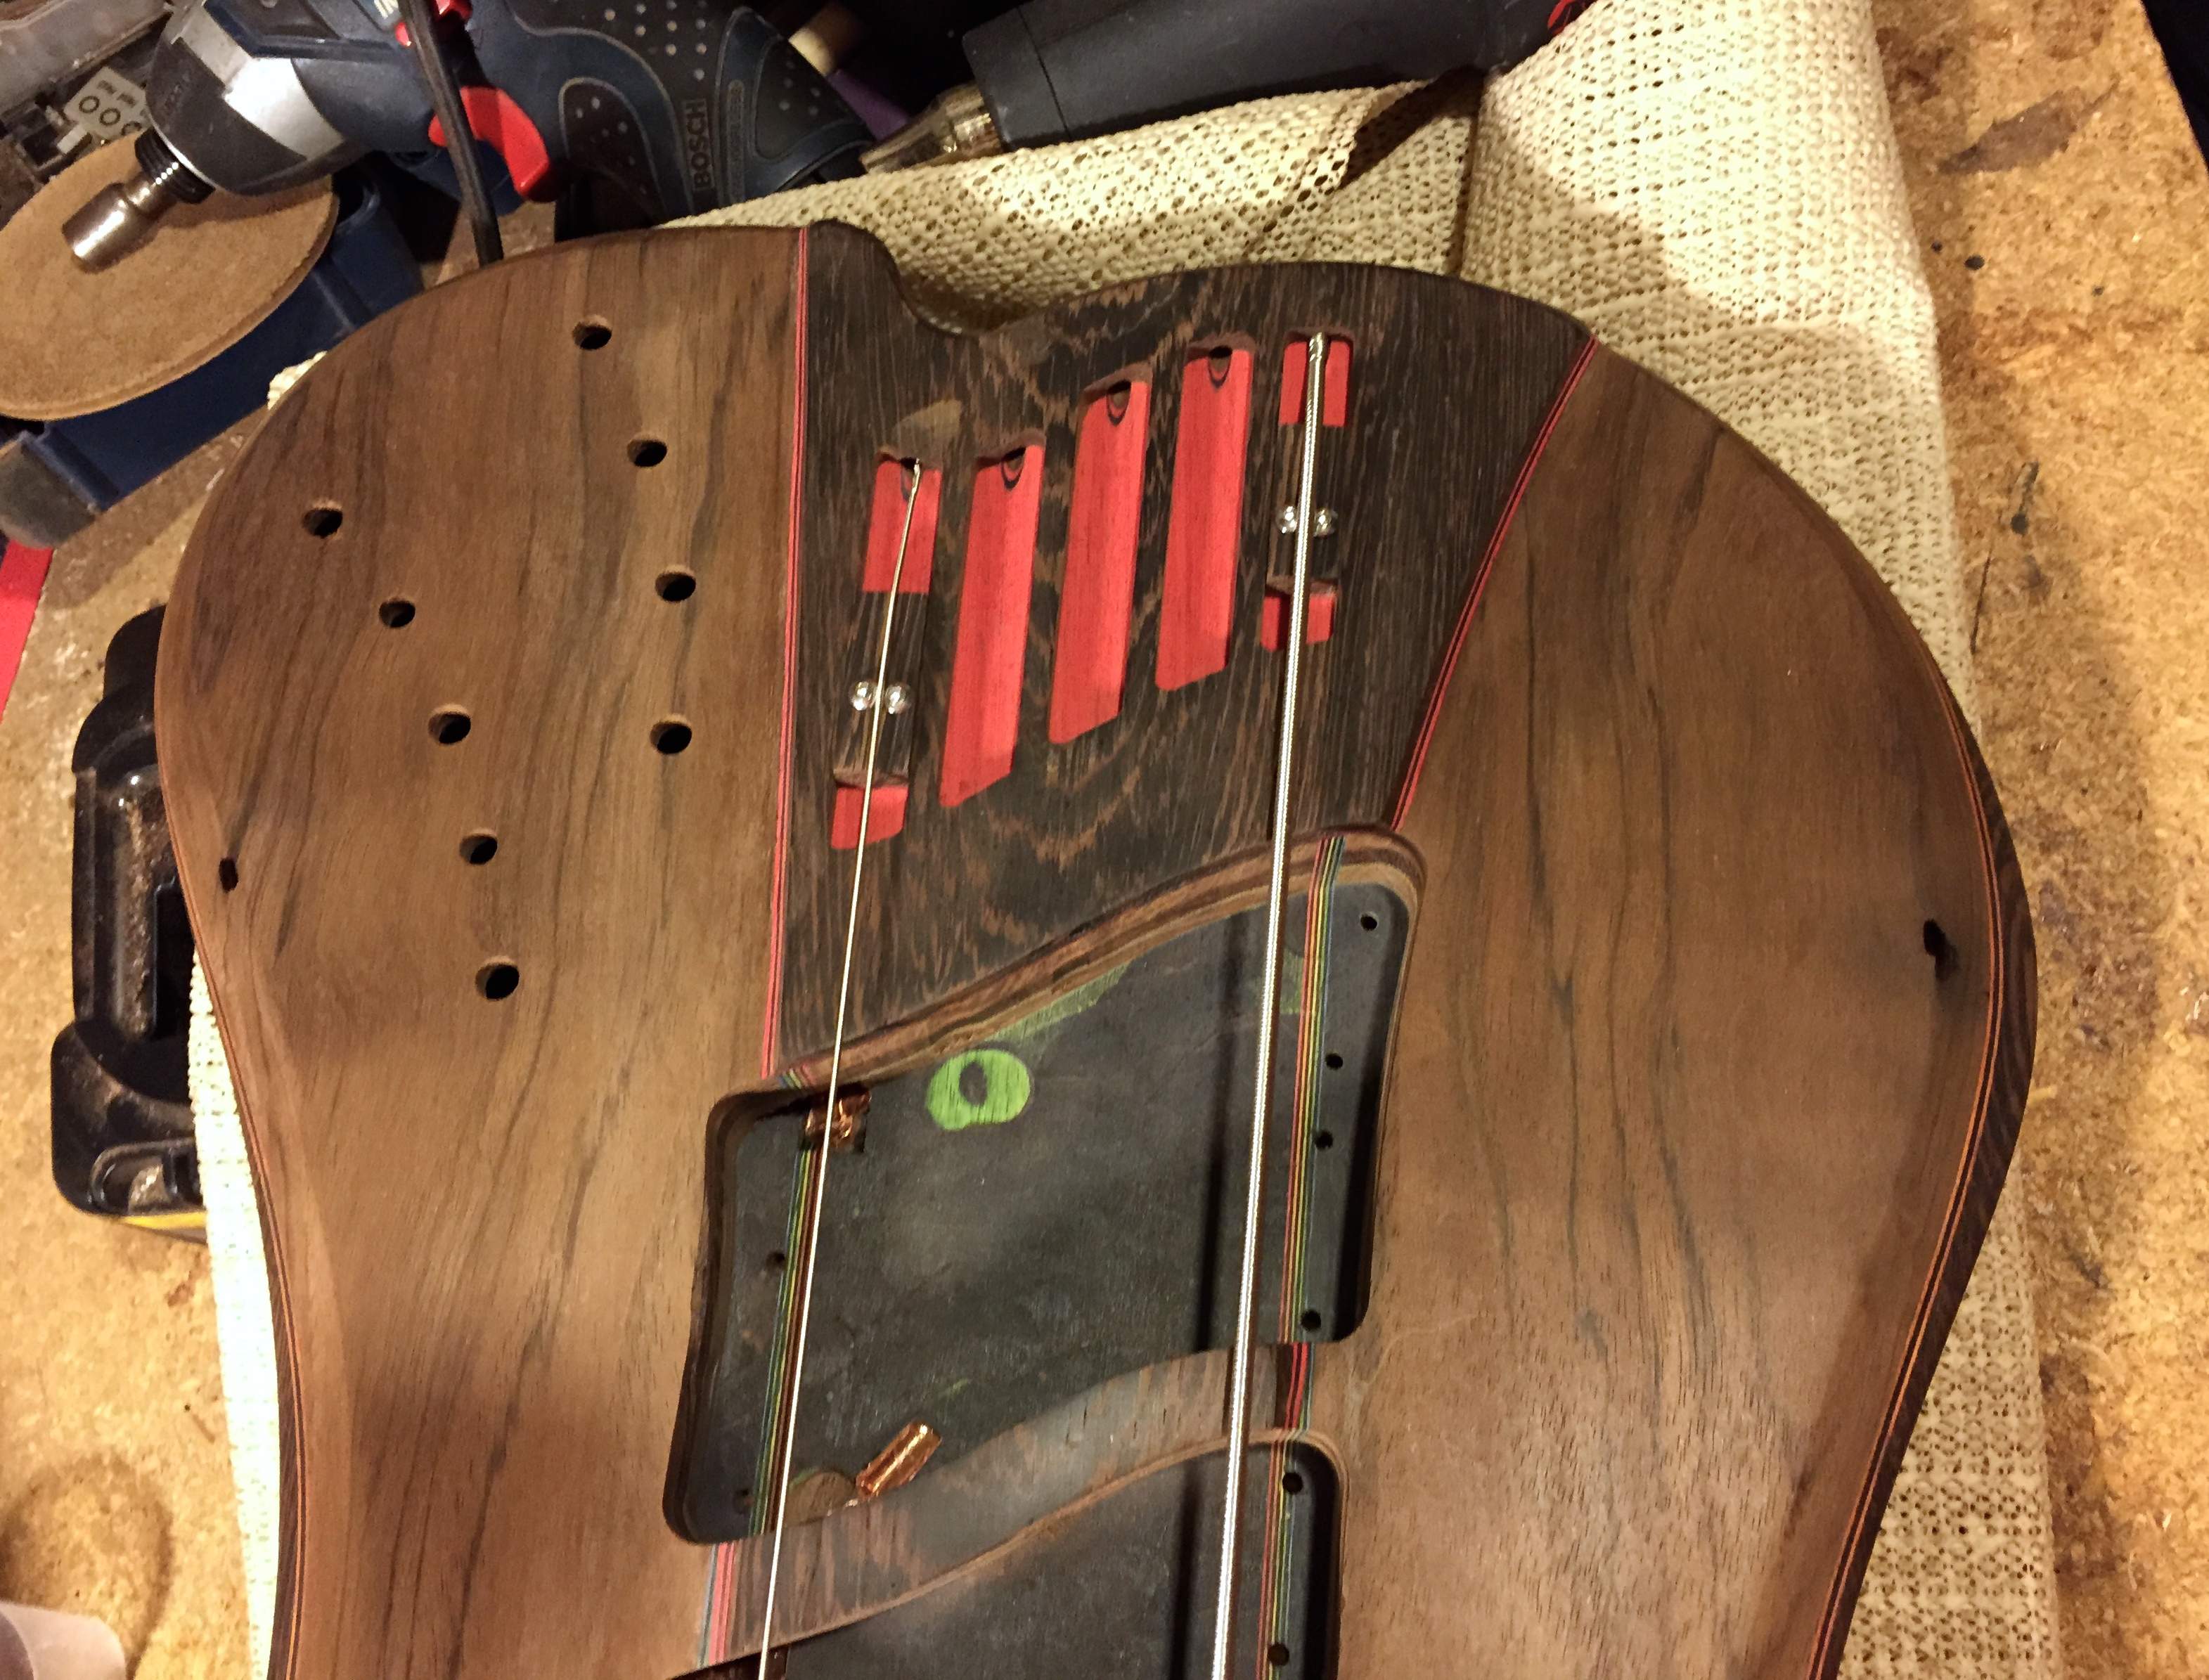
Hopefully there will be no problem from any residual uncured epoxy.
Between a lot of work, my daughter's wedding, starting in a new band, getting a new workstation synth, and some disappointments with the pore fill, there had been not a lot of progress on this lately. If this had been for a client I would have kept on it, but since I'm the client, I can adjust.
One thing that didn't work is the heat gun thing. What it did was drive out a seemingly unlimited supply of pinpoint air bubbles from the wood grain, small enough not to pop. So it created a foam problem. That ended up being wiped off before curing, and re-coated.
I've been working this on my test piece. I've done a two-coat fill, then sanded it back and tried again with different mixes and technique. I've also needed to fill in two wormholes on the body - actually one hole, split between the two wings with the bookmatch. Unfortunately on the last go, I must have miscalculated my resin/hardener/thinner ratio, because I got something that did not harden. I had to wipe down the holes in the body, and then irrigate with acetone. On the test piece I wiped down with acetone-soaked paper towels. Then I tried to raise out the last uncured epoxy with the heat gun, and managed to scorch the bass body. So, more sanding and shaping.
Currently I have the test piece with a new first coat on it,
and the holes in the body filled again.
Hopefully there will be no problem from any residual uncured epoxy.


Thanks. It will be even nicer with the final shaped bridge saddles.I like what you're doing with the bridge. Looks great.
The row towards the edge of the body is three knobs and two switches, alternating. Master volume knob - pickup select switch - pickup blend knob - Z-mode switch - passive tone knob. The row towards the center will probably get smaller knobs, and is the four band EQ.What are all the knobs going to be? That's a lot of holes!



- Aug 25, 2004
- 939
- 1,337
- Disclosures
- Builder: Martin Keith Guitars
Pete - what epoxy are you using for the filler? Have you checked for compatibility with alcohol as a thinner? Acetone is a much more commonly used thinner for epoxy resins, so the alcohol may have contributed to the poor cure and the bubbling. I'd be nervous about using DA as a thinner since the denaturants sometimes vary and could affect the chemistry.
Plus, evaporative solvents can cause the bubbling issues you're having - acetone is less prone to this (IIRC) because it's more volatile and thus evacuates the resin more quickly.
I pore fill with epoxy at full mix ratio, no thinning. Most wood fillers are a pasty consistency, so the epoxy is already thinner than those. If using West System, use the 206 hardener - the 205 is too quick and will hit B-stage (gelling) too quickly, unless you mix 10g at a time and just keep remixing small batches and doing the instrument in zones.
Since you're trying to fill pores, the thicker stuff will penetrate less but build more quickly, both desirable IMO considering the target.
The AdTech resin is even thinner and may do what you need with penetration into some of the softer areas (i.e. the flatsawn wenge), though it requires longer cure times than the West...sometimes significantly so.
Also - remember that all epoxies will end up with an amine layer on the surface after curing (the so-called "amine blush"). This can interfere with proper curing of any subsequent oil finishes, and should be washed off with a damp rag before oiling.
Details, details. If you had told me in high school that I would ever think so much about glue, I'd would have assumed you'd been sniffing some.
Cheers,
Martin
Plus, evaporative solvents can cause the bubbling issues you're having - acetone is less prone to this (IIRC) because it's more volatile and thus evacuates the resin more quickly.
I pore fill with epoxy at full mix ratio, no thinning. Most wood fillers are a pasty consistency, so the epoxy is already thinner than those. If using West System, use the 206 hardener - the 205 is too quick and will hit B-stage (gelling) too quickly, unless you mix 10g at a time and just keep remixing small batches and doing the instrument in zones.
Since you're trying to fill pores, the thicker stuff will penetrate less but build more quickly, both desirable IMO considering the target.
The AdTech resin is even thinner and may do what you need with penetration into some of the softer areas (i.e. the flatsawn wenge), though it requires longer cure times than the West...sometimes significantly so.
Also - remember that all epoxies will end up with an amine layer on the surface after curing (the so-called "amine blush"). This can interfere with proper curing of any subsequent oil finishes, and should be washed off with a damp rag before oiling.
Details, details. If you had told me in high school that I would ever think so much about glue, I'd would have assumed you'd been sniffing some.
Cheers,
Martin
Last edited:

I agree with the above, I've never had problems with epoxy bubbling when thinning with Acetone. But for filling I actually thicken mine with silica. That said I got away from using epoxy for anything but the occasional fingerboard. I've found that filling with my pre-thinned coating system works better for me.
Thanks, all. I'll try either unthinned, or thinned with acetone. I tested the alcohol-thinned mixtures on scrap before, even at twice the alcohol, and they cured fine - even the excess in the cup. So I think think the the non-curing-ness of that one batch had to be a resin/hardener ratio mistake. I hadn't considered solvents and bubble production, though.
The main reason I've been thinning is to try to get more penetration, on the assumption that more penetration would give better figure in the walnut, which has a bit of a wave to it. Based on the truth-or-is-it-really that oil finishes give greater figure enhancement due to better penetration.
Also, thinning makes it way easier to mix the epoxy without entraining bubbles.
The main reason I've been thinning is to try to get more penetration, on the assumption that more penetration would give better figure in the walnut, which has a bit of a wave to it. Based on the truth-or-is-it-really that oil finishes give greater figure enhancement due to better penetration.
Also, thinning makes it way easier to mix the epoxy without entraining bubbles.
- Aug 25, 2004
- 939
- 1,337
- Disclosures
- Builder: Martin Keith Guitars
With more porous woods (walnut, wenge) I'd worry about too much penetration if using a solvent. The thinned mix will get in there,
and thereafter there's nowhere for the solvent to go except back out through the partially cured resin.
For figure enhancement, I don't necessarily buy that the oils do a better job. IMO it has as much to do with the refractory quality of the finish film than it has to do with penetration. I've always believed that you're really only seeing the outer thou or two anyway, so penetration beyond that point has little value for the visual effect. It will add mechanical strength (good for ding-resistance on an oiled guitar) and some weight, though that latter is negligible on a solidbody.
As for bubbles in the epoxy cup - it's inevitable while mixing. I haven't found them to be a problem during pore filling. For the first coat, I trowel the stuff on with a folded paper towel and then wipe down with dry paper until they come off looking dry. This leaves a little in the pores and gives the 'penetration' coat, where the first tiny thickness gets saturated with resin. After that, a second coat which is really just meant to build.
Here's a piece of a tutorial by Mike Doolin on pore filling with epoxy, courtesy of the good folks at LMI - note that he uses DA as a solvent/thinner, but only for the second coat to re-wet any burned-through areas following the initial fill:
The mix ratio is critical for epoxy; if you get it wrong, it will never cure and will leave a sticky mess. I measure it by weight on a triple beam balance gram scale since I'm using such a small amount. The ratio by weight is 2.23 parts resin to 1 part hardener. I thoroughly mix the epoxy first, and then mix in an equal amount by volume of Silica Thickener. I only mix up about a tablespoon of the mixture at a time. The mixture is about the consistency of cold cream, and almost that white in color, but it goes invisible when scraped into the pores.
However, epoxy is not intended as a finish product, so it doesn't flow out well at all and tends to fish-eye. The solution to this is to scrape it on with a plastic card, a business card or a single-edge razor blade, leaving as little as possible on the surface. I spread the epoxy across the wood surface and immediately scrape off as much as I can. This is a critical point: scrape off as much epoxy as possible! Don't leave any on the surface, just scrape it away and it will remain behind in the pores. That way, you won't have to sand it level later. On the other hand, make sure to get some epoxy on every square inch of the wood surface, to ensure consistent color and adhesion under finish.
The curves of the neck are a difficulty. I scrape it on with a flexible plastic card that will wrap around the curves, and scrape off as much as I can that way. Then I wipe off the little ridges with an alcohol-wetted rag.
The epoxy starts to set in a few minutes, so I typically mix one batch for the sides, another for the back and top and another for the neck. So, a few tablespoons of epoxy is plenty to seal and fill an entire guitar. If you do a careful job of scraping, making sure to cover every square milimeter but not leave any on the surface, you will completely fill the pores in one application. In practice, I almost never achieve a one-coat fill, so I apply another coat after at least 6 hours curing in my storage room. Temperature affects the cure too, so it's best to hang the guitar in a fairly warm room while the epoxy is curing, 70 degrees or higher.
Important: do not use shellac over or under epoxy, the two will not stick to one another! Either one works as a sealer and improves adhesion to the waterborne, but it's one or the other, not both. I prefer epoxy because it "wets" the wood better and acts as a filler as well.
After curing over night I may sand the surfacevery lightly with 400 grit gold sandpaper to remove any little nubs or dust specs. This is a very cursory sanding - you don't want to sand through to the wood, you just want to level the surface and take off any nubs. It's even better if you don't have to sand at all, which is possible if you do a good job of scraping the epoxy off when it's still wet. If you sand through to the wood, it won't have the same color or depth as the rest of the suface. If you do sand through to the wood, you can thin a little epoxy with an equal part of denatured alcohol and wipe this thinned epoxy onto the surface with a soft cloth pad, wiping with the grain and trying not to go back over areas you've already wiped. The alcohol evaporates away quickly, leaving behind a very thin coat of epoxy. The purpose of this coat is to get some epoxy onto any bare wood that you've exposed, to ensure consistend color and adhesion. Let this last epoxy coat cure for at least 6 hours before applying the waterborne.
and thereafter there's nowhere for the solvent to go except back out through the partially cured resin.
For figure enhancement, I don't necessarily buy that the oils do a better job. IMO it has as much to do with the refractory quality of the finish film than it has to do with penetration. I've always believed that you're really only seeing the outer thou or two anyway, so penetration beyond that point has little value for the visual effect. It will add mechanical strength (good for ding-resistance on an oiled guitar) and some weight, though that latter is negligible on a solidbody.
As for bubbles in the epoxy cup - it's inevitable while mixing. I haven't found them to be a problem during pore filling. For the first coat, I trowel the stuff on with a folded paper towel and then wipe down with dry paper until they come off looking dry. This leaves a little in the pores and gives the 'penetration' coat, where the first tiny thickness gets saturated with resin. After that, a second coat which is really just meant to build.
Here's a piece of a tutorial by Mike Doolin on pore filling with epoxy, courtesy of the good folks at LMI - note that he uses DA as a solvent/thinner, but only for the second coat to re-wet any burned-through areas following the initial fill:
The mix ratio is critical for epoxy; if you get it wrong, it will never cure and will leave a sticky mess. I measure it by weight on a triple beam balance gram scale since I'm using such a small amount. The ratio by weight is 2.23 parts resin to 1 part hardener. I thoroughly mix the epoxy first, and then mix in an equal amount by volume of Silica Thickener. I only mix up about a tablespoon of the mixture at a time. The mixture is about the consistency of cold cream, and almost that white in color, but it goes invisible when scraped into the pores.
However, epoxy is not intended as a finish product, so it doesn't flow out well at all and tends to fish-eye. The solution to this is to scrape it on with a plastic card, a business card or a single-edge razor blade, leaving as little as possible on the surface. I spread the epoxy across the wood surface and immediately scrape off as much as I can. This is a critical point: scrape off as much epoxy as possible! Don't leave any on the surface, just scrape it away and it will remain behind in the pores. That way, you won't have to sand it level later. On the other hand, make sure to get some epoxy on every square inch of the wood surface, to ensure consistent color and adhesion under finish.
The curves of the neck are a difficulty. I scrape it on with a flexible plastic card that will wrap around the curves, and scrape off as much as I can that way. Then I wipe off the little ridges with an alcohol-wetted rag.
The epoxy starts to set in a few minutes, so I typically mix one batch for the sides, another for the back and top and another for the neck. So, a few tablespoons of epoxy is plenty to seal and fill an entire guitar. If you do a careful job of scraping, making sure to cover every square milimeter but not leave any on the surface, you will completely fill the pores in one application. In practice, I almost never achieve a one-coat fill, so I apply another coat after at least 6 hours curing in my storage room. Temperature affects the cure too, so it's best to hang the guitar in a fairly warm room while the epoxy is curing, 70 degrees or higher.
Important: do not use shellac over or under epoxy, the two will not stick to one another! Either one works as a sealer and improves adhesion to the waterborne, but it's one or the other, not both. I prefer epoxy because it "wets" the wood better and acts as a filler as well.
After curing over night I may sand the surfacevery lightly with 400 grit gold sandpaper to remove any little nubs or dust specs. This is a very cursory sanding - you don't want to sand through to the wood, you just want to level the surface and take off any nubs. It's even better if you don't have to sand at all, which is possible if you do a good job of scraping the epoxy off when it's still wet. If you sand through to the wood, it won't have the same color or depth as the rest of the suface. If you do sand through to the wood, you can thin a little epoxy with an equal part of denatured alcohol and wipe this thinned epoxy onto the surface with a soft cloth pad, wiping with the grain and trying not to go back over areas you've already wiped. The alcohol evaporates away quickly, leaving behind a very thin coat of epoxy. The purpose of this coat is to get some epoxy onto any bare wood that you've exposed, to ensure consistend color and adhesion. Let this last epoxy coat cure for at least 6 hours before applying the waterborne.
Martin,
Thanks for the further info. I'll look into the filler - I should be able to get some from my workplace.
Thanks for the further info. I'll look into the filler - I should be able to get some from my workplace.
Hmmm, I'm noticing two conflicting ideas in the last post - second coat for build, versus keep it down to no actual surface build. Am I missing something here?

keep us posted can't wait to see the final build!Hmmm, I'm noticing two conflicting ideas in the last post - second coat for build, versus keep it down to no actual surface build. Am I missing something here?
- Aug 25, 2004
- 939
- 1,337
- Disclosures
- Builder: Martin Keith Guitars
I think (thought?) the second, thinned coat was more for rewetting any areas that had been burned through after the sanding on the first coat, rather than building up any kind of film.
Well, today I sanded off the double coat on the sample piece and started again. The second coat had been done with a paper towel wipedown, and ended up with tons of linty crap embedded, plus there were a few pores that had whitish fill after the first coat and sanding that didn't darken with re-wetting.
Sanding back to wood and back up to smoothness went great, as this is the first time I've had all the grits to do a proper series. 80, 100, 120, 150, 180, P220, and P320. The only thing debatably missing was 280. It went much quicker than using fewer grits.
I laid on a slightly thinned coat (resin:hardener:acetone = 1:5:0.5 - manufacturer normal mix is 1:5:0) and scraped/squeegeed back with a thin credit card-ish thing. I don't have any silica filler to mix in. Doolin's method for curved surfaces of necks is not as effective on compound saddle curves of a neck heel. I gotta say, for pore fill, the flat and ribbon-like surfaces of an acoustic guitar box have to be much easier to deal with than the roundovers and curves of a solidbody.
Sanding back to wood and back up to smoothness went great, as this is the first time I've had all the grits to do a proper series. 80, 100, 120, 150, 180, P220, and P320. The only thing debatably missing was 280. It went much quicker than using fewer grits.
I laid on a slightly thinned coat (resin:hardener:acetone = 1:5:0.5 - manufacturer normal mix is 1:5:0) and scraped/squeegeed back with a thin credit card-ish thing. I don't have any silica filler to mix in. Doolin's method for curved surfaces of necks is not as effective on compound saddle curves of a neck heel. I gotta say, for pore fill, the flat and ribbon-like surfaces of an acoustic guitar box have to be much easier to deal with than the roundovers and curves of a solidbody.
Coming along nicely Pilot.
Pore fill update
Between a lot of work, my daughter's wedding, starting in a new band, getting a new workstation synth, and some disappointments with the pore fill, there had been not a lot of progress on this lately. If this had been for a client I would have kept on it, but since I'm the client, I can adjust.
One thing that didn't work is the heat gun thing. What it did was drive out a seemingly unlimited supply of pinpoint air bubbles from the wood grain, small enough not to pop. So it created a foam problem. That ended up being wiped off before curing, and re-coated.
I've been working this on my test piece. I've done a two-coat fill, then sanded it back and tried again with different mixes and technique. I've also needed to fill in two wormholes on the body - actually one hole, split between the two wings with the bookmatch. Unfortunately on the last go, I must have miscalculated my resin/hardener/thinner ratio, because I got something that did not harden. I had to wipe down the holes in the body, and then irrigate with acetone. On the test piece I wiped down with acetone-soaked paper towels. Then I tried to raise out the last uncured epoxy with the heat gun, and managed to scorch the bass body. So, more sanding and shaping.
Currently I have the test piece with a new first coat on it,
View attachment 617816
and the holes in the body filled again.
View attachment 617818
Hopefully there will be no problem from any residual uncured epoxy.
More Pores
There are still things I don't like on the test piece, and I'm not certain what the final finish will be, but I figure it is safe enough to start the pore fill on the bass. The final finish could be a sprayed automotive finish, or an oil finish.
Front of bass masked so that it won't get fingerprinted etc. while working on the back,
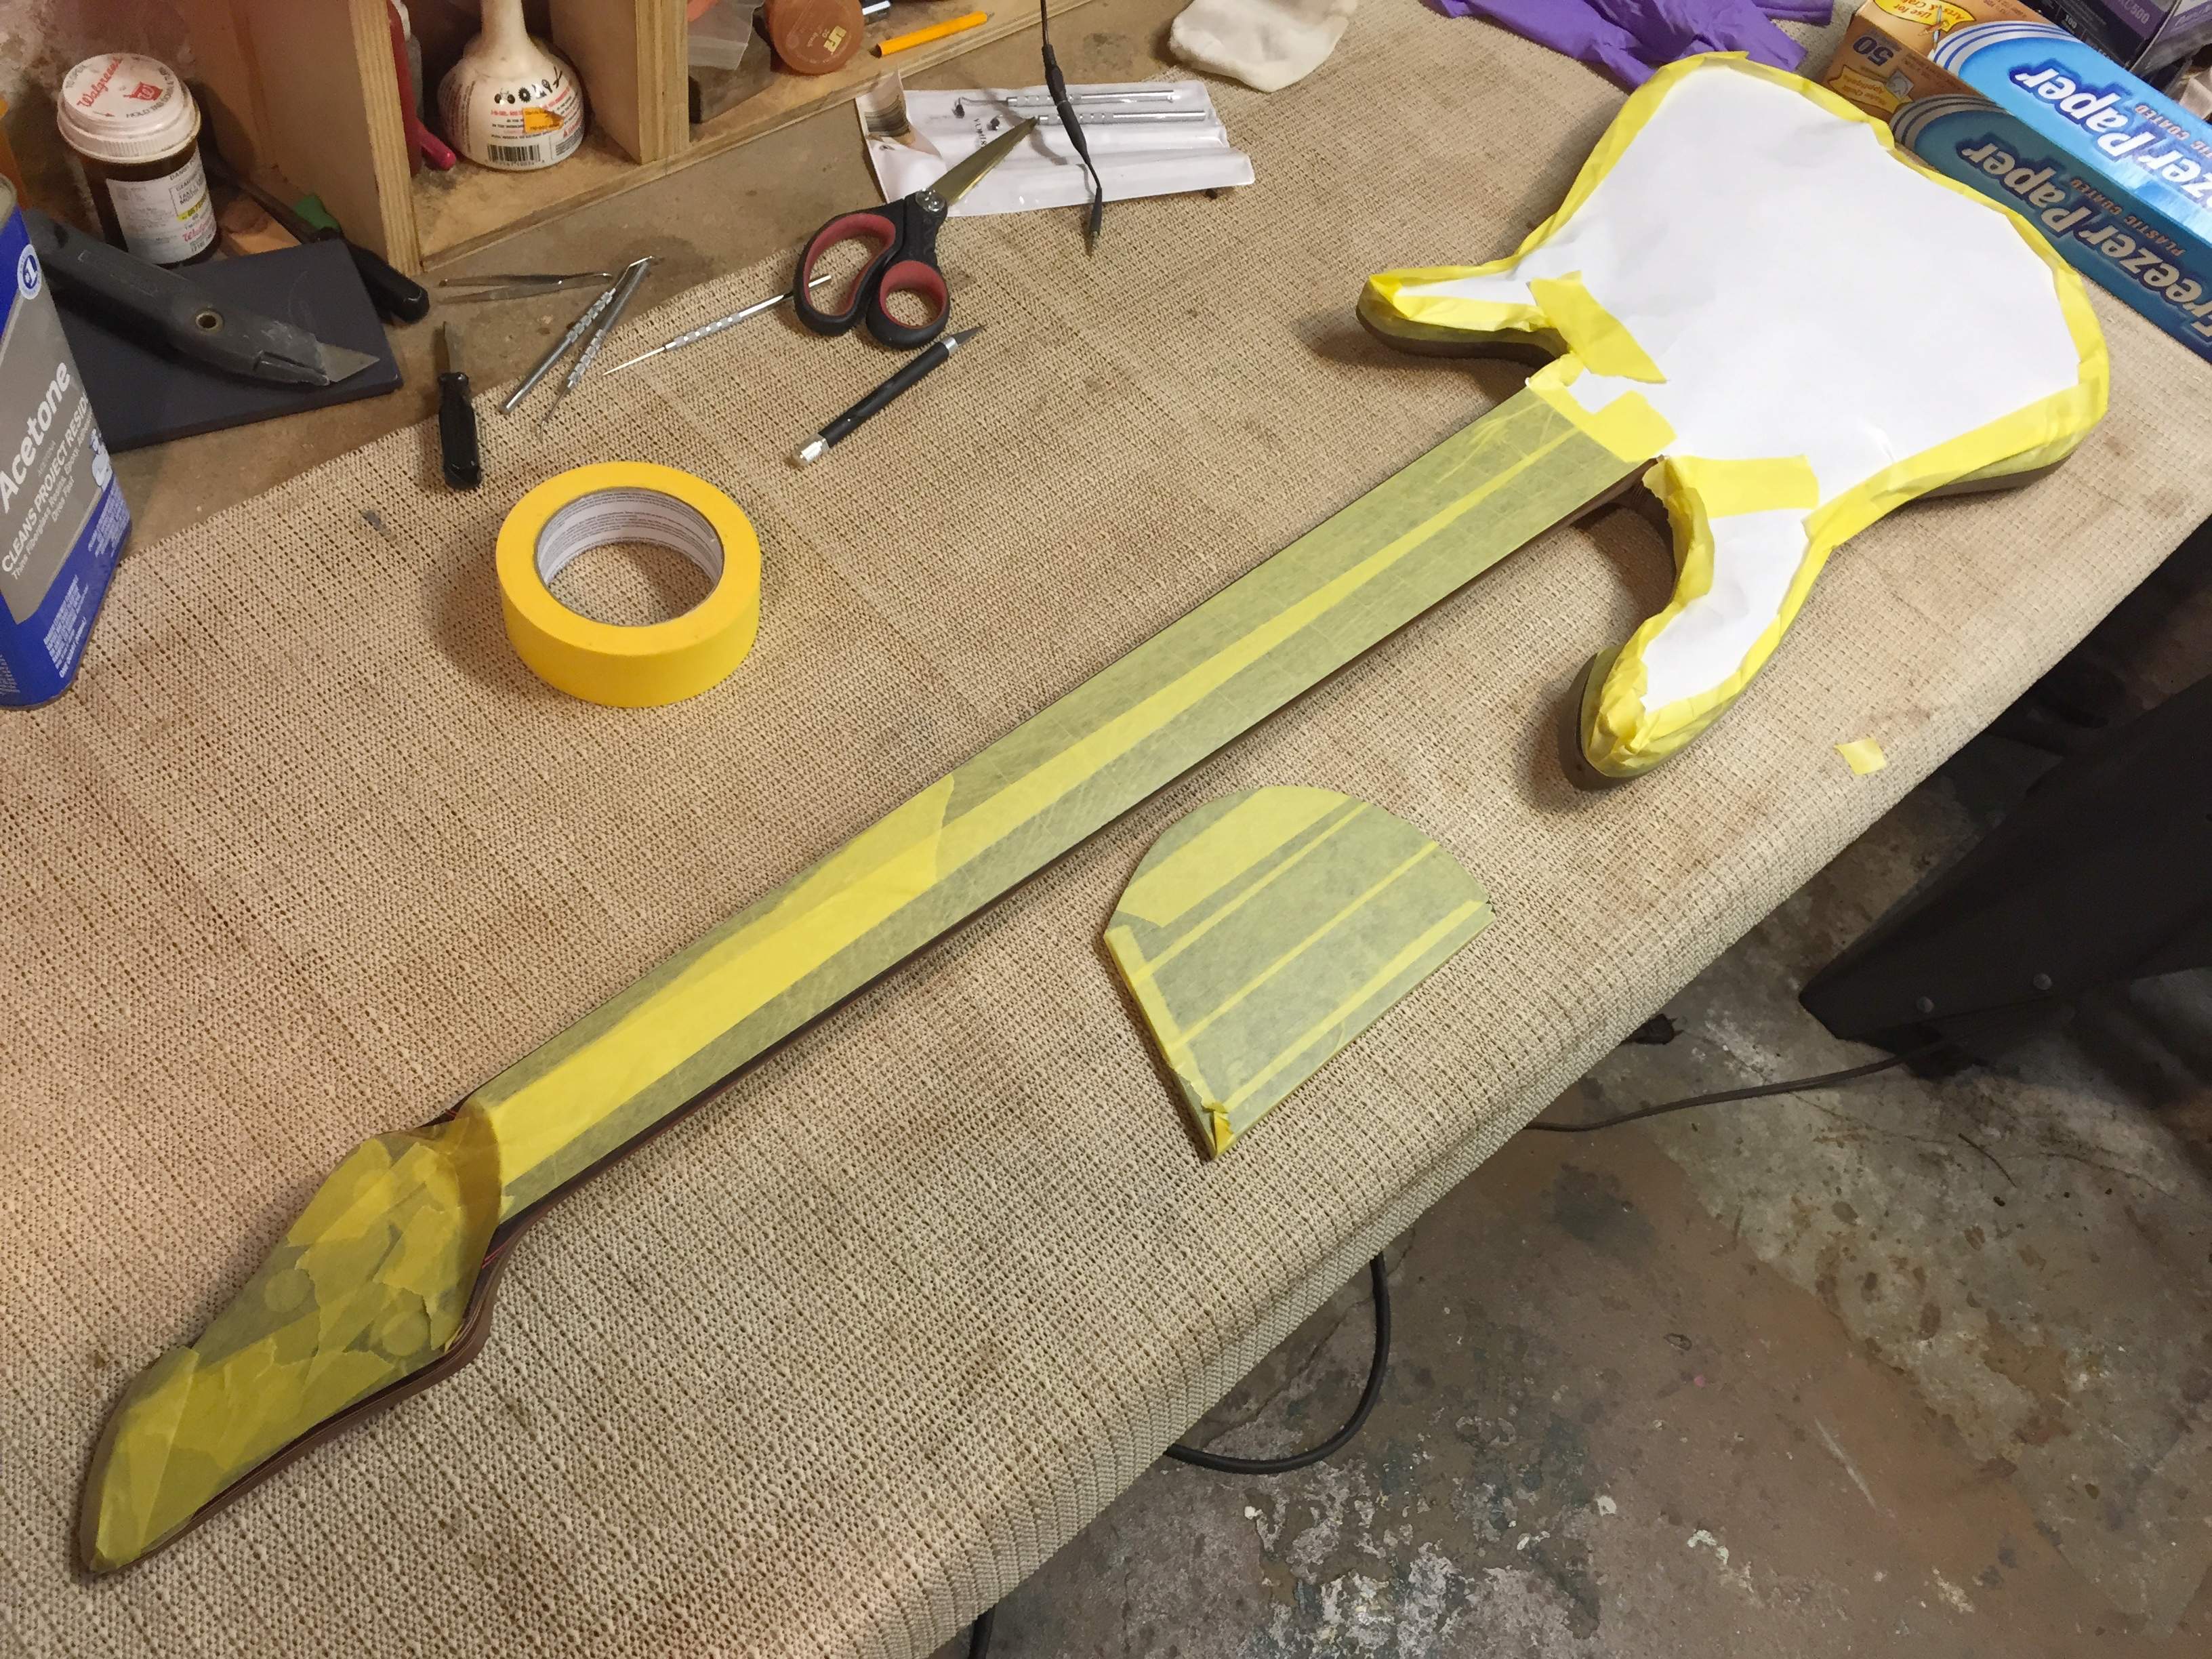
and the back ready to be worked on.

I mixed the epoxy 1:5:0.1, adding just a touch of acetone to help it flow out. From previous tests I had found that the more acetone added, the longer it take to develop a full cure. Applied using credit cards, and a gloved finger in a few very curvy areas. I'm scraping back to leave as little surface film as possible. I expect to do two pore fill coats, maybe three.
Body first coat,
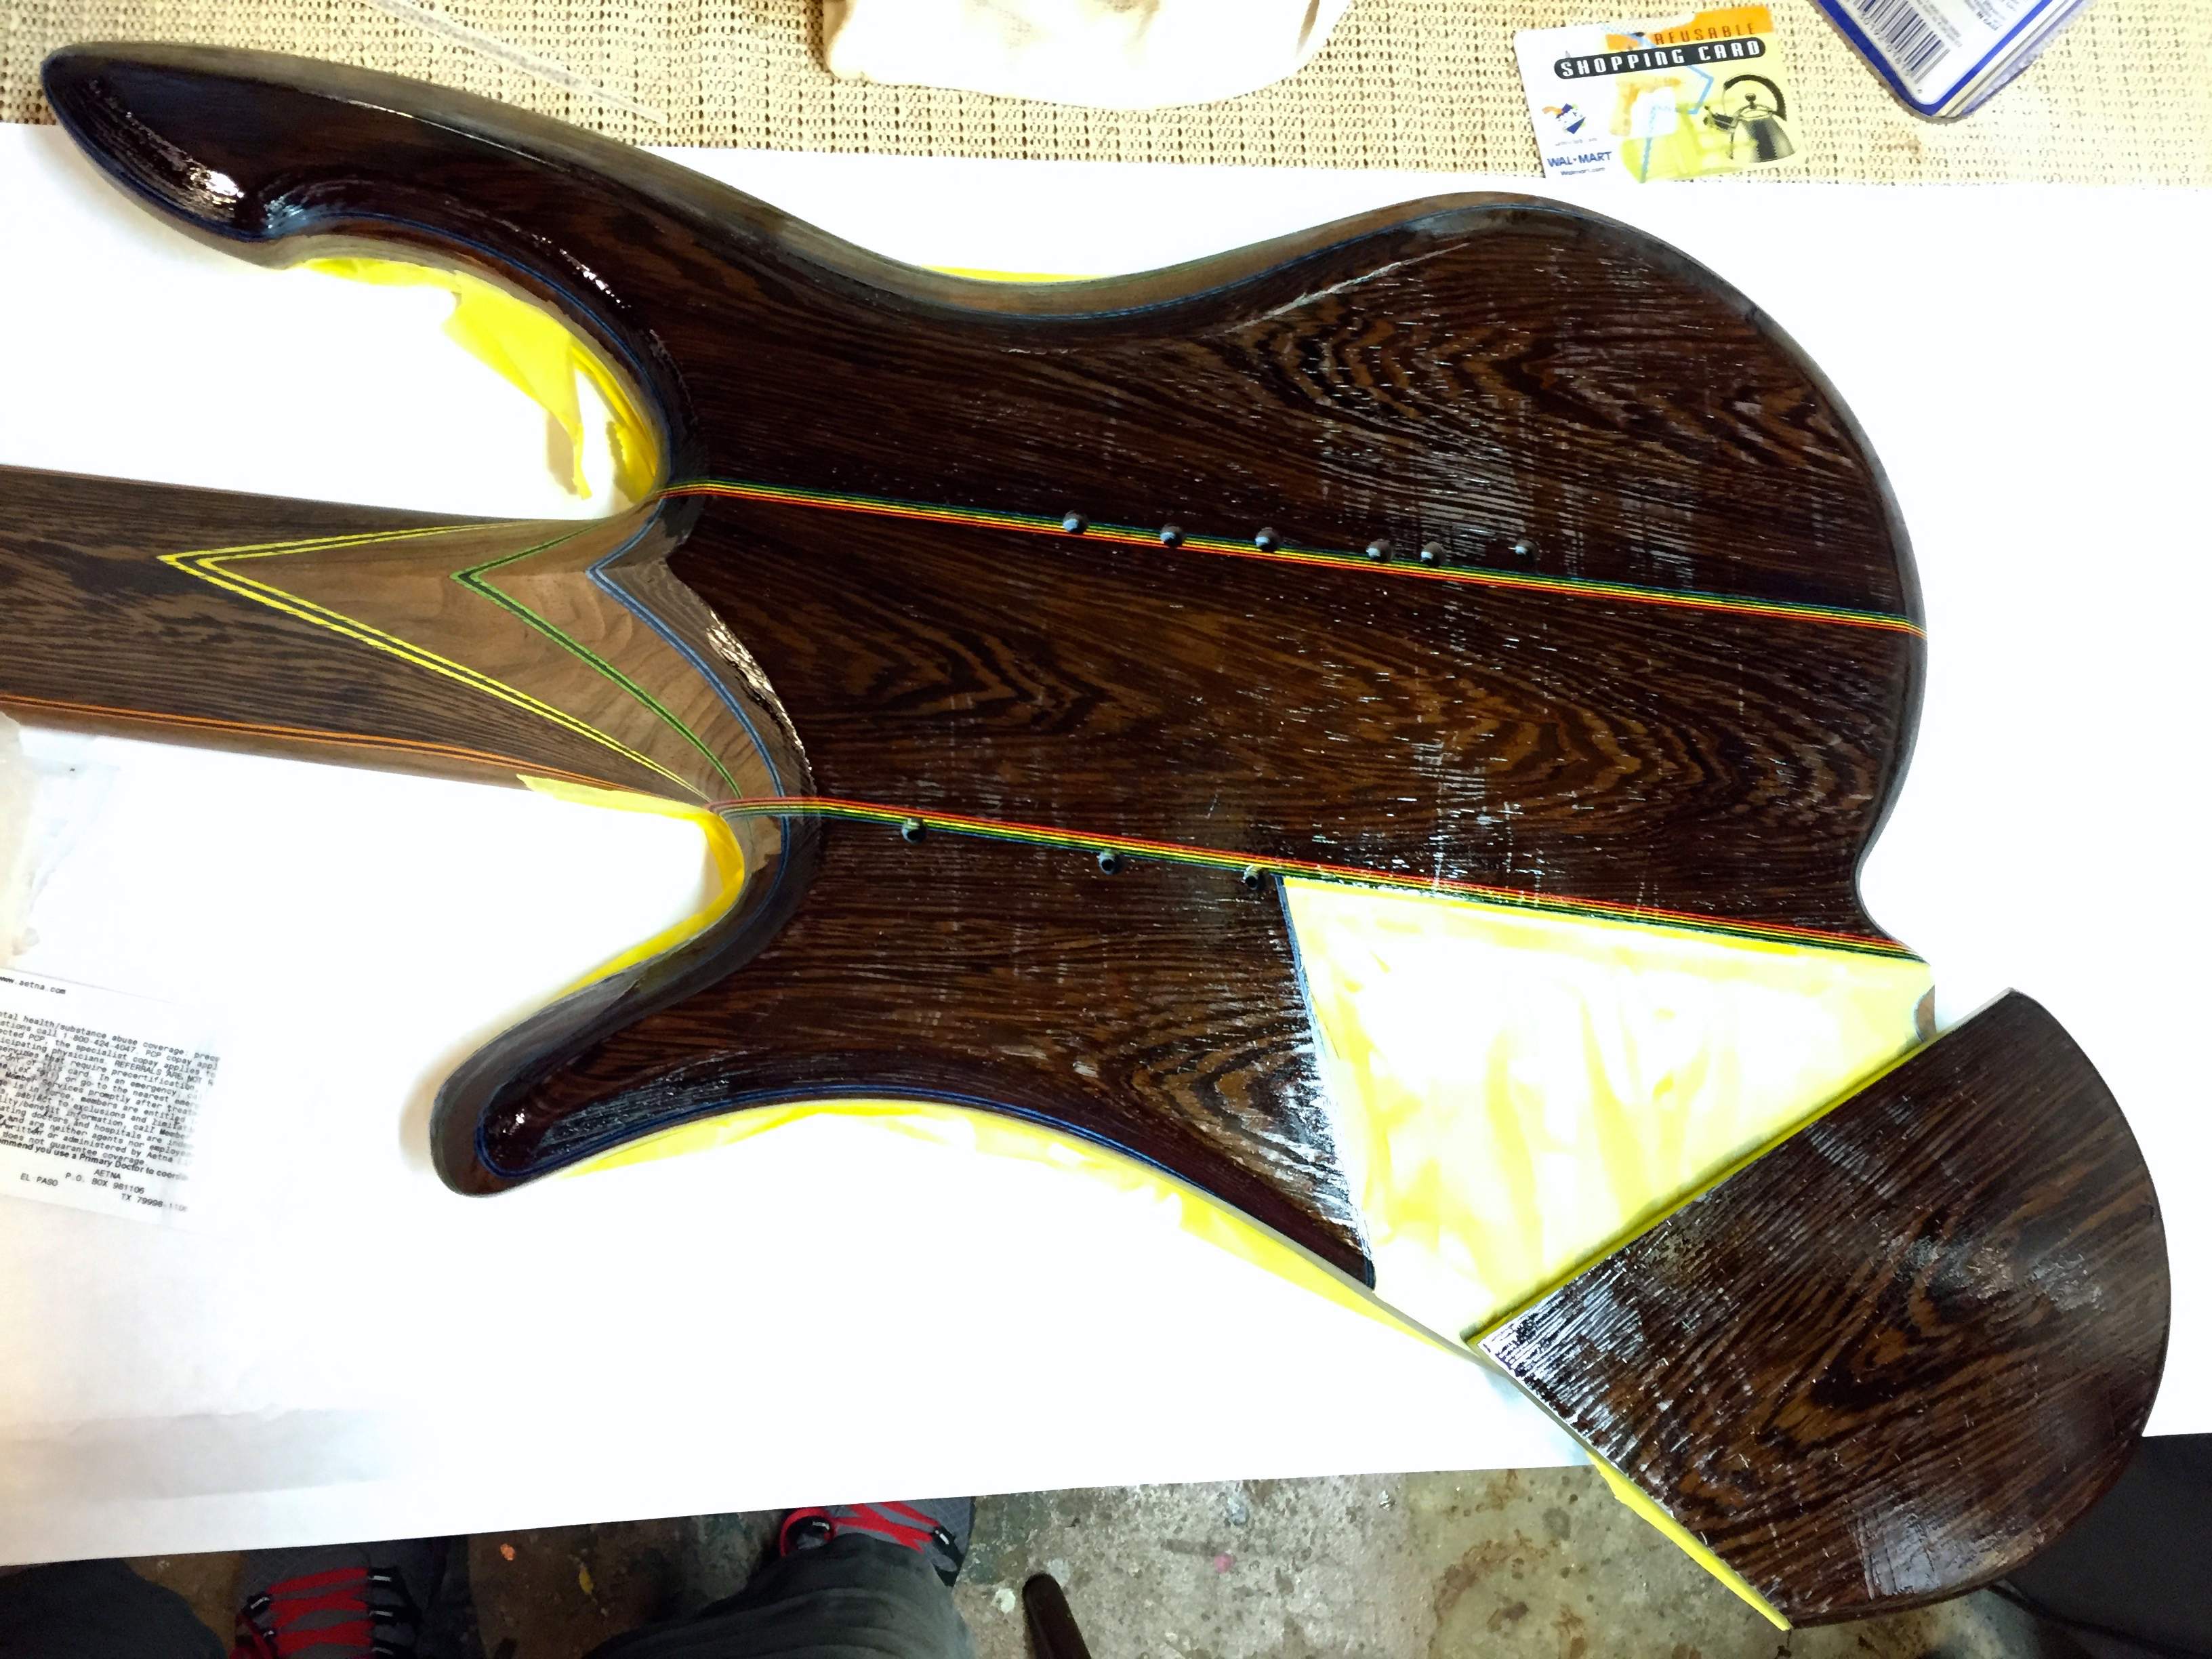
and first coat on the whole thing.
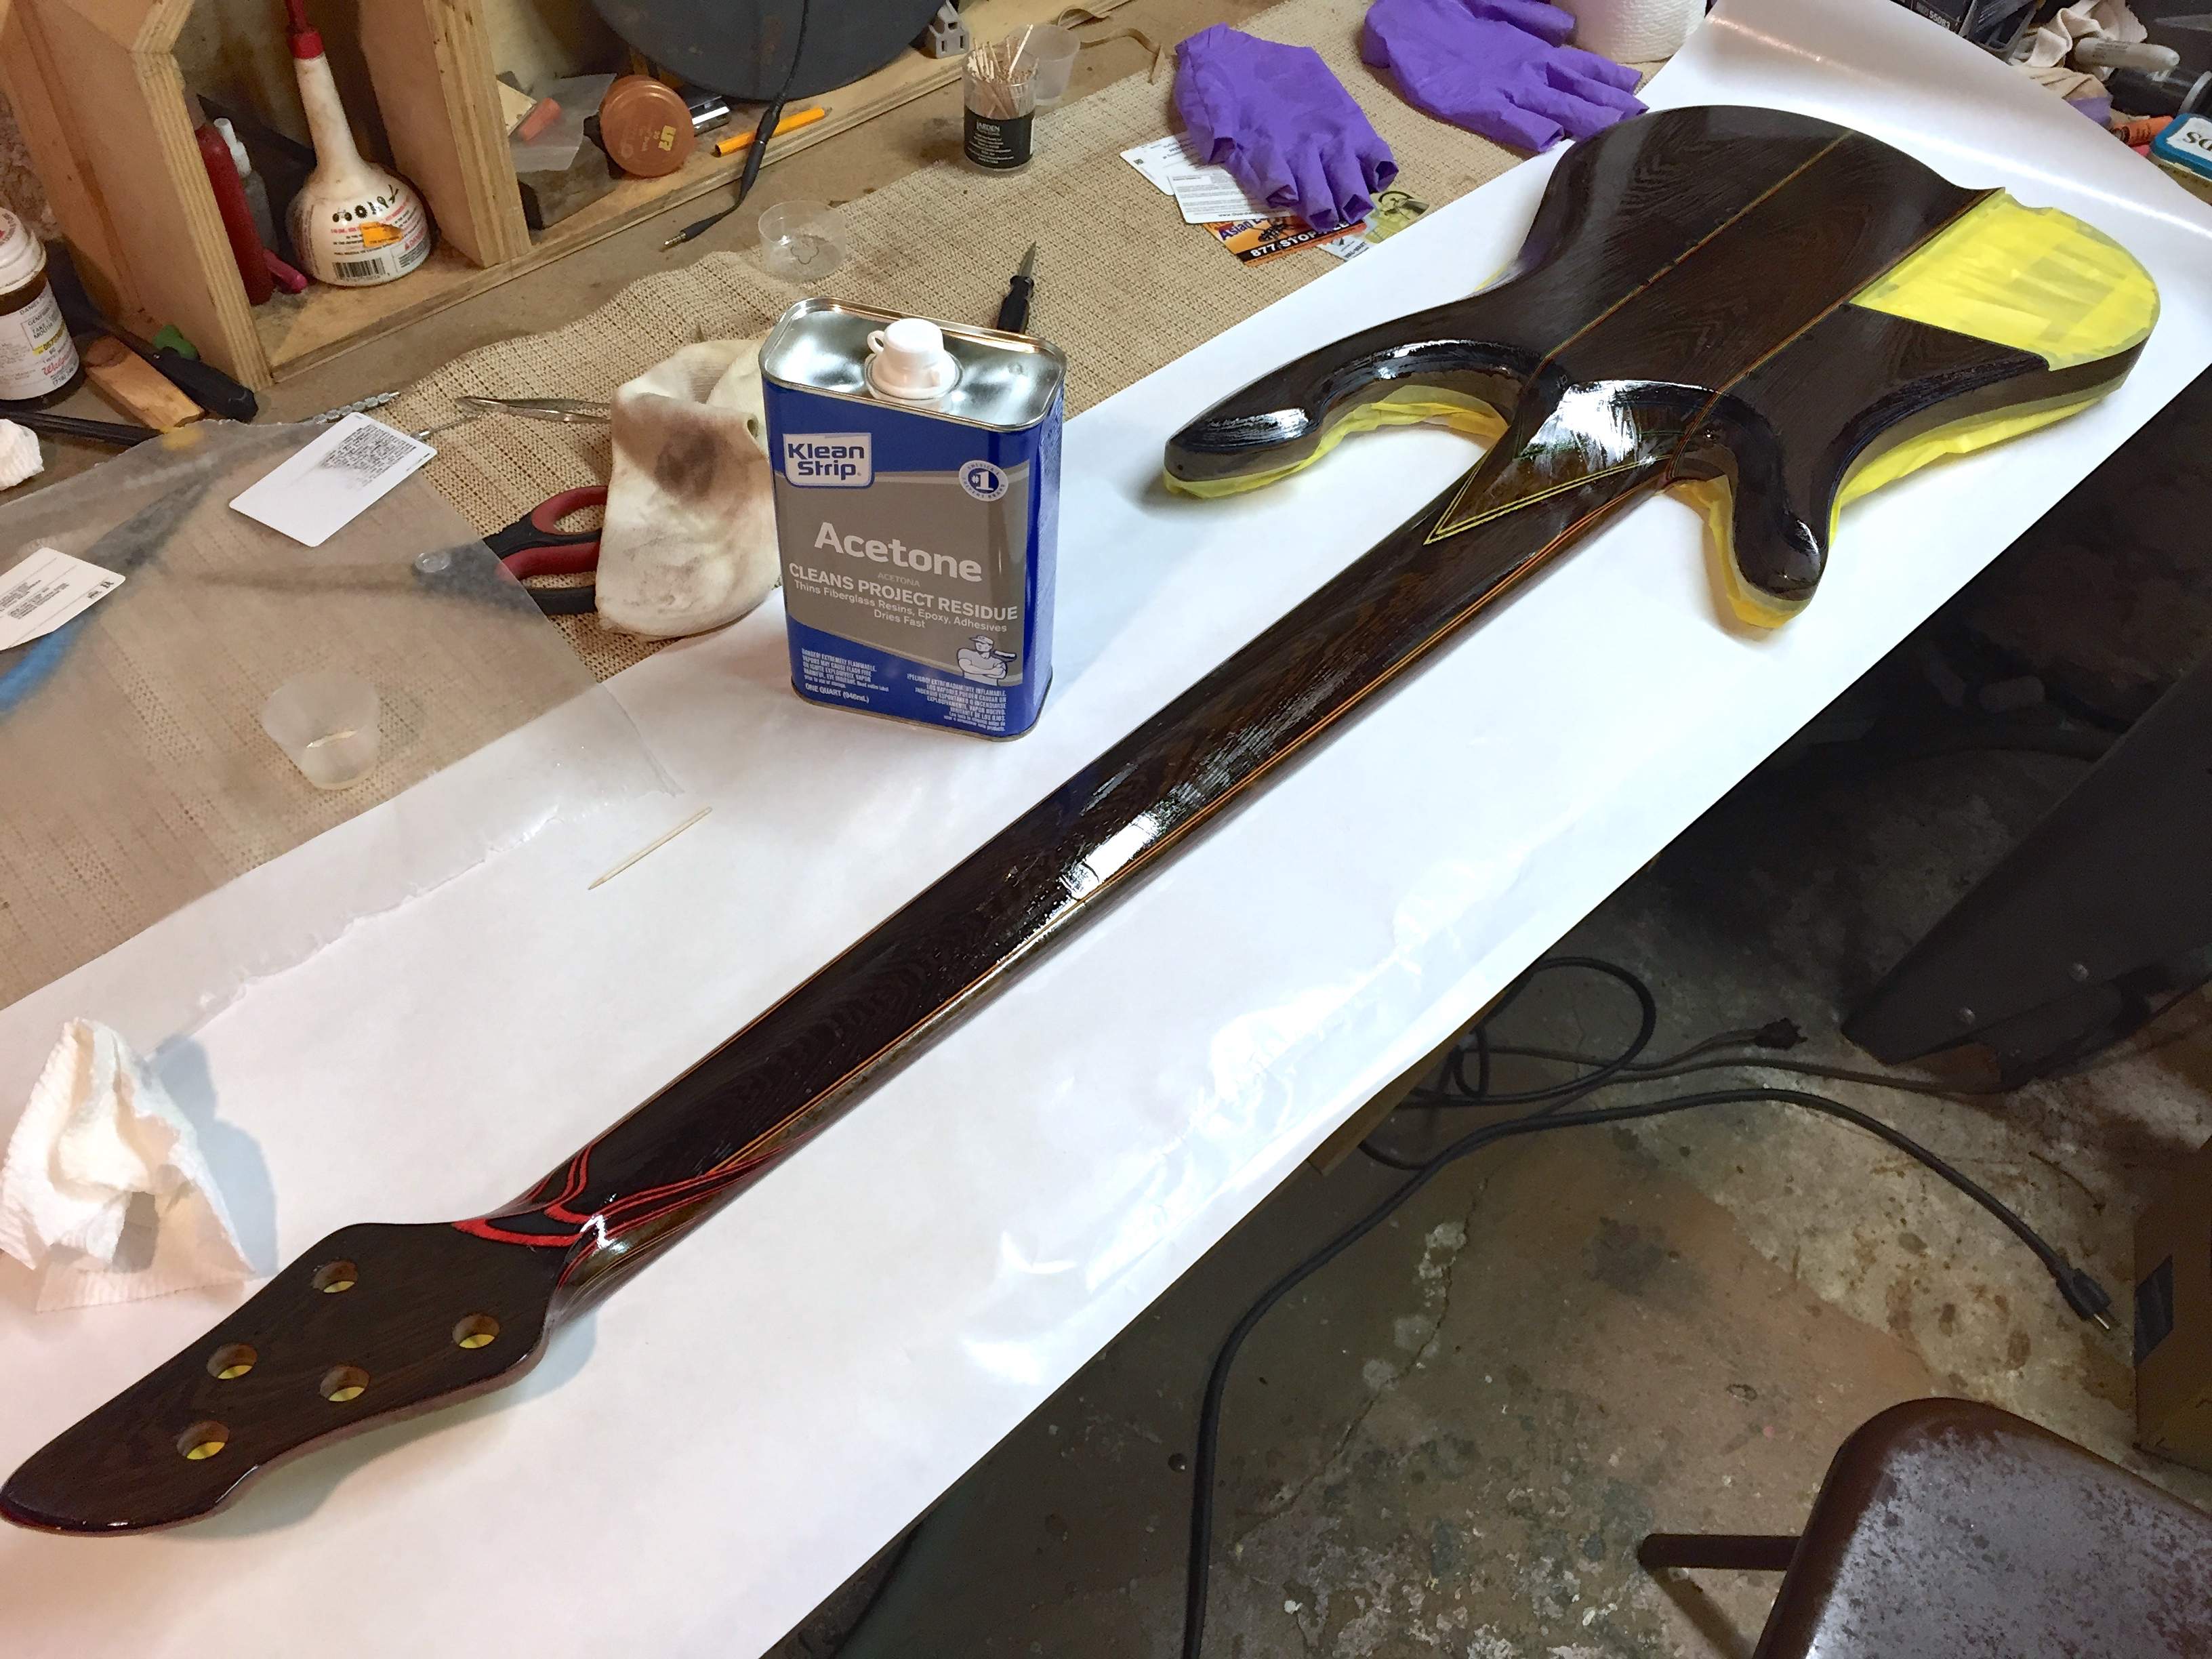
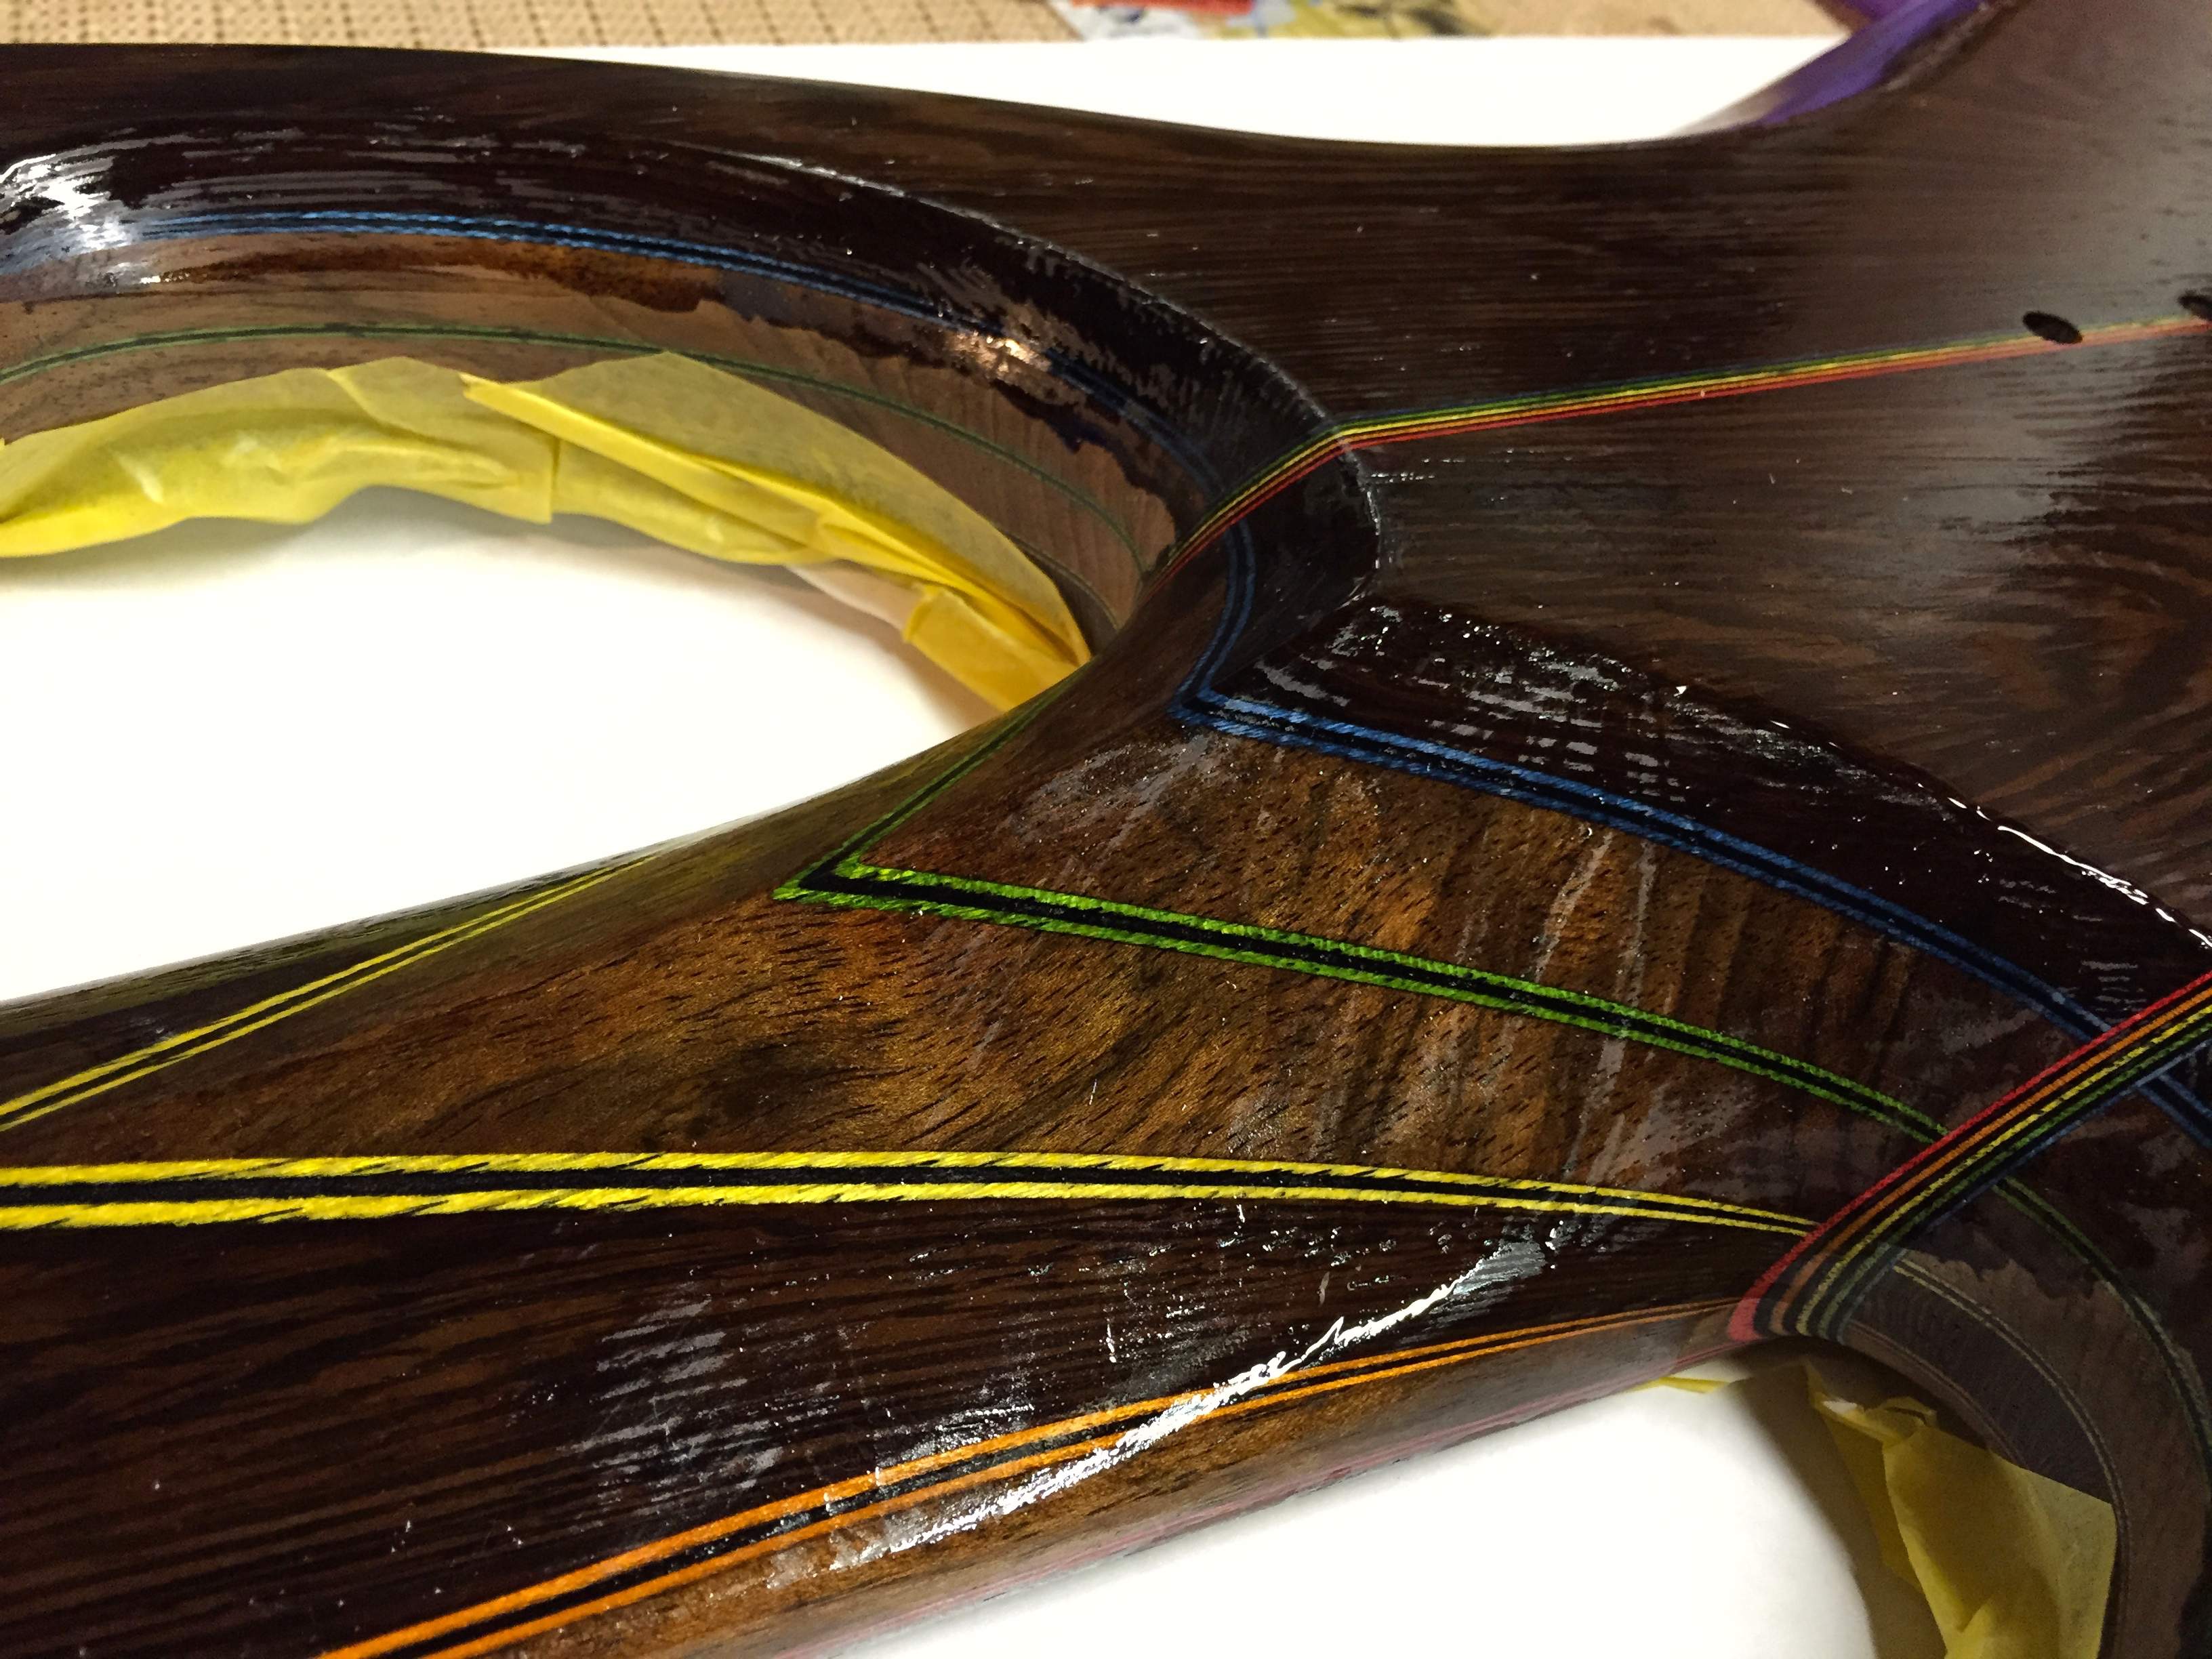
I'm happy to see that the wenge striping is not completely disappearing with a finish, even if the final finish may be different. And the marbling in the walnut is going to look good.
There are still things I don't like on the test piece, and I'm not certain what the final finish will be, but I figure it is safe enough to start the pore fill on the bass. The final finish could be a sprayed automotive finish, or an oil finish.
- Did my final sanding. This is after having come to a comfortable place with all the curves and contours. Doing the final sanding after what I thought had been a "near-perfect" semifinal sanding turned up a bunch of rough areas that needed attention. In the end I brought this up to 500 grit. 320 was too rough, but I think 500 will be sufficient.
- Spent a long time blowing dust out of pores. Even after doing so, there were a few that needed cleaning out with a dental pick. I had already found from the test piece that the wenge is unforgiving in this aspect, and any dust in pores will remain light colored even when wetted with finish.
- Rubbed down the whole bass with acetone. This was partly to get out any oil that might have come from my compressor, and party to clean up. What was surprising was how different the wood looked when it was really clean. A big difference from the "clean" of a dry wipedown, which must have been leaving micro dust behind.
Front of bass masked so that it won't get fingerprinted etc. while working on the back,
and the back ready to be worked on.
I mixed the epoxy 1:5:0.1, adding just a touch of acetone to help it flow out. From previous tests I had found that the more acetone added, the longer it take to develop a full cure. Applied using credit cards, and a gloved finger in a few very curvy areas. I'm scraping back to leave as little surface film as possible. I expect to do two pore fill coats, maybe three.
Body first coat,
and first coat on the whole thing.
I'm happy to see that the wenge striping is not completely disappearing with a finish, even if the final finish may be different. And the marbling in the walnut is going to look good.

Everytime this thread gets updated i feel a little warm glow inside. Gorgeous as always.
A quick observation; the flowing lines of the neck volute seem to conflict with the hard lines of the neck heel. It could be the way the photo was taken, but that's what I see.
A quick observation; the flowing lines of the neck volute seem to conflict with the hard lines of the neck heel. It could be the way the photo was taken, but that's what I see.


