
A shed load of info here. You've given me plenty to think about and check out. I appreciate your time and experience thanks. Every day is, indeed, a school day...

Enjoy the benefits of a premium membership!
Upgrade Account
-
TalkBass has been independent since 1998. Add your voice.
Create a free account to reply to discussions, view embedded media, and browse with fewer display ads.
Join free Log in
Want zero display ads or expanded classifieds tools? Compare plans.
You are using an out of date browser. It may not display this or other websites correctly.
You should upgrade or use an alternative browser.
You should upgrade or use an alternative browser.
Threaded Inserts
- Thread starter Fingerz
- Start date
More options
Who Replied?

I don't see this as a huge concern.if a thread gets damaged that's a real bummer.
For any remotely competent worker, the threads will last longer than the bass. That's the whole point of using metal threads rather than wood screws.
Someone who's going to irreparably damage machined threads deep in a hole is probably also going to find a way to damage where removable inserts go.
There's always helicoils into the metal insert as a repair if you really want to stretch the probability...

100% for the Bruce bars... I have used them in several builds.
Brilliant.
Brilliant.
If you're going stainless screw/bolt into stainless insert, use antiseize. Loctite makes it. It's silvery/gray in color. Only need a little dab on the threads. Just remember that if you go the brass /stainless path, the brass fastener will get chewed up over time if you are constantly taking your neck off. And if you really crank the fastener tight as hell, the brass threads will deform.

There's always helicoils into the metal insert as a repair if you really want to stretch the probability...
Yes, one of the bonus features of the "BruceBars" is that there's enough brass in the bars that they can be repaired. If you ever manage to strip the brass threads, you could always repair it from the bottom with a Heli-coil.
I've never yet had to repair one, but it's good to know that it could be done. I've installed the bars in about 70 of my own model basses and around 700 guitar and bass necks for other Luthiers. Never had one seize or strip yet.
I used steel T-nuts in my necks for a few years way back in the late '90's. But I stopped because I had a couple of scary failures. Steel screws galled and seized in the steel T-nuts, and they broke free and spun inside the neck. A very scary situation to repair...That's why I came up with the brass BruceBars. They can't seize up, and they can't spin in place.
Last year, I finished and shipped a special bass that had two necks, a fretted one and a fretless one. Both had brass bars installed in the heel and stainless machine screws. I'm confident that those necks can be swapped hundreds of times without any damage to the screws or threads.
The main reason why I put the brass bars and machine screws in the neck/body joints of my basses is that it allows the joint to be clamped together tighter, with more force. It makes the joint stiffer and makes a significant difference in the overall sound of the bass. Mostly it increases the clarity of the deep bottom end. Some of you will snort in disbelief, but I don't care any more. I know it works and I've proven it with the instruments I've built.
The ability to disassemble the joint many times with no wear or damage is a bonus.

Great Thread!
I’ve taken to this technique with the guys over at Texas Toast:
I just like tap/threading the wood and having the inserts go in with no stresses. It’s an easy operation.
I’ve taken to this technique with the guys over at Texas Toast:
I just like tap/threading the wood and having the inserts go in with no stresses. It’s an easy operation.
Agreed 100%
Here’s the starter kit I ordered:
Easy-to-Install Thread-Locking Inserts, with Installation Tools, Steel with Thin Wall, 1/4"-20 Thread
McMaster-Carr
Here’s the starter kit I ordered:
Easy-to-Install Thread-Locking Inserts, with Installation Tools, Steel with Thin Wall, 1/4"-20 Thread
McMaster-Carr
Yes, one of the bonus features of the "BruceBars" is that there's enough brass in the bars that they can be repaired. If you ever manage to strip the brass threads, you could always repair it from the bottom with a Heli-coil.
I've never yet had to repair one, but it's good to know that it could be done. I've installed the bars in about 70 of my own model basses and around 700 guitar and bass necks for other Luthiers. Never had one seize or strip yet.
I used steel T-nuts in my necks for a few years way back in the late '90's. But I stopped because I had a couple of scary failures. Steel screws galled and seized in the steel T-nuts, and they broke free and spun inside the neck. A very scary situation to repair...That's why I came up with the brass BruceBars. They can't seize up, and they can't spin in place.
Last year, I finished and shipped a special bass that had two necks, a fretted one and a fretless one. Both had brass bars installed in the heel and stainless machine screws. I'm confident that those necks can be swapped hundreds of times without any damage to the screws or threads.
The main reason why I put the brass bars and machine screws in the neck/body joints of my basses is that it allows the joint to be clamped together tighter, with more force. It makes the joint stiffer and makes a significant difference in the overall sound of the bass. Mostly it increases the clarity of the deep bottom end. Some of you will snort in disbelief, but I don't care any more. I know it works and I've proven it with the instruments I've built.
The ability to disassemble the joint many times with no wear or damage is a bonus.
Pleasure to ‘meet’ you Bruce
Are you making these bars yourself or is there a manufacturer/product out there. Similar things have been used in furniture I’ve purchased over the years.
I’m sure I can locate the exact length bolts that would work.
Inspired.
Pleasure to ‘meet’ you Bruce
Are you making these bars yourself or is there a manufacturer/product out there. Similar things have been used in furniture I’ve purchased over the years.
I’m sure I can locate the exact length bolts that would work.
Inspired.
I make the bars myself, from 3/8" square brass bar stock. On my own Scroll Basses, I use two long parallel bars, with a 10-32 tapped hole at each end. And a bunch of 1/4" holes drilled in the middle to reduce weight. The slots are routed into the top surface of the neck heel. I rout the slots so that the bars are a nice sliding fit in them. I don't use any glue to install them, although they will get some epoxy on them when the fingerboard is glued on.
Here are some examples:
On necks where the bolt pattern isn't rectangular, I use separate small blocks and individual slots.

If anyone chooses to use tee nuts I can offer a couple of suggestions. My M.O. is always to remove as little neck material as possible, so tee nuts provide a mechanical connection without the need to do routed channels. I used to sink them lower and install a short section of 3/4" dowel rod over the top, but now simply counterbore a shallower pocket and add a bit of Titebond at the outer flange edges for extra protection against any possibility of them lifting upward. For them to lift up and rotate they would have to push the fretboard up, and that ain't happening.
I pre-drill where the anti-rotation prongs go into the wood with a small drill bit to make driving them in easier. There's no need to Mongo them in!
It's vitally important to add a small piece of tape over the screw hole to prevent ANY glue from entering where the assembly bolts will go. It doesn't matter what type of mechanical fastener you choose to use, but DO NOT permit glue to contaminate the threads of the fastener.
I've been using tee nuts for jig and furniture assembly for years and have never had a single incident of "seizing" although I always add a light coating of Vaseline to the threads prior to assembly. I suppose if I ever have a problem I'll change my errant ways, but you know what they say about old dogs...

I pre-drill where the anti-rotation prongs go into the wood with a small drill bit to make driving them in easier. There's no need to Mongo them in!
It's vitally important to add a small piece of tape over the screw hole to prevent ANY glue from entering where the assembly bolts will go. It doesn't matter what type of mechanical fastener you choose to use, but DO NOT permit glue to contaminate the threads of the fastener.
I've been using tee nuts for jig and furniture assembly for years and have never had a single incident of "seizing" although I always add a light coating of Vaseline to the threads prior to assembly. I suppose if I ever have a problem I'll change my errant ways, but you know what they say about old dogs...

If anyone chooses to use tee nuts I can offer a couple of suggestions. My M.O. is always to remove as little neck material as possible, so tee nuts provide a mechanical connection without the need to do routed channels. I used to sink them lower and install a short section of 3/4" dowel rod over the top, but now simply counterbore a shallower pocket and add a bit of Titebond at the outer flange edges for extra protection against any possibility of them lifting upward. For them to lift up and rotate they would have to push the fretboard up, and that ain't happening.
I pre-drill where the anti-rotation prongs go into the wood with a small drill bit to make driving them in easier. There's no need to Mongo them in!
It's vitally important to add a small piece of tape over the screw hole to prevent ANY glue from entering where the assembly bolts will go. It doesn't matter what type of mechanical fastener you choose to use, but DO NOT permit glue to contaminate the threads of the fastener.
I've been using tee nuts for jig and furniture assembly for years and have never had a single incident of "seizing" although I always add a light coating of Vaseline to the threads prior to assembly. I suppose if I ever have a problem I'll change my errant ways, but you know what they say about old dogs...
View attachment 4649398
I like your method of pre-drilling for the anti-rotation barbs!
I didn't like having to press the barbs into hard woods, so I switched to these t-nuts..

...which are intended for harder woods.
I press those in, usually with a c-clamp, then thread in a screw from the other side of the neck to pull the nut into it's seat.

Bruce's separate small blocks remind me of weld nuts.
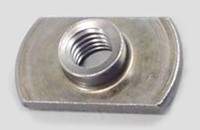
Seems like a potential off-the-shelf alternative. Or, for that matter, a square nut. As long as you can bury it under a fingerboard.
Seems like a potential off-the-shelf alternative. Or, for that matter, a square nut. As long as you can bury it under a fingerboard.
I like your method of pre-drilling for the anti-rotation barbs!
I didn't like having to press the barbs into hard woods, so I switched to these t-nuts..
View attachment 4649537
...which are intended for harder woods.
I press those in, usually with a c-clamp, then thread in a screw from the other side of the neck to pull the nut into it's seat.
Thanks for the alternative suggestion.
I have used these on some instrument projects where the nut was somewhat more visible because they look much better than standard tee nuts. I don't have as much faith in them as tee nuts, and the spiral design of the fins can contribute to them lifting out of the bore if a lot of torque is required when loosening them, although that wouldn't be a problem in a trapped shallow counter bore.
Anyone who is looking for these can find them more easily by using the name they commonly go by, "propeller nut".
The important thing to consider when looking for "off the shelf" hardware is to use something that has a extended barrel that fits a counter bore to ensure that the nut lines up precisely with your bolt hole center. The extended length of the barrel will make it easier to fit your hardware because it will accommodate more variance in the fastening bolt length.
Last edited:
If anyone chooses to use tee nuts I can offer a couple of suggestions. My M.O. is always to remove as little neck material as possible, so tee nuts provide a mechanical connection without the need to do routed channels. I used to sink them lower and install a short section of 3/4" dowel rod over the top, but now simply counterbore a shallower pocket and add a bit of Titebond at the outer flange edges for extra protection against any possibility of them lifting upward. For them to lift up and rotate they would have to push the fretboard up, and that ain't happening.
I pre-drill where the anti-rotation prongs go into the wood with a small drill bit to make driving them in easier. There's no need to Mongo them in!
It's vitally important to add a small piece of tape over the screw hole to prevent ANY glue from entering where the assembly bolts will go. It doesn't matter what type of mechanical fastener you choose to use, but DO NOT permit glue to contaminate the threads of the fastener.
I've been using tee nuts for jig and furniture assembly for years and have never had a single incident of "seizing" although I always add a light coating of Vaseline to the threads prior to assembly. I suppose if I ever have a problem I'll change my errant ways, but you know what they say about old dogs...
View attachment 4649398
Yes, that's how I did it when I used T-nuts. The common zinc-plated steel T-nuts are less likely to have galling problems than stainless T-nuts, but you should put some kind of grease or wax on the treads to prevent corrosion. I always put waxed socket head cap screws into the threads during the fingerboard glue-on, to make sure no glue gets in there. I do that today with the brass bars, too. And I also pre-drilled the little holes for the spikes, like you are doing.
I used T-nuts in my basses for about ten years, and liked them. They were a big improvement over any of the commercial inserts that install from the bottom. And I never had any fail in my own Scroll Basses. They are mostly 20-25 years old, and most have never had their necks removed since I installed them.
But in those days, I was building a lot of custom necks and necks for other Luthiers. I was recommending and installing T-nuts in many of them, for all the good reasons we've been talking about. But it was in those necks that I had two or three cases of neck bolts seizing in T-nuts, and spinning in place. The little spikes just bent flat. It was a scary situation, because you couldn't get the neck and body apart without drastic wood cutting.
The one incident I remember in particular was one of my buddy Jon Wilson's GuitarViols. A $3000+ instrument that's fairly fragile, and belonged to a pro customer. It was in for some service and due to go out on tour. For unknown reasons, when Jon was loosening the front neck attaching bolt , it locked up in its T-nut and spun it inside the neck. Panic City! Poor Jon about freaked out. We couldn't get the instrument apart, or back together. It was stuck. Fortunately, the screw had backed out a few turns before seizing, and there was an 1/8" gap between the neck and neck pocket. I used the end of a hacksaw blade, in the gap, to saw the bolt in half and get it apart. Then I put the neck in the mill and carefully core-drilled the T-nut out from the bottom side. Put in a new T-nut and a maple plug. We saved the instrument, but it was scary.
I had several other incidents of bolts seizing in T-nuts, for unknown reasons. I thought I was being careful lubing the threads and installing them. The ones that locked up solid were other people on the wrench. They didn't recognize what was happening, and kept turning until it locked.
Those are the reasons why I stepped back and re-thought the hardware for attaching necks. I liked how the T-nuts worked for clamping, but I wanted to make them from brass, to minimize any chance of corrosion or galling. And make the design non-round, so they could never spin in place if they did bind up for some reason. I'd rather break the bolt off than have the insert spin in the wood.
That's how I came up with the "BruceBar" design. 3/8" square brass bar stock, a drilled and tapped hole, set into a routed slot from the top. Real simple to make up and very strong and secure for the long term. I've put them in all my own basses since about 2003, and in about 800 necks for other customers since then. A few other Luthiers have been copying the idea, with my permission and encouragement. I'm not aware of one ever stripping, galling, or otherwise failing.
By the way, I stock T-nuts here in my shop and I use them a lot in building fixtures and machines. They are a great simple way to bolt together wood parts. But I don't trust them enough for instruments.
Last edited:

They were a big improvement over any of the commercial inserts that install from the bottom.
Can I ask, in what way?

I find the clamping pressure comes from the topside of the neck pushing it into the pocket tightly and evenly across the pocket. Regular inserts in the bottom of the neck can also be brought tighter, but there is a difference when you have both in front of you. I was a little skeptical when I was first looking at it, but after testing and doing both many times, the top-mounted insert joints feel tighter and more like a neck-through. Bruce probably has a much more engineer-y explanation.Can I ask, in what way?


How much more force? Do you have a torque target?The main reason why I put the brass bars and machine screws in the neck/body joints of my basses is that it allows the joint to be clamped together tighter, with more force.
Socket heads in the final assembly too? I would guess the driver ‘camming out’ of Phillips-head screws sets the practical torque limit in conventional Fender-style neck joints.I always put waxed socket head cap screws into the threads during the fingerboard glue-on
I find the clamping pressure comes from the topside of the neck pushing it into the pocket tightly and evenly across the pocket. Regular inserts in the bottom of the neck can also be brought tighter, but there is a difference when you have both in front of you. I was a little skeptical when I was first looking at it, but after testing and doing both many times, the top-mounted insert joints feel tighter and more like a neck-through. Bruce probably has a much more engineer-y explanation.
Mmmmm....
Yeah I'm sceptical!
The inserts I've used in my current build are put in from the underside, but they stop short only just under the fretboard so I can't see how it's physically any different which side they are put in from.


