• TalkBass has been independent since 1998. Add your voice.
    Create a free account to reply to discussions, view embedded media, and browse with fewer display ads.
    Join freeLog in
    Want zero display ads or expanded classifieds tools? Compare plans.

What to do when the wood hits the fan ? :)

MrArose13

Guest
Commercial User
Aug 15, 2011
571
171
Atlanta Georgia
www.rosebudbasses.com
Disclosures
Owner/Luthier:RoseBud Basses & Guitars LLC
It’s been a while since I've posted anything. Although I’ve been lurking (and loving it), I’ve been crazy preoccupied. So when tragedy struck today (my time Aug/23/2014) I thought … hummm this might be a fun thread.(back story) Quite some time ago I started this Rose Stem model 5-S and got all the way to a rough guitar shape, but shortly after I was commissioned and it’s been hanging on a hook ever since.

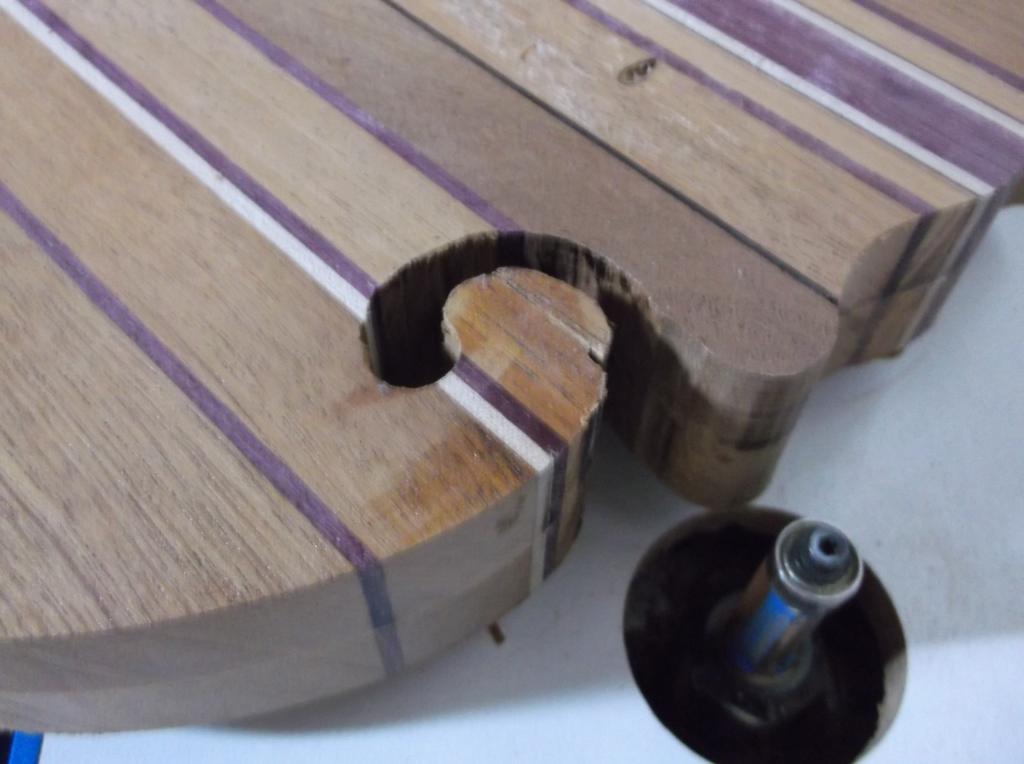
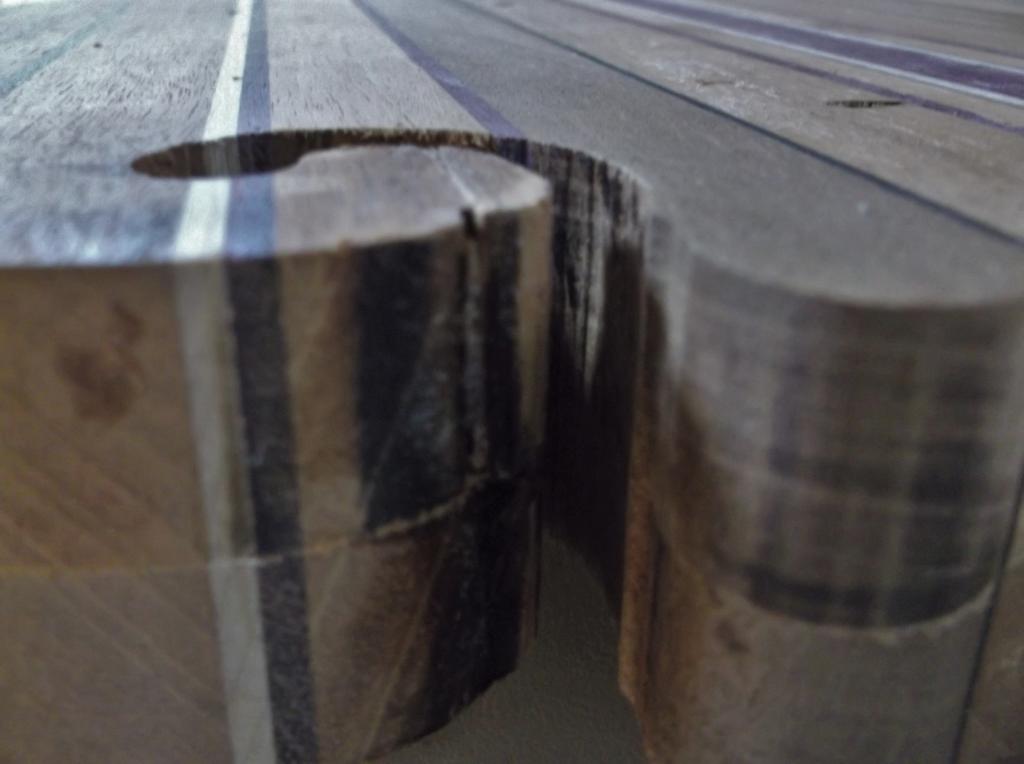
I found a bit of a lull today and decided it would be a good time to rout the body of this bass to the template. When I do this I start with a hand held router (with a top bearing template bit) and rout about half way down then finish it off on a router table. Everything was going well and I was excited to see progress on this bass when… (I thought I was being careful mind you) as I rounded my signature “cord curl” the router bit (on the table) dug in and quite literally exploded the ball end or tip of the curl. Quickly I stopped and found the pieces, I glued, clamped and waited.

It looks HORRIBLE.

Here’s the pics…

46361431-da6f-4433-98a3-20235d374bc0_zps0f108b61.jpg

[URL=http://s1323.photobucket.com/user/MrArose13/media/RS-%20Files/016_zps3dfcf88c.jpg.html]016_zps3dfcf88c.jpg
[URL=http://s1323.photobucket.com/user/MrArose13/media/RS-%20Files/014_zps50a5c693.jpg.html]014_zps50a5c693.jpg

This is when I thought this would be a fun thread, and a learning experience for the novice out there (no offence intended to anyone). These things happen to all of us and it’s what you do with it that counts.

SOOO… The conversation I present to you is… what would you do to fix it?

I look forward to hearing from some folks, till then Happy Building :D
[/URL][/URL]
 
  • Like
Reactions: KramerDon
I was wondering where you had been. Good to see that you are still around here. :)

I would probably either replace the curl from the purpleheart piece if the cracks are very bad or if the visible cracks are mostly on the surface I would try to give the curl a roundover and a slight front to back taper to get rid of the damaged parts.
 
If the cracks are that bad and they don't clean up with a roundover as Smilodon suggested, you can replace the section after the purple and white veneers with a fresh chunk of mahogany, or what ever is that main wood that broke. You'll have to do some clean chisel work for cleanup, followed by sanding with a small hard block. After you clean it up, you can do some of that routing on the main body, before you do the replacement. Then pre-shape the replacement piece to be glued, and also figure out some creative clamping methods. Finish by shaping with hand tools, since you've already learned the lesson the hard way. :)
 
Had noticed your absence also, glad you're back. Sorry it's like this.

Do you still have the laminate slabs, or pieces of same, that you cut the body pieces from? If so, any suitable pieces for a full replacement and re-do?

Might be a case for a larger, more drastic (but potentially easier to hide in the laminate stripes) kind of repair.

Just a thought. Could be way off though...
 
First up.

I HATE ROUTERS FOR THAT VERY REASON!

Secondly. I'd try and trim some more timber out of the curl before routing it any more... but you probably already know that.
Third. I've found that when pieces have ripped off like that my router speed is often too slow. If the router is running faster, it just cuts instead of ripping it off like that.

Fourth. Is there a way of changing the shape slightly to put a jack hole in there or something similar?
 
This is helpful, you amy have saved me heartache, I was thinking about doing one of those kind of cutouts, (but in the rear center ala 'lembic
) and was planning on using a router, guess I better stick with the coping saw instead. Hope your fix turns out nice, great looking piece of wood.
 
Hey guys in my absence I was working on my 2nd acoustic, (and some other none bass related projects) after 6 years I thought it was time to do that again. Now that’s done, it will probably be another 6 years before I do another one. Some glam shots just for fun…

20140503_105808_zps5cb4b5a9.jpg

[URL=http://s1323.photobucket.com/user/MrArose13/media/acoust/20140513_215704_zps295b5606.jpg.html]20140513_215704_zps295b5606.jpg

[URL=http://s1323.photobucket.com/user/MrArose13/media/acoust/20140527_134418_zpsc9cf171b.jpg.html]20140527_134418_zpsc9cf171b.jpg

[URL=http://s1323.photobucket.com/user/MrArose13/media/acoust/20140527_134608_zpse8be79ec.jpg.html]20140527_134608_zpse8be79ec.jpg

[URL=http://s1323.photobucket.com/user/MrArose13/media/acoust/d9b458ec-fb06-45f4-8c88-cb83c00379b6_zps36f73f7f.jpg.html]d9b458ec-fb06-45f4-8c88-cb83c00379b6_zps36f73f7f.jpg

[URL=http://s1323.photobucket.com/user/MrArose13/media/acoust/20140601_105045_zpsb1dc90e0.jpg.html]20140601_105045_zpsb1dc90e0.jpg

[URL=http://s1323.photobucket.com/user/MrArose13/media/acoust/20140601_164832_zps30babe54.jpg.html]20140601_164832_zps30babe54.jpg

[URL=http://s1323.photobucket.com/user/MrArose13/media/acoust/20140802_191554_zpsf558fa48.jpg.html]20140802_191554_zpsf558fa48.jpg

[URL=http://s1323.photobucket.com/user/MrArose13/media/acoust/20140802_191617_zps5b421640.jpg.html]20140802_191617_zps5b421640.jpg

[URL=http://s1323.photobucket.com/user/MrArose13/media/acoust/20140802_191650_1_zps7c1acceb.jpg.html]20140802_191650_1_zps7c1acceb.jpg


Any way… thanks for participating in the conversation/game guys, it’s nice to be chatting with everyone again. So I tried the first option collect the pieces and glue them back on/in, but that is a tight space and I couldn’t get in there well enough to get things lined up. Also, there were a lot of small slivers that could not be found that left small voids, at least half way through the thickness. Seeing as this is supposed to get an oil finish, all of that would be seen.

So, Smilodon… round over and sand is a nice thought and a good solution, but in this case it’s too far gone. Replace the whole piece, possible.

My man Pj… your SK-2 is coming along quite well. Small pieces with lots of end grain like to chip out this doesn’t usually happen on the curl but… eah. “Creative clamping methods” Indeed.

Wraub… I don’t think your way off at all. The idea is to make it look as if it never happened so if that’s what it takes.

Reverendrally… thanks for chiming in. lol, routers can be your best friend and your worst enemy no doubt. As far as changing the shape, that’s out of the question. Doable for a personal build, but I don’t plan on keeping this one.

Mizio… What that shape isn't wacky enough as is? ;) Ha.

It will be Thursday be for I fix this, so please continue to talk among-st your self’s for a bit.

And as always happy building. :D
[/URL][/URL][/URL][/URL][/URL][/URL][/URL][/URL][/URL]
 
  • Like
Reactions: lbridenstine
BTW... I don't know why everything after my pics is getting underlined. I guess I'm need to work with the new format a bit more :)
It looks like you started typing before the end bracket of the image link. If you hover over the text, it links to the photobucket link of the last picture.


The builds are looking good. I need to learn how to make an acoustic at some point. Maybe an acoustic bass too.
 
It looks like you started typing before the end bracket of the image link. If you hover over the text, it links to the photobucket link of the last picture.

Thanks lbridenstine! I often feel like an old dog trying to learn new tricks when it comes to computer stuff.


The builds are looking good. I need to learn how to make an acoustic at some point. Maybe an acoustic bass too.

Man, I really want to get into acoustic building, but I have no idea where to even start. That looks great, love the wood binding

THANKS GUYS !

I find acoustics to be a different kind of building experience, a lot more hand tools, glue scraping and making sure things are in the right spot. Not to mention... :ninja: real tone wood considerations, (which are still just assumptions of what you think/hope will happen) not trying to open any cans folks, just saying. :nailbiting: :bookworm: :ninja: Then there're the special tools and jigs involved.

I got lucky and found a guy about an hour away from me that only builds acoustics. So I was able to use all his stuff, talk technique, why's and why not's, and have some over all supervision (for a small fee of course). It was a nice bit of extended education and just what I need since the last acoustic I built was 6 years ago.

My under standing, there's a different bracing formula used an acoustic basses. I don't know it, nor did the guy I was working with. I hope the next time I do an acoustic, I'll get the opportunity to do a bass. I don't have one of those yet. :)
 
Thanks lbridenstine! I often feel like an old dog trying to learn new tricks when it comes to computer stuff.


THANKS GUYS !

I find acoustics to be a different kind of building experience, a lot more hand tools, glue scraping and making sure things are in the right spot. Not to mention... :ninja: real tone wood considerations, (which are still just assumptions of what you think/hope will happen) not trying to open any cans folks, just saying. :nailbiting: :bookworm: :ninja: Then there're the special tools and jigs involved.

I got lucky and found a guy about an hour away from me that only builds acoustics. So I was able to use all his stuff, talk technique, why's and why not's, and have some over all supervision (for a small fee of course). It was a nice bit of extended education and just what I need since the last acoustic I built was 6 years ago.

My under standing, there's a different bracing formula used an acoustic basses. I don't know it, nor did the guy I was working with. I hope the next time I do an acoustic, I'll get the opportunity to do a bass. I don't have one of those yet. :)


Yeah, its the forms, hand tools, and lack of knowledge about bracing that keeps me from diving into that world. But I will probably take the plunge one day.
 
So I had a predetermined plan for the repair, but now I’m thinking to keep in the spirit of things… let’s do them all starting with the least wood removal to a full on replacement (if need be). Once it’s fixed… well, it’s fixed.

It might take a while, but I might as well keep this thread alive to complete the bass.

Happy building :D
 
  • Like
Reactions: Jonny5bass
I wish I could contribute some knowledge here but mostly I just want to see the fix! Hopefully get some ideas to fix a couple of "whoops, damns!" on my first build.

No worry's, that was the point of this thread. So stay tuned, I think i'll get to the first repair option before the night is over and we'll see how it comes out. :)
 
  • Like
Reactions: Jonny5bass
Looks like this accident is going to turn out well after all. Good luck with the repair!
I'd be happy to assist anyone with acoustic questions. I've built many of them professionally and personally. The tonewoods are my main area of expertise. Acoustics are lots of fun and lots of work but sooo worth it in the end. I like building basses better FWIW.
 
Let’s start with my exciting discovery. (a little back story might explain my excitement)

After routing and sanding my fancy ” cord curl” has just over a 1/4“ gap (big enough for an instrument cable). Over the years I’ve shaped these things using various methods of which were inconsistent and tedious. So in my hunt for the kind of consistency that could only be achieved with a small router bit, I found the small router bit kit sold by Dremel. As luck would have it, the ¼” straight bit was the perfect size to suit my needs, but I would need a bearing to use it as a pattern bit. As misfortune would have it, a top bearing was not a provided option, (not even on the web, at least not when I was hunting). The next discovery happened while perusing my local Rockler where I found a 1 ¼” x 1/4” flush trim bit, (or what I’d call bottom bearing). I thought I had it all worked out at that point... Sadly I was wrong. No matter how I tried, I could not make it work as desired. I just needed a bearing for the Dremel bit, the hunt continued. Finally… while attending an annual sale at a place called Highland Woodworking, (there’s only one I believe and it’s local to me in GA.) I found it… for me it was like finding a jewel, a ¼” O.D x 1/8” I.D bearing. Quickly I gathered up my intended purchases + my jewel and speed home. As I raced into the shop with enthusiasm, I pulled out the Dremel bit and tore open the heat sealed baggy that contained my precious jewel. The bearing slid right on to the shank, “Like a glove”, I said aloud. As I stared at the perfect bearing wide eyed checking with a straight edge that it was truly flush. I raised 1 eyebrow… I don’t have a stop collar. How am I supposed to keep this thing on… Crap! :facepalm:

So to date I’ve used many kids of cylindrical objects, (pressed tightly between the bearing and the collet) to hold the bearing in place, as I’ve seen other woodworkers do. With the most successful being a nylon stand off with a 1/8” I.D. and an O.D. under ¼”, but being a form of plastic it’s not suited for the temperatures and friction generated in use. Leading us to my most recent discovery, Out of nowhere a thought came to my brain, so simple, so available. As it turns out the ball end of a bass string has a ¼” O.D x 1/8” I.D. now with the bearing and a stack of 2 string ball ends, (pressed tightly between the bearing and the collet, as said before and accompanied with a router type base) I’m content with this bit as a pattern bit. Great for template detail work and tightening up the corners of pickup cavities.

DSCF0492_zps77843016.jpg


All right, enough of that… I mentioned all the stores and brands should anyone want to acquire a similar set up. Most recently, it seems just about any of my routerbit needs can be found here at a reasonable cost.

So I got some work on this incident done the other night. After resetting my template, I used my new ¼” bit setup to flush route as deep as the Dremel base would allow in 1/8” increments (about half way down). Then finished up on the router table setup with a ¼” flush trim bit.

Results…

DSCF0496_zps75118757.jpg


As you can see a round over won’t take THAT out, not to mention the curl gest a smaller round over. So, let’s move on to repair option 2…

…and, I’ll have more on that as soon as I can pull myself out of the shop and sit at the computer.

Till then, Happy building. :D
 

Latest posts