• TalkBass has been independent since 1998. Add your voice.
    Create a free account to reply to discussions, view embedded media, and browse with fewer display ads.
    Join freeLog in
    Want zero display ads or expanded classifieds tools? Compare plans.

Winter 2017 Build Off - Padauk Single Cut

Honestly, I've only not used them on my first build and I don't really remember any major differences in working them vs. nickel frets.
Thanks. I love the look of them. Glad to hear it won't be much different in terms of working. Sounds like I'm following the same trajectory; nickel-silver on the first build, now doing EVO's.
 
  • Like
Reactions: lbridenstine
The Luminlays are in.

They were really fragile. I was tapping them in with my plastic hammer and pieces kept breaking off. I figured it out after a few and the rest went in fine. I used end nippers to cut them close to the binding.

tumblr_p51i60xPL01qi8q1ao1_540.jpg


They were glowing even when I was sanding them.

tumblr_p51i60xPL01qi8q1ao2_540.jpg


I used screws in the pickup areas to line up the padauk to the body.

tumblr_p51i60xPL01qi8q1ao3_540.jpg


Wet look (naphtha - I wiped it with acetone before gluing too)

tumblr_p51i60xPL01qi8q1ao4_540.jpg


Glued

tumblr_p51i60xPL01qi8q1ao5_540.jpg
 
The Luminlays are in.

They were really fragile. I was tapping them in with my plastic hammer and pieces kept breaking off. I figured it out after a few and the rest went in fine. I used end nippers to cut them close to the binding.

View attachment 2937465

They were glowing even when I was sanding them.

View attachment 2937466

I used screws in the pickup areas to line up the padauk to the body.

View attachment 2937467

Wet look (naphtha - I wiped it with acetone before gluing too)

View attachment 2937468

Glued

View attachment 2937469

Wow that padauk is stunning! Very nice!
 
  • Like
Reactions: lbridenstine
I've worked on a couple of things between the last update and now, but didn't think it was worthy of bringing back the thread. Round over, bevel, cavity covers.

Yesterday I finally got back in the workshop and worked on it for more than 8 hours.

For the neck angle, I marked the angle on the sides and cut with the bandsaw, then followed it up with the straight edge and router on each side.

tumblr_pcmos5HAyN1qi8q1ao7_540.jpg


When I got to the second side, I found that the 2 side's lines didn't match perfectly, so I had to clean it up afterwards to level it out. (will try to post a video clip later)

I fitted the nut and got the bridge, tailpiece, and a couple strings out so I could check the angle before gluing the wings on.

tumblr_pcmos5HAyN1qi8q1ao5_540.jpg


tumblr_pcmos5HAyN1qi8q1ao6_540.jpg


tumblr_pcmos5HAyN1qi8q1ao8_540.jpg


tumblr_pcmos5HAyN1qi8q1ao3_540.jpg


I used my tenon jig to drill holes for dowel rods to line up the wings.

tumblr_pcmos5HAyN1qi8q1ao9_540.jpg


tumblr_pcmoy86txT1qi8q1ao6_540.jpg


tumblr_pcmoy86txT1qi8q1ao8_540.jpg


tumblr_pcmoy86txT1qi8q1ao1_540.jpg


Marked where I needed to cut off the end of the neck/heel area.

I started with my fret saw, but it was taking too long, so I ended up also using a forstner bit, shinto rasp, and dremmel with a sanding drum. The dremmel worked really well, so I'm going to try to use that more to finish up the shape later.

tumblr_pcmoy86txT1qi8q1ao5_540.jpg


Used some of my other templates to make a new template for the soapbar pickups.

tumblr_pcmoy86txT1qi8q1ao3_540.jpg


Ready for glue.

tumblr_pcmoy86txT1qi8q1ao2_540.jpg


I dry clamped to figure out a plan of action before adding glue for this. I started out with the bass standing like in the picture above, except with my cutoffs as clamping cauls. Well, the cauls turned and the clamps sprung off and hit me in the jaw and made me bite my tongue. No real damage and I caught the bass!

So, I clamped the bass laying down on the bench instead of standing up.

tumblr_pcmoy86txT1qi8q1ao10_540.jpg


tumblr_pcmoy86txT1qi8q1ao7_540.jpg


tumblr_pcmoy86txT1qi8q1ao9_540.jpg


tumblr_pcmoy86txT1qi8q1ao4_540.jpg


Ugh, too much squeeze out around the fretboard.


Back down to the workshop!
 
I might actually be able to record with this tomorrow. Last week this was just a passing thought like "I wonder if there's anyway I can get it recording-ready by next week" and didn't think I actually could.

Wish me luck on getting the setup done after work today.


tumblr_pctujf5kKW1qi8q1ao9_540.jpg


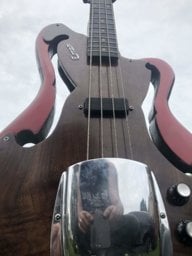
I had a helper with the string-up. This is Obie.

tumblr_pctujf5kKW1qi8q1ao3_540.jpg


tumblr_pctujf5kKW1qi8q1ao4_540.jpg


All of my cables are at our drummers house, so I had to do this. It worked!

tumblr_pctujf5kKW1qi8q1ao6_540.jpg


tumblr_pctujf5kKW1qi8q1ao1_540.jpg


tumblr_pctujf5kKW1qi8q1ao2_540.jpg


tumblr_pctujf5kKW1qi8q1ao7_540.jpg


tumblr_pctujf5kKW1qi8q1ao5_540.jpg


tumblr_pctujf5kKW1qi8q1ao8_540.jpg


tumblr_pctujf5kKW1qi8q1ao10_540.jpg