• TalkBass has been independent since 1998. Add your voice.
    Create a free account to reply to discussions, view embedded media, and browse with fewer display ads.
    Join freeLog in
    Want zero display ads or expanded classifieds tools? Compare plans.

Winter Build-Off 2021 - Late entry

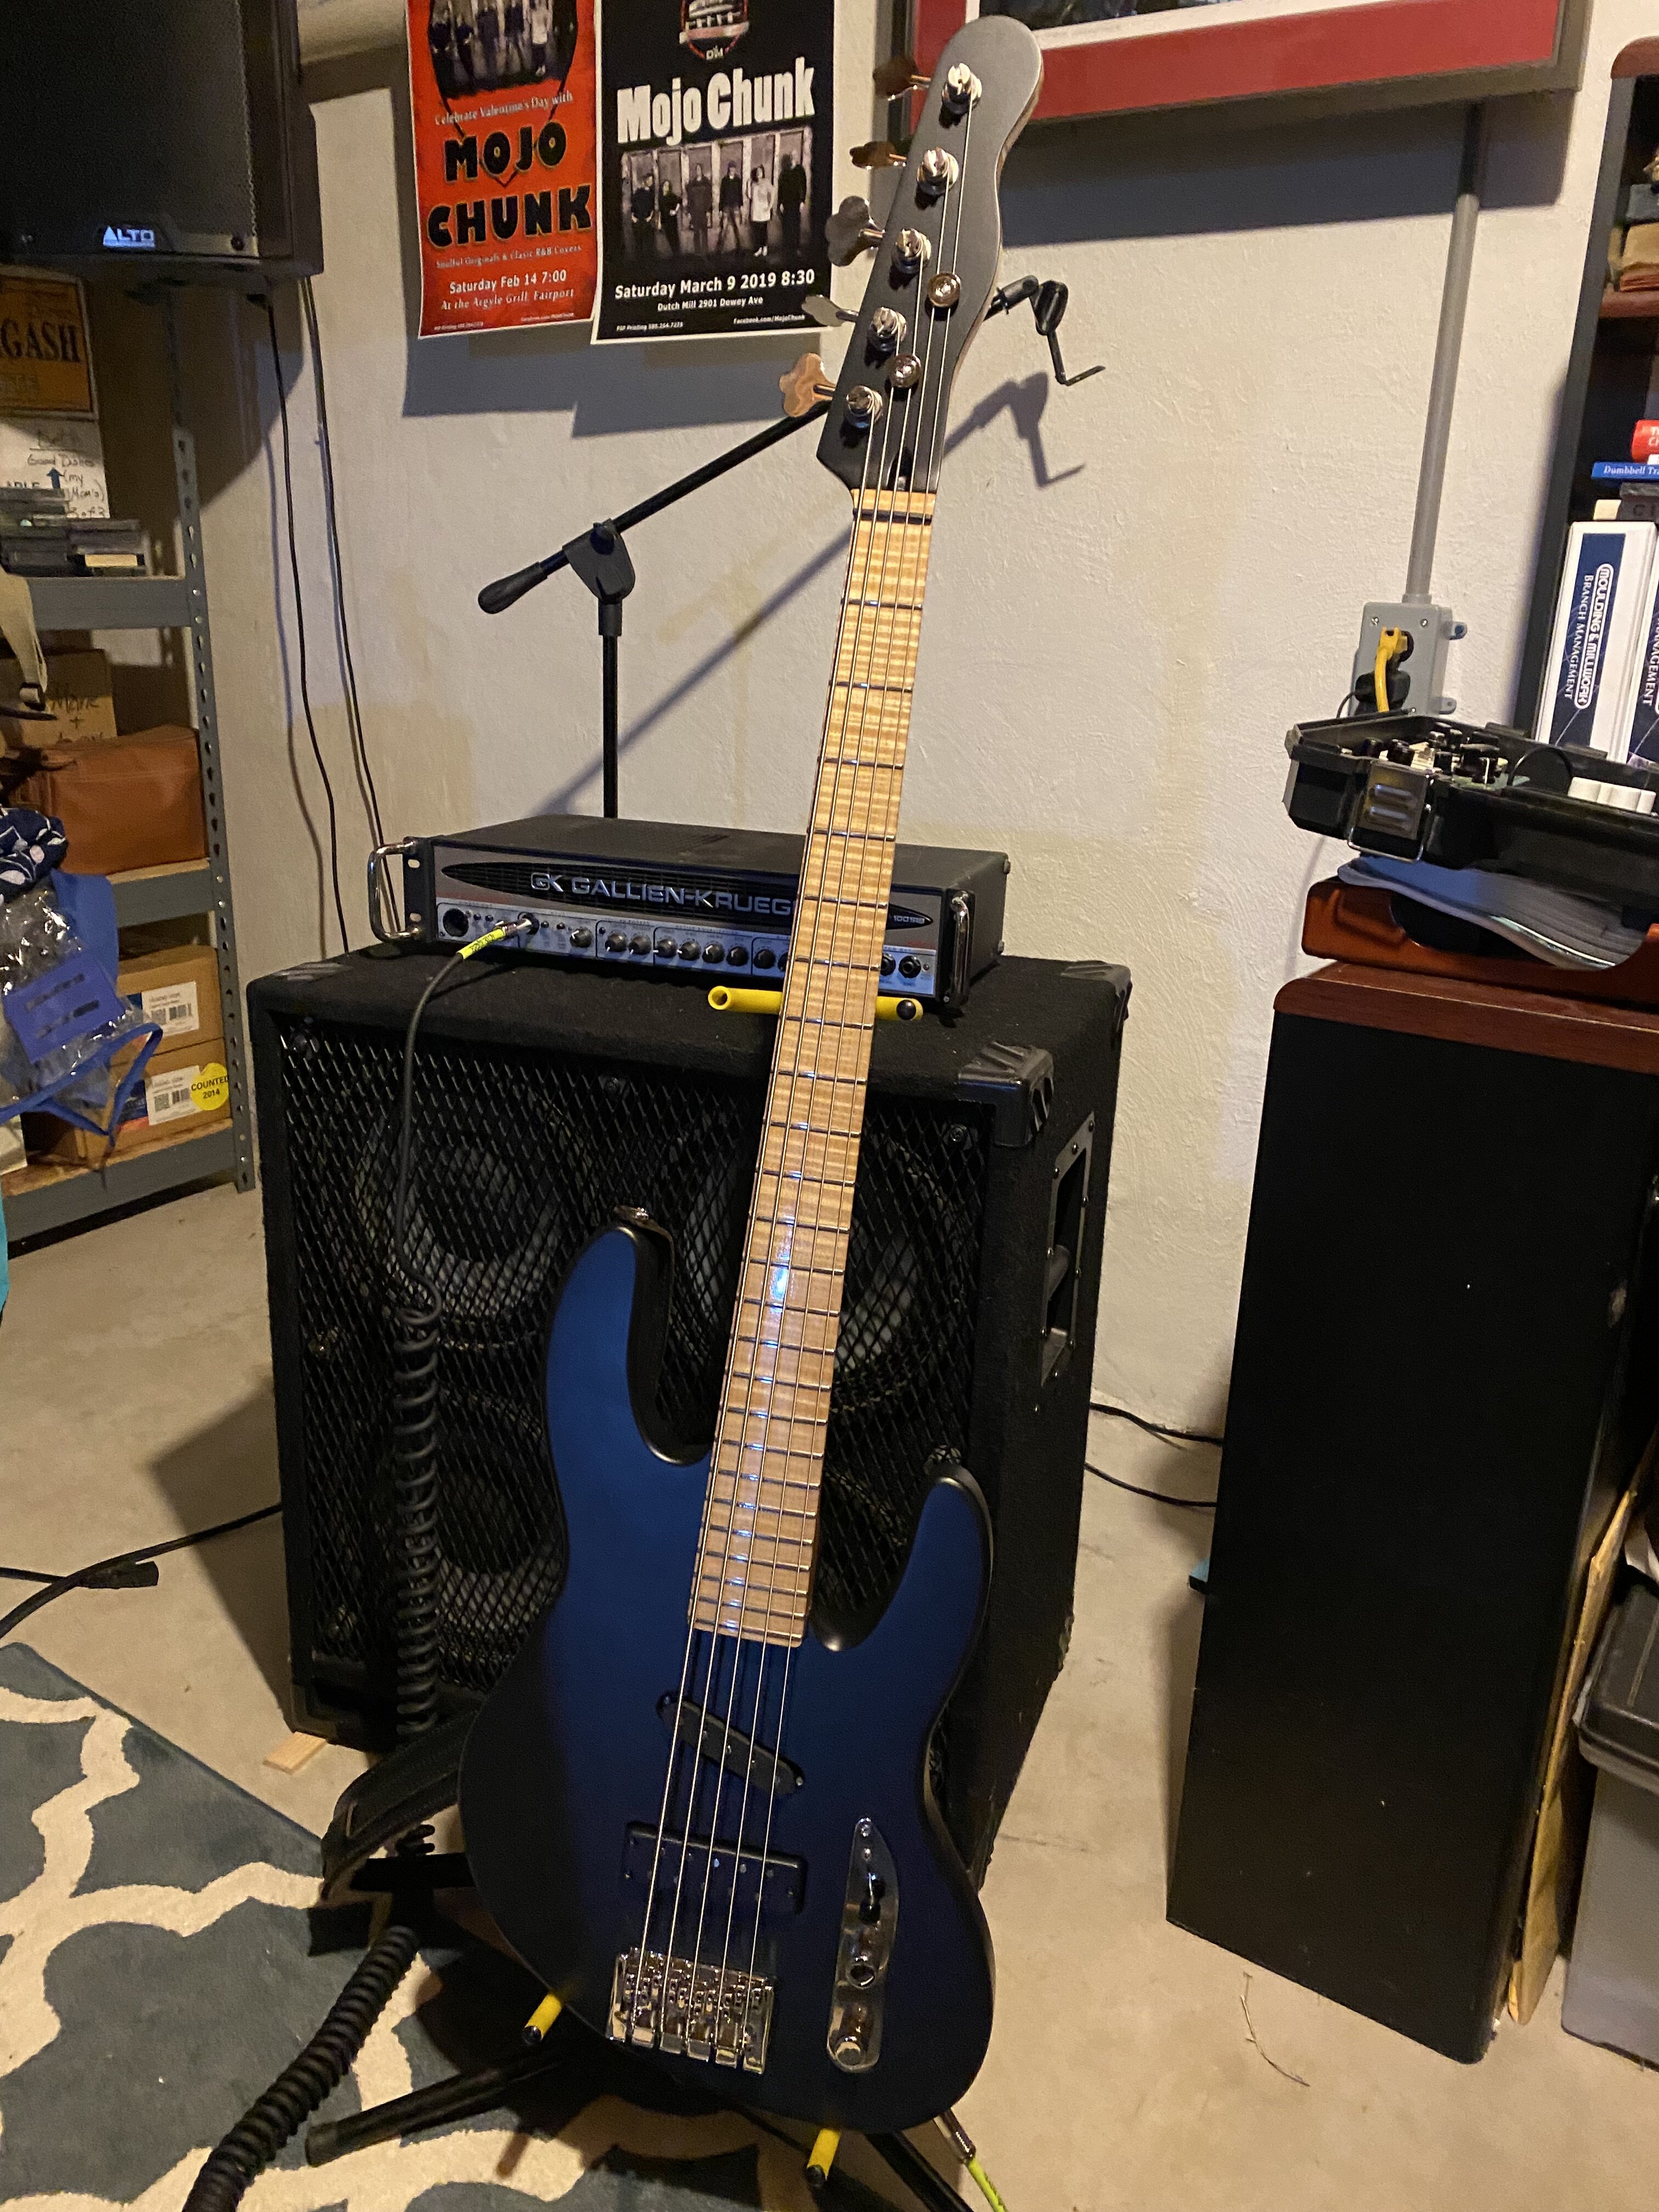
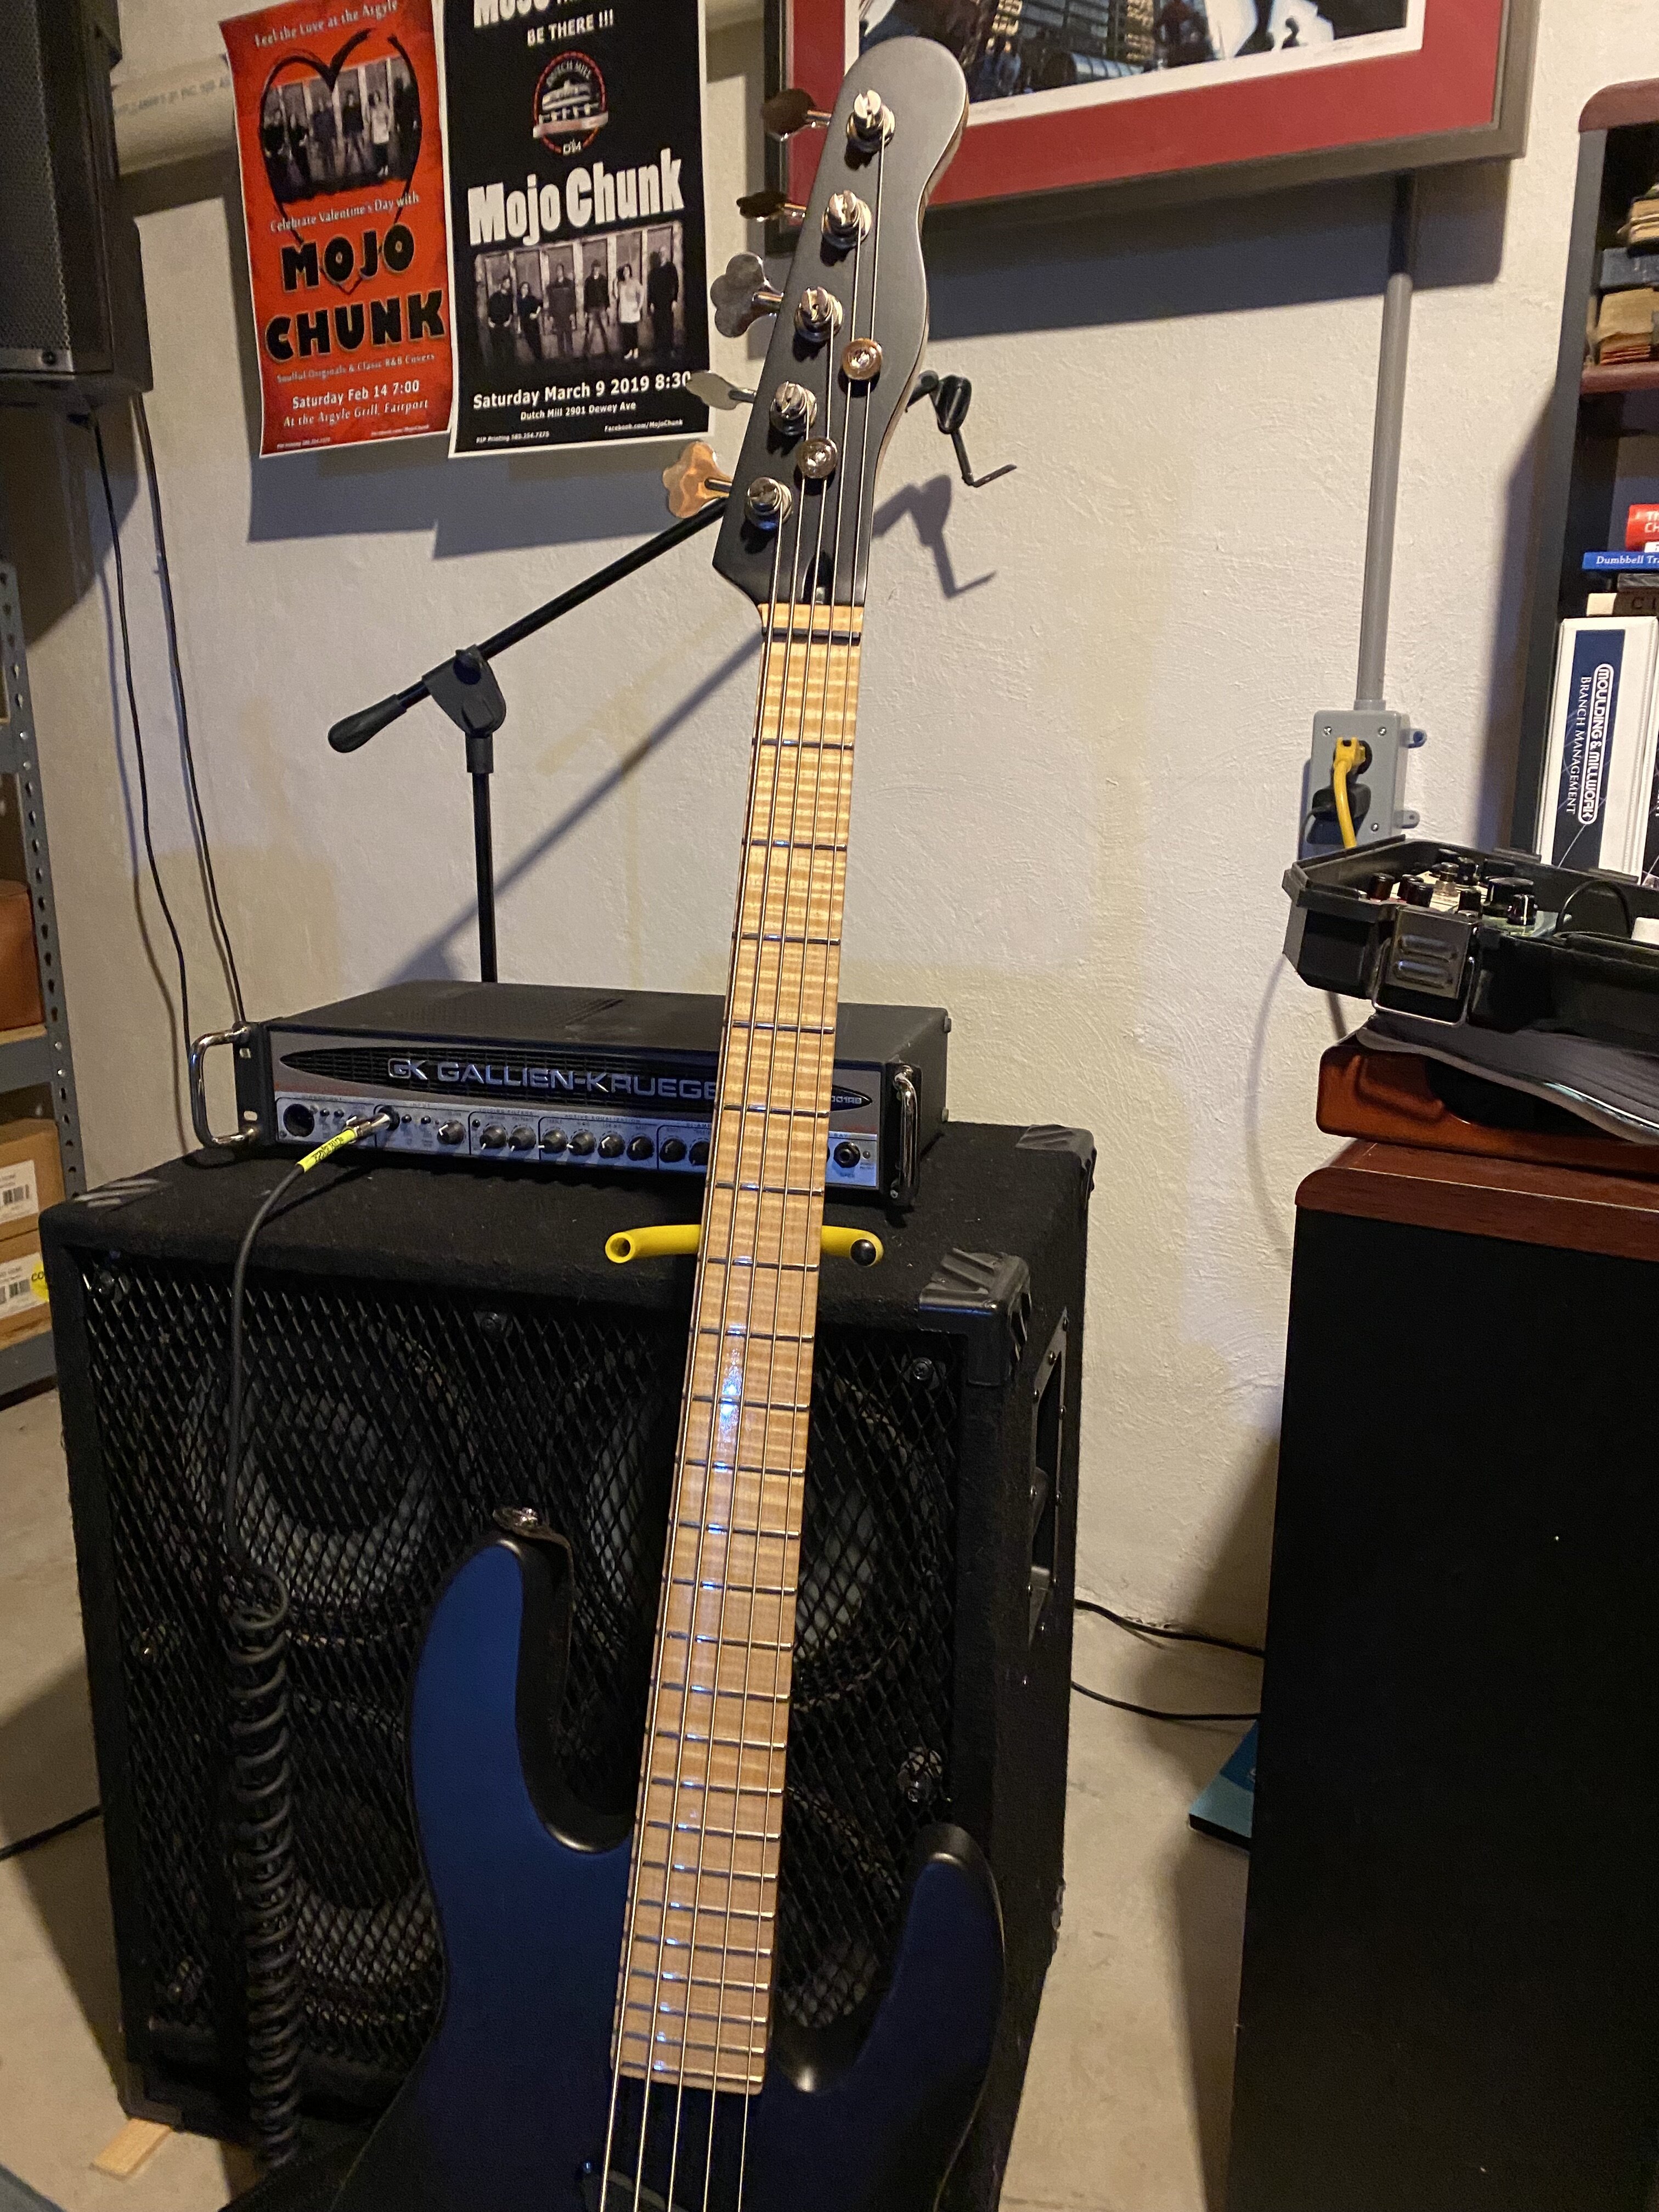
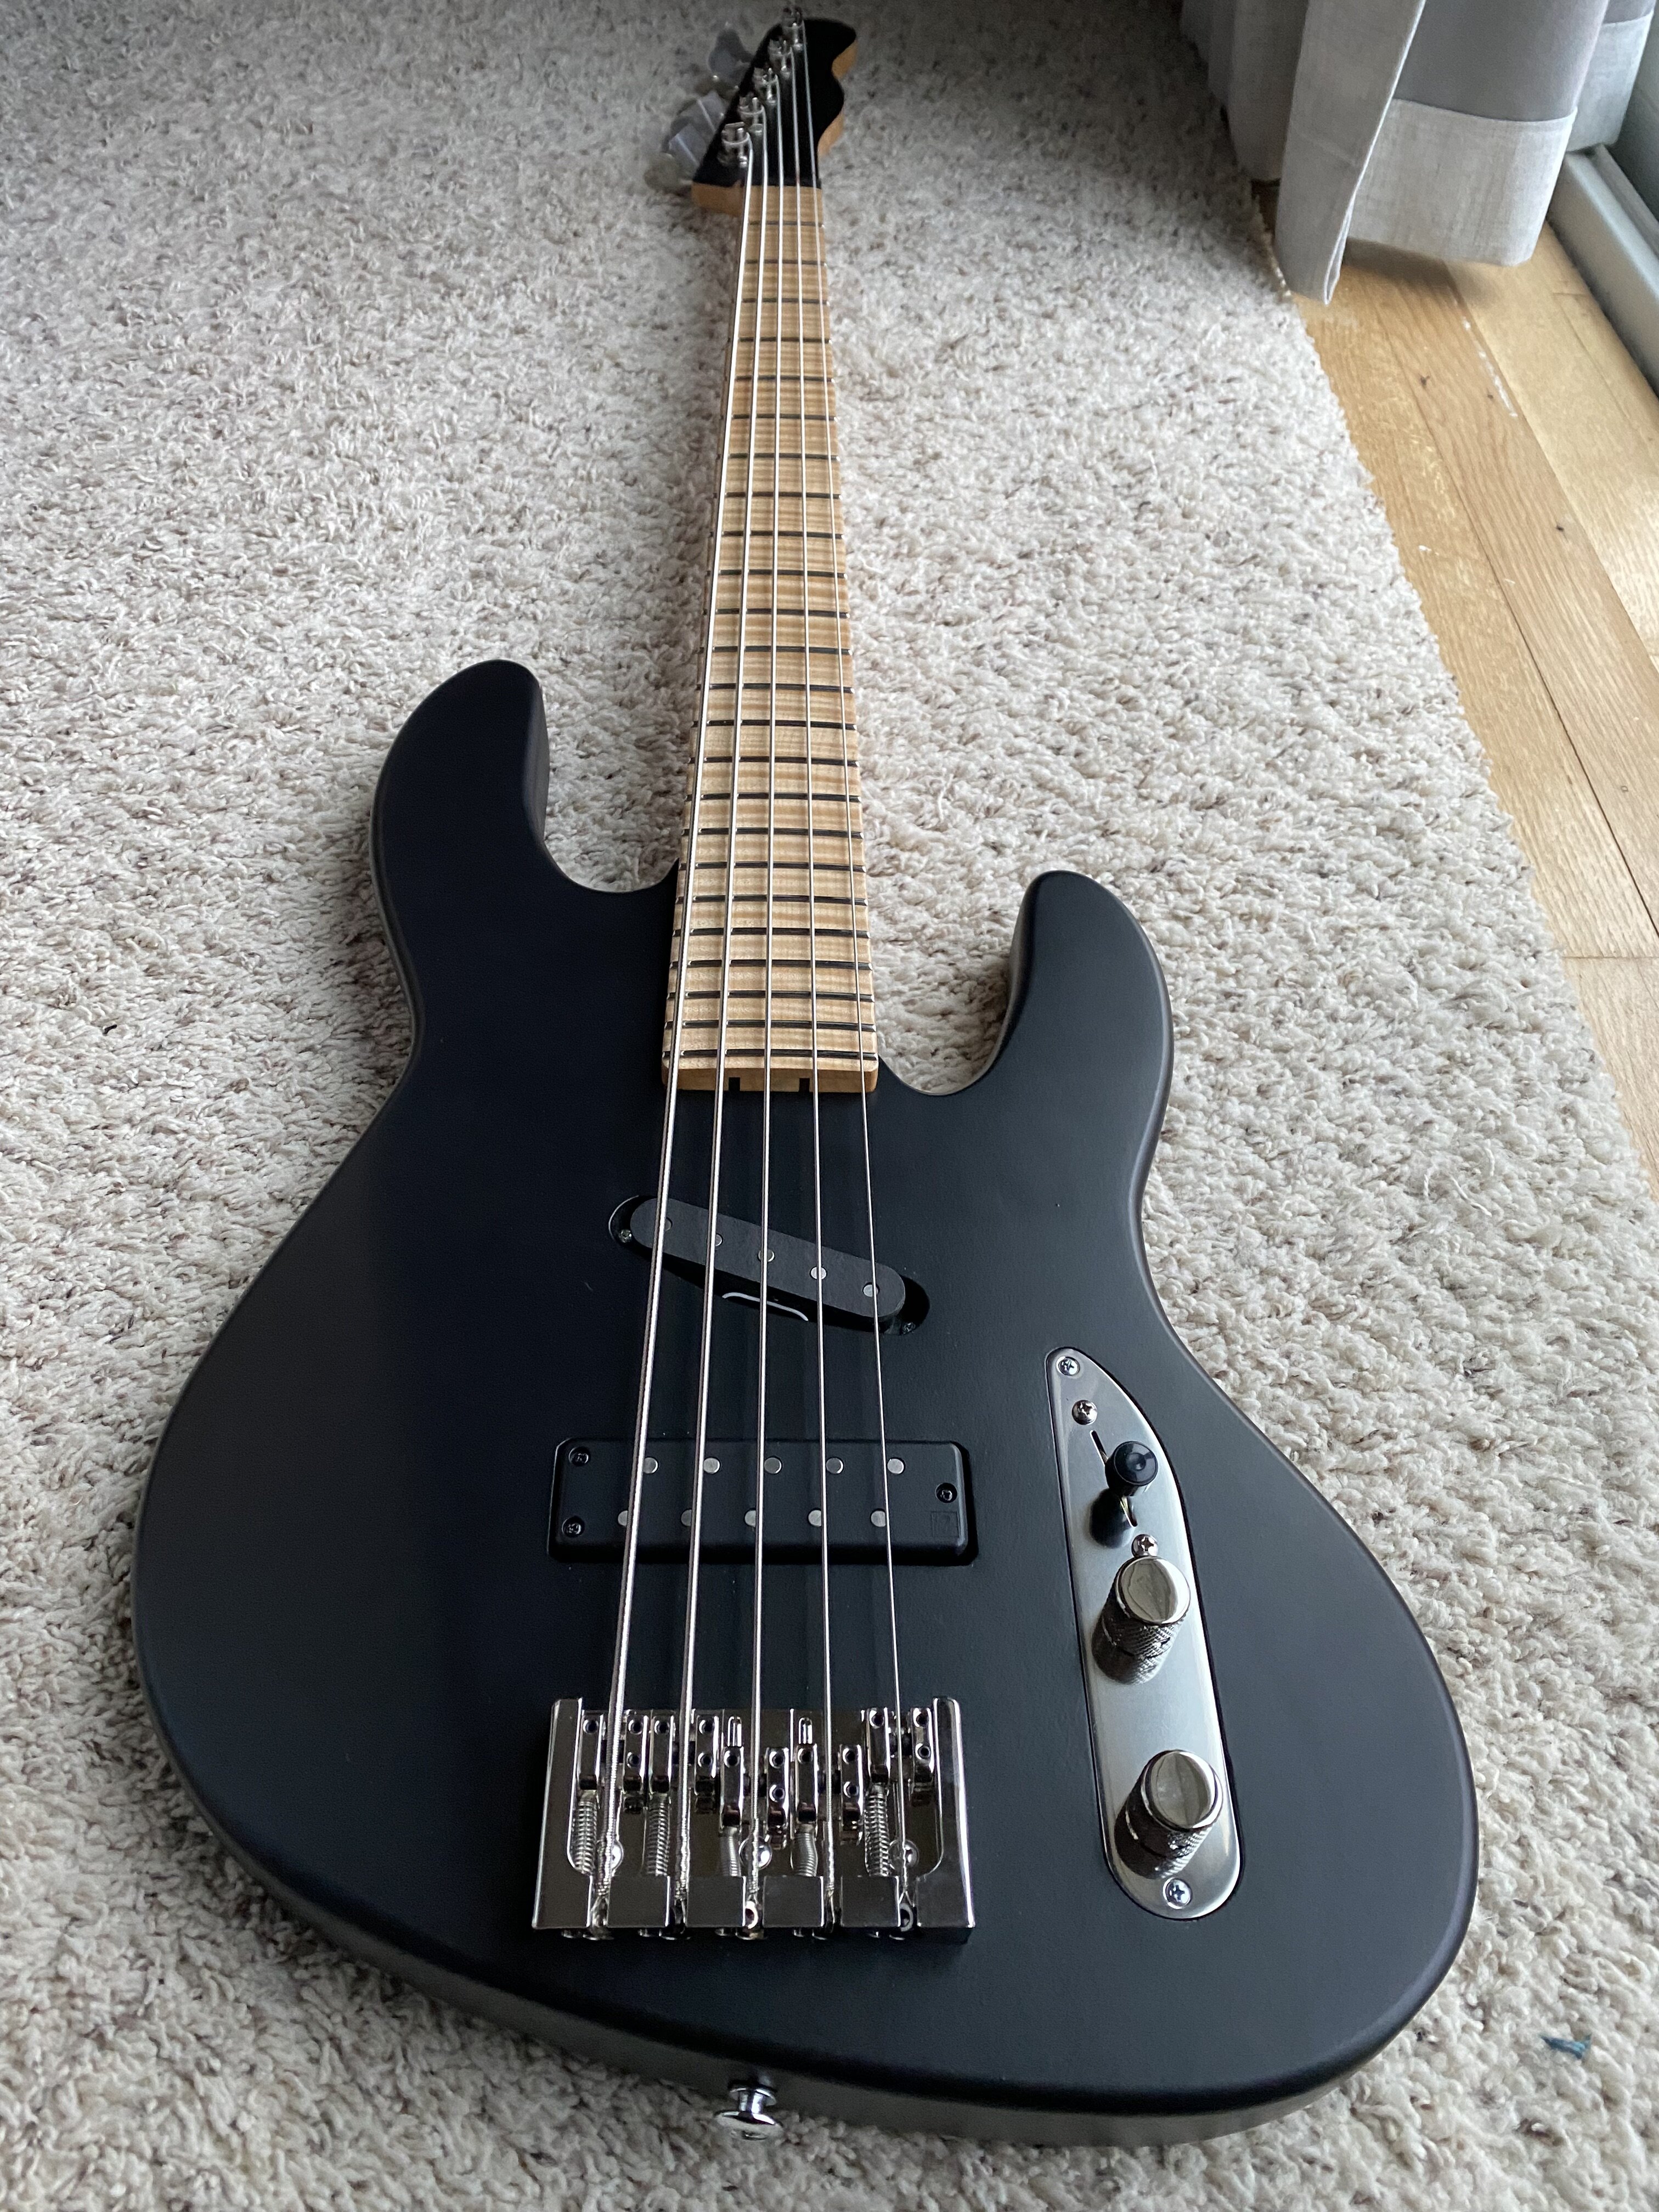
Haha, I started this build in 2021 and thought about posting in the build off. Knowing myself and how I tend to get multiple projects going and not be able to finish any on time, I never posted when I began this build. Good thing because I just finished it this week. Middle of February 2024. Here is the finished bass and then I’ll get into the details.
upload_2024-2-15_18-50-1.jpeg

upload_2024-2-15_18-51-16.jpeg

upload_2024-2-15_18-51-49.jpeg


First off let me say, I have no business entering my work against the quality of builders that post here. I stretched my skills in every step of this and often exceeded my abilities, especially in the finishing stage but more to come on that later. This is only the second guitar or bass body I have done and my first neck from scratch.

Some day I will either draw plans or buy them and try to build exactly to those plans but unfortunately that is not how my brain works. I come up with a concept and start building from there. My inspiration was a ‘51 P-bass but with 5 strings. I loved some of the others I have seen posted on here. But as often happens, things got a little sideways in my brain as I thought about this. I’m already stretching the parameters with a 5 string, what about 6? No, too wide to be my everyday player. How about 24 frets to capture almost all of that extended range? That’s doable so that gets added to the plans. Two pickups would be nice for some tonal options, yep, we’re going with that. At this point, I began purchasing some wood and looking at hardware and pickup options. More on the process as we go. I’ll sum this up with how I would describe this bass. It’s the bass version of a Rat Rod from the 50’s. Barely a shadow of the original car, loud, fast, a little rough around the edges, yep that’s it, my ‘51 Rat Rod P-Bass.

Most of the instruments I own are some version of natural wood. My choice of Matte Black was a conscious decision to depart from that. When it was still a traditional looking 5 string ‘51 in my mind, I was thinking Seafoam Green or one of the other classic Fender colors. Once the Matte Black idea hit, there was no going back.


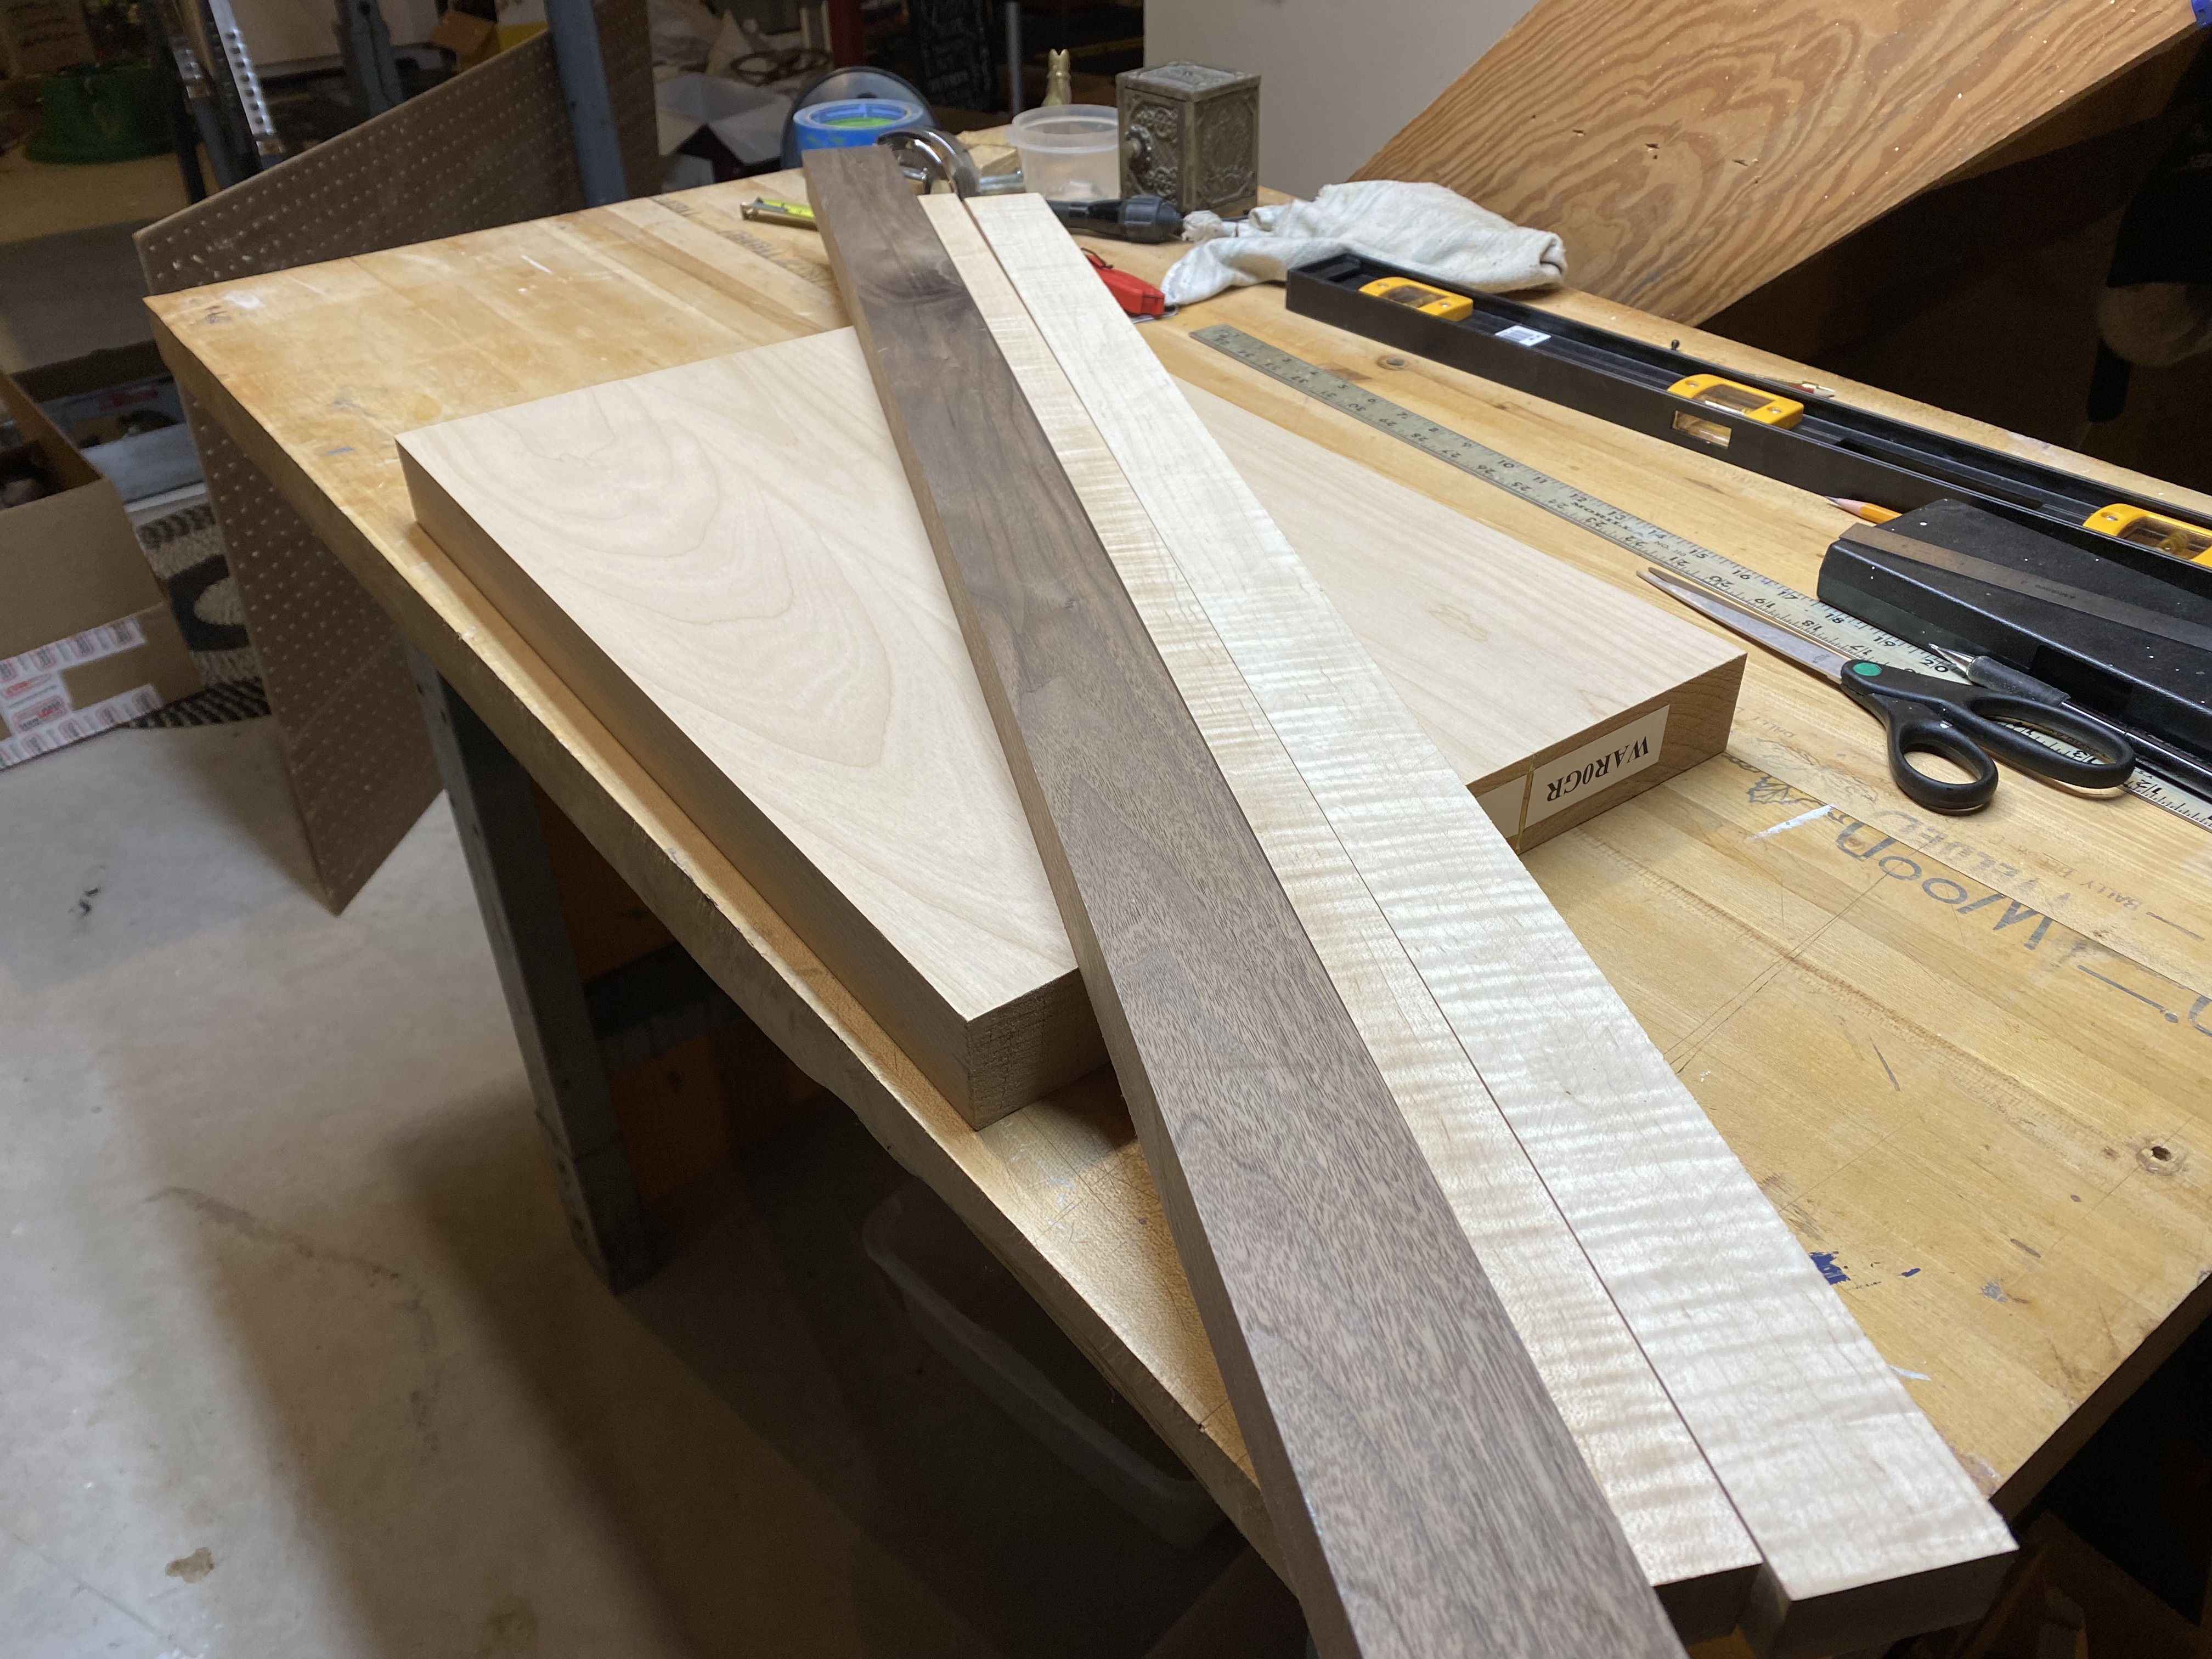
On 6/9/21 I order up a block of Alder from Stew Mac because they listed the weight of their blanks. The older I get, the heavier my 10+ lb L2500 feels after a long show, or even a short one. Those two hour shows without a break are tough . I also ordered some curly maple for the neck from Kevin at Curlymaplewood.com.
upload_2024-2-15_18-53-32.jpeg

upload_2024-2-15_18-54-35.jpeg


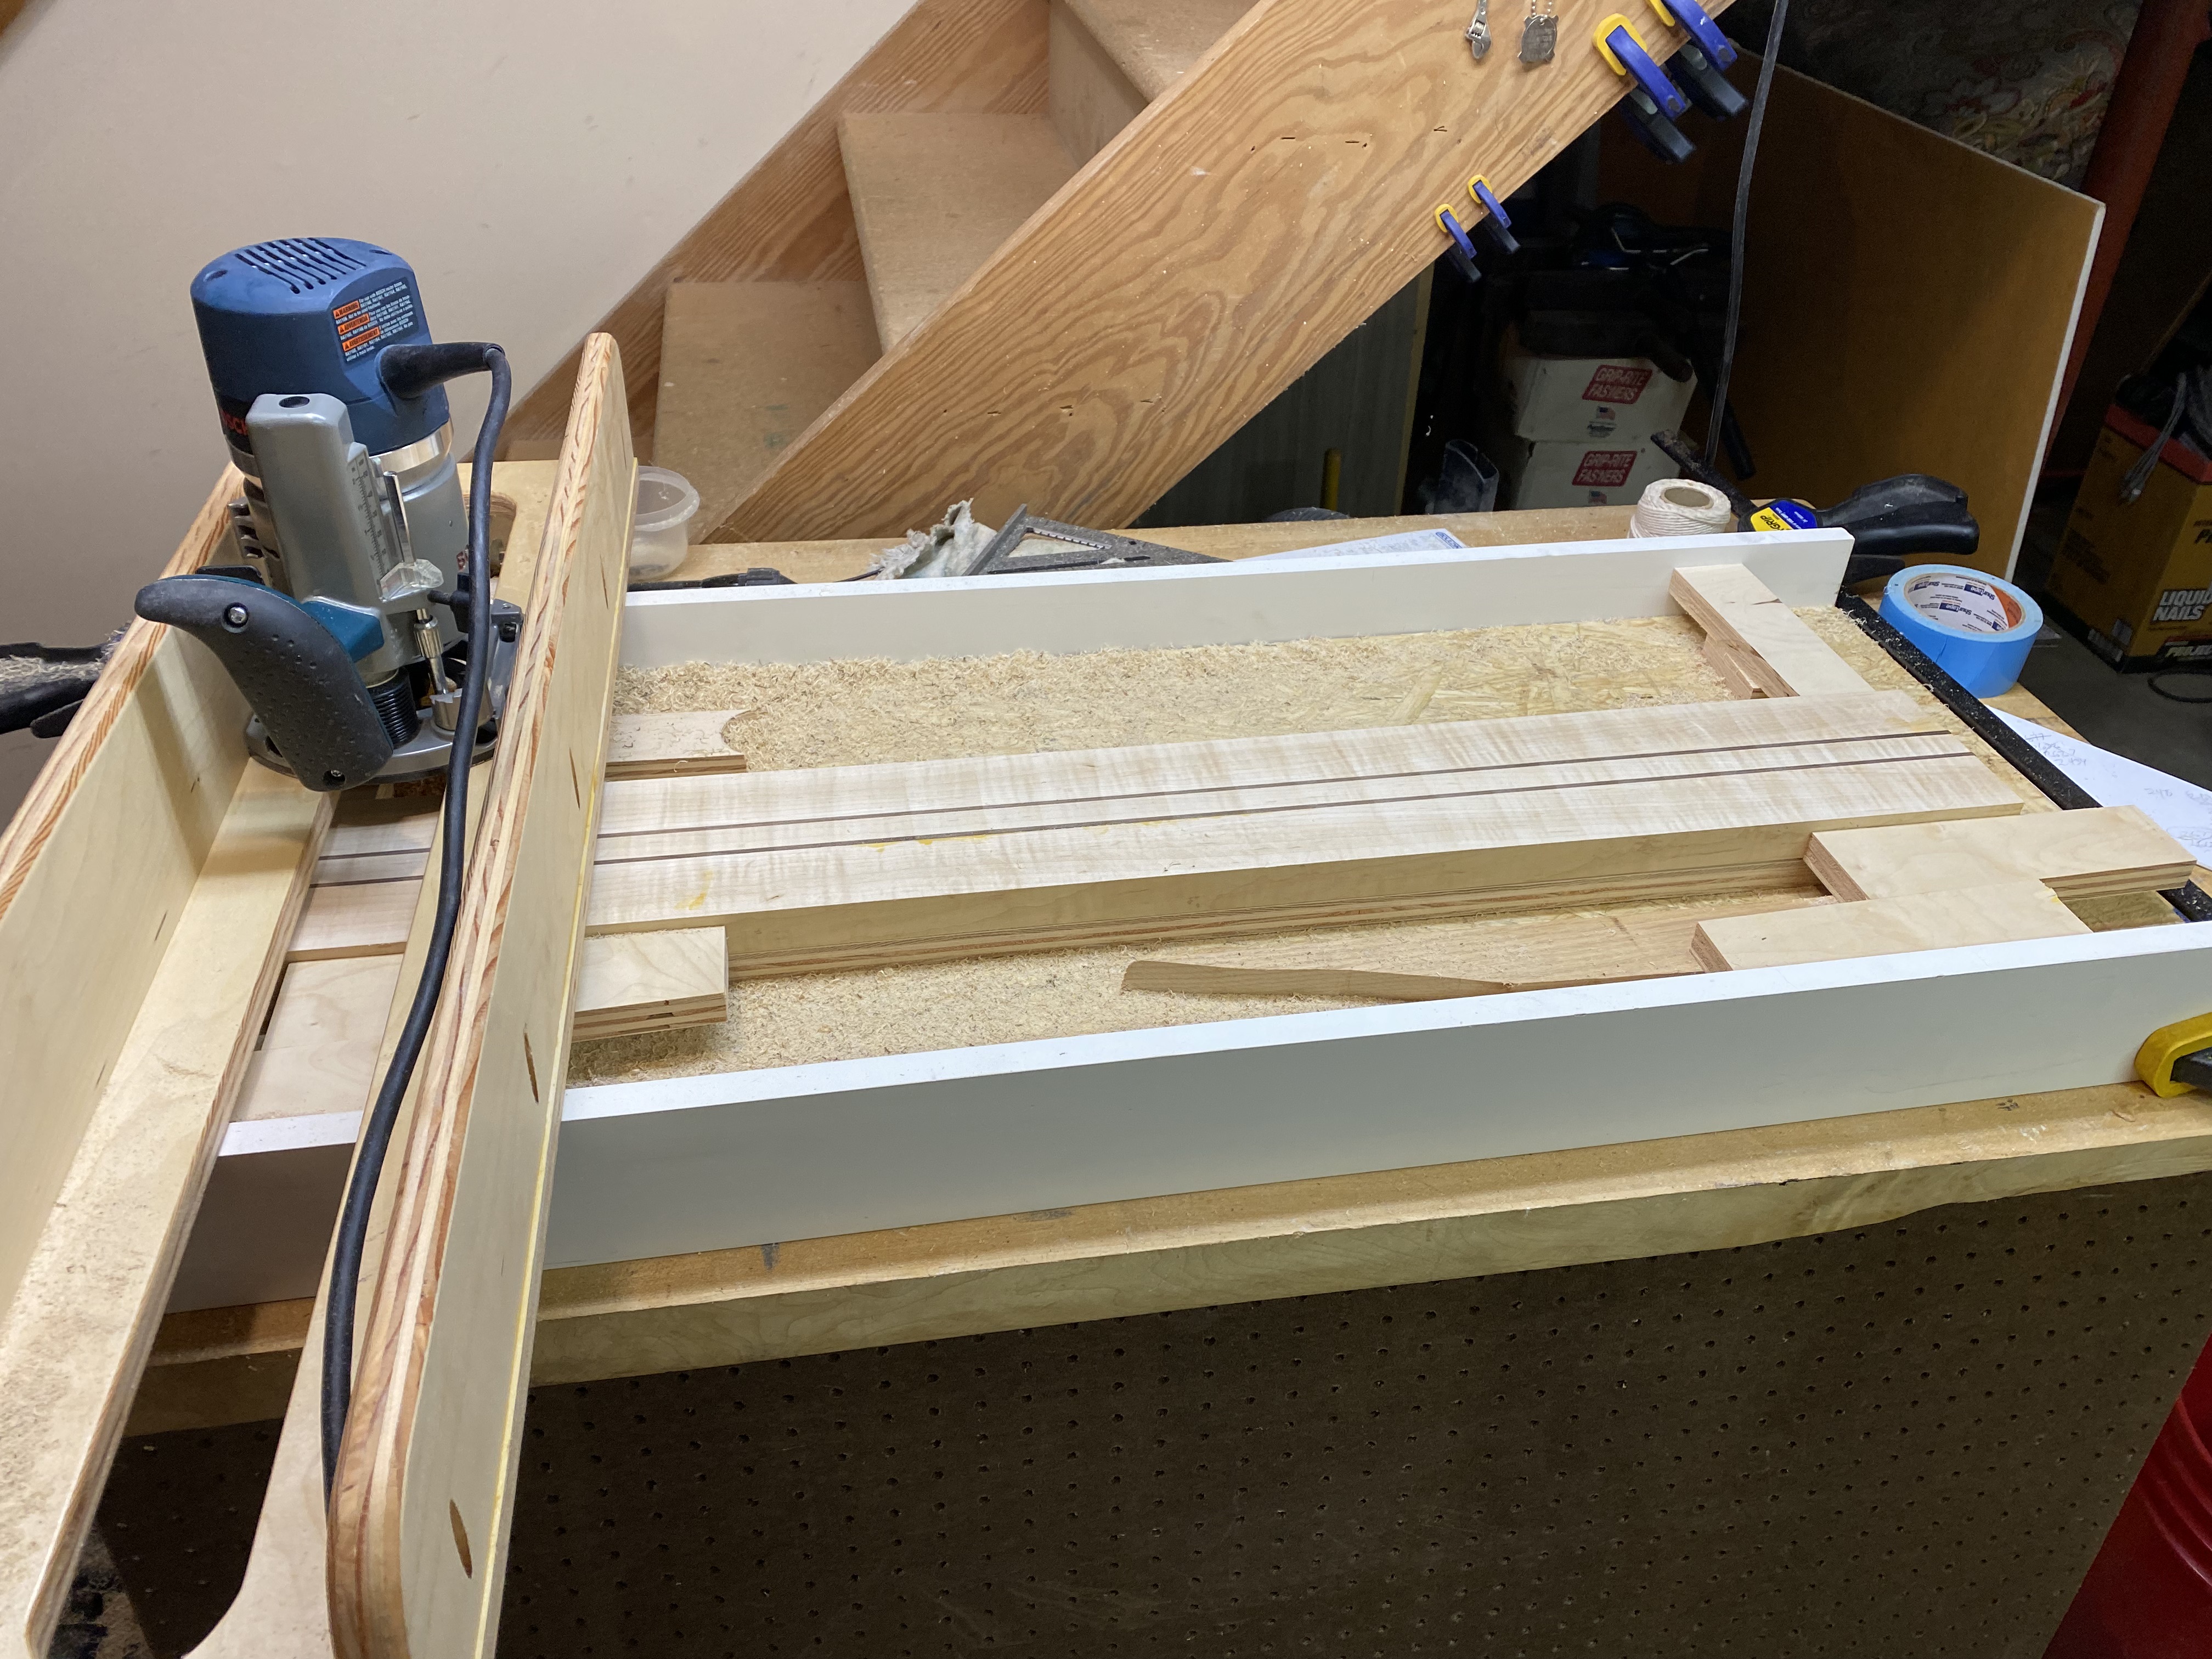
At 48mm (1-7/8” I’m converting myself to metric) the body blank was thicker than I wanted. I don’t have a planer so I made a makeshift router/surfacer setup. Some parallel boards and I made this sled for the router to slide in. It worked great and I got the blank down to 42mm.
upload_2024-2-15_18-55-53.jpeg

I guess I don’t have a pic of surfacing the body blank but this is the jig I used for all my thicknessing needs.
upload_2024-2-15_18-58-50.jpeg


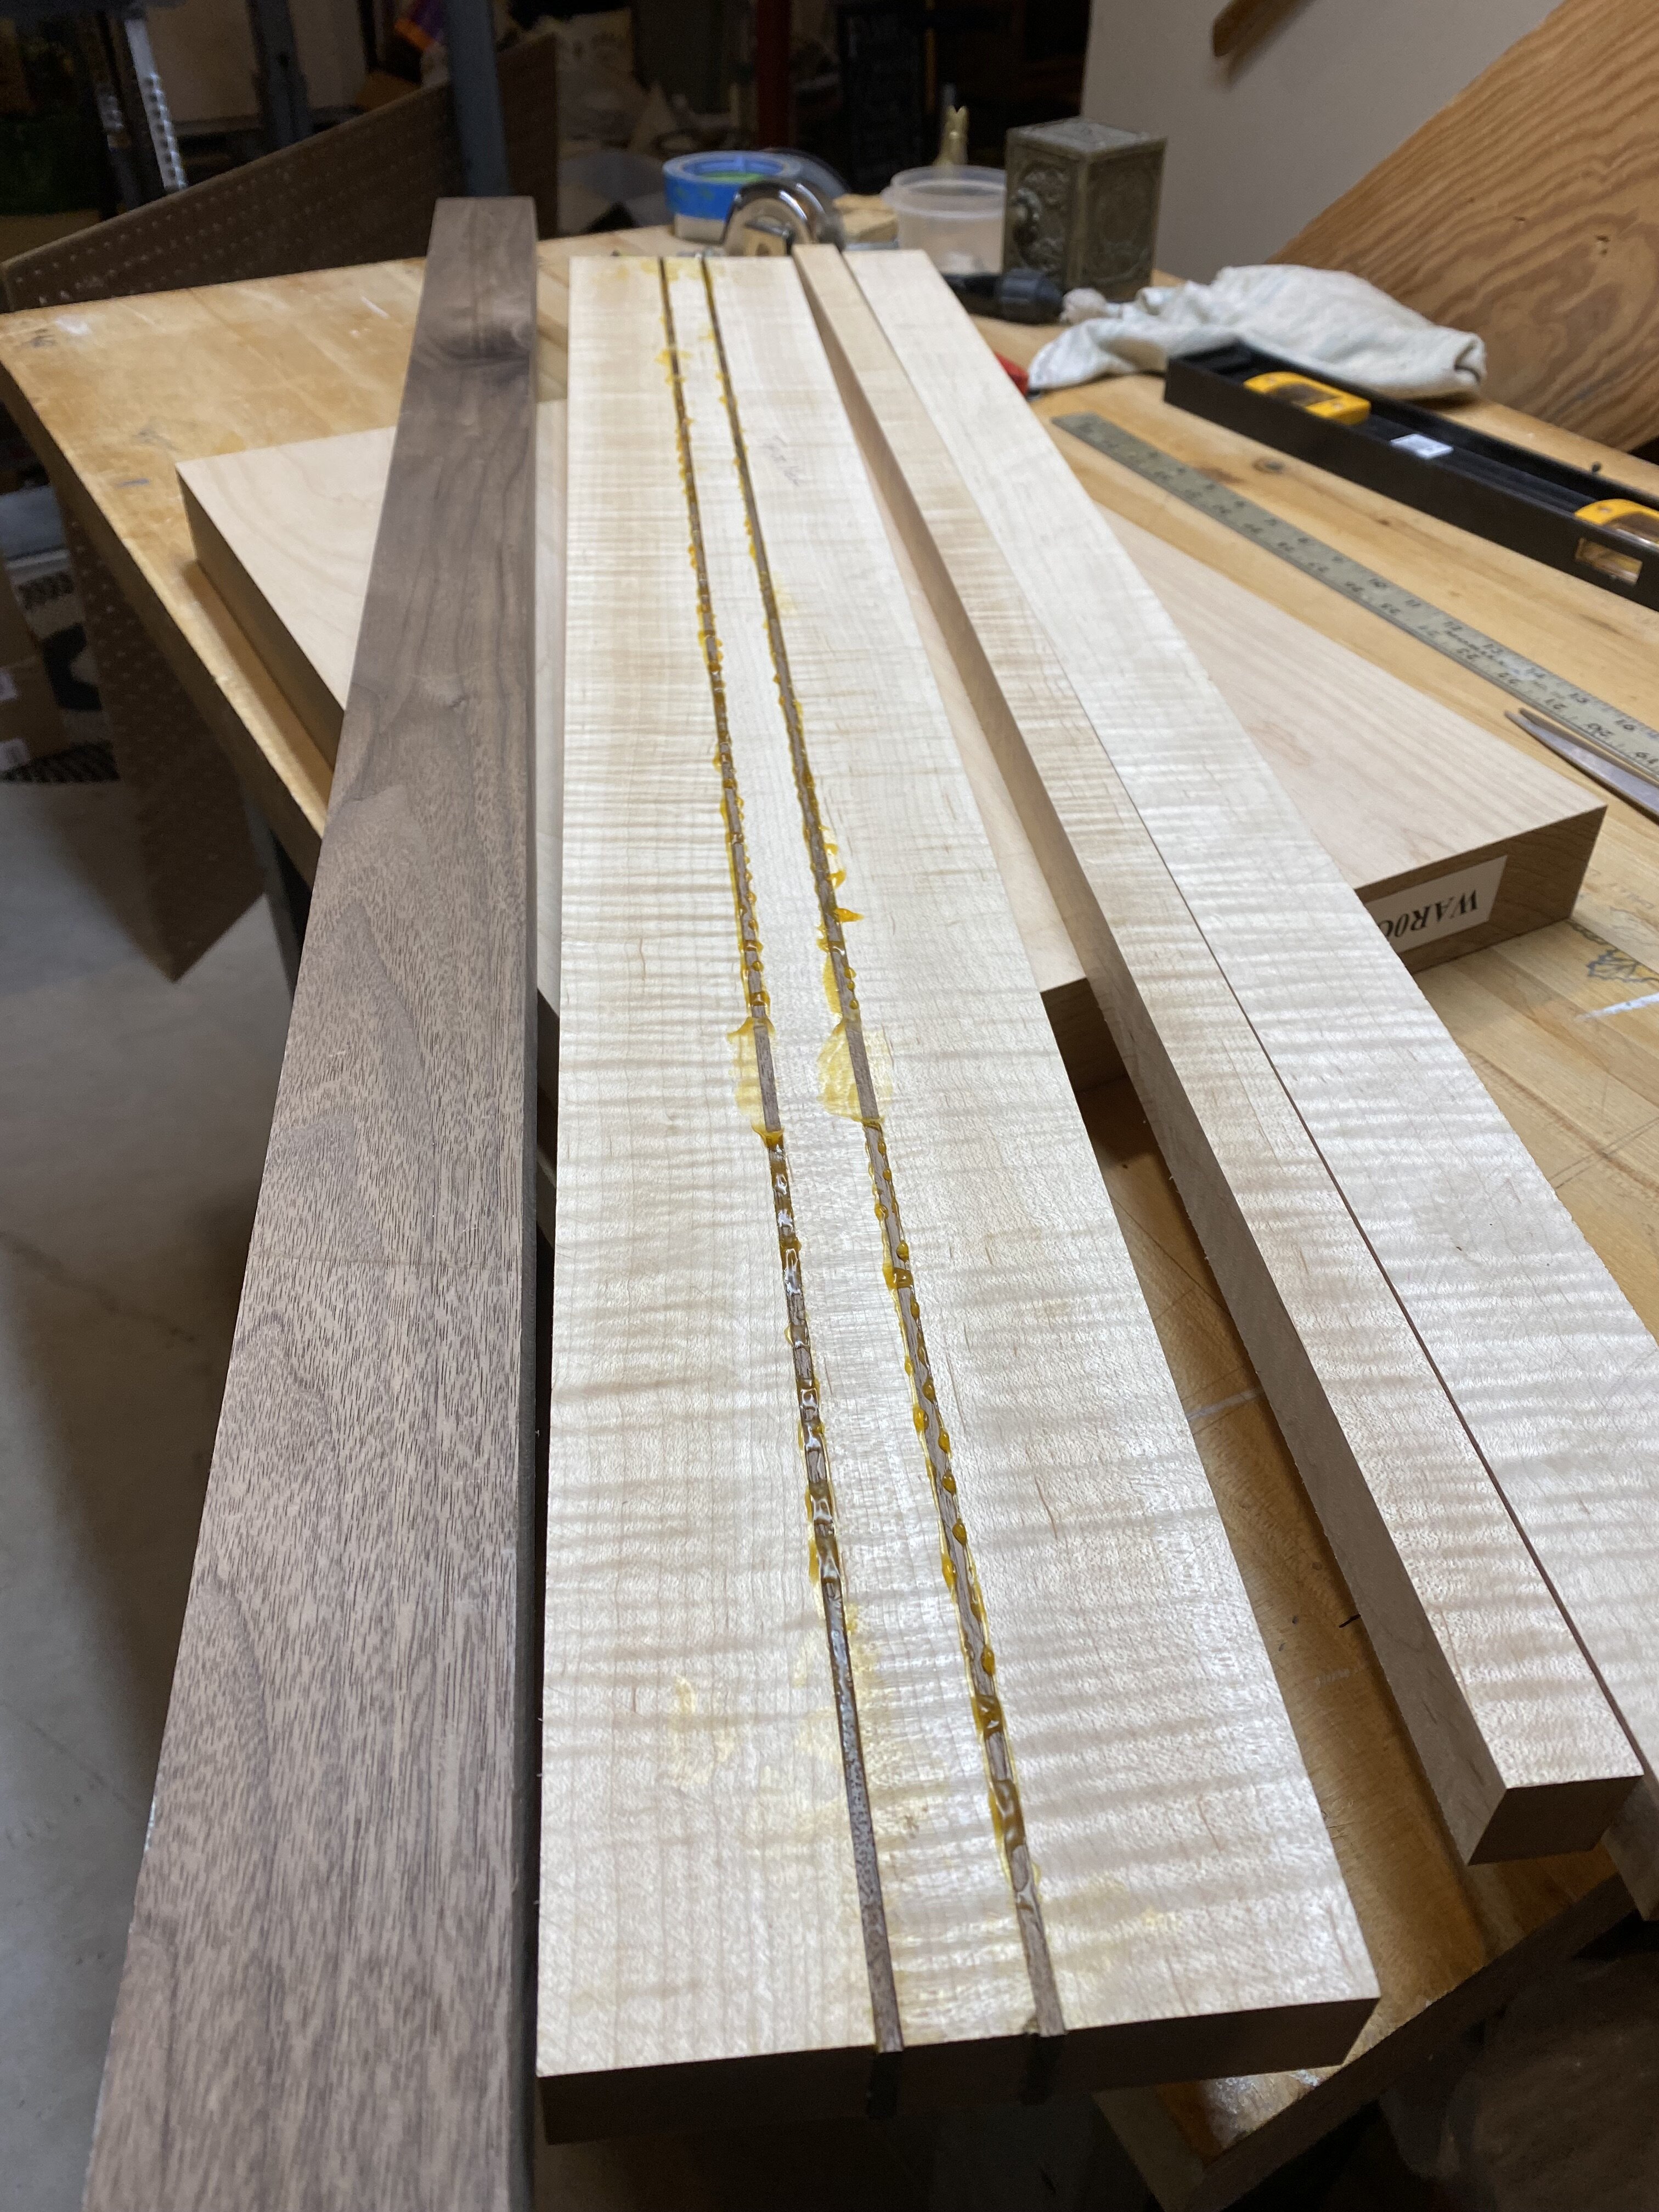
Now for the neck I wanted quartersawn curly maple but I was worried about stability in that thickness of figured wood. So I ordered a flat sawn piece with a nice curl that was 1-?”, I ripped that into 3 pieces. My son has some black walnut of the right dimensions and he ripped some 5mm strips for me. So keeping the curl oriented I turned each of the 3 pieces of maple on its side creating a quartersawn effect. After the fact I found out that I should have changed the orientation of the center board (flipping it end to end maybe?) for better stability but so far so good.

I’ve never done a detailed post like this so I’m going to stop here in case I lose something or it’s not right. More to come…
 
Last edited:
Next I started on the neck. I routed channels for the truss rod and carbon fiber reinforcement rods. First mistake of the project came up quick. I was using a spiral up-cut router bit to cut the truss rod channel. The up-cut while being efficient at removing chips is also pulling the bit down into the work. I must not have tightened the collet enough. It felt like the router was facing more resistance and laboring. In an instant I realized something was wrong and pulled the router out. It was too late and the bit had gone through the neck blank and into my workbench. I thought I had a pic of the damage but I was probably too traumatized to take a pic. To fix it I drilled out the damaged area with a Forster bit and cut a matching plug in similar grain out of scrap stock. It’s noticeable but not a bad looking fix. I reinforced the inside cavity with epoxy and also glued in the carbon rods with it.
upload_2024-2-15_19-21-45.jpeg

upload_2024-2-15_19-22-39.jpeg

upload_2024-2-15_19-23-9.jpeg

Here is my rough cut body and some hardware laid out to get an idea of what it will look like.
upload_2024-2-15_19-25-22.jpeg

Next on to the fret board. The grain and figure ran at a bit of an angle to the blank but fortunately it was wide enough that I was able to rip the fretboard blank so that the grain was pretty straight.
upload_2024-2-15_19-28-37.jpeg

upload_2024-2-15_19-30-8.jpeg

at this point I should have surfaced the fretboard blank a little thinner but thought the added thickness would be used as I did the fretboard radius.

Then I tackled cutting the fret slots. Talk about a nerve wracking procedure. I didn’t want to spend a fortune on a template. I found an inexpensive plastic one but that didn’t seem accurate enough. I looked at some other options but decided on printing the fret layout to scale and using light spray adhesive to stick it to the fretboard. I used a Stew Mac fret slot saw and used a block of wood to help me stay perfectly aligned. I didn’t trust the paper template either so I was measuring each fret to confirm and adjusting the placement as I went.
upload_2024-2-15_19-40-59.jpeg

upload_2024-2-15_19-41-30.jpeg
 
Having cut out the rough neck shape on the bandsaw I needed to cut the headstock to the thickness I wanted. I thought about setting up my surfacing jig with the router again but decided to do a simpler jig and rip it on the table saw. Another stressful operation but it was successful.
upload_2024-2-15_20-4-59.jpeg

Then to glue the fretboard on. I used every clamp I owned trying to get even pressure across the whole board.
upload_2024-2-15_20-15-7.jpeg


I used my template to cut the neck to final width along with the fretboard.
upload_2024-2-15_20-18-12.jpeg


For almost all of the machining I made templates of MDF. I used double stick tape or clamps to hold the template in place.
upload_2024-2-15_20-4-59.jpeg

As I said earlier, sometimes my design is evolving during the process. At times that would necessitate only using a portion of the template or moving it to complete the job. I could have made a new template but this was easier.

At this point I realized the fretboard was just way too thick. I was too lazy to set up my surfacing jig so I started to sand it down with a belt sander. Yes, I know, dumb, risky but it was working well and I would stop regularly and check it with a straight edge. Until one Friday night. I had had a couple glasses of wine with dinner but felt completely fine. I went down to work on the fretboard for a little while and was not paying attention. So I ended up with this.
upload_2024-2-15_20-15-7.jpeg

Yes, the second big mistake of the project. Once again I was sick and angry with myself. After taking a few days to gain my composure, I took the time to set up my surfacing jig and correct my mistake.
upload_2024-2-15_20-18-12.jpeg

Now I ended up with a thinner fretboard than I wanted but still workable. At this point I started shaping the back of the neck with a combination of a draw knife, spoke shave and rasps. If I was doing it again, I would use a router in the router table to hog out a good portion and then finish the profile by hand.

Things had moved along well at this point. Of course delays for family and work stuff would happen but moving right along. Then in Feb ‘22 I was in my shop one night and was feeling dizzy when I would bend over to adjust my router in the table. I decided to let that wait and do something else. That required the table saw and as I was setting that up the dizziness was getting worse. I thought to myself that power tools and dizziness are not a good combination. I called it a night and went to bed early. It was worse the next day. By noon I was in the hospital and later to be taken by ambulance to Strong, the big hospital in Rochester, NY. They found a mass on my brain and wanted the expert neurosurgeons to have a look. It has all worked out pretty well. I have a Cavernous Angioma in my brain that had bled. They can induce stroke symptoms and seizures so I was fortunate that I only had dizziness. That got better right away but I had some balance and thought process issues in my recovery time. As I got better I would try to work on my bass but always felt I would make a mistake. Good news is that I’m just about fully recovered and just have occasional vertigo that doesn’t get too bad.

Other delays that would pop up were interviewing, hiring and training my replacement at work so I could retire and I had a total knee replacement on my left knee Jan ‘23. After I retired it’s been full steam (maybe a few setbacks) ahead on my bass.
 

Attachments

  • upload_2024-2-15_19-54-34.jpeg
    upload_2024-2-15_19-54-34.jpeg
    1.9 MB · Views: 23
  • upload_2024-2-15_19-58-4.jpeg
    upload_2024-2-15_19-58-4.jpeg
    3.1 MB · Views: 17
  • upload_2024-2-15_20-2-0.jpeg
    upload_2024-2-15_20-2-0.jpeg
    3.2 MB · Views: 18
Once I was feeling better I began to work on the neck again. I can’t believe I have no pics of carving the back of the neck or radius in the fretboard. It was such a labor intensive task and so critical to the final outcome but oh well, here we are. Another downside to my previous mistake of taking too much material off the fretboard was that I had to recut most of the fret slots.

So now I was approaching decision time on what finishes to use. I wanted this to be a player with a durable finish. I decided on Spraymax 2K clear top coat. I wanted gloss on the neck to highlight that beautiful curl and matte on the body. I was afraid the 2K poly wouldn’t give me that depth in the figure I wanted, I used a neutral stain to pop the grain a little.
upload_2024-2-16_7-51-36.jpeg

The back is not more amber, it was just the lighting where I had it drying.
upload_2024-2-16_7-53-7.jpeg


Frets were next on the agenda. I used the jumbo frets from Stew Mac and also bought their fret pressing caul to go in my drill press. I got my station all set up. I used super glue to glue in the frets and realized that if I didn’t work carefully and cleanly, I could have a real mess on my hands.
upload_2024-2-16_7-58-26.jpeg

upload_2024-2-16_7-59-12.jpeg

upload_2024-2-16_7-59-51.jpeg

This was one of my more successful procedures. When I went to level the frets (again, no pics) I only had a few that were high. I only had to do minor leveling. On to the finish!
 
It’s best to use the minimum amount of whatever glue to glue in frets but if you do that again, wax the fretboard first. Any squeeze out, even CA, will just pop right off of the wax.
Good to know. I did just use a small amount, I was afraid of making a mess. Does waxing the board cause an issues when the finish is applied? I assume you would strip the wax off first but can you get it clean enough?
 
  • Like
Reactions: Matt Liebenau
Speaking of finish, it was now time for that. This is one of my decisions that I would change if I had to do it over. Spraying the 2K finish without a spray booth was beyond my skill level. I should have done multiple coats with an oil finish then waxed and buffed it. But away I went with the spray job. It looks great from a distance but if you zoom in you see all the defects. Maybe some day (now that I know the bass plays great) I’ll sand it out and refinish.
upload_2024-2-16_9-29-51.jpeg

upload_2024-2-16_9-30-22.jpeg

upload_2024-2-16_9-31-16.jpeg
 
My plan was to finish the neck first so I could route the neck pocket exact. So I began the bass body phase of the build.
upload_2024-2-16_9-34-37.jpeg

I waited until I had the neck attached to position the bridge and make sure everything was aligned. I tried to use the B and G strings to check the alignment but they were too unwieldy. I opted for builders twine and it worked perfect. The spring clamps are just on there for weight.
upload_2024-2-16_9-38-15.jpeg

Getting the pickups positioned so the strings passed over the pole pieces was another challenge.
upload_2024-2-16_9-40-12.jpeg

I used Nordstrand pickups, their hum canceling version of the ‘51 P and the Big Rig based off the ‘51. I ordered them in 17mm string spacing assuming the neck pickup would be spaced a little tighter but it was also at 17mm. I thought about calling and asking if they would work with me on a swap but got the idea of mounting it at an angle. I liked how it looked so that became the plan.
 
From here it was fun, back to basic woodworking. Lots of drilling, routing and making templates.
upload_2024-2-16_9-49-45.jpeg

Another thing I wish I had taken pics of was the jig I made to cut the body bevel on the table saw. It worked like a charm.

I used a 1/4” round over bit for the edges and back to my friend the belt sander for the belly contour and some coarse grit on the sander to blend everything together.
upload_2024-2-16_9-55-47.jpeg
 
One more small issue. When I was drilling in the side of the body for the jack I had a plan. Three forstner bits, 1” for the rim of the jack plate, 7/8” for the body of the Jack plate and 3/4” for the jack itself into the control cavity. It worked good in the practice piece I did but when it came to doing it on the body, not so much. On the cheap forstner bits that I have, the centering point on the 1” was much larger than on the others. Without the center being anchored the bits wandered and I ended up with a mess.
upload_2024-2-16_10-24-33.jpeg

I ended up boreing holes in scrap and clamping them in place to keep the bits on center. It got the job done but I needed a bit of bondo to fix the outer edge.

Now on to finishing the body. Admittedly the weakest part of my game. Lessons learned after the fact. I should have used grain filler or sanding sealer even though I was using tight grained wood. Meticulous preparation is the key to success. What did I do instead? I used automotive primer and wet sanded that. It looked good but when I sprayed the flat black some defects showed that I had missed in primer. I fixed those with some automotive glazing putty, sprayed primer again, wet sanded and then paint.

Something in that process did not agree with the flat black I was spraying. It would look ok as I sprayed the wet coat but as soon as it flashed off it was a different color over the primer spots. On my last coat, I thought I had it beat by laying down a heavy coat. It was flowing on very nicely and even though I was putting it on really heavy, I was avoiding any runs. But the minute I stopped spraying, the finish cracked.
upload_2024-2-16_10-39-29.jpeg

Back to the drawing board. I tried sanding it off but it was coming out very uneven. I was afraid to sand too much and disturb the shape of the body.
upload_2024-2-16_10-43-17.jpeg


So I went with a chemical stripper. Back outside, in the cold, made a huge mess, basically a terrible day but it was done. Then I began the meticulous prep I should have done in the first place.

The challenge was that it was now winter and I couldn’t spray outside. The 2K paint is highly toxic so spraying in the basement was a problem. Don’t ask me why I chose this paint, seemed like a good idea at the time. Anyway, my wife was going to be gone for a few days so that was my chance. I was all ready and had everything clean and in place ahead of time. I had my makeshift spray booth set up and was ready to go. I put the cat in the garage so I didn’t poison her and got to business. 2 coats of matte black and 2 coats of matte clear and I had success. After it had flashed off and was dry enough to not pick up dust I took the parts to an upstairs bathroom. I had an electric heater in there to keep it really warm and had the exhaust fan on to vent the fumes. I let it cure up there all day. I opened some windows in the basement and put a fan in one to vent the basement. A few hours later I was cleaning up, the cat was back in the house and I was a happy camper.
upload_2024-2-16_10-55-7.jpeg
 

Attachments

  • upload_2024-2-16_10-54-33.jpeg
    upload_2024-2-16_10-54-33.jpeg
    2.4 MB · Views: 21
impressive! and doubly so given all of the obstacles on this build journey! :thumbsup:

your bass looks amazing! i'm glad it all worked out --- congratulations on your late entry, but it looks like you're a winner on multiple counts! :thumbsup:
Thanks! Most of the obstacles were self inflicted haha. Poor planning, poor preparation, poor execution will get you every time, there are no short cuts. I should know that by now
 
Once I began this step it became real that I was in the home stretch! Mounting and wiring the electrics. I had the pickups routed kind of deep so I had to add a wood spacer on the bottom of the hole. I used superglue and a small screw to hold it in place. I shielded the control cavity and cover. I mounted the pots and switch on cardboard and began the wiring there. Once I could go no further, I set that in the control slot and finished wiring in the pickups and output jack. I used a 4 way switch so I have neck and bridge in series, neck, bridge and neck in parallel and bridge. The tone pot is a push/pull so I have the bridge with series and parallel options.
upload_2024-2-16_19-10-50.jpeg
upload_2024-2-16_19-10-50.png
upload_2024-2-16_19-10-50.jpeg

upload_2024-2-16_19-13-54.jpeg
 

Attachments

  • upload_2024-2-16_19-10-50.jpeg
    upload_2024-2-16_19-10-50.jpeg
    1.7 MB · Views: 21
  • upload_2024-2-16_19-10-50.jpeg
    upload_2024-2-16_19-10-50.jpeg
    2.1 MB · Views: 18
So now the body was mostly complete. Now I started the fretwork. I have heard that some pro’s can do a level, crown and polish in an hour. It took me 4 days. No, I wasn’t working on it 8hrs a day but it wasn’t quick.
I had sprayed the neck with the 2K gloss poly so the first job was removing that from the frets. Wow, that stuff was tough. You can see in this pic that I have the desired thin line left on top of the frets, the problem is that it is also on top of the poly.
upload_2024-2-17_9-23-48.jpeg

You could see I was just break through the poly in a couple spots. I was using the Fret Guru Dagger 2.0 fret crowning file but also tried every other fine tooth file I owned. I even tried sandpaper. What worked in the end was being fairly aggressive with the dagger until I had some metal showing through then cleaning the plastic out of the file with a brass brush and then going more carefully. Sometimes having to repeat that step.
upload_2024-2-17_9-31-4.jpeg

I also experimented with the dremel and metal polishing paste but it was too soon. In the end, just lots of careful filing did the job.

For the fret ends I tried some small hobby files I had, I tried the tri-file and wasn’t loving the results. I ended up doing all the fret ends with the little file but didn’t like the results, they just didn’t look finished. I found a little diamond file in my drawer, something I got free with a tool purchase long ago and thought that might be the answer. It worked beautifully. The only downside was it had sharp edges. Even though I had the fretboard taped I still needed to be really careful. It would slice right through the tape. I was thrilled with the results. Then came sandpaper. 400->600->800 then I started with 1000 but didn’t see much change. I tried the dremel with metal polish again and that was it! They polished up real nice. The perfectionist in my wanted to put the magnifiers on and keep refining but the practical side won out. They were smooth, looked great, what else did I need.
upload_2024-2-17_9-49-53.jpeg

I had band rehearsal that night and was dying to take my finished bass. I put a new set of strings on but ran out of time. I thought I was just an hours worth of work away but I’ve probably put in another 8 hours on it since. The nut was too high then truss rod and bridge adjustment, lots of final detail. I did have it playing but far from ideal.
 
Go to the hardware store, it might have to be someplace like ACE or TruValue I’m not sure HD or Lowes has them, and get a file card. It’s a flat brush with metal bristles made for cleaning files.

If you want to use the diamond file with less worries safe edge it. Take the sides to a bench grinder and smooth them off then do the same thing you did with the frets. Start at 100 or 150 grit and sand up to about 1000 so the edges are smooth. I’ve done that with a number of files where I don’t want one edge to cut for whatever reason.
 
  • Like
Reactions: RJC1811 and Beej
These are the files (if you can even call that little diamond thing a file) that I used on the fret ends.
upload_2024-2-17_12-30-17.jpeg

Final tweaks, I have the action set really low. I feel so good about being able to get there with no buzzes. I’m not sure I’ll be able to leave it there, my right hand technique might require a little more space so the strings aren’t clacking against the fretboard. Or I guess I could just practice and refine my technique . Intonation is dead on and the neck plays in tune up and down. That was another worry of mine that my fret layout measurements weren’t exact enough. Cosmetically I painted the white wire that was visible on the neck pickup black and changed the silver pickup screws for black ones.
upload_2024-2-17_12-38-56.jpeg

One last fault is that it looks like the fretboard rises a bit on the G string side by the nut. I don’t know if it twisted a bit as it sat unfinished for all the time I wasn’t working on it or if it was my fretboard radius sanding technique. The good news is that it doesn’t affect playability. As I checked the neck with a precision straight edge, it always looked perfectly flat. Oh well, it works for me.
upload_2024-2-17_12-48-14.jpeg


Well that wraps up my build. Most of the time it was an enjoyable experience with a few hard lessons thrown in the mix. Feel free to ask any questions or offer feedback. Being somewhat of a perfectionist I thrive on how to do it better next time.