• TalkBass has been independent since 1998. Add your voice.
    Create a free account to reply to discussions, view embedded media, and browse with fewer display ads.
    Join freeLog in
    Want zero display ads or expanded classifieds tools? Compare plans.

Winter Build Off 2026 - Evolutionary Pair

Okay, here we go!

This is mine, these are mine – we'll see...

Against my plans, I didn't manage to build a bass last year. Even now, I only have limited time until the end of April. So I hope that the WBO will help me push myself a little.

Both (maybe three?) basses will be scratch builds. The concept and design is quite similar to the previous one(s). One will have movable pickups and a D-extension. So, in general, it's about evolutionary developments – some refinements, some changes. I've already posted some initial thoughts on it. But I'll move the rest of the build process here for now.

I'll keep some things more simple, e.g., no bindings, no curved body, flat headstock (for some reason). The main goals are: different pickup designs, a different D-extension, better finishes (I have many questions about finishes), my own bridge design, and (hopefully, depending on how much time I can spend on it) some experiments with electronics. I will also work on new tools, fixtures, etc.

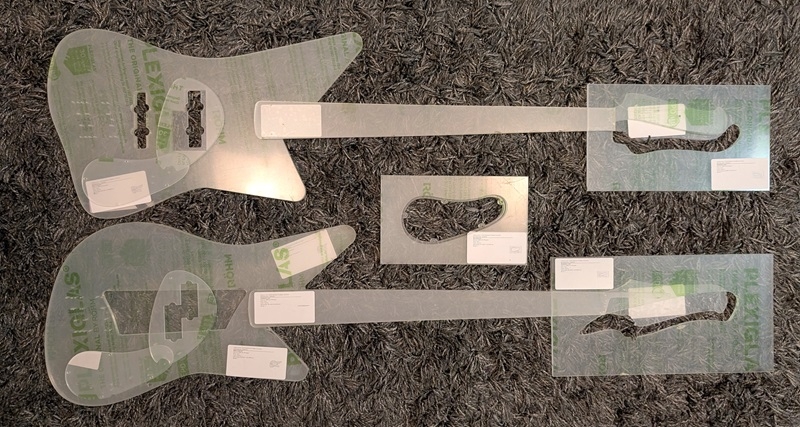
The wood has been hanging around here for a while, but the templates arrived just today – three weeks earlier than expected. So I'm going to take the chance and enter the WBO. I quickly ordered a few things today. Fingers crossed!

I'm excited to be part of this!

PXL_20260108_193703070.jpg


PXL_20260108_192455447~2.jpg


PXL_20260108_200011420.jpg


🖖
 
Very nice ! Where did you get your templates from ? I typically make my own, but those look good, and I love that they're clear. It'll make laying out the body easy, since you can see the grain through the template .
Thanks!

I used to make the templates myself with a curve ruler and the Bondo trick. Since I now need quite a few templates and can't use my old ones, I had the idea of having them milled in MDF. I want to make the pickguards out of Plexiglas. So I looked for someone who cuts Plexiglas and found a supplier in the Netherlands (BMTEC/CutWise). All in all, it was pretty much the same price as buying ready-made template sets made of MDF. I'm curious to see how I can work with them. The edges aren't completely smooth because they cut it with a laser. That's why the small holes are a bit tricky.
 
  • Love
Reactions: Dark Horse
Thanks!

I used to make the templates myself with a curve ruler and the Bondo trick. Since I now need quite a few templates and can't use my old ones, I had the idea of having them milled in MDF. I want to make the pickguards out of Plexiglas. So I looked for someone who cuts Plexiglas and found a supplier in the Netherlands (BMTEC/CutWise). All in all, it was pretty much the same price as buying ready-made template sets made of MDF. I'm curious to see how I can work with them. The edges aren't completely smooth because they cut it with a laser. That's why the small holes are a bit tricky.


They look great, and I think you'll like using plexi/acrylic templates. Be careful not to drop them though …they fracture easily. I know this from experience 😂
 
That looks really good. I've been considering making something similar myself, but I'm concerned that the magnets will be too much drag on the saw. What has your experience been, is it too much friction?

I've been trying to come up with a design that has guide bearings like a traditional jig, but to make that whole contraption move is another thing entirely.
 
  • Like
Reactions: 13ghosts and Beej
That looks really good. I've been considering making something similar myself, but I'm concerned that the magnets will be too much drag on the saw. What has your experience been, is it too much friction?

I've been trying to come up with a design that has guide bearings like a traditional jig, but to make that whole contraption move is another thing entirely.
That certainly depends on the magnets (diameter and strength). That's why I chose small ones (6 mm), because I was a little worried as well. I started with four and then added another five. It's no problem at all and holds well. When I'm done with the fingerboards, I'll get back to you on this.
I also thought about guide bearings. But then I decided that a jig shouldn't be more complex than the object you're building with it...
 
  • Like
Reactions: Gary_M
That looks really good. I've been considering making something similar myself, but I'm concerned that the magnets will be too much drag on the saw. What has your experience been, is it too much friction?

I've been trying to come up with a design that has guide bearings like a traditional jig, but to make that whole contraption move is another thing entirely.
Mine's basically the same but slightly less sophisticated (Allen key and high-tech depth stop on the saw blade). Three big magnets but there's not much drag. I rub a bit of candle wax on the guide now and again. (I also do that to the soles of hand planes).
HFN 032.JPG
 
Mine's basically the same but slightly less sophisticated (Allen key and high-tech depth stop on the saw blade). Three big magnets but there's not much drag. I rub a bit of candle wax on the guide now and again. (I also do that to the soles of hand planes).View attachment 7414786
Yes, I had recently seen your version in another thread. That's when I decided to implement it that way too. 😎
 
  • Like
Reactions: Gary_M and tidbits
I printed out the fretboard design to glue it onto the fretboard and then saw the fret slots. Now that I have transparent templates, some things are easier. So I printed everything out (best settings), glued it together properly, put the template on top: 1.5 mm misalignment from the 1st to the last fret. Printed again (with fewer overlapping pieces), same result.
Measured the template, measured the printout, read the length and height in Inkscape, calculated the length: the template is correct, but the printer is useless for this kind of job.
Tomorrow I'll try rotating it 90°. If that ends up the same, I'll have to find a professional printer. That's holding things up a bit...

13ghosts_WBO26x2.png


So today I stuck with planing the neck blank. I'm going to build a test neck first. For that, I'll use the rosewood fingerboard and the thinnest neck blank I have (roasted maple).

13ghosts_WBO26_x1.jpg
 
OK, so if I print the fretboard in horizontal orientation, there is no distortion with my printer.

13ghosts_FBD_howToPrint.png


However, no matter how careful you are, there will always be slight distortions (+- 0.5 mm) after gluing the sheets together (don't ask how I know). When using the template as an additional guide to align the sheets, it works perfectly. I use a (dirty) glass plate between my legs with my desk lamp as a light table.

13ghosts_FBD_glue.jpg


Summary
If you choose this approach:
  • Rotate the fretboard horizontally and print it in portrait mode.
  • Always place the fretboard in the center of the page. This way, the distortions will always be the same.
  • Use as few sheets as possible.
  • Use a transparent template as an additional alignment aid (well...).

Then it will be accurate, otherwise it is not guaranteed.
 
  • Like
Reactions: definenredefine
You know that paper doesn't like water...

Once you've cut out the long, glued-together printout, applied glue to the fretboard, and now try to apply the prepared printout to it, the following will happen: The paper will expand and everything will end up warped and bent.

Back to square one!

Next attempt and my advice:
  • Don't cut anything out, leave the sheets large (see below).
  • Place the fretboard on your light table.
  • Place the printout on top of the fretboard the way you want the grain to be.
  • Lift one side of the printout.
  • Apply a thin line of glue in the middle of the fretboard (I use a glue stick).
  • Fold the printout back onto the fretboard.
  • Continue with the other side (lift, glue, stick).
  • Then it should have worked (test with template).
  • Now apply glue to the top and bottom edges of the fretboard to secure the printout.
  • Cut off any excess paper.
  • Done!


13ghosts_HowToGlueOnFB.jpg


Then it was time for the slots. And that went absolutely smooth:

13ghosts_FretSlots0.jpg


13ghosts_FretSlots1.jpg


13ghosts_FretSlots2.jpg
 

Attachments

  • 1769174486987.png
    1769174486987.png
    1 MB · Views: 13

Latest posts