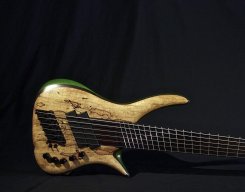
• TalkBass has been independent since 1998. Add your voice.
    Create a free account to reply to discussions, view embedded media, and browse with fewer display ads.
    Join freeLog in
    Want zero display ads or expanded classifieds tools? Compare plans.

YAFB ...

Invalid Link Removed
file_zpsm701g7k1.jpg


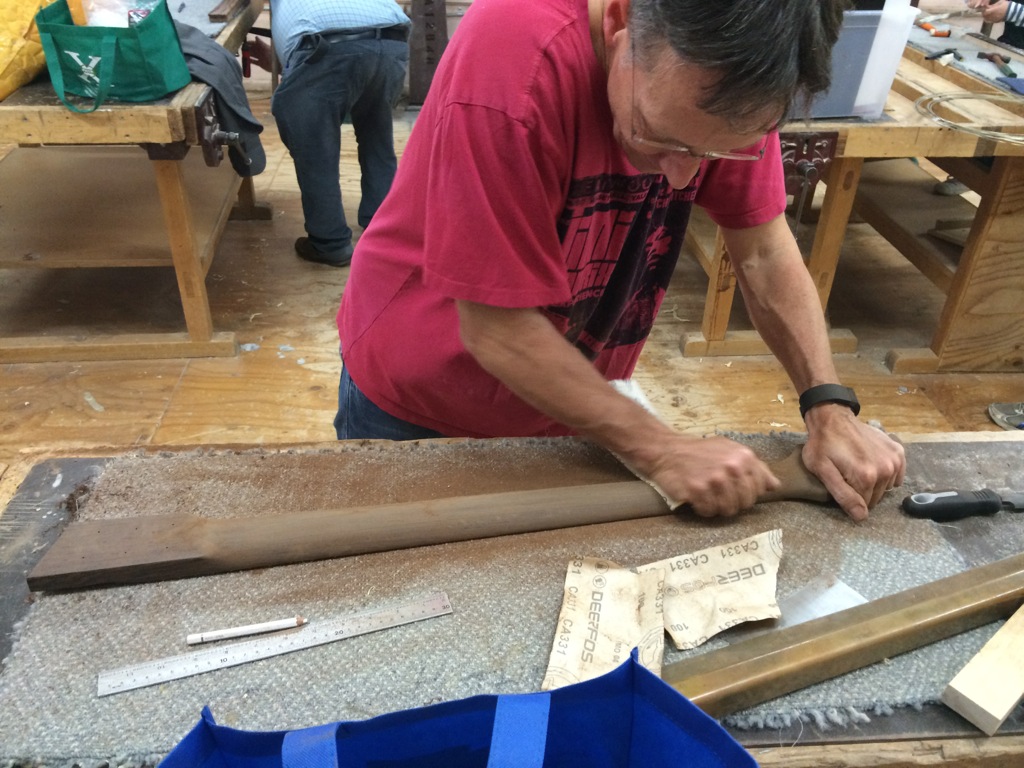
Elbow grease shot. That'll teach me to disregard the toughness of wenge ;)

After some good input from David (and comments from Blaine who has become a little bit like a godfather to this project) I now have a decent volute (instead of a functional but aesthetically unpleasing one). Check.

I have managed to get rid of the dead flat centre line along the neck by scraping, sanding, scraping, sanding, sanding, sanding, scraping, sanding - you get the idea. Doing it the hard way and paying for my impatience. Having said that the neck is a flat neck which actually feels very comfortable (because it's not all that thick).

Wenge is a bloody tough timber - after a long time sanding with 100 grit paper there are still some file marks. I'll have to spend another hour or so to get rid of those. I could probably keep sanding for days before I hit the carbon rods or the truss rod, incredibly tough stuff.

I drilled 6 holes into the heel of the neck to house the threaded inserts. Well, that was interesting. I'll post some pics later. Here's what happened:

Nominal recommended diameter is 9.54mm (this is for an M6 size insert). David suggested to try this on a piece of wenge, and fortunately Blaine had a small piece lying around. Grain orientation was like on our necks. I drilled 9.6 and 10 mm holes. Couldn't even get the insert into the 9.6, and got about halfway into the 10 when the piece just cracked along the grain line. Good thing I trialled this.

Next attempt with 10.5 and 11 mm. Ultimately settled on the 11 - it was still very tough to get the insert in and it did not budge, at all. Don't think I even need to glue it in, rock-solid.

Then I did the actual holes (with my lovely assistant Blaine
wink.gif
) in the neck. The issue there was that I have very limited depth, and I really didn't want to come out on the face of the neck. I didn't but the inserts are not in yet (that's for next week).

So productive and frustrating evening all in one. Not far off.

Homework:
fill the ends of the fret slots;
sand out the file marks;
fine-tune the body-heel transition;
sand it up to 600;
ever so slightly break the edge of the fret board to make it feel "played";
install Luminlay side dots;
and oil it up.

After that I'll be able to install the tuners.

So hopefully all that's left to do in class with the neck is putting in the inserts and install the nut, and then I can start thinking about installing electronics. 2 sessions to go.

Pix later.

Regards,
Michael

 
Mike,
That is going to be a spectacular bass, love the red transparent color. How thick are you ending up on the neck? Do you have any idea how much "meat" is left between bottom of trussrod and back face of neck? I'm really paranoid about sanding mine too thin and having the trussrod blow out the back. 3/16" clearance seems to be an accepted minimum, which makes my neck a little thicker than I'd like it, around 7/8" at the first fret.
 
Promised pics:

Invalid Link Removed
IMG_1627_zpsunnlbxap.gif


That's the volute. Much better than before but I think I can improve on it a little. There is still capacity for more sanding
smile2.gif
. You can also clearly see the remaining file marks, and they all have to go. Did I mention sanding?

The neck in all its beauty:

Invalid Link Removed
IMG_1629_zpsrlxqnvot.gif


The heel with the holes:

Invalid Link Removed
IMG_1631_zpskfbaij1h.gif


and the threaded inserts in place (but obviously not inserted):

Invalid Link Removed
IMG_1633_zpsusejvgo1.gif


Again, I can improve the body-to-neck transition with a little more sanding (possibly some light filing).

Received my nut today and the jack. Not long now.

Comments welcome.

Regards,
Michael
 
  • Like
Reactions: Gilmourisgod
Mike,
That is going to be a spectacular bass, love the red transparent color. How thick are you ending up on the neck? Do you have any idea how much "meat" is left between bottom of trussrod and back face of neck? I'm really paranoid about sanding mine too thin and having the trussrod blow out the back. 3/16" clearance seems to be an accepted minimum, which makes my neck a little thicker than I'd like it, around 7/8" at the first fret.

Thank you for the kind comments.

I'm surprising myself with this but a lot of credit goes to the excellent guidance we receive in the course (I'm not quite doing this off my own bat). Getting plenty of little tips and tricks - having said that quite often I would have taken a very similar, or identical, approach. Anyway.

Yes, the neck. The current thickness values are just over 19 mm at fret 1, and just over 21 mm at fret 12. The fretboard is rather thin at 4 mm so the actual "meat" of the neck at fret 1 is about 15 mm. The truss rod channel is just about 9 mm deep so there's still 6 mm (or approx. 1/4") of material. That means I can do a lot more sanding ;). Mind you, everyone in the course jokes about me finding the truss rod, and "hang on, Michael, there's still a couple of grams you can sand off" - all in good spirit of course.

The neck profile is a very flat D. Originally I was shooting for a more traditional D but the way I approached it (did this one off my own bat) resulted in a much flatter shape. I'll leave it as is because I actually really like it!

Not all that long now - can't wait to actually hear it, and how the sound compares with my Sandberg and Dingwall.

Thank you for looking and commenting.

Regards,
Michael
 
Right, took off early today for age-related reasons
icon_mrgreen.gif
and did some more work.

First of all I finished the shaping, a little more at the volute, and a fair bit more at the neck-body transition. Happy now.
Sanding. I sanded and sanded. And I've come to realise that what looks like file marks all along the neck is actually the grain that's just a little different. Had a look at my Thumb neck and could see it there too.

Went all the way to 1200 just to see what it's like. Beautiful. Incredibly smooth, love it.

All this sanding completely clogged the fret slot ends so I won't be able to fill them properly - tried vacuum but not quite good enough, will have to use the compressed air in the workshop.

So I decided to put the Luminlay side dots in. Interesting, a little bit of amateur hour - see last pic.

Measured 4 mm down from the fretboard, pre-drilled with a 1 mm drill, all good. Actual drilling with the 3 mm went perfectly fine until the very last one. I didn't fill those, might fix them on Tuesday and Luminlay after that.

The actual "installation" is fairly straightforward. Drop of superglue on the end, stick it into the hole (somewhat tight fit) and hammer in until the stick doesn't move any more. I certainly did hammer and snapped the stick in half - the loose half flew off into the garden (my workbench is open air at the moment) and is probably lost unless I can see a glow later tonight. Fortunately I did order 4, and the good folks in Japan added a quarter stick for each stick as a reserve anyway so all's good.

Looking down the neck there are a couple of imperfections (which I can't feel when pretending to play - they're in my Thumb neck as well so I'm not terribly worried). The headstock is also at a slight angle (not the back angle but a sideways angle, I suppose it could be referred to as "roll"?). Nothing major at all, just one of those many little things.

Pics:

Invalid Link Removed
IMG_1639_zpsjly0aft5.gif


Looks absolutely beautiful.

And this is absolutely dreadful:

Invalid Link Removed
IMG_1638_zps5qw6duwj.gif


I also put the bolts through the body and fastened the inserts just to have a look. As you can see the front two will need to be cut back a little, otherwise I'm good. You can also see that there won't be a lot of clearance since the neck (once the frets end) will be almost, or completely, flush with the body.

Invalid Link Removed
IMG_1642_zpska8xurgx.gif


The first insert on the right looks like it was the guinea pig. Now for some good news: putting the neck down on this array works perfectly: the inserts line up perfectly with the holes which makes me rather happy
yep.gif
.

Here are the actual bolts. Brass at the moment but they easily can be changed once I get black ones. Mind you, it doesn't actually look too bad with the red
wink.gif
.

Invalid Link Removed
IMG_1643_zpsb5xecsbp.gif


Result.

Comments, as usual, welcome.

Regards,
Michael
 
Good session last night, very educational.

Put in the 6 threaded inserts and it wasn't quite as straightforward as expected (which is a good thing).
They went in without splitting the neck which is definitely a plus (I was a little afraid of that happening since there are three along the same grain line). One kind of stopped while still sticking out about 0.5 mm, and I wasn't going to force it so I sanded back the corresponding area on the body, just a touch.

Here's the neck and the drill press with the little implement:

Invalid Link Removed
IMG_1644_zpsfyflxf8y.gif


It's simply a cut-off bolt with two nuts preventing the insert from winding its way up the bolt. One then manually turns the shaft while applying pressure - bit sore today, it requires a fair bit of force and I'm normally just a keyboard warrior.

Here are all 6 in place:

Invalid Link Removed
IMG_1645_zpshxq0yy4e.gif


Then it became a little frustrating. Despite my elation that everything was (apparently) aligned perfectly (expressed in one of my previous posts), well, it wasn't. Doesn't take much (0.5 mm or so) for the bolt NOT to go into the thread. That meant I had to widen the holes in the body to allow for some sideway movement of the bolts. Used a reamer for that, and eventually I was able to get all 6 bolts in. It's not pretty though, and for future projects I'd be rather weary using inserts again (unless I use precision drill templates).

So, neck and body together for the first time. Felt good. I have to say that the body (without the electronics and hardware) feels too light, almost eerily so. Balances fine but it feels "wrong". Almost cheap (which it definitely isn't) but I expect that to change with bridge, pickups and electronics in place.

Here's the project's Godfather giving his smile of approval:

Invalid Link Removed
IMG_1646_zpsl41fubnq.gif


Feels good, will be very comfortable to play. Neck is beautiful.

Did a little more work on the head stock (shallow slot for the nut, removal of some material covering the truss rod access and clean-up in that area). Blew out the dust from the fret slot ends so I can finally fill them properly. And discussed whether or not to fill the "out-of-line" fret marker hole (well, I was told in no uncertain terms to fix it so I better
wink.gif
).

So a little bit of homework:
fill fret slot ends;
fix fret marker;
sand back;
do something about the body end of the neck - bit of a wasteland at the moment;
final sanding of neck;
application of some oil (I have Ken Smith's mixture;
putting on the tuners;
and put neck on body.

Then I can focus on finishing the installation of the hardware and electronics next week. Exciting times.

Comments and questions (as usual) welcome.

Regards,
Michael
 
Hmm...
Must be a system to make sure they align.
Perhaps clamping the two pieces together and pre-drilling them at the same time?

How did you do it originally to line them up?

Thank you, Jisch,

Not sure if a template would work, just threw it out there.

I did exactly what you describe there, Derek, but apparently it's still very easy to get deviations of 0.5 mm here and 0.5 mm there, and it all adds up.

In the end it all fits but it's much fiddlier than I thought, and not as neat as I hoped (not that anyone will be able to see it but I KNOW).

Regards,
Michael
 
  • Like
Reactions: redboy1975
The problem with the clamp and drill method is that the grain of the wood can still redirect the bit (I think). I have used ferrules for through body stringing before and I was amazed how far off it was when I got to the other side of the body (those end up under the bridge so you can't see it). I think if you had a template to use on both sides it would be best, but even then you can still get drift and if the template is not lined up perfectly, ouch.

I really want to use inserts though as with the placement of the truss rod nut on mine, it's likely I'll have to pull the neck to make adjustments - I wouldn't trust wood threads if I'm taking off and putting it on more than a few times.
 
Hi all

Here's some progress. As mentioned I filled the little fret slot holes with a mix of epoxy (araldite) and left-over wenge sanding dust (of which I had plenty.

I tackled the bottom ones first (they're seen less often than the top ones) and mixed the filling in a little (scientific) tube. Probably not quite enough wenge in there. This is what it looked like after drying and some scraping:

Invalid Link Removed
IMG_1649_zpsl2fun0ee.gif


For the top mix I added more wenge which resulted in a less smooth fill:

Invalid Link Removed
IMG_1653_zpsyrmszber.gif


Plenty of scraping and sanding later it looked pretty good. It's never a perfect match because wenge has such different sections very close together (very hard, very light) but it looks better than seeing the end of the fret (at least I think so) and is a perfectly smooth surface.

As mentioned I then sanded and sanded and sanded, filled the two remaining fret marker spots with Luminlay, more filing and sanding. Then application (fairly generous) of the magic Ken Smith whatchamacallit. The effect on the wenge was quite dramatic: it went from milk chocolate to 70% cocoa. I let it sit for a while (very uneven absorption at the start, getting much more even later in the process), wiped, re-applied, let it sit, wiped, you get the idea.

I then mounted the tuners:

Invalid Link Removed
IMG_1655_zpsseztjzz2.gif


As you can see the wenge is beautifully chocolatey, and I thought I'd buck the trend of those angled tuners and mount them straight. I mean, come on it's an old hat, right?

Then I put the neck on which worked much better than last Tuesday - I very gently tightened the bolts in a cross-pattern (just like you do with a car wheel) and it just nicely dropped into place.

And here's the pic:

Invalid Link Removed
IMG_1659_zpsnvqrqqcl.gif


Couple of comments:
Of course I didn't mount the tuners straight - I'm not that crazy;
the red looks a little too bright in the pic, it's all good in real life, and works beautifully with the now much darker wenge;
the weird things you see where the pickups go are pieces of hot water pipe insulation foam - great suff, very stable, great degree of firmness and give;
where the bridge should be is an example of "don't try this at home, kids": impatient, I tried to put the inserts in, and failed miserably (including a small scratch next to the jack). I shall meekly finish this on Tuesday.

Here's the back:

Invalid Link Removed
IMG_1660_zpswbfb2yno.gif


A close-up of the headstock from the back showing off the typical wenge grain:

Invalid Link Removed
IMG_1661_zpsylfs0fbb.gif


And finally the body-neck transition, also showing the beautiful wenge neck (it's just perfectly smooth) and the 6 bolts. Doesn't show how nice the transition actually is
smile2.gif
:

Invalid Link Removed
IMG_1662_zpsckknctws.gif


There you go. Right now it looks like a neck with something attached to it - the neck seems to be very loooooong. Balance is obviously not quite there (even though it sits almost horizontally all by itself even though the tuners added a fair bit of weight) but will be fine once it's all assembled.

I am very hopeful to have a playable instrument by the time of the Sydney GTG.

Thank you for looking, and comments, as usually, very welcome.

Regards,
Michael
 
I don't have a logo;
I have plenty of Luminlay sticks;
I'm thinking "star constellation" (like Orion, or similar).

Am I
idiot2.gif
?

Yes, I am:

Invalid Link Removed
IMG_1669_zpsdwwqvoq3.gif


Can you guess what it is? Picked it for a reason
wink.gif
.

Regards,
Michael
 
Really nice!

That trans red body is an absolutely perfect shade with the wenge 'dark chocolate'.


But you can see that down there? North Star, too?;)

Thank you,

It's exactly like I pictured it in my mind, actually, and David who did the paint job) intuitively picked the right red. It is a lot less intense in "normal" light and is actually a burst, works perfectly.

And no, we can't. It's a bit of a reference to my northern hemisphere upbringing and also alludes to a slightly naughty behaviour of the bass itself (hint: use the US name for the constellation).

Regards,
Michael
 
Quick update. Completely wasted session last night, was really hoping to have the nut set up and start with the electronics but those threaded inserts somehow got in the way ... .

So, threaded inserts. Great idea but I'll either have to do a lot of practise run-throughs or simply leave it to the experts.
As already mentioned previously in the neck post I had to drill holes 1.5 mm larger than the recommended size to even have the slightest chance to get the inserts into the wenge. Since the holes are so much bigger there is a definite "chance" for the insert not to centre properly which means that your carefully laid-out alignment is completely out of whack (even if it's only 0.5 mm it's very difficult to get the bolts in!) and getting the bolts in is (potentially) a bit of an issue.

With that background, and considering that wenge is a very tough wood compared to mahogany and maple, I approached the bridge mounting situation thinking that the recommended hole size will work. Not so. The first insert kind of went into the mahogany OK - only a little bit of lifting. The second one (that was the "don't try this at home") was right at the mahogany-maple glue line. Not quite enough pressure (I did this at home, remember), and the insert simply drifted off into the softer mahogany.

David suggested to plug the hole and start again. Here's the pic. A mahogany peg superglued in. As you can see it's at an angle - that's how far the insert drifted off:

Invalid Link Removed
IMG_1672_zpshy9mdg0o.gif


At that stage I had already attempted to get the third insert into the maple and had sheared off the bolt
eek.gif
. Not happy. And this was at 1 mm over the recommended hole size.

Once the peg was in I sawed off the top and levelled it, then drilled a 7.5 mm hole (instead of the rec 6.5) into the plugged space. And I drilled the hole in the maple out to 8 mm.
Maple plug went in OK. The centre one stopped about 2/3 of the way in. I tried again and was nearly there when the bolt sheared off - like this:

Invalid Link Removed
IMG_1674_zpsvef9qils.gif


At that stage I was a little disappointed - didn't look too good. I thought what the, I'll just use 2 screws. Problem was that the insert in the maple had moved forward (see above) and did not line up at all.

Drilled out the middle insert. Will remove the other two. Have mahogany sticks I'll use to plug the holes with. And the I'll just use the supplied wood screws. Job done.

On second thought, I might ask one of my drummers (who's pretty good with metal
smile2.gif
- no, not that kind of metal) to make me a solid block of aluminium, rout out the area under the bridge and do a Dingwall-style bridge mounting. Actually, just kidding.

So that's my frustration. I think my experience has scared David off using inserts.

Comments as always welcome, and thank you for reading.

Regards,
Michael
 
I picked up some threaded inserts today and the guy warned me that the bolt could snap off and to do a test hole if you're using harder wood. That's tough. I'm about to do mine tomorrow, it's a bit scary, but I'm going into mahogany.

After my experience I would highly recommend a test hole, or even a "test array" simulating the actual spacing of your inserts. I would think you will need to drill the holes slightly bigger than recommended as well. Together that should give you a good idea as to how it'll work for you.

Very interested in your results - hopefully all goes well! I've gone into this a little blue-eyed myself :(

Regards,
Michael