• TalkBass has been independent since 1998. Add your voice.
    Create a free account to reply to discussions, view embedded media, and browse with fewer display ads.
    Join freeLog in
    Want zero display ads or expanded classifieds tools? Compare plans.

YAFB ...

In most cases I think you would be just as well off threading the wood itself and skipping the inserts. That wenge would have taken 1/4 - 20 threads or larger no problem. A good new tap and you would be all set. For something like maple, drill, tap, then soak with thin CA glue, let it dry, re-tap. Unless you can find a specific tap for the threaded inserts I think they won't be nearly as strong as just tapping the wood.

This picture is the bridge for an acoustic bass I built. The post between the base and saddle is just a 1/4-20 threaded insert and it supports the strings no problem.

DSC02303.JPG
 
Yeah, won't be going through this again, at least for the bridge. Just thought it would be a nice little exercise, but I'm paying for it. Then again, nothing ventured nothing gained, and experience is what I'm after. This is my first build after all, and there's nothing wrong with trying a few things - prefer to ask "why not?" and learn from that rather than "why?".

Anyway, some progress.

Repair of the threaded insert disaster in full swing. The first thing I need to do is get the inserts out of the two outer holes. That was much more difficult than I thought. The recommended method (drew bolt in, tighten first nut hard against the insert, tighten second nut hard against the first nut, and remove insert by simply screwing it out) didn't work at all. All that happened was the bolt coming undone.

What to do? I ended up sacrificing a cheap screwdriver and hammered that into the insert (which is brass). I could then use a pair of pliers tightly holding the screw driver shaft to get it out. Worked OK for the insert in the mahogany:

Invalid Link Removed
IMG_1680_zps4uji90kf.gif


Did not work at all for the insert in the maple. Did not budge. At all. Decided to drill it out. It's only brass.
First bit: 3,,. Not a problem. Second bit 4 mm. Still OK. Bit number 3 at 5 mm bit into the brass and actually moved it further in. And that's pretty much where I left it. There's a little off the top but enough depth to have plenty of contact area for glueing in the wood:

Invalid Link Removed
IMG_1681_zpsvcx5tklj.gif


Bit of an interesting trip, this one. Plenty learned, and hopefully I won't forget for the next builds.

Dropped into Bunnings earlier today (my wife needed a few plants for the front garden) and picked up a 9.5 mm Tassie oak dowel. Really didn't have the patience to round off the pieces of mahogany I took with me last Tuesday, and surely Tassie oak will be sufficiently hard to hold the screws. Anyway, drilled the holes to 9.5, and instead of me sanding the dowel to just below 9.5 I simply put a short measure of dowel in the drill and spun it round in a piece of sanding paper. Worked beautifully and quickly. Here are the dowels before:

Invalid Link Removed
IMG_1684_zpslpa9qob7.gif


and after:

Invalid Link Removed
IMG_1685_zpskk5yacj5.gif


Applied a good amount of Titebond with a cotton bud, hammered the dowels in, and they're now "resting" before cutting back, filing back, and sanding level. Looks a little ugly right now but, as mentioned previously, what happened under the bridge stays under the bridge
wink.gif
.

Feel like I'm in a better place now, everything back on track.

And some progress on the control cave cover: a 1 mm stainless steel plate that fits like a glove.

Invalid Link Removed
IMG_1676_zpstmmhyipw.gif

Invalid Link Removed
IMG_1678_zps947ufx45.gif


One of the drummers I play with is pretty good at metal (both kinds, and he did this. Over night. Very happy.

Comments and questions welcome, and thank you for looking.

Regards,
Michael

 
Question, did you use any wax, soap or other type of lubricant when trying to install the inserts? Because I have never had any problems threading even brass inserts into maple, as long as you use some type of lubricant.
 
Question, did you use any wax, soap or other type of lubricant when trying to install the inserts? Because I have never had any problems threading even brass inserts into maple, as long as you use some type of lubricant.

Answer: no. And I'm not sure why not because in hindsight it makes perfect sense. This interweb thingy is pretty useful sometimes, thank you for that.

Did you drill the hole for the insert at the prescribed size as well? That's the other issue, being able to align everything perfectly ... .

Regards,
Michael
 
I used bees wax on the inserts I just put in my build. I had to go one size up with the drill bit though - when I used the drill specified on the package the mahogany split away right near the hole (on a test piece). It went it perfectly and thankfully all four holes lined up - I put the process I used in my build thread.
 
I used bees wax on the inserts I just put in my build. I had to go one size up with the drill bit though - when I used the drill specified on the package the mahogany split away right near the hole (on a test piece). It went it perfectly and thankfully all four holes lined up - I put the process I used in my build thread.

Great,

Good to know. That gives me confidence for my next build :thumbsup:.

Regards,
Michael
 
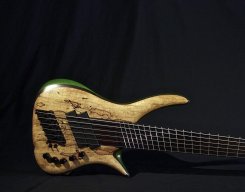
I never really managed to "show off" the final product - took some pics today, and here they are, brutal reality check. Before we do that a little reflection.

I've played the bass a couple of times (unfortunately the Dingwall is simply too good!!!). When I have played it I was really quite happy with everything - playability, sound, weight (digital bathroom scale says 3.6 kg), neck, balance (despite initial fears it might be a bit neck-heavy - hence the "Big Dipper"
wink.gif
). I also have had very positive comments regarding sound and appearance.

So overall I'm very happy but, as mentioned, the Ding simply overshadows everything. I may have to wait a few more months before that wears off a little to free my mind ... .

With that out of the way, here are the pics. I won't comment on them but feel free to ask if you see anything you would like to know more about.

Invalid Link Removed
PA101586_zps4246mslv.gif


Invalid Link Removed
PA101587_zpsrqgkakgt.gif


Invalid Link Removed
PA101591_zpslsfswveq.gif


Invalid Link Removed
PA101594_zpsu1qzyx2j.gif


Invalid Link Removed
PA101595_zpsokilqax0.gif


Invalid Link Removed
PA101597_zpsgprjxg2g.gif


Invalid Link Removed
PA101601_zpsdgy3wyfp.gif
 
Invalid Link Removed
PA101604_zpsotydapnx.gif


Invalid Link Removed
PA101609_zpsurcargbs.gif


Invalid Link Removed
PA101615_zpsq3ysee7e.gif


Invalid Link Removed
PA101620_zpsmteidqdt.gif


Invalid Link Removed
PA101621_zpseyvyp6pk.gif


Invalid Link Removed
PA101623_zpsdmna31jb.gif


Invalid Link Removed
PA101625_zpsjxojxw1p.gif


Invalid Link Removed
PA101627_zpsekzw2aam.gif


Invalid Link Removed
PA101632_zpsuit1iomm.gif


I've said it many times before but happy to say it again: without David's (Searle) guidance and support this would have been not half as good as it is now - a lot of appreciation!!

Thank you for looking and your comments. Next builds are kind of under way but nothing really to show just yet.

Closure ... is ... good
yep.gif


Regards,
Michael
 
C'mon, don't be so hard on yourself. It's only your first build mate. You should be pretty bloody proud of it.

It looks awesome. Great execution on the neck, pretty good fret work, snug fit neck pocket and neat cavity routes. I think you nailed the fundamental aspects of building an instrument.

All the best for the next build!!! :hyper::bassist::hyper::bassist:
 
  • Like
Reactions: MichaelOz