• TalkBass has been independent since 1998. Add your voice.
    Create a free account to reply to discussions, view embedded media, and browse with fewer display ads.
    Join freeLog in
    Want zero display ads or expanded classifieds tools? Compare plans.

FenderBird build JAEbird II

Dadagoboi

CATALDO BASSES
Commercial User
Jul 1, 2005
4,291
21,932
79
Florida Swamp
cataldobasses.com
Disclosures
CataldoBasses: Designer/Builder ThunderBuckerPickups:Consultant
This is a variation on my JAEbird series. Here's the prototype which has a deeper cutaway, a shaved heel and a reworked headstock. I made it of pine 2x4s, it has a Lace Bassbar, Allparts Hipshot clone bridge (no longer available) and Hipshot Ultralite tuners.
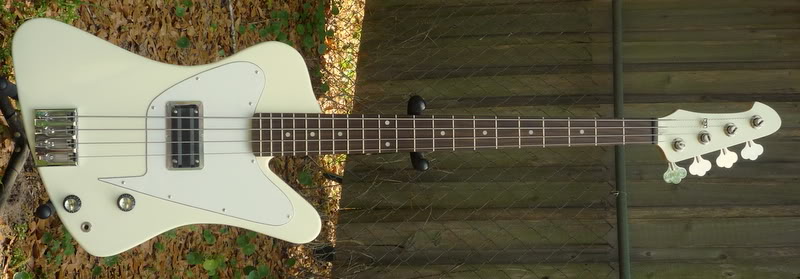
P1020705.jpg


P1020728.jpg


The original concept was to make the final version a 32" scale to completely eliminate the neck dive inherent in Thunderbird type designs. The proto has a 34" Chinese LH neck. With the relocated strap button, smaller headstock and Ultralites neck dive is gone...and that's with one 2 ounce Bassbar. This bass will be made of genuine mahogany with two ThunderBucker pickups. They are clones of 1960's Gibson TBird pups complete with full nickel covers designed and hand built by Steve Soar. If anything it will be body heavy. Weight should be around 8.5 lbs with a 34"inch scale RH neck.

After looking at it for a while I realized the body needed to go on a diet so I rough photoshopped a slimmer version with a smaller top horn, tighter waist and slightly more tail. (top picture)
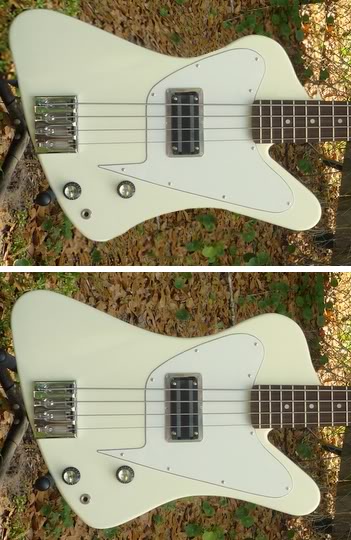
JAEbirdIIProtoComparo.jpg


Next step was to disassemble the proto and mark the changes on the body. Here it is attached to an old body template.
P1030141.jpg


And the other side
P1030142.jpg


Next step will be modifying the old template and pin routing the body.

 
My weapon of choice, Onsrud 3hp inverted pin router. Bought used off Ebay. I highly recommend this particular model. Safe and relatively inexpensive and indestructable.
DSC02486.jpg


I used it first to copy the parts I could of the proto to the old template
P1030143.jpg


Then I drew the changes on the template, band sawed to the line and smoothed them out with 60 grit and various backing blocks. Here it is with a mahogany blank I laid up
P1030145.jpg


Next step is using the pickup/neck/pocket/bridge locator template attached to the back side of the blank. The pickup routes were copied from my '66 Embassy, again using the pin router. The three screws holding the template are either scrap or the control cavity, remember, the BACK is up. Either that or this will be a lefty
P1030149.jpg


here it is, front side up, ready to have the body shape template aligned and attached with screws in non visible spots (oops)
P1030150.jpg


Template attached after minor mishap, pickup ring will cover it. I band saw close to the line to put as little stress as possible on the Bosch 110 volt router, it's old an out of production. Saving my pennies for a 220 Volt Porter Cable replacement.
P1030152.jpg


Next will be routing the shape
 
As the proud owner of the black jaebird (#2) on Carlo's website I can attest to the quality. I really like the changes. Looking forward to the build.

As the proud owner of the seafoam jaebird (numer 4?) on Carlos's website I also can attest to the quality. And I feel the need to say you suck Carlo cause I'm already starting to get pains that rolaids will not relieve.
 
I have found that pretty much every Thunderbird and Fenderbird bass has neck dive built into the design.

My solution is a straplock extender.
My approach is to try to solve design problems without adding unnecessary elements. That's one of the main reasons I build prototypes using lightweight pine bodies. JAEbird II should have zero dive due to neck and bridge being moved as close to the end of the modified Thunderbird shape as possible, a small headstock and Hipshot Ultralites. It will also fit in a standard Jazz size case/gigbag.

Your extender looks like a good fix for typical Thunderbirds from '76 on. The '60s Reverses have one more fret into the body and don't dive as much in my experience.
 
I find the extender also helps balance the non reverse tbirds. But your approach is better ... I don't have as good of a shop as you do so I don't start with a blank piece of wood. So the extender is a good solution for me.
 
I find the extender also helps balance the non reverse tbirds. But your approach is better ... I don't have as good of a shop as you do so I don't start with a blank piece of wood. So the extender is a good solution for me.

I can relate. It's been a long process from beginning with a Craftsman sabre saw and 1 hp router in my back yard. I began this 'Bird in 1982, around twenty years later modified the LH Fender headstock to eliminate dive. Finally completed last year.

DSC01996-1.jpg


DSC01998-1.jpg
 
Here's the template I used to route the pups and neck pocket. Moved up to the top side, lined up with a dummy neck and the pup routes. I use a transfer punch (complete set $10, Harbor Freight) to mark the bridge location and then drill them with 1/8" drill.
P1030260.jpg


Sometimes a 1/8" hole get slightly misdrilled. I HATE THAT. I use a polystyrene dowel with a sharpened end, shoot some superglue gel in the hole and push the dowel in. Then I trim it flush and use more superglue around it to fill any gaps. If you need to drill the correct hole almost on top of the old one, no problem, the drill does not wander like it does with a wood plug. You can see a white dot around the transfer punch in the top picture, that was a screwup that was quickly fixed. Works great for painted bodies. This plug gets covered by a pup ring.
P1030236.jpg


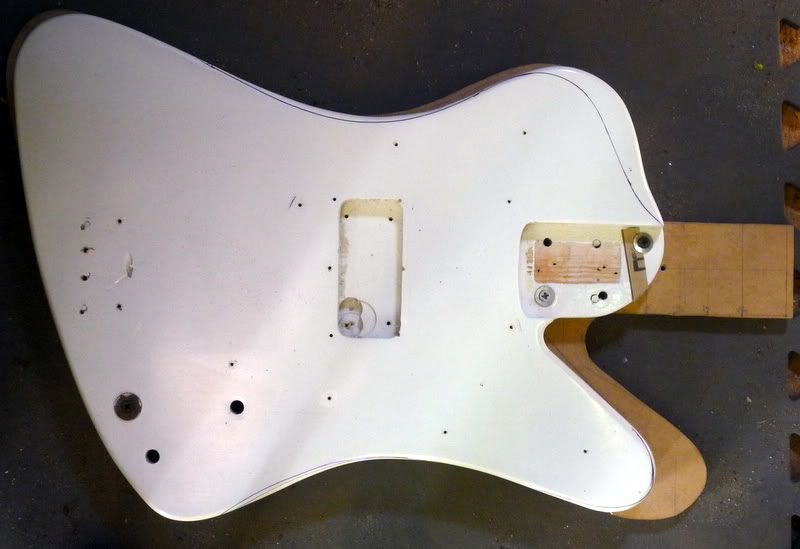
Here's the body mocked up with ThunderBucker covers waiting for guts. I don't like the ski slope where the top horn (bout, hump?) meets the neck, that's getting shaved.
P1030256.jpg


Next is the rest of the body drilling and shaping.
 
This morning I did the final contouring and sanded the body to 180 (80,120,180). It will be 97 today so I mixed the sealer with anti blush thinner. Dries more slowly than the regular thinner to allow any moisture in the finish to escape, doesn't get you as high though.

First application.
P1030295.jpg


Decided to wait until tomorrow to sand and shoot second coat. This is the type gun I use for everything except touch up, $20 from Harbor Freight. I've owned guns that cost between $200-400 but they really aren't necessary to shoot nitro. Neither is a spray booth if you keep air pressure to a minimum.
P1030299.jpg


After second sealer coat I'll shoot a white primer coat and one or two polaris white top coats.
 

Latest posts