• TalkBass has been independent since 1998. Add your voice.
    Create a free account to reply to discussions, view embedded media, and browse with fewer display ads.
    Join freeLog in
    Want zero display ads or expanded classifieds tools? Compare plans.

Double Bass perforated basses

Matthew Tucker

Commercial User
Aug 21, 2002
2,686
387
Sydney, Australia
www.bresquebasses.com.au
Disclosures
Owner: Bresque Basses, Sydney Basses and Cellos
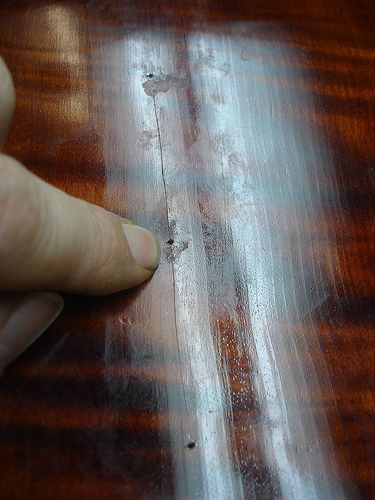
Here's a crack repair technique I've been coming across a lot lately.
3907347943_58bf1e89eb.jpg


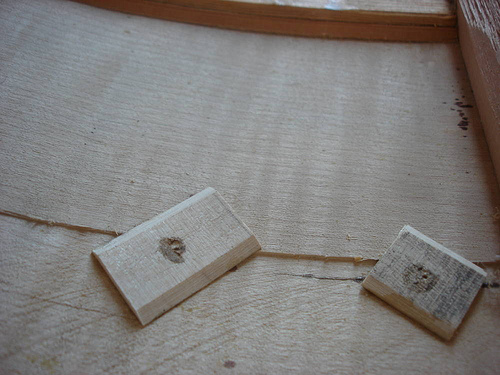
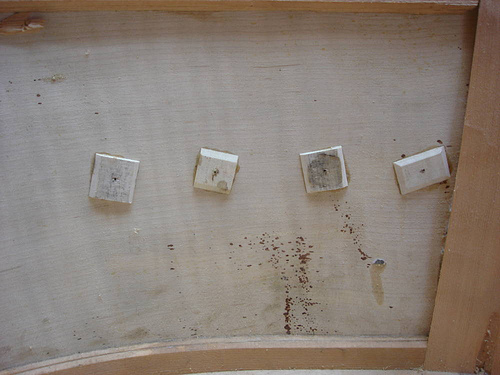
The repairperson appears to have drilled tiny holes through the ribs of the bass along the crack, threaded a piece of wire or thread through the hole and out through the FFs, then attached a cleat to the wire, which is then pulled back through the FFs to cleat the back of the crack. then I suppose the wire is removed when the glue is set.

But i don't think its a very satisfactory repair because you end up with this sort of result on the inside with bad contact and grain running any old direction.:
3908127144_058a5da977.jpg
3908126594_7fbd1a89e5.jpg


I can see that this might be a quick cheap way to cleat a rib crack without removing a top, but I find it a pity to see basses old and new with varnish riddled with holes that no-one has even bothered to try to conceal!

 
That is a bit hard on the eyes. I had a split in my top repaired by Jeff Sahs in a somewhat similar manner; he drilled a small hole & inserted a clamp(the clamp was held together by a thin wire); after the glue had set up the clamp was removed, the tiny hole patched & nearly invisible.
[freely endorses Jeff Sahs' work]
:)
 
If done correctly, this can be of great help in a non-invasive repair technique.

Hints: Jewelers drill and bit. Jewelry wire. (very tiny stuff).
For a clamp, a guitar tuning gear mounted on a small block of wood with rubber added to bottom so as not to mar the bass. Tighten up that sucker to pull up the cleat that has been carved, lined up (cross grain wise and pyramid shaped), and glued up correctly.
That hole will be so small nobody could see it with a tiny touch up.
Invasive only if you consider a wire going through an F hole invasive.
 
There's something about this repair that bothers me. It seems to be an effective, but cheap and sloppy way to get a fix working. Regardless how small, I do not want holes drilled into the bass to be left, esp if they're not filled. Maybe it's ok for cheap basses but anything worth a damn, forget it.
 
There's something about this repair that bothers me. It seems to be an effective, but cheap and sloppy way to get a fix working. Regardless how small, I do not want holes drilled into the bass to be left, esp if they're not filled. Maybe it's ok for cheap basses but anything worth a damn, forget it.

No, thanks.
I remember two basses in Brescia Italy, where they were made, by Garparo DaSalo and Giovanni Paulo Maggini. Both had fine repairs using this technique. Weigh that against pulling a top or back plate off of basses of this value and....well.
And yes, diddy, the holes were filled with fine wood perfectly matching the original wood. Both museum quality instruments, 1600's as I remember.
The only way we could find the repairs was by looking inside with a flashlight. And that wasn't easy.
 
Those holes were way bigger than necessary. I've seen these repairs done with minute holes and wire and finished so that they were invisible. I agree with Paul. If you have an old bass, you want the top removed as infrequently as possible. What I've done is have the repairs done in this fashion and wait until a big job needs to be done and clean up everything on the inside.
 
Actually, you can have complete control over placement and cross grain line-up by anchoring the cleat to the end of the wire so it doesn't move around. I ain't sayin' how though. :hmm:
You guys are creative. See whatchoo come up with. :cool:

PS. It's all about the choice of the wire used in terms of size and stiffness. Tiny, strong and stiiff. (gettin' nasty again, sorry). There's a guy on the board that posts sometimes, who hates when I do that. That's why I do it. Drives him right up the wall. :D
 
That type of crack repair was illustrated in Don Teeter's book, "Acoustic Guitar Repair" from the 1970s ('not sure if it was vol. 1 or II). The basic idea is drill a small hole, stuff a thin string through the hole, thread a cleat on to the string, and then use an external guitar machine mounted to a little block to crank it all up and pull everything into position. Simple, low tech, moderately effective. Don told me when he was my neighbor in 1986 that it was a fairly outdated method by then, just like slipping the heel and redoing the binding instead of resetting a Martin guitar neck.

Have you got any crusty old guitar repairmen in your neighborhood telling everyone, "Sure I can fix it....it's just a big fiddle....and I won't charge you what those violin snobs do...."

j.
www.condino.com
 
Master Italian violin family luthiers have been using this effective, noninvasive technique for a few hundred years with amazing results on some of the finest violins, violas, celli, double basses, violone, and gamba family instruments in existence.
But, what the hell did/do they know.