• TalkBass has been independent since 1998. Add your voice.
    Create a free account to reply to discussions, view embedded media, and browse with fewer display ads.
    Join freeLog in
    Want zero display ads or expanded classifieds tools? Compare plans.

Strat style shortscale bass build

Hi all,

Thanks to the TB luthiers forum and several other great sites, I got the urge to build!

This story starts back in '85 when I bought a '78 Fender Musicmaster bass from a friend for short money, basically as a favor. I didn't like the bass, and really had no use for it at the time, but the price was right. $40 if IIRC.

Since that time the bass was taken apart and re-assembled with a DIY body (made in high school shop class) modeled after an Alembic that I saw JPJ playing with Zeppelin. It didn't get much playing time and stayed that way until a couple months ago.

Unfortunately, somewhere along the line the original body got lost or thrown away, but I did manage to hang onto some of the key parts that made this project possible.

Here's a drawing I spent lots of time messing with in CAD software trying to get it right. I used bits and pieces of drawings found on the net and info from books and articles. I really wanted this to be as close to a real Strat as possible.
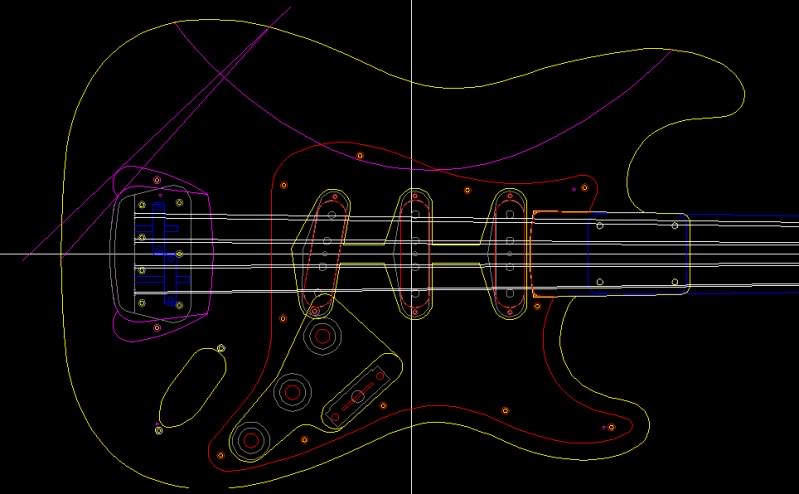
StratBassScreen.jpg
 
  • Like
Reactions: 4 Out of 5
I had planned on using a piece of ash I got on Ebay, but it's MC was just too high and it needs to dry for a while before it's used.

I went to my local hardwood supplier and picked through the short bins and came up with this nice piece of American cherry for $13. I did a little research and found most people think cherry is a great body wood and now I absolutely agree!

DSC02486.jpg


Hacked in two, then milled the edges on my milling machine(yes, building a bass in a machine shop) because I don't have a jointer :)

DSC02489.jpg
 
Here, I flycut the blanks backside to have a smooth starting point. Would it have been easier if i had a surface planner? I'm not sure.
DSC02490.jpg


Then I've flipped to the frontside, skimmed the surface to 1.75" thick and traced the body outline just to be sure. That double sided tape is amazing. I actually had to pry the body off the machine table when it was done.
DSC02493.jpg
 
I've screwed a piece of aluminum to the blank just where the center of my program will be and drilled a hole. Because my machine travel is around 12" and I need around 13", this will enable me to slide the head of the machine out and re-find my program center accurately.

Then I've completed the first half of the programmed profile. Cherry mills very nicely! I'll be using it again I'm sure :)
DSC02495.jpg


Profile complete.
DSC02499.jpg
 
  • Like
Reactions: herndonbassist
Control cavity pockets and all the holes. I did add four nail holes to paint just like Leo did, but I decided against using them later on.
DSC02501.jpg


Neck pocket and corner rounding. I used a hand held router for the corners and made a few boo boos:( The horn ends will need some touchup. It's been a while since I've routed anything and I should have practised on scrap. And I lost some material at the end of the neck pocket. It just crumbled while I was milling. Doesn't seem to matter though, neck fits great.
DSC02505.jpg
 
Luckily I had some marine grade plastic filler from a recent unreleted project. This stuff worked perfectly to fill the routing mistakes and machines like butter. While I was at it I decide to recut the neck pocket profile. It seemed a little loose to me by about .020".
DSC02507.jpg


Here is the body, sanded to 320 grit and sprayed with three coats of BIN white shellac primer. I used Reranch nitro lacquer for the color and clear coats later on, and that's the primer the site suggests using. Please excuse the messy shop in the background:eek:
DSC02533.jpg
 
This was basically the point where I decided I wanted the whole bass to look like it was made this way in '78. Maybe a light relic on the body, pickguard and any new hardware to match the original neck and hardware.

I had a hard time deciding the color for the pickguard. I settled on white, but I may eventually change it to black if I don't like it. I think either color says 1978!
DSC02523.jpg


Finished.
DSC02524.jpg
 
I had decided early on that this bass really only needed to have one pickup, basically a shortscale P bass. But how to keep the Strat looks? One real '51 re-issue P pickup (bought here from a fellow TBer!) and two faux pickups.

I made two '51 P pickup replicas and added a dumby tone pot and 5 way switch.


DSC02475.jpg


DSC02478.jpg
 
Before paint.
DSC02480.jpg


I had a blast making the faux pickups. After machining, I painted them with a dark gray primer that darkens nicely when dipped in potting wax. Added the fake magnet poles, wrapped with black string to match the real pickup. Sorry, I don't have any pics of the faux pickups complete by themselves. But you will see them installed in the pickguard when I show the finished control cavity pics.
DSC02481.jpg
 
The Reranch colors I picked, and a test piece. This shows the color that really says "1970's" to me. Vintage cream. It's supposed to look like aged Olympic white, but I think it's a little too yellow. Not Reranches fault, they recreate the original Fender color to a T IMO. Oh, and my favorite coffee cup, used year round;)
DSC02546.jpg


I intended to do a light coat of neck amber to add a little more aged look, but it just looked way too yellow for me. I'm glad I tested first.
DSC02547.jpg