• TalkBass has been independent since 1998. Add your voice.
    Create a free account to reply to discussions, view embedded media, and browse with fewer display ads.
    Join freeLog in
    Want zero display ads or expanded classifieds tools? Compare plans.

MARCH (MULTISTRING) MADNESS...32 and counting

Dadagoboi

CATALDO BASSES
Commercial User
Jul 1, 2005
4,292
21,945
80
Florida Swamp
cataldobasses.com
Disclosures
CataldoBasses: Designer/Builder ThunderBuckerPickups:Consultant
That's two Twelvers and an Eighter:

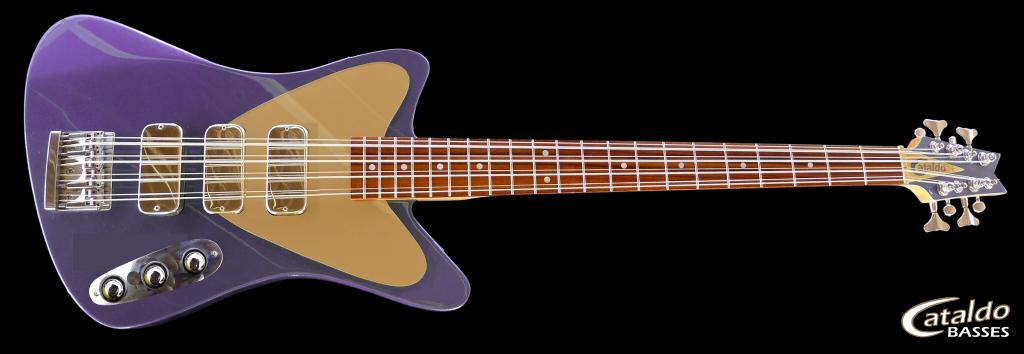
#1 -8 string 34" scale bolt on neck 3 pickup G8R "Mardi Gras", Crown Royal Purple metallic from this concept by Fateau Scioppe.
121314_zpsd752ab71.jpg


#2 -12 string 34" scale through neck 2 pickup G8R
P1100770_zpsrcrzn8kg.jpg


#3 -12 string 32" scale through neck 1 pickup. This one's for me, I haven't determined the body shape but maybe this:
P1040110_zpstwunr1jy.jpg


Bridges will be Schaller 471-8 with modified saddles for tighter string spacing. Steve Soar of ThunderBucker Ranch is working on those and the pickups.

The necks:
top to bottom:
#2 34 3 piece maple, mac ebony, twin trussrod, 'Hamer' profile.
#1 34 maple/ rosewood
#3 32 same as #1
P1100780_zpsx49oz3wf.jpg


Necks #2 & #3 built by @ctmullins
 
Last edited:
#1
Template for neck pocket/pup routing mounted to the back of the 1-3/8" blank. Masking tape is to prevent senile operator from putting pup holes in the wrong places since this is a 3 pup build.

P1100785_zpsdbwimzwj.jpg


Attempting to translate Signore Scioppe's concept to wood .
P1100786_zps4qzora53.jpg


Slightly different perimeter than the current G8R, pickguard will also have to be updated. Neck pickup location is 5/8" north of usual placement.
P1100788_zps4u3tdeqz.jpg


Mocked up. Time for lunch, then routing after a nap. @kat888's NR lurking in the background.
P1100792_zpspg6nys1z.jpg
 
It's like getting pix from the breeder when you're waiting for kittens.
Kittens? They just magically appear from under the house around here. Then they just as magically disappear after a while. Life in the swamp.

Cut the pup routes one at a time, moving and screwing down 'Wonder Template' for each. Took about 15 minutes. I usually do special pup routes from the top with a handheld but this is actually faster and more accurate.
P1100795_zpsok3w8amq.jpg


Bridge pup route is deeper for the single coil that goes there.
P1100798_zpsiim1szvs.jpg


Dashed line is the old perimeter.
P1100797%20C_zpsdnmyo1o0.jpg
 
So subbed. :)

I'm actually at a bit of a lull myself right now, having finished my BFM PA build. Might be a good time to work on my own 12. :cool:

Wife says it's time to do the Volkswagen that's been in the garage for the last seven years. As usual, she's right. :woot:
 
Headstock. I made a rubbing from my Robelli 8er onto some label paper.

P1100762_zpsjnvmvts8.jpg


Found the hole centers, stuck the label onto the paddle, and transferred everything. Drilled the tuner holes and the crotch of the Vee. Attached a piece of 1.5" pine to the back of the headstock to get enough clearance for the bandsaw. Cut kerfs into the radius to make it easier to cut with the 1/2" blade.
P1100809_zpsbplfaadz.jpg

P1100813_zpsjrnhqgej.jpg


Shinto rasp, files, scraper, oscillating spindle sander, etc. Next time I'm making a template to route the perimeter. This took too long.
P1100816_zps05lwopkx.jpg


Approximation of the final look. Headstock will match body, TRC will match pickguard.
P1100818_zpswt45oc94.jpg
 
Man that's wicked looking! How'd you attach the pine, just some tape?
Thanks!

I never use tape to attach templates, etc. if I can avoid it. I screwed it on from the front through two tuner holes with washers.

P1100809_zpsbplfaadz.jpg
 
Okay, this is actually one of the most exciting part of these builds for me.

The Schaller 471-8 bridge I use. It has more adjustment than any other multi bridge I know of, individual saddle height adjustment being the most important to me.
P1060034_zps27zb6npe.jpg

The BIG drawback is that the saddles are narrow and don't allow the tight spacing of a 'tuneamatic' style bridge. Note how wide the gap is between the fundamental and the octaves.

Here's a Tuneamatic style, the saddles touch each other so theoretically there could be zero gap....but there's no individual height adjustment.

TOM_zpstzxce0rg.jpg


Here's my solution:

P1100850_zpsv9vzqspm.jpg


Yeah, they're tiny! 4 'Wide Stance' saddles to bridge the gap, paired with a stock saddle for each string group.

P1100851_zpswidrpxoq.jpg


The first prototype from ThunderBucker Ranch. Needs slight modification but they work well enough for 'proof of concept'. Production saddles will be brass, Steve milled these from 3/8" aluminum.
chips1_zpsrqedjtwd.jpg


chips2_zpsgtc2poes.jpg


chips3_zpsai0iyd1o.jpg


chips4_zpswpmllpjf.jpg


Then they get cut off like 1/8" aluminum bread slices.

Comparison:
P1100847_zpssrr1k3fn.jpg


Wide Stances go to the outside. In addition to allowing string spread to be the same from nut to bridge (easier fretting, trust my 70 year old fingers), the total string width at the bridge is reduced by ~5mm. 61 from 66 (2-3/8 from 2-5/8").

P1100856_zpslnacni0o.jpg


P1100855_zpswxe0gekb.jpg


That lets me use necks that are 2.5" wide at the 21st fret with plenty of space on either side of the string...Excuse the toothpicks, haven't slotted the saddles yet.

Wide Stance on the Big Bottom:

P1100857_zpsiqufgvjk.jpg


As I said, I'm excited...doesn't take much these days.
 
Oh yeah. I'll take two dozen of those. Who do I make my check out to? ;)
I had a feeling you'd have some interest!

The one problem that hasn't been solved is how to reinstall the circlips on the screws that go through the saddles. Removing them is relatively easy. You put the saddle carrier in a plastic bag and pry them off. The bag keeps the clip from flying away.
 
This is the thing that frustrated me about multi-strings - getting the string saddles with individual height and intonation. Thanks for documenting, I'm going to come back to this in a few months.
You're welcome!

Control Cavity. Easier to just draw it on the body and forstner it.
P1100863_zpslqwa24cj.jpg


Then connect the circles

P1100865_zps182p8eik.jpg


Dashed line is the 7/8" dia hole for jack cup.

P1100867_zpsnvv7dpce.jpg


Shopsmith set for horizontal boring with Forstner. Body blank notch makes access easier.

P1100868_zpsigc6xfaf.jpg


1/2" spade bit angled thru the 7/8" jack hole for wire access.

P1100870_zpsq5csfwmh.jpg
 
Picking up speed...

This AM I put Mardi Gras G8R together to make sure everything is in the right place.

P1100874_zpselcx4brc.jpg


Used the pin router and old template to route most of the perimeter. Bandsawed the revised horns and sanded them correct.

P1100875_zps7gzsttrq.jpg


Traced the outline onto some HDF laminate flooring.

P1100876_zpsy0qzbuaq.jpg


Attached it to the new body to pinroute the new perimeter using it as the template.

P1100878_zpsjpzr1tmb.jpg

That triangular piece is to keep it level on the router table

I left about 1/16" to clean up with a file. That avoids the cutter hitting the body.

P1100879_zps3qnbcjwh.jpg


Minus on the top horn

P1100880_zpsrmfknbh5.jpg


Plus on the bottom

P1100882_zpsqpxcfuqn.jpg


Another crappy template...one of a series.

Proof of Life.

P1100887_zpslkjfbg7i.jpg