
Enjoy the benefits of a premium membership!
Upgrade Account
-
TalkBass has been independent since 1998. Add your voice.
Create a free account to reply to discussions, view embedded media, and browse with fewer display ads.
Join free Log in
Want zero display ads or expanded classifieds tools? Compare plans.
You are using an out of date browser. It may not display this or other websites correctly.
You should upgrade or use an alternative browser.
You should upgrade or use an alternative browser.
Über-Jay 5 Buckeye Burl
- Thread starter miziomix
- Start date
More options
Who Replied?Before I die I will own a bass with a Buckeye Burl top. Right up there with Spalted Maple and Claro Walnut as my favorite woods. I agree, this top is perfect for the Nemesis theme. Looks very Rorschach-y, which is awesome.

Looking awesome, Maurizio!!
Thank you Geoff!
That's a great way to fill those voids around the perimeter. I had few that I took care of with Zpoxy and Wenge shavings and dust...to me the great thing about Buckeye burl is that it doesn't always have a consistent look. The patches of grey and yellow are sometimes very random and the voids can be anywhere.
Indeed! I love chaos.
I wouldn't do the same thing with pretty much any other top with grain. A Burl? oh boy..........
 I have recently done something interesting - to me at the very least - on another BE Burl with large voids. I shall post pictures as soon as the bass is sprayed.
 definitely subbed!
Thank you! Great to have you here guys.
Before I die I will own a bass with a Buckeye Burl top. Right up there with Spalted Maple and Claro Walnut as my favorite woods. I agree, this top is perfect for the Nemesis theme. Looks very Rorschach-y, which is awesome.
I agree on everything
..............update...........
Of course, a bass with such a personality was crying for an inlay. Nemesis.............. the winged goddess of retribution. Typically holding a sword and a scale. If you google it you'll see a lot of images. turning the myth of Nemesis in an inlay is as intriguing as it is challenging.
I worked quite a bit to strike a balance between the rich iconography and a contemporary, minimalist style. A figurative approach just didn't seem right for this bass.
Wings..... sword...... female...... balance... or the lack thereof........retribution....punishment.......
After quite a few attempts I landed onto one that both the owner of the bass and I felt good about.
With Chinese New Year in the way it took me about six weeks to get it done and two more to get it to my address (and some complain that it takes six to nine months to build a bass....).
I like the fact that, the inlay marks the 12th fret but goes all the way down to the 15th. In the picture it marks the 11th actually. But that has changed - see picture below.
Then comes the easy part. Inlay the board and glue, sand, fill, sand, clean up. God bless Dremel.
And here's the final result - although a little idea is tormenting me..............................
Thank you for being part of this.
Maurizio

Maurizio, I love your work. All your designs are brilliant and the woods you work with are fantastic. If I ever had the funds available for a custom build you are at the top of my short list of luthiers I'd choose from.
Please give us more of this beauty.
Please give us more of this beauty.

Maurizio, I love your work. All your designs are brilliant and the woods you work with are fantastic. If I ever had the funds available for a custom build you are at the top of my short list of luthiers I'd choose from.
Please give us more of this beauty.
Thank you so much for your kind words and for following my builds. And for having me in that list
Loooove the abalone detail!
 Thank you
------------- update time.
Shaping the neck profile is the very last thing that I do on a neck. Prior to that, neck joint holes and headstock holes for anchors are drilled and counter sunk where necessary. Here are the Luminlay dots being installed.
I will probably start installing frets too before shaping neck profile. The more I think about it, the more it makes sense to me. Does anyone do that? Any advise? Thanks!
Here's the body cavities being drilled and then routed. For the body too, contours are the very last thing I do. It's just so much more comfortable to work with a flat surface.
Checking that everything is fine. Holes still need to be drilled.
The large void on the right, by the controls area, was filled with sawdust, bark and CA. I tape the bottom on the other side, to keep the small pieces and sawdust from falling. Then the tape is removed and more sawdust added to fill tiny voids and holes. More CA seals it. Finally CA is spread all over the Buckeye inside the cavity. The thin glue finds its way into the pores and tiny cracks and hardens the entire area. It also shows what the top is going to look like when finished.
A pretty snug fit. Later on I will slightly sand the walls to make it just a bit less tight, accounting for lacquer. I always leave extra wood at the end of the neck. In case you wondered, there's actually no reason for it really. I just happen to do that all the time.
Hope you like what's happening in this little shop. I will be back with more updates soon.
Thank you for joining the ride
I've only started building my first bass recently, so I'm no pro, but I did it in that order. I fretted my neck before shaping it. The way I saw it, it would be easier to fret the neck when it has a flat surface on the back rather than contoured. My advice would be to be careful! I accidentally hit my 5th fret and dinged it pretty bad while shaping, and replaced it because of that.
Also, nice work on this bass. I absolutely love your work and your basses. I try to follow along with each of your builds, because they're all so cool!
I've only started building my first bass recently, so I'm no pro, but I did it in that order. I fretted my neck before shaping it. The way I saw it, it would be easier to fret the neck when it has a flat surface on the back rather than contoured. My advice would be to be careful! I accidentally hit my 5th fret and dinged it pretty bad while shaping, and replaced it because of that.
Also, nice work on this bass. I absolutely love your work and your basses. I try to follow along with each of your builds, because they're all so cool!
Thank for sharing your experience. It does make sense to me. The thing is, one starts with one of the many available ways and that becomes THE way. I can see a few reasons why it could be better for me to install frets first. Although I am more thinking about the possible benefits during finishing process, you might have a point. Two new necks are lining up. One is shaped and I will test my theory re. finish. The other one is not shaped yet and it will allow me to test the rest too.
Thank you for your kind words too. It's great that you like my builds. Is there a thread of yours?
Ciao, Maurizio
-------------------------update time

Pictures got a bit mixed up last time. You must have noticed that those in the last update were take prior to the inlay. These instead were takes after. I started shaping the profile.
Here's the soon to be Über-Jay bass sitting right next to my own Ü-Jay MarkII - the second prototype I built years ago. Over time the design has evolved and it is now slimmer than before. This fiver looks quite a bit slimmer that the four stringer next to it.
The design change came about while I was building the Ü-J5 Funk Machine for my friend Jauqo III-X. Actually he suggested that and I am glad he did. Thank you Jauqo.
Shaping the headstock is one of those moments I look forward to. This time around the fun started earlier on, when I realised that there was not enough Buckeye left to make a HS plate. So I looked for two pieces that could be joined by using the bark as a transition. I think it worked pretty well?
I am in Singapore where one of my basses should arrive today. If all goes as planned I should be able to present it to a few fellow bassists. Thanks to Reg of Bassfreq, a great shop that specialise in boutique basses. I am humbled that two of my basses will join some of the best basses out there. And it's quite scary too LOL
Thank you for reading this far
Hi there, time for an update on this build. Today I would like to share with you a little detail that has been recently added to this bass.
If you look at the previous pictures you will notice that the look of the front consistently plays with white/gray/black/greenish elements. We like that very much and that is the way it was meant to be. Unless...
Unless I recently started having the feeling that something was amiss. That a little element of disruption was needed. Then I suddenly saw this little red spot in the shape of drop of blood falling from the sword blade. Very Nemesis, as the owner put it. (See why I am so keen on giving every bass a name? LOL)
I had a little red ruby Swarovski crystal. I shared the idea with the owner and we went for it. It's very subtle. Depending on the angle you look at it, it can be quite visible or almost look like a dim light shining from underneath the board.
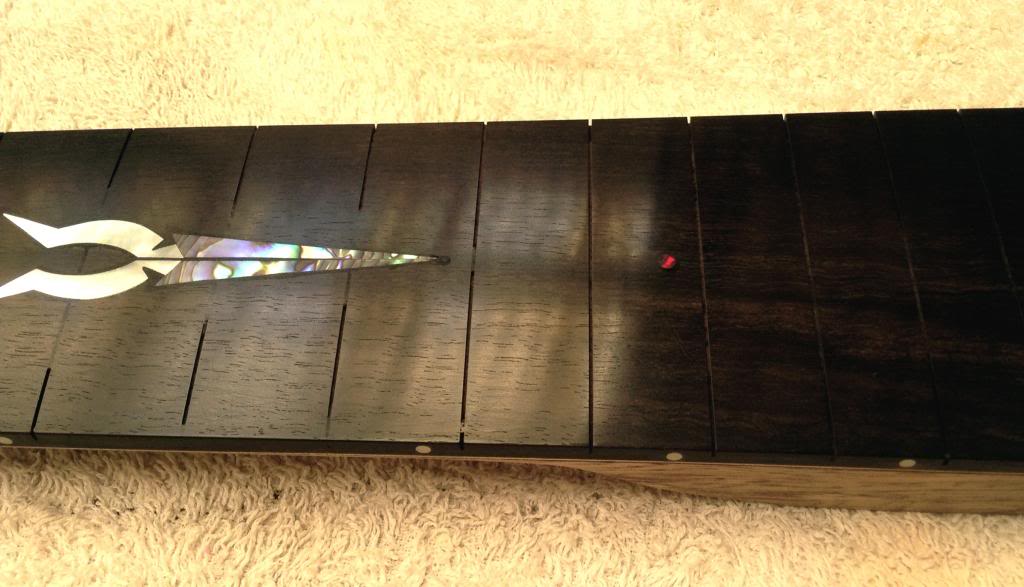
The Ebony fretboard is sanded to 12,000, then fretted. This is the first time I fret a neck before lacquering it. The thought of doing it this way has bugged me for sometime and I could not find flaw to the logic that, doing all the rough work before applying a finish it's a sound idea.

Actually, fretting before lacquering came to my mind as a solution to something I don't really like, which is the look of the fret tang at the edge of the board. This way I can fret the board as if it had a binding. Then glue the frets from the side and seal with sawdust. Sand flush, move on. Definitely a keeper.
Removing any fear to damage the fish at the edges, this method immediately opened my mind to better and more efficient ways to do fret dressing. I took a long, large file and sanded the fret edges in a breeze. Then remembered that I have three industrial diamond plated steel bars which I sometimes use for fret leveling ( with dubious results ). With those, fret edges came out really smooth. Much faster and more precise that my old way. Another keeper.
I wasn't too sure it would all work the way I envisioned it. But it worked like a charm.
Here's to experimenting. If we never dared, we'd be still running after our dinner.
If you look at the previous pictures you will notice that the look of the front consistently plays with white/gray/black/greenish elements. We like that very much and that is the way it was meant to be. Unless...
Unless I recently started having the feeling that something was amiss. That a little element of disruption was needed. Then I suddenly saw this little red spot in the shape of drop of blood falling from the sword blade. Very Nemesis, as the owner put it. (See why I am so keen on giving every bass a name? LOL)
I had a little red ruby Swarovski crystal. I shared the idea with the owner and we went for it. It's very subtle. Depending on the angle you look at it, it can be quite visible or almost look like a dim light shining from underneath the board.
The Ebony fretboard is sanded to 12,000, then fretted. This is the first time I fret a neck before lacquering it. The thought of doing it this way has bugged me for sometime and I could not find flaw to the logic that, doing all the rough work before applying a finish it's a sound idea.
Actually, fretting before lacquering came to my mind as a solution to something I don't really like, which is the look of the fret tang at the edge of the board. This way I can fret the board as if it had a binding. Then glue the frets from the side and seal with sawdust. Sand flush, move on. Definitely a keeper.
Removing any fear to damage the fish at the edges, this method immediately opened my mind to better and more efficient ways to do fret dressing. I took a long, large file and sanded the fret edges in a breeze. Then remembered that I have three industrial diamond plated steel bars which I sometimes use for fret leveling ( with dubious results
). With those, fret edges came out really smooth. Much faster and more precise that my old way. Another keeper.I wasn't too sure it would all work the way I envisioned it. But it worked like a charm.
Here's to experimenting. If we never dared, we'd be still running after our dinner.
Thank for sharing your experience. It does make sense to me. The thing is, one starts with one of the many available ways and that becomes THE way. I can see a few reasons why it could be better for me to install frets first. Although I am more thinking about the possible benefits during finishing process, you might have a point. Two new necks are lining up. One is shaped and I will test my theory re. finish. The other one is not shaped yet and it will allow me to test the rest too.
Thank you for your kind words too. It's great that you like my builds. Is there a thread of yours?
Ciao, Maurizio
Yes, my thread is here:
http://www.talkbass.com/threads/black-limba-rosewood-4-string-bass-1st-build.1049577/, although my build is nothing in comparison to many other current builds.

Yes, my thread is here:
http://www.talkbass.com/threads/black-limba-rosewood-4-string-bass-1st-build.1049577/, although my build is nothing in comparison to many other current builds.
Thanks for the link. Very nice build! Love the wood combo.
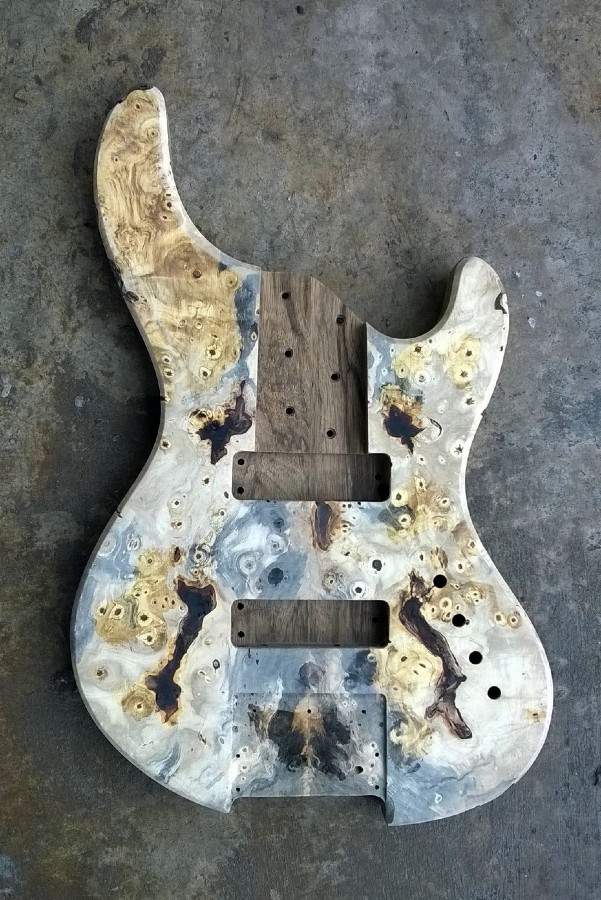
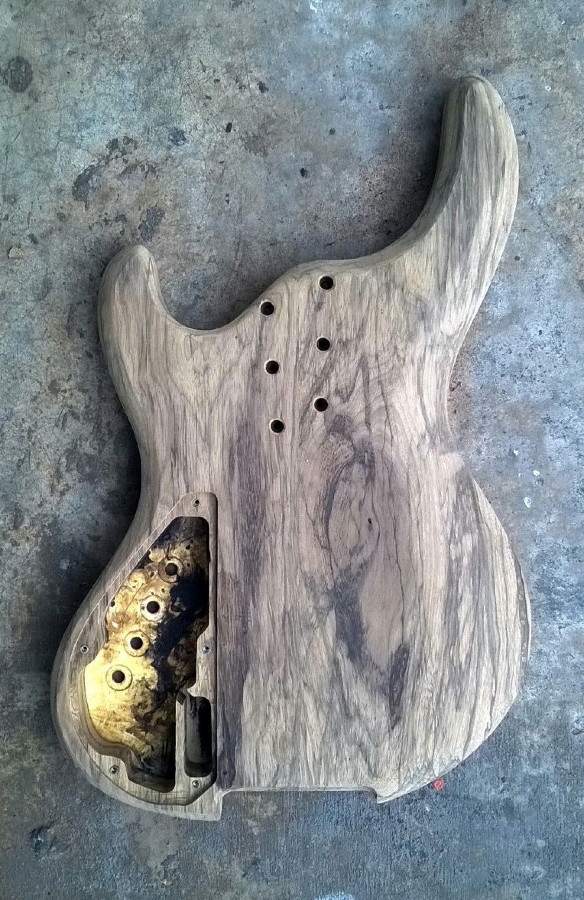
Bass ready for pore filling. I really like the way the large voids turned out. I wish I could have done the same to the one on the bottom right. Alas, that was right above the cavity so I had to create a ceiling with Buckeye bark. It all looks a bit dull now. But you'll see it pop with the finish on
Neck is ready, So, barring some last minute addition, we're good to go.
Thank you!
Maurizio
Neck is ready, So, barring some last minute addition, we're good to go.
Thank you!
Maurizio

The two largest symmetrical voids almost look like modern looking F-holes! Cool! Can't wait to see it finished!

Bass ready for pore filling. I really like the way the large voids turned out. I wish I could have done the same to the one on the bottom right. Alas, that was right above the cavity so I had to create a ceiling with Buckeye bark. It all looks a bit dull now. But you'll see it pop with the finish on
Neck is ready, So, barring some last minute addition, we're good to go.
View attachment 410427 View attachment 410428
Thank you!
Maurizio
I totally
The two largest symmetrical voids almost look like modern looking F-holes! Cool! Can't wait to see it finished!
True! And you can see the body core wood through the one on the left. As close to an F-hole as a solid body can be
I totallystoleborrowedpaid homage to your bolt layout on my current Ash body project.
Thank you!
Thank you!
This is my version, using bigger ferrules sunk into the wood.