• TalkBass has been independent since 1998. Add your voice.
    Create a free account to reply to discussions, view embedded media, and browse with fewer display ads.
    Join freeLog in
    Want zero display ads or expanded classifieds tools? Compare plans.

2nd Build - The Falcon

Yep I feel very lucky to be able to use this shop. A lot of the machines are pretty old and haven't exactly been maintained as one would like, but we have finally been replacing some of the older things lately. For example I walked in last week and found this brand new SawStop table saw. We will be replacing the other table saw with another one of these bad boys in a few weeks. Cuts like butter. The difference is amazing.

0627131734a_zpsdb193f82.jpg


This is what I'm thinking for the control cavity. It seems a little large to me. I'm looking at a 5 knob 18v pre, so I need room for 2 9v batteries, but I don't have the parts in hand so I'm not sure if this is overkill or not.

0625132210_zps9e98cb8a.jpg


Neck and body core.

0625132212_zpsb297f3ae.jpg


The walnut top I will be using against the body core. Wetted with mineral spirits. Pretty...

0625132223a_zpsb22af896.jpg


Scarf joint.

This is the headstock. I'm using a solid piece of flame maple since I want the headstock to match the body and I don't want to see seams. Sorry I forgot to get pics of the neck undergoing the same process.

0626132230a_zps8c2eaa9b.jpg


0626132232_zpse472596b.jpg


0626132232b_zps7b3b1fde.jpg


The jig is a copy of one I found on the web somewhere. Don't recall where, but it was on a general woodworking site. It pivots on the bolt you see there and there is a pin that locks into a hole drilled in the base on the other end. This particular neck is 13 degrees, and I have several other holes drilled for other angles.


This is my router sled jig. Pretty standard.

0627131648a_zps530a311a.jpg


You can see here how ragged the edge is. I was worried about the headstock moving around since I couldn't get a clamp in there. I thought it would be a good a idea to put double stick carpet tape in between the neck and the headstock. There is a tiny gap between the two, and that allowed the wenge to splinter up. It's fine though since it will all get carved away eventually, but next time I won't do that.

0627131648b_zpsf46ab0d8.jpg


0627131701_zpsd6410f99.jpg


We do not have a jointer in the shop, so I use the jointer function on the router table. It does a pretty good job. Not as good as a real jointer, but its not too shabby. Here I am jointing the bubinga back plates.

0627131732_zps4d14ad19.jpg


I did not think to get a before pic, but here is the result:

0627131734_zps799e6cb0.jpg


This is a really nice piece that was in the cut-off bin at my local hardwood place. I didn't have a use for it at the time, but I couldn't pass it up, it was so nice. Most bubinga I've seen is usually much more uniform. I love the grain in this one. I resawed it and it's been sitting in the shop for over a year. I'm not sure I should hide it on the back side of a bass. Maybe it needs to shine on another build? The crappy cel phone pic doesn't do the color justice.

That is all I have for this update until next week when the fretboard, veneers and truss rod come in.

I'd welcome any questions, comments or suggestions you guys might have. Thanks.
 
Here's a couple pics of my 1st build. I did not think to do a thread on it at the time.

Short scale
Northern hard ash Telecaster guitar body
Flame maple neck
Birdseye maple fretboard
Matching Ash headstock veneer
Tru-Oil finish
Gotoh tuners
Fender bridge
GFS middle position strat single coil lipstick pickup
5-way strat switch wired as a decade switch.
2 caps. Position 1: 0.047 uF, Position 3: 0.022 uF, Position 5: no cap
Rotosound black nylon tapewounds
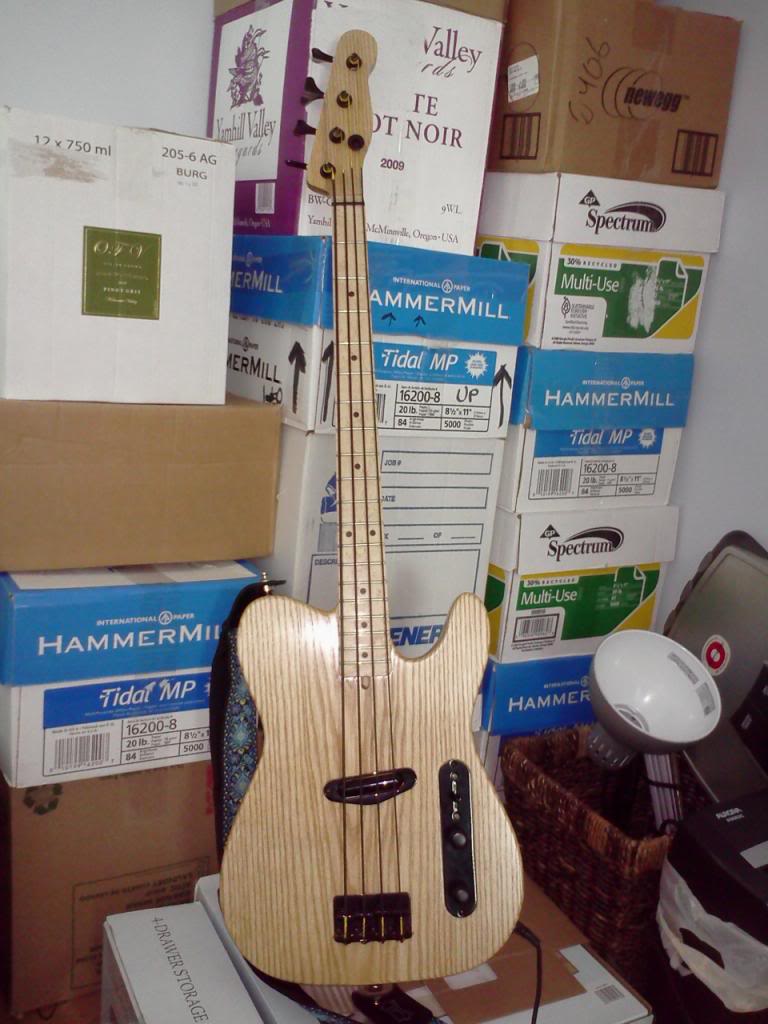
0625131501_zps15bdb2f4.jpg


Sorry about the boxes, we just moved and I literally broke my guitar stand just as I was getting ready to take this pic. The others are still packed somewhere...
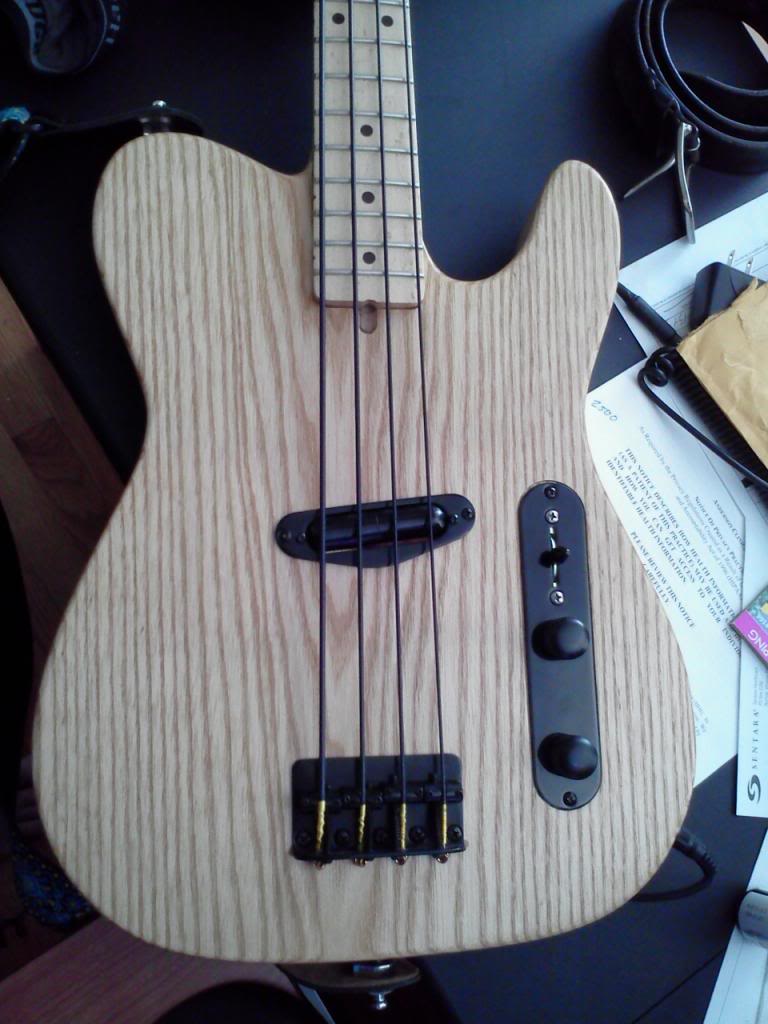
06251314551_zps361fac2c.jpg


06251315001_zps12071933.jpg


This is the 2nd body and 2nd neck. The original body was of pine. I screwed up the neck and when I made the 2nd one, it was too narrow (due to chipout) for the neck pocket, so I decided to make another body. It was all for practice anyway and I didn't expect it to turn out all that great, but I love it now.

There are still a few things I need to do to this. I want to do a few more coats of Tru-oil. I cut the nut badly (you can see it in the 1st pic) so I need to replace that and the bridge is mis-aligned by about a 1/16 of an inch. I'm waiting until I get the nut replaced to see if that will matter much. I also wish I had not done the ash veneer on the headstock. I had wanted the headstock to match when it was a pine body, so I did the pine veneer on the headstock. When started over, I just went with the same concept, but I think now it would have been better with the flame maple. The original was plain rock maple.

I am still debating about the pickguard. I have the material and made a template, but I liked the look without, so I have not cut it yet. I will probably cut it out and see what it looks like since I'm stalled on my current build.

Oh, and I need black screws for the switch. It bothers me that everything is black except those 2 screws...
Do they make black anodized frets? lol
 
My order came in from LMI so I got some more work done on the neck. And I had my 1st major screw-up.

Here is the dry fit of the scarf joint.

0705131700_zps86684b94.jpg


There are 5 layers in the scarf joint. There is a 1/8" piece of bubinga, sandwiched by maple and black veneer. I drilled 2 holes and inserted some brass rod to keep everything aligned during gluing. I would normally use toothpicks, but the box was empty, so I had to punt.

0705131700a_zps7d859089.jpg


Glue up

0705131726a_zpsf153e13e.jpg


And here is where I screwed up. 1st I went overboard on the glue. There was a LOT of squeezeout. I've already cleaned it up in this pic. Finding the holes in each layer through the glue to thread the pieces onto the rods was challenging. I got glue all over the place. Then, when I went to clamp I realized that the rods were right where I needed to put a caul. I also did not want them to get glued in. Metal rods and routers don't go together. So I put the clamps on the headstock end and then pulled the rods out. Well, I guess I didn't clamp them tight enough because the whole headstock rotated a bit when I was tightening every thing down. Because of all the glue I did not notice it until the next day when I unclamped everything.

Note to self: Do not use a paint brush to apply glue.

I realize now that I could have just put the caul on the other side of the brass rods, no problem, but between getting glue all over, and it taking so long to get all the pieces together that the glue was setting up, I got rushed.

So it was out of true by several degrees and the headstock template would no longer fit. The right side was hanging off. I did not get any pics of this next part, since I was a bit unhappy at the time and forgot. But the scarf joint itself looks really good. Pics coming up later today.

I decided to cut the headstock parallel with the neck and sand it flush. Luckily I had some cut offs that matched up pretty well for the wings.

Adding the wings to the headstock.

0707131853_zps04f73625.jpg


0707131853a_zps9df8586c.jpg


So I made a bad decision, which led to a dumb mistake, but I was able to avert total disaster. As my great-uncle used to say, "Don't worry, you are going to make a mistake. Just figure out how to transform your mistake into a design feature."
 
Here's a couple pics of my 1st build. I did not think to do a thread on it at the time.

Short scale
Northern hard ash Telecaster guitar body
Flame maple neck
Birdseye maple fretboard
Matching Ash headstock veneer
Tru-Oil finish
Gotoh tuners
Fender bridge
GFS middle position strat single coil lipstick pickup
5-way strat switch wired as a decade switch.
2 caps. Position 1: 0.047 uF, Position 3: 0.022 uF, Position 5: no cap
Rotosound black nylon tapewounds

0625131501_zps15bdb2f4.jpg


Sorry about the boxes, we just moved and I literally broke my guitar stand just as I was getting ready to take this pic. The others are still packed somewhere...

06251314551_zps361fac2c.jpg


06251315001_zps12071933.jpg


This is the 2nd body and 2nd neck. The original body was of pine. I screwed up the neck and when I made the 2nd one, it was too narrow (due to chipout) for the neck pocket, so I decided to make another body. It was all for practice anyway and I didn't expect it to turn out all that great, but I love it now.

There are still a few things I need to do to this. I want to do a few more coats of Tru-oil. I cut the nut badly (you can see it in the 1st pic) so I need to replace that and the bridge is mis-aligned by about a 1/16 of an inch. I'm waiting until I get the nut replaced to see if that will matter much. I also wish I had not done the ash veneer on the headstock. I had wanted the headstock to match when it was a pine body, so I did the pine veneer on the headstock. When started over, I just went with the same concept, but I think now it would have been better with the flame maple. The original was plain rock maple.

I am still debating about the pickguard. I have the material and made a template, but I liked the look without, so I have not cut it yet. I will probably cut it out and see what it looks like since I'm stalled on my current build.

Oh, and I need black screws for the switch. It bothers me that everything is black except those 2 screws...
Do they make black anodized frets? lol


This bass looks great! I am usually not a fan of natural finishes, but this finish, with the minimalist and all black hardwarde and the addition of black strings makes it look super!

Personally, I wouldn't add the pickguard. I think it would take away from the look.

Great job, especially for a 1st!
:bassist:
 
So I got some more work done yesterday.

You can see the scarf joint here. I ran a 2X4 through the drum sander to flatten it, then taped the neck to that to get the headstock off the ground. Several passes later, the scarf joint is flush with the neck. I couldn't do the same thing with the surface of the headstock since then it wouldn't fit, so I did that on the belt sander, then traced the head stock template. The grain matches up pretty well. I have to do better about taking pics. I keep forgetting to get things like a close up of the grain matching...

0707132303_zps2a0a6ed8.jpg


Here is a mock up of the headplate and the fretboard. I found a pretty cool area of the left over walnut and sanded it down to about 1/8". The fretboard is macassar ebony. I am checking the clearance and figuring how far up the headplate has to be. I want the veneers to run under the fretboard so they are continuing the design of the scarf joint rather than ending flush.

0707132304_zps09a70608.jpg


Dry fit before gluing. I brought some wooden stick cotton swabs from home this time. The gluing went a lot easier this time. This is a good shot of the scarf joint.

0707132330_zps292bb748.jpg


0707132330a_zps86f9500e.jpg


Obligitory clamp forest. I had to use pliers to get them tight enough. I have pretty big, fat ham hands and couldn't get things tight enough with just my fingers.

0707132356_zps58dc7fce.jpg
 
It's the little things that kill you...

After gluing up the head stock, I went back to working on the control cavity. I had already hogged it out with a forstner bit, so I just needed to clean it up on the router table. I started with the long flat side using the fence, then I pushed the fence back and continued around the curve freehand, taking very shallow cuts. Everything was going really well, but because I was working inside the hole, I ran the piece the wrong way and accidently did a climb cut. Well, it grabbed the piece and pulled it into the fence. I guess I hadn't pushed it back far enough. This is what I ended up with.

0708131333a_zps3b356683.jpg


The rebound caught me on the wrist, but I only got a small cut. It could have been worse. I think the router is probably the scariest tool in the shop. I'm usually pretty good with it, but I was tired and got careless. I've gotten a replacement board and will have to re-do this later after it acclimates to the shop. And I will make a template next time... :)
 
I've gotten a lot done lately, but haven't had time to update the thread. There's quite a bit here, so I'll do several smaller posts.

I had 2 problems with the truss rod route. One was my fault and one was not.

I guess I didn't tighten down the collet enough when I changed bits, and it worked it's way up as I was doing the 2nd pass. I've never experienced this, and no one here has ever seen it either. As a result, the channel gets a lot deeper for the last inch or so. It was pretty close to breaking through. I filled it with some epoxy mixed with wenge dust. There is only 7mm left there, so I will have to make sure I don't take much off the center of the neck when carving.

75395592-503d-4656-bef0-1829dcc30264_zps19d10faa.jpg


This is how much it slipped.
619edea1-b6fa-40f8-abc3-6ae0798b6bf5_zpsde4025a7.jpg


Problem #2: Someone, who shall remain nameless, came up behind me and tapped me on the shoulder trying to get my attention just as I had started my pass. Needless to say, I was startled by this and became very unhappy. In fact I was overflowing with unhappiness so I let them have the majority of it. They now understand (I think) that they should not do this kind of thing in the future.

This is the result:
3cf5c3d8-c28e-42ac-a708-8ba3f86def6f_zpsd24b055c.jpg


So all this made me a bit agitated, and I should have walked away and took a break. But no, I grabbed the wrong size bit and did this:

ef5748fc-2de1-4b69-95d6-9c6a220ef42b_zps0b4d57a8.jpg


This bass will have an added design feature. MESSTUPT: Multilam Exotic Super Sustain Trussrod U-Channel Performance Tonecover
 
Carl Thompson once showed me the first bass he ever built. At the time, it was sitting under a kitchen counter/work table in his Brooklyn apartment with no hardware attached - just sorta laying there. Carl's not all that sentimental about such things.

Anyway, he shows me this bass from around 1970 or 71 and it's got an ebony heel block. He says "Ever see (un-named luthier)'s heel blocks? Here it is. He used to work in my shop and this bass was always laying around. I screwed up the neck joint and figured I'd better use a contrasting wood so it would look like I meant it. Now he's got everyone believing it's a tone-enhancing feature!"

True story. So, if Carl Thompson can botch a neck joint, I think you get a buy on a truss rod cover! ;)

On another note, I'm very impressed by that shop. Not the scope or equipment of it; it's a fairly typical large theater shop, but the cleanliness and organization of it. I'm in your line of work - currently doing automation at the Metropolitan Opera House in NYC - and I've worked around the business for almost 30 years. Whoever runs your shop runs a tight ship. Clean, organized, beautiful! My hat's off! I don't usually see them that well-kept... the Met included!
 
Ok I have a lot of updates, so I'll do a bunch of smaller ones instead of one big one.

Got the truss rod in.

0709132237a_zps9f7dd536.jpg


Leftover walnut off cut makes a good filler strip

0709132257_zpsb6067200.jpg


I usually go too heavy on the glue, so i backed off a bit. A little too much. There were a couple of small voids that I filled with CA.

Macassar Ebony fingerboard. Ain't she purty?

8d2558c3-b798-4a1e-a595-6acaa1cf63ff_zps4c7d6b56.jpg


Wings glued up

0714132245_zpsdc1279e3.jpg


All cut out and shaped on the spindle sander.

39c89ba1-f619-4885-82cc-8d1bd62802dc_zps59394a20.jpg
 
Sorry I left my camera at home this day, so no progress pics.

Got the headstock shaped and drilled. Just like everything else, I traced the template, cut it on the bandsaw and shaped it on the spindle sander. As you can see, it will have a very large bullet shaped truss rod of doom. Still working on the design.

d6e8853b-4eba-435e-a551-f5ba50bcf966_zps46f6c1f9.jpg


I did the control cavity yesterday. I'll be making the cover out of a piece of the same board from farther down. It's on the same grain line, just a bit wider.

3b3757df-fe44-4710-894c-9a0c94837eae_zps0308b7ad.jpg


I hogged it out with a couple different size forstner bits, then broke out the router and ran a flush cut bit around it. There were some glue drips that I took care of with a dremel sanding drum, then cleaned it up again. Then I used a rabbeting bit to do the ledge. I had to use some a board and some shims to get a level playing surface for the router to sit on. Not much material there and was way to easy to tip it.

Guess that's it. I thought there was more, but most of the other pics are repeats. I have to take 3 or 4 of each shot to get 1 good one.
 
You are a much bigger man than I to let that pass with just an expression of anger. Without exaggeration, I would actually scrap all of that, charge him for the replacement of everything, and $50 per hour of my time spent to that point. If that honest to goodness happened to me, I'd not leave that one alone for less than $500. Interrupting a person while working is unbelievably stupid and would earn anyone working for me the door. People can be killed from idiot maneuvers like that...
 
Carl Thompson once showed me the first bass he ever built. At the time, it was sitting under a kitchen counter/work table in his Brooklyn apartment with no hardware attached - just sorta laying there. Carl's not all that sentimental about such things.

Anyway, he shows me this bass from around 1970 or 71 and it's got an ebony heel block. He says "Ever see (un-named luthier)'s heel blocks? Here it is. He used to work in my shop and this bass was always laying around. I screwed up the neck joint and figured I'd better use a contrasting wood so it would look like I meant it. Now he's got everyone believing it's a tone-enhancing feature!"

True story. So, if Carl Thompson can botch a neck joint, I think you get a buy on a truss rod cover! ;)

On another note, I'm very impressed by that shop. Not the scope or equipment of it; it's a fairly typical large theater shop, but the cleanliness and organization of it. I'm in your line of work - currently doing automation at the Metropolitan Opera House in NYC - and I've worked around the business for almost 30 years. Whoever runs your shop runs a tight ship. Clean, organized, beautiful! My hat's off! I don't usually see them that well-kept... the Met included!

Thanks Lo-E, much appreciated. I must have missed your post. But that may be understandable since I was updating the thread between hitting the GO button. :cool: Nice to hear from a fellow theatre person.

Yeah, I've watched all the CT videos on YouTube. What a cool cat. I've been an admirer of his for a long time. Must have been really cool to hold that bass. I especially like the one where he talks about "making a hole without making a hole", and the one where he talks about tone blocks and stuff. Wish there was another name for it. I mean other than, "Piece of wood glued to the back of the neck so we can use less expensive 4/4 boards". Maybe if we translate it into one of those long ass German words...

So I'm not horribly uspet by it all. It's my 2nd bass. I'm still learning how to do this. I know my way around a shop, but a flat this is not, and in all honesty the machines are not really set up to do fine woodwork. It'd be 10X easier if they were. Almost all the blades are dull, dull, dull. Some of these machines were past their prime 10 years ago, though were are finally in the process of replacing most of the worst ones.

Been a squinty-eyed sparker, I mean, electrician for 25 years now and been at Arena for 15. I'm running One Night with Janis Joplin (it's 2nd run). It's actually heading up your way into the Lyceum in the fall.

The TD that set up the shop started there as an intern in the '70s and was TD over 30 years. He retired a couple years ago. He was an old school guy. The new TD actually used to work at the Met, I think in props and came to us from Intiman after it shut down.

Really the shop only looks that clean because we were between builds and had a couple weeks to clean house. And right now we are basically on hiatus and we only have one show up and running out of 3 spaces. I can take some pics during a build if you want to see what it really looks like.
 
You are a much bigger man than I to let that pass with just an expression of anger. Without exaggeration, I would actually scrap all of that, charge him for the replacement of everything, and $50 per hour of my time spent to that point. If that honest to goodness happened to me, I'd not leave that one alone for less than $500. Interrupting a person while working is unbelievably stupid and would earn anyone working for me the door. People can be killed from idiot maneuvers like that...

I hear you Beej. Can't do any of that though.

But just as a point of clarification, they are not a production person so don't know the 1st thing about shop etiquette. And I forgot to say that I had been standing there with my back to the door with the machine off inspecting the 1st pass until right before they got up to me, so I didn't see them coming and they didn't know I was going to turn on the machine. I forgot to mention that part. I guess I was not thinking when I posted. I was still ticked off. Granted they should have backed off, but they were also startled by the sudden noise. If the router had been running they probably would have come around to the other side so I could see them. Maybe... Not apologizing for them, just clarifying what actually happened.