• TalkBass has been independent since 1998. Add your voice.
    Create a free account to reply to discussions, view embedded media, and browse with fewer display ads.
    Join freeLog in
    Want zero display ads or expanded classifieds tools? Compare plans.

2nd Build - The Falcon

The Stats:

32" Scale 22-fret 4-string neck-through
9pc. Wenge and Mahogany neck w/maple veneer accents
Flame Maple body wing core
Walnut top
Bubinga back
Flame maple toneblock
Fingerboard undecided.
All black hardware:
Hipshot Ultralite tuners
Hipshot "D" 2-piece bridge
Exposed blade pickups, ala Joe Barden, possibly Lace.
Pre undecided, most likely will be Vol, Blend, T, M, B. Again open to suggestions.

Obligitory Wood Shots:

0202131655_zpsa3a82260.jpg

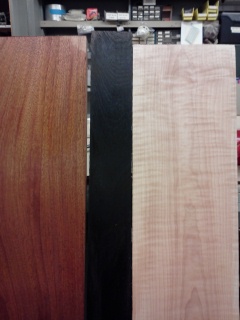
8" wide 4/4 Flame Maple. The whole board is just as nice.

0202131654c_zps497c80f2.jpg

Family shot. Back row: Mahogany, Wenge, FM. Front Row: Bubinga
0202131654a_zps4cea9aaa.jpg


0202131654b_zps9d022d0a.jpg

Bubinga. This was going to be the top way back when I was going to have the neck show.


The Design:
Falcon2_zps2d2a56dd.jpg


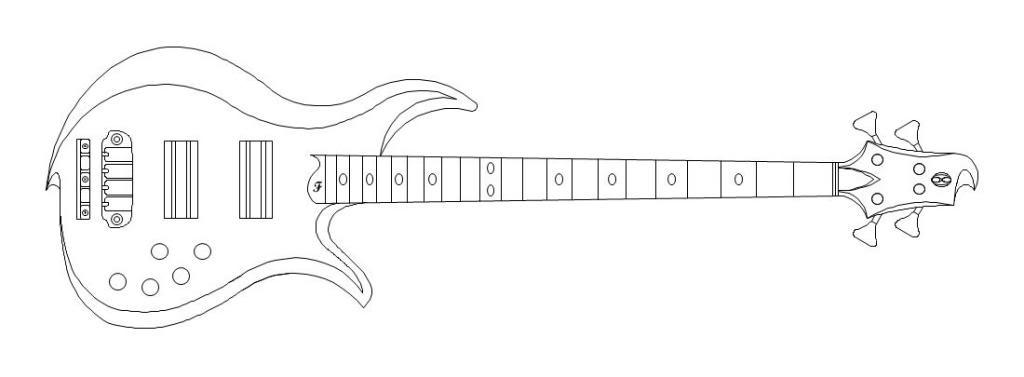
The bass will be heavily carved both on the body and the headstock. I've named it The Falcon because the cut on the end of the headstock reminds me of a raptor's beak.

I'm still refining some things. The carve on the lower horn is not quite right. It should be the same width on both sides. I'm also trying to decide if where the carvings meet the neck should be parallel like in the lower horn or converge on the neck like in the upper horn.

It is not represented here, but the body will have 2 accent veneers. It will go flame maple core, black veneer, flame maple veneer, walnut top. The headstock will have a walnut veneer to match the body. I would like to do a matching bubinga veneer on the back, but I'm not sure I will have enough left over after cutting the wings.

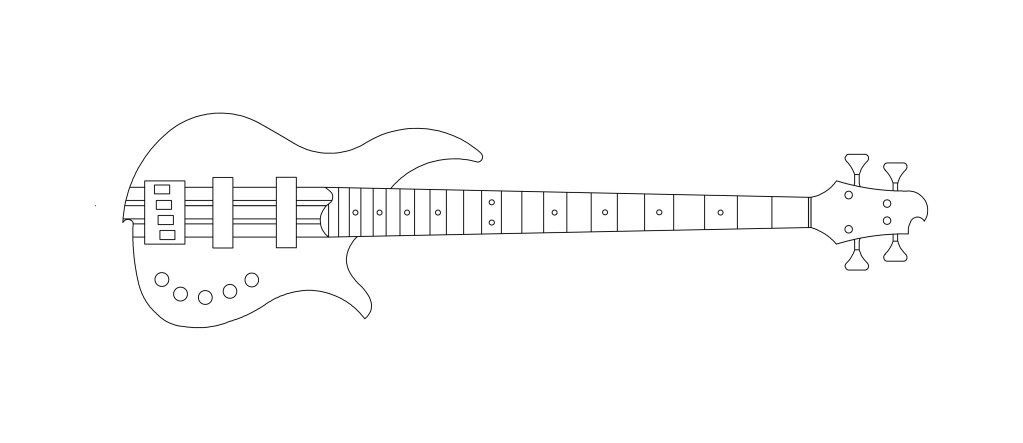
The bass has been through a lot of revisions and tweaking. As you can see it's pretty ambitious for a second build. As a comparison, here's the original drawing. I will rework this into a short scale piccolo bass.
pic13.jpg


Thanks everyone. I'm intending this build thread to be detailed with lots of pictures. Including the mistakes. There may be an adult beverage shot (or two). But I can't start yet.

My hair is, ahem, not ready... :o

I think many people will be interested in the scene of the crime, so next post will be about the shop where I work and the tools I will be using to perpetrate my wood butchery... :D

 
Falcon2_zps2d2a56dd.jpg


The bass will be heavily carved both on the body and the headstock. I've named it The Falcon because the cut on the end of the headstock reminds me of a raptor's beak.

This should look really cool. I love the headstock shape and the falcon inspiration. The wood combination sounds great. I think the inlays being ovals like that will look really nice too, not sure if you did that on purpose in the drawing or if it's supposed to be normal dots.

I put a little bit of a carve on my headstock and I was cautioned to not do too much because of the tuner placement. I think you basically need to have the tuners sitting there while you're planning out how far to carve to make sure you don't go too far.
 
I am a little worried about the point on the bottom. I plan on doing a test piece to see just how bad it will be. I figure if Alembic can have those pointy things on the Series II I can probably make it work. I'm pretty easy on my gear also.

lbride: yes the ovals are intentional. Not sure what they will be at this point though. I'm leaning to paua abalone. I think the tuners are well enough inland from the carve that I won't have any problem. I'm hoping next week to do a section on the body and the headstock just to see where exactly things will fall.
 
I am a little worried about the point on the bottom. I plan on doing a test piece to see just how bad it will be. I figure if Alembic can have those pointy things on the Series II I can probably make it work.
I think I've worked out their strategy for preserving delicate features -- charge ten grand for the bass, and the customer will baby it as if it were made of glass!
 
Ok. Shop time.

I'm an electrician (also known as "lighting guy") at Arena Stage in Washington DC. I hang and focus lights, program the lighting console and run the board during the shows. Conventionals, moving lights, practicals, fog, LED's, basically anything that gets plugged in. People are always asking me to re-wire houses, install ceiling fans, 220v outlets, etc. I CAN do it, but I'm not that kind of electrician. We have also been referred to as "squinty-eyed, no-good sparkers".

I recently did this Janis Joplin show last year. Full on Rock and Roll rig:


So I have access to the shop. It's pretty big. It has to be. They build large sets in there. There is no fine woodworking going on here. Every thing is pine, MDF, plywood, plexiglass and steel. We used to use a lot of 5/4 clear pine, but not so much anymore these days. Almost everything is put together with drywall screws for easy dismantling. There is a reason we call them "wood butchers". :D

Sorry for the crappy cel phone pics, my camera doesn't want to play right now.

0715121839a.jpg

Steel area.


0715121839.jpg

Drill Press/Mill, Cold Saw, Stock Storage.


0715121840.jpg

One of 2 table saws. Crosscut saw in the background. You an see the dust collection here also.


0715121840a.jpg

Yes, we have some clamps. This is about half of them. We also have pipe clamps up to 15'


0715121841.jpg

Dadoe saw. I used this to thickness a headstock once. Leaves grooves that have to be sanded out though.


0715121841a.jpg

Wire rope/aircraft cable area. Drawers are full of Nicopress for the various sizes of cable we use.


0715121843.jpg

One of our newer toys. Kreg router table. No lift though. :crying: It has one of the bigger Porter-Cable routers in it.

0715121843a.jpg

Hardware. Mostly different kinds of bolts, nuts, washers. The smaller drawers on the left are all brads and nails for the pneumatic nailers. The blue box with the cylinder on it is a hydraulic pump.

0715121848.jpg

Tool room left side


0715121845.jpg


0715121845a.jpg


0715121845b.jpg


0715121848a.jpg

Tool Room right side


0715121847.jpg

Screw gun anyone?


0715121847a.jpg

Angle grinders, Jig Saws, router bits, etc.


0715121846b.jpg

Brad guns. We likey


0715121846.jpg

Routers big and small. This is not even all of them. All P-C.


0715121846a.jpg

Under the routers we have sanders.


0715121847b.jpg

Various things in cases. Sawzalls, portable bandsaws, etc. I don't think I've even opened some of them.


0715121849.jpg

Another new toy. Laguna 18" bandsaw. Now we just need a resaw blade, but I'll most likely have to buy it myself. In the background you can just see part of one of the 2 dust collection units, and a bunch of risers for one of the sets we just pulled out.

0715121850.jpg

I know this is a really crappy picture of the paint room, but it gives you an idea of the size. Those are 4X8 sheets drying. The black square in the back is the spray booth.

0715121851.jpg

And the aforementioned spray booth.

That's it for now. I did not get pics of a lot of the machines. We just got done building 2 shows back to back and everything is all over the place. These pics are from a while back when things were relatively clean...

Next post I'll have pics of the machines, remnants of a dead set, and hopefully I will start on the neck blank.
 
SAWDUST!

Got the neck blank ripped and glued up. Unfortunately my camera still won't give up any pics, so I can't post pics of the glue/clamp up. I had to use the cel phone. Hopefully I can get this cleared up soon and will post those later.

0219131743_zps501150cf.jpg


Surfacing on the drum sander.


0219131842_zpsf18d9423.jpg


9 pc. Wenge/Maple/Mahogany. It looks like it curves at the far end, but it's just my crappy cel phone.


0219131844_zps4a0626c3.jpg


Close up. The Wenge is a lot darker in person.

0219131845_zpsb81fcd3d.jpg


More to come.
 
Ok, this build has been on hold for awhile. Really busy at work and the house we rent got sold out from under us, so no time to make sawdust. But I was able to get to work on it this past weekend. The goal is to have most of the sawdust making done by the end of July. The shops are all on vacation so I'll have a lot more time to work when people are not building sets all day. I've tweaked the design a bit and cleaned up the drawings.

I've settled on a Macassar Ebony fretboard from LMII. I asked for a streaky one with a lot of contrast as opposed to one with a lot of thin stripes. We'll see what we get. I'm having them slot it, since I'm on an accelerated schedule. I hate buying stuff sight unseen, but I've heard people say the boards are very nice, so I'm cool with it. I just like to see, touch and smell my wood before I use it... ;) I also ordered black and white veneers and the truss rod while I was at it.

A couple of things have changed. I could not get the walnut top I had chosen to straighten out. Both boards are severely cupped. I've tried everything over the last 4 months, but they are just not going to co-operate. I thought this may happen so in March I resawed the other end of the board. It's been sitting stickered since then. It was slightly cupped, but not enough that I couldn't run it through the thickness sander to 1/4". Sorry I forgot to get pics of this. We'll see if it moves any over the next week or so.

It is not wide enough to go across the entire face of the bass as I was planning, so now the neck is going to be exposed on the face of the bass. Not what I had originally envisioned, but you roll with the punches. It will be fine. I like the neck.

Templates cut out and sanded.

0622131852_zpsd779ace4.jpg


We've moved and I couldn't find my pattern bits anywhere, so I just traced the templates onto the wood with a pencil and did the final shaping on the spindle sander. The other reason I decided to do it this way is that I wouldn't have to worry about tearout on the flamed maple. It's pretty highly figured and this seemed a good way to avoid that. I had a big problem with that on my last build. It came out very well I think. I did the templates the same way and I have a pretty good eye with the bandsaw and sander so I think it may be SOP for future builds.


0622131843_zps045e28ed.jpg


0622131836_zps8fb47e1a.jpg


0622131909a_zps369a0ec9.jpg


0622131909_zpsba87cfa6.jpg


That's it for now, thanks for looking!
 

Latest posts


