• TalkBass has been independent since 1998. Add your voice.
    Create a free account to reply to discussions, view embedded media, and browse with fewer display ads.
    Join freeLog in
    Want zero display ads or expanded classifieds tools? Compare plans.

32" Fully hollow Archtop Bass - build diary

Woods will be Italian spruce for the top and Italian walnut for the back and sides. The neck will be flame maple. Here's the top and back:

View attachment 7015287

The top will be hand carved, no CNC here! You can see how the log get's split so the sides are matching and the grain is running a vertical as possible. This spruce is from the Fiemme Valley in Italy, the same trees that Italian violins have been made from for centuries.

View attachment 7015286
Nice choice of wood! Love spruce and walnut for classical guitars, and this is very sweet!!!
 
  • Like
Reactions: honza992
I don't seem to have had much time in the workshop in January, so this is coming along only slowly. Here's a photo update on the top...
IMG_20250127_180700.jpgIMG_20250127_181249_HDR.jpg

In between sessions with the scraper, I drilled the holes for the tuners using my super-duper tuner-hole-drilling-jig-deluxe, then fitted the tuners. I love these Grover Sta-tites. I know they're guitar tuners, but they seem to work fine. This one has a 32" scale so the tension is a bit lower anyway. ..
IMG_20250130_124539.jpgIMG_20250130_143101.jpg

Hopefully they'll be a bit more progress next week :)
 
I don't seem to have had much time in the workshop in January, so this is coming along only slowly. Here's a photo update on the top...
View attachment 7139321View attachment 7139322

In between sessions with the scraper, I drilled the holes for the tuners using my super-duper tuner-hole-drilling-jig-deluxe, then fitted the tuners. I love these Grover Sta-tites. I know they're guitar tuners, but they seem to work fine. This one has a 32" scale so the tension is a bit lower anyway. ..
View attachment 7139323View attachment 7139324

Hopefully they'll be a bit more progress next week :)
Love the look of the headstock and tuners!
 
  • Like
Reactions: honza992
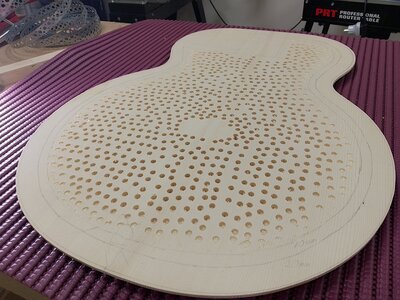
I've carved down to the bottom of the drilled holes, which gave a plate thickness of 6mm. I like to do it in more than one go, but this time rather than drilling holes I used a metal scribe in the drill press to punch holes to a plate thickness depth of 5mm. It leaves lovely clean holes which really help with the consistent removal of material.
IMG_20250211_105359.jpgIMG_20250211_105342.jpg

At this point I'm mostly using an Ibex violin makers plane, checking plate thickness with my custom plate-0-rator jig. I've probably mentioned before that I hate making jigs, but I'm pretty good at making fugly ones from scrap that work fine, but look terrible. Some scrap, some threaded rod and job done....Works great though.....
IMG_20250211_100735.jpgIMG_20250211_100747.jpg
 
OK, I'm calling the carve done. For anyone thats interested, the final thickness were 4mm under the bridge, reducing to 3.4mm at the perimiter. There still some sanding to do on the outside, and the recurve once the box is closed. So the perimeter will end up around 2.5-3mm. Or at least that's my plan, Reality of course will differ.....

I realise I forgot to take a final photo before sandng the inside of the top. Here it is nearly ready, when there was probably a couple of sessions with the scraper still to do. If you zoom in you an see my numbers. Just the number 6 means 3.6mm, 4 means 3.4mm etc etc
IMG_20250218_113502.jpg


I've started on the bracing. It'll be a simple X brace. I marked out the brace profile with my Gibson profil-o-rator. I normally select "Treble", just to annoy the gods of bass....
IMG_20250219_113258_HDR-1.jpgIMG_20250219_113306-1.jpgIMG_20250219_113337.jpg

I use two simple 'H' jigs which get clamped down at the start of this process. As I'm sanding the brace to shape it means the brace is locked in position. I have to say they work brilliantly. I'll take a picture of the sanding process tomorrow.
 
Last edited:
Here's a bit more progress with the top. The bracing is complete. It ranges from 8mm (16mm for the flyover) in the middle to 1.5mm at the ends. That's really lightly braced for an archtop, but a bass guitar needs bass. And for that the top needs to be flexible. Will it explode when I put strings on? I hope not:eek: .....Ken Parker uses braces only 5.3mm high in the middle, so I figure mine should be ok.

Sanding the braces to exactly fit the top:
IMG_20250223_174018_HDR (Medium).jpg

I glue the first one in using West Systems epoxy, which I realise is not exactly a traditional guitar glue. But, it's 100% solids, so any tiny gaps will be filled, and it needs very little clamping pressure.

First one...
IMG_20250224_112327 (Medium).jpg

Then the other....
IMG_20250225_103602 (Medium).jpg

I've also made a start with cutting out the f holes. Coping saw, then violin makers knife, then it will be various sanding blocks.

IMG_20250225_145214_HDR (Medium).jpg

Thanks for bearing with me, I've got a few other things on at the moment so this is not the world's fastest build!
 
The top is more or less ready to be glued. Before that though I need to install the pickup sensors.

I'm using a James May Engineering Ultratonic, which uses two piezo sensors on the underside of the top, positioned under the bridge. The third sensor you can see is wired out of phase, and is used to cancel out feedback. It'll be interesting to see whether it's able to cope with the phenominal amount of feedback a lightly built acoustic bass guitar can produce. It's also ready for a magnetic pickup if I decide to add one later. I then wrap everything in foam to prevent damage, and tape them to the inside of the top ready to be fished out and connected to the output jack when the time comes.

IMG_20250227_103023 (Medium).jpgIMG_20250227_105859 (Medium).jpg

Before gluing on the top I also put on a very thin layer of finish, Osmo in this case. Largely so that when you look in through the f hole it looks nice, but also I guess it slows down the process of the wood expanding and contracting as humidity changes.

IMG_20250227_125819_HDR (Medium).jpg

Next, top gluing!
 
Now the top is glued I did a quick tap test to have a look at the resonant frequencies.
Box closed, before binding and recurve 101 223 258.png


The three first frequency peaks are at 101, 223 and 258Hz. The lowest one is the air resonance of the box - the frequency at which air is most happy sloshing in and out of the box.

The next two are the main resonance of the top, and the main resonance of the back. They are close to each other, only a few semitones apart, so at the moment I can't tell which is the top and which is the back. Normally on an acoustic guitar the top is the lower one, and the back (if it's built lightly enough to have a noticeable back resonance) a few semitones above. However, this is an archtop, built lightly both top and back. Because the top is arched (and therefore quite stiff) it may be that in fact it has a higher resonant frequency than the back, which has a much lower dome.

There's still sanding to do, binding to fit, and once that's done I can start on the recurve - the dip you see round the perimeter of an archtop. It's used to loosen up the top, and lower the resonant frequency.

So I'm not sure the frequency graph above tells us too much, but I thought it might be of interest. And as I build more of these basses, I can compare resonant frequencies throughout the build process. Whether that makes for a better instrument is another matter.....
 
I've cut the binding channels this time using a different method. I've got the Stewmac binding jig, where the router sits on top of the guitar, and rides up and down on a support. I hate it. It's fiddly to set up and (critically for me) dust extraction is hard to get perfect. So this time I tried something different. I took the 'doughnut' from the Stewmac jig and mounted it in my router table. Because the top and back are domed, there are two points of contact - the peak of the dome on the table, and the edge of the guitar on the doughnut. Like this:

IMG_20250303_115838 (Medium).jpg

I can't remember who I stole this idea from, otherwise I'd give them credit. It's a brilliant and incredibly simple system. If it was you, THANKS!:)

Once the channels were cut I started doing test fitting for the binding itself. Getting the joins as invisible as possible takes some time:

IMG_20250303_174817 (Medium).jpg

At that point I suddenly realised that I can't count. I thought I had enough pieces of binding, but I don't. I use Rocklite which means ordering it from the UK. Post to Italy can take anything from 5 days to 3 months! No joke. My dauthers christmas present from my brother (posted just before christmas) arrived a few days ago. So there's going to be a bit of delay in progress to this one. In the meantime I'm going to start something else.....there's a new thread brewing.