• TalkBass has been independent since 1998. Add your voice.
    Create a free account to reply to discussions, view embedded media, and browse with fewer display ads.
    Join freeLog in
    Want zero display ads or expanded classifieds tools? Compare plans.

7-String Soprano Bass

turindev

Commercial User
Jul 1, 2005
514
1,594
Chattanooga, Tennessee USA
www.m7bassworks.com
Disclosures
Builder, m7bassworks.com
Title is a little tongue in cheek, but I thought I might share what I have been working on lately. I took on a commission to design a 7-string guitar (cough.. I mean.. soprano bass). I was intrigued by the design process and had very few guidelines other than the number of strings and scale. It has been a fun journey and I have now completed a prototype (which eventually was sold) and the first true build. Here is a little documentation of the journey:

It all began with about 100-120 hours of design time. There were a lot of tweaks and design elements to experiment with, so it took a lot of time up front. The body design ended up having a few key components/goals:
- Extremely high upper fret access to the 24th fret
- Contours! I re-used my existing lower horn design, but wanted to add a new style contour for the upper fret access. I also changed the shape of my tummy contour
- Top/Back: I tend to always do "sandwich" bodies with a .20" to .25" top and back, it gives the back a really cool look wherever you have contours


Here is a look at the initial design:
upload_2021-4-12_22-51-0.png


The arm cutaway and upper fret cutaway both reveal the mahogany underneath, and the upper horn contour adds a nice aesthetic without being deep enough to go through the top.

Here is a look at the back:
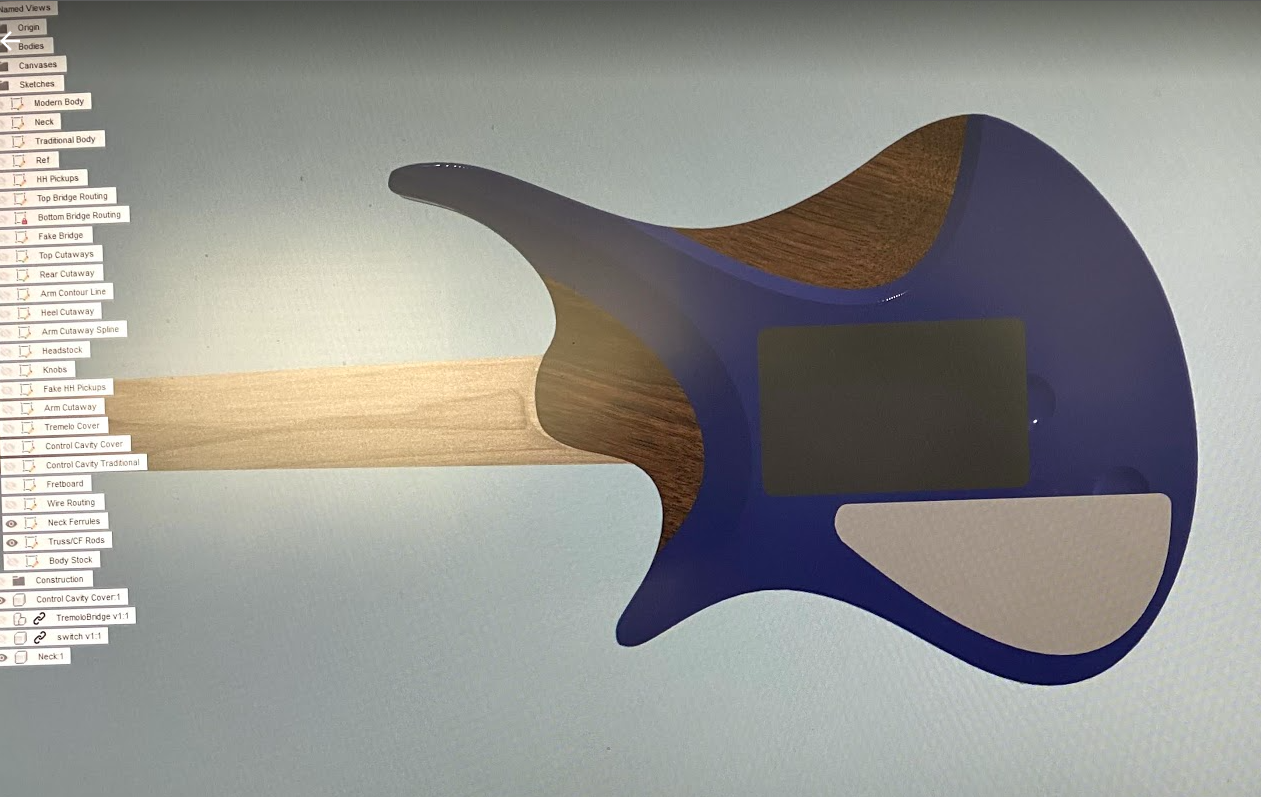
upload_2021-4-12_22-54-33.png


Similarly the tummy cutaway and neck heel contour reveal mahogany. The tremolo cover as well as the control cavity cover are magnetic with access recesses for removal.

Now that the design is done, its onto the prototype build!
 

Attachments

  • upload_2021-4-12_22-52-0.png
    upload_2021-4-12_22-52-0.png
    836.4 KB · Views: 35
Now its time to mill some lumber! For the prototype I am using 2 1/4" flame drop tops surrounding an african mahogany core. I got some beautiful quarter sawn African Mahogany at my local lumberyard so I glued up enough for 3 bodies:

upload_2021-4-12_22-57-48.png


Time for glue-up!
upload_2021-4-12_22-59-28.png


Now that we have the Mahogany part of the blank created, I glued up the top and then the back in the same fashion. I used slightly curved cauls that put slightly more pressure in the middle to help with the glue-up:
upload_2021-4-12_23-1-7.png


After the blank was done, it was time for some final test simulation before cutting the body on the CNC:
upload_2021-4-12_23-2-2.png

upload_2021-4-12_23-3-11.png


Now that everything looks good, its time for the first cut!
upload_2021-4-12_23-4-20.png

upload_2021-4-12_23-5-39.png


A few minor tweaks are needed, but everything is pretty close to what I was looking for. Here is a look at the back after the covers are cut and dry fit:
upload_2021-4-12_23-6-47.png


Next up is sanding and neck/fretboard work.
 
Next up is sanding the sides and adding the roundover. Similar to my bass designs, I like to use a 3/8" roundover but only about half of the profile. This gives the edge a slight angle since only the top of the roundover bit engages:

Sand sand sand!
upload_2021-4-12_23-9-29.png


At this point I also install the brass inserts for my pickup screws:
upload_2021-4-12_23-10-51.png


After a lot more sanding, the body really starts to take shape:
upload_2021-4-12_23-12-49.png

upload_2021-4-12_23-13-11.png
 

Attachments

  • upload_2021-4-12_23-11-23.png
    upload_2021-4-12_23-11-23.png
    986.9 KB · Views: 43
Now its time to dye the top. This requires a lot of careful taping. I use a 3M automotive pinstriping tape that does a good job and doesnt allow the dye to penetrate. For the dye, I am using Angelus Leather dye.

Tape time!
upload_2021-4-12_23-15-39.png

upload_2021-4-12_23-16-18.png


The strategy here is to dye the entire top black, then sand back the black so that the only black remaining is deep in the grain so it highlights the flame.
This black is REALLY black
upload_2021-4-12_23-20-20.png


Here is the black once it has been sanded back:
upload_2021-4-12_23-20-57.png


Here is a look at applying the turquoise dye over the black
dyeTimelapse.gif


Finally here is a look at the back once the dye was applied and lightly sanded with steel wool:
dyeBack.gif
 

Attachments

  • upload_2021-4-12_23-15-18.png
    upload_2021-4-12_23-15-18.png
    756.8 KB · Views: 45
Here is a look at the top after the same treatment:
upload_2021-4-12_23-29-44.png


I ended up adding a slight bit of black to the edges to give a little hint of a burst:
upload_2021-4-12_23-30-58.png


Now its time for a few very light coats of sealer before a few full coats of sealer to stop the dye from bleeding
upload_2021-4-12_23-34-31.png


Really pleased with the dye lines on this one:
upload_2021-4-12_23-35-20.png
 
On to the neck. This will be a maple neck with a birdseye fretboard. This part is pretty much standard and is done just like the basses.

Neck Top with truss rod and carbon fiber rod channels:
upload_2021-4-12_23-37-23.png


Here is the flipped neck stock rough cut:
upload_2021-4-12_23-38-4.png


At this point in the process I had someone sign up to purchase this prototype at a hefty discount. Their only request was that their initials be on the back of the headstock, so you can see them on the back.

Here is the neck after final passes:
upload_2021-4-12_23-39-17.png


I don't have any shots of the fretboard being cut, so we will jump ahead a bit now.
 
For the fretboard markers on this one I wanted to do a little something different. This guitar model will have dots that match the body color, so I decided to try using epoxy inlays tinted with Mica Powder.

Here is the mixed up epoxy with "Sea Green" mica powder to match the turquoise body:
upload_2021-4-12_23-41-48.png


I inlayed the initials on the headstock with the same epoxy. Here is a look at that process:
upload_2021-4-12_23-42-43.png


Similarly here is the fretboard:
upload_2021-4-12_23-43-21.png


Came out really great and is a good match for the body color. Time to test fit the neck with the body and some electronics to get a feel for the build:
upload_2021-4-12_23-45-11.png
 
Time for fret install! The spec is for jumbo stainless steel frets. Sigh. I love the performance of SS frets, but man oh man is it hard on the hands and tools. Oh well, time to go for it!

These will be blind frets, similar to my basses:
upload_2021-4-12_23-47-33.png

upload_2021-4-12_23-47-47.png

upload_2021-4-12_23-48-15.png

upload_2021-4-12_23-48-44.png


Did I ever mention that when you are cutting stainless steel frets they can fly off at high velocities? At least, I have heard it can happen.
upload_2021-4-12_23-49-33.png


Now that those pesky frets are installed, its time for fret leveling, end dressing, etc
fretDress.gif
 
Now we are pretty much done (after electronics wiring, etc etc).

The prototype has a Matte finish, and the "real" first edition has a gloss finish. The process was exactly the same for the next one, but I used 5A quilted maple instead of flamed maple for the top and back. Here is a sneak peek at the dye on the next one. The customer wanted an "ocean blue" burst, so I went with a light blue on the edges to turquoise in the middle:

upload_2021-4-12_23-55-46.png


Another difference on the production model is I decided to dye the trem cover to match the body
upload_2021-4-12_23-57-16.png


This one will have a roasted birdseye neck and fretboard as well. Next up are the final reveal pictures for both the prototype and the production model!
 
Took both of the guitars out for some photos, I am really pleased with how they came out. The new owners are also really happy, which is of course the important part. I actually am looking forward to designing a sort of ultra-modern bass with some of these same techniques and aesthetics when I have a moment.

Anyway, here is the final results, thanks for reading along!
3E6DF1D1-375C-4066-B6D0-5249C994E2B0.jpeg
EBE6A88F-346E-429F-949F-DBD7E2960217.jpeg
F62951B6-83B4-46FC-85CC-65E1BEA6534E.jpeg
D9608263-D1D0-43B0-B497-20557A672F1A.jpeg
B00EF5DF-7480-47A7-8E81-EE2360F9A042.jpeg
F37C8EDC-42F4-40FA-9185-2B8D81254DE0.jpeg
 
really nice work so far! The cuts for the pickups, neck, etc are very clean. Also digging the threaded inserts. Will you use them on other screws (control cavity, neck)?
Thanks Leo! I definitely use them on the neck as well. The neck bolts are 10-24 flat head machine screws that go into the inserts.
 
  • Like
Reactions: Leo Smith
Very nice! I wonder, given that the boundary of the dye seems to follow the machined profile, is it possible to dye the top and back of the blank before the final machining stage and avoid a lot of taping?

You are thinking right, pretty much only the flat surface is dyed in this design, but there is a lot of prep (aka sanding) that has to happen to that surface after machining. Technically I could sand it and dye it before machining, but then I would end up scratching it a lot during the edge sanding and roundover on the router table and spindle sander.

However to your point, that is kind of what I do on the roundover contours (not the more shallow cutaways though). I use some sandpaper on a hard block to "clean up" the edge and add a hair of a bevel.
 
  • Like
Reactions: Max Bogosity