• TalkBass has been independent since 1998. Add your voice.
    Create a free account to reply to discussions, view embedded media, and browse with fewer display ads.
    Join freeLog in
    Want zero display ads or expanded classifieds tools? Compare plans.

A/E piezo four string - the last of the Phoenix basses

The glue is dry on that four so it's time to start another one.

I salvaged 2.5 basses from the fire, these basses were not in the studio at the time of the fire so they suffered smoke damage and some level of heat, but weren't actually burned.

The first one a short scale four string fretless was sanded down and refinished. The second, a dual course eight string was refinished and reworked, unlike the short scale there was a lot of work involved in fixing that one.

And finally I have this four string A/E that was laying right side up on a bed during the fire, meaning the unfinished interior of the body got a good dose of smoke. The heat also caused the top of the body to cave in (it was always a little concave, the heat probably just moved the ultimate conclusion on the "is that top thick enough" answer along). I ultimately decided it was a loss and I would recover what I could from it. I tried to save the K&K pickups out of the body, but in the process of trying to remove them I made a bad cut and destroyed them. They were held in with CA glue so it was a long shot at best.

The neck on that instrument, however, was always a favorite of mine. I was never 100% sure about the wood I used as it was a piece my dad had in his shop. After doing a few more instruments I am pretty sure it's sapele. It's a beautiful piece of wood that I cut and rotated 90 degrees to make this neck, it kind of looks bookmatched.
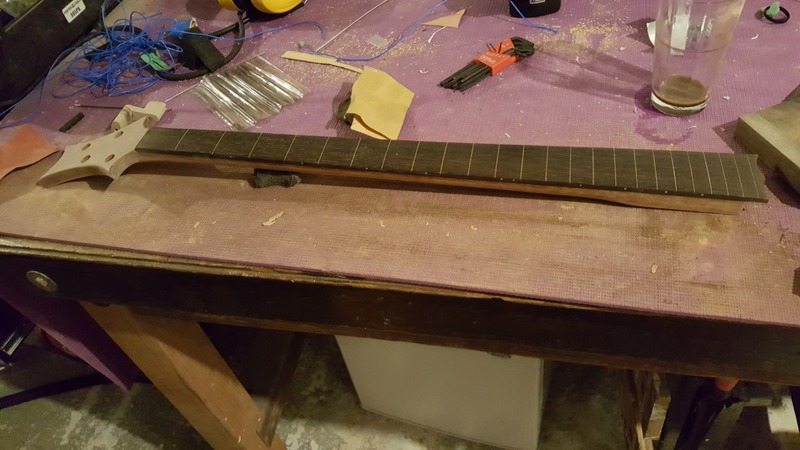
20170805_110827_zps2tpw8xvv.jpg


20170805_110837_zps23gjd53q.jpg


My plan is to use this neck to make a new A/E bass, but this time I'm going to use ghost piezo pickups instead of the K&K system. I have the saddles, a buffer on the way and tuners. I need to pick out wood for the body. I guess this doesn't look like a lot of wood, but wow I have a lot of wood right now.
20170805_081500_zps8oo3dn1h.jpg


I have this awesome piece of sapele that I could make the body out of, I also have some bookmatched walnut with sapwood I could use. The basic idea would be a sort of hollow body look so it would have a top on it. I'll have to go up and stare at more wood before I decide. I'd really like to do a one piece top with an F hole or something on the bass side bout.

I got the sanding done on the neck and put a coat of tru oil on it. It looks pretty good.
20170805_111821_zps3minbpiv.jpg


I'll take my time on this one, hopefully the buffer gets here soon.
 
Since this is the last Phoenix I decided using wood that went through the fire is appropriate. I have this really nice piece of (roasted - ha!) sapele, it's 7"x2" by 4' (not exactly sure on the length, but it's plenty long enough). This piece of wood was in the room right next to where the main fire was, so it got some good heat and smoke damage. I am certain it is sound - no cracks and it didn't actually burn. I don't know how hot this room got, but the PVC waste pipe that was right over where this wood was stored was melted.

My idea for the body is to take this piece of wood and cut it in half lengthwise (like a bookmatch cut). I'll chamber the wood from the inside then glue them back together to create the body. I may put a piece of walnut in between the two, I'll decide that after I get the cuts done and I see what it looks like. I figure you're going to be able to see the seam between the cut, so I might as well accentuate it. This will match the neck (sapele) and the headstock veneer (walnut).

20170807_150603_zps28iiclps.jpg
 
I got the wood cleaned up (it's mahogany not sapele) and resawn. To resaw it I made three passes on the table saw, the last one with the blade as high as it would go, then ran it through the bandsaw to cut the last 2" or so in the middle. It looks great there's some good wavy grain in there.
20170808_175017_zpsfdslpdzk.jpg


I'm going to have to plan things a bit more than I normally do if I'm going to do clamshell chambering (copyright). Hmmm I literally just thought of this, I guess my first step is gluing the top two pieces and the bottom two pieces together. I should do that before I start cutting shapes. Then after I get all the chambering and routing done I can run it through the sanding planer before gluing the two halves together.

I think it would be best if I think a few steps ahead here, I can see painting myself into a corner pretty quickly.
 
Glue up looks good. I'll need to put them through the planer, but I think I'll cut out the shape first, then plane, then carve the top and do the chambering. Once I have it planed I'll know whether I need to put something in between the two pieces, I don't think I will, it should end up being about 1.5" thick.

Here's the body design so far, I'll do some nip and tuck as I go - any suggestions welcomed (and of course the cutouts will be symmetrical, I just freehanded them for now).
20170809_083826_zpsgxdabnoy.jpg


20170809_084522_zpsuepgdjfo.jpg
 
  • Like
Reactions: reverendrally
Good idea on the points. I updated the design made the horns pointer, slimmed down the back end and moved cut outs further up on the body. I'll stare at this more before doing any cutting, I'm not sure I'll do the mdf thing, but probably cardboard. No matter what I do with a template I'll always do final nipping and tucking on the design, so I don't think cutting one out of mdf will get me closer than cardboard. I normally cut with the bandsaw then use the spindle sander to bring the shape in, I use the lines as a guideline.

20170810_084153_zpscgykipdr.jpg
 
good ideas. thanks a lot!

I see what you're saying about the radius on the treble side, I think if I hook that in more it won't need to be longer, but I'll see what it looks like.

I have this cardboard that isn't corrugated, it's the stuff they put down on the floor when they're moving appliances into a house but don't want to wreck the finished flooring.
 
  • Like
Reactions: reverendrally
I did some body contouring and chambering this morning.

I haven't really ever shaped the front of a bass before, but once I started it was really a lot like putting the belly cut on the back. I drew a line around the outside of the front piece, just to give me some sense of how deep the carves were going. I mostly held to that line, but went a bit deeper in places. I can't really describe the cut, but it's got lots of curves that are hard to see in pictures.
20170812_081451_zpsbfw2wmo5.jpg


20170812_081459_zpsuo8akry9.jpg


20170812_085303_zpsv6mqdsgd.jpg


20170812_085313_zps8tl7d0vp.jpg


20170812_085319_zpsnsrxll5i.jpg


20170812_090340_zps76dcivaa.jpg


Once I had the front established I had to chamber, but the depth of the chambers had to vary according to the contours on front so I used this to drill holes to leave the right amount of material on the front (probably about 3/16"). I didn't have the foam on there at first and made some nice dings all over the front which had to be sanded out.
20170812_100119_zpsfqpyykzt.jpg


I used a router to get close, I'll sand them smoother, but it's close:
20170812_095356_zpsnik9f9cn.jpg


I then transferred all the chambers I did on the front half to the back half and Forstner'ed them out then routed them. The back will have a belly cut, but the rest of the back will just have a slight roundover.
20170812_101456_zpsofp5kkiy.jpg


My aim is to make this feel like an acoustic, so chambering will make it feel light and the barely rounded over rear will also feel like an acoustic.

I probably won't get much more done this weekend, kids coming home.
 
I finished matching the cavities, cleaned them up a bit. Just before gluing I realized that I needed a path to run the piezo wires back to the control cavity, that would have been painful to fix.
20170813_100238_zpsulh0vgf0.jpg


I planned on making my own bridge, but after looking at it, I think I'm going to with a bridge I have here. It will require that I drill out both the string saddle holders and the bridge plate for the wires, but I think that's the best option here. I also think I'm going to forgo the holes in the body as well, the carved front looks so nice, I don't want to mess it up with ill placed or shaped holes.

I cut out the control cavity on the jigsaw, I think I'm getting the hang of that tool. You have to "stay ahead" of the blade if you're not careful you end up putting a lot of sideways pressure on the blade (which is impossibly thin). It came out really great this time:
20170813_100254_zpsfatoios3.jpg


Then it's glue up time. I used screws in the neck pocket and a couple in the control cavity to hold the two pieces in place, it's important to keep the grain matched up.
20170813_101710_zpsnbimxhs5.jpg


20170813_101716_zpsnj2ev7lo.jpg


Then into the bag it goes:
20170813_101931_zpsqsrkmzap.jpg
 
I got the neck pocket done. Rather than trying to make a template I drew the lines on the body then I used double stick tape and stuck a piece of wood on each side for the edges. I freehanded the bottom, then I used a chisel to finish it off. It's probably a bit too tight, but better than the alternative, I guess. I'll sand it out a bit.
20170813_162454_zpseevq3aod.jpg


20170813_162504_zpsj7hoglzm.jpg


20170813_164506_zpsecryipip.jpg

My biggest concern right now is lining the screw holes up with the inserts, this is the first time the inserts are already installed. I think I'll trace the back of the neck and see if I can lay that over the the back of the body. Luckily both the neck and the body are made with two pieces of wood so it should be easy to line up the centerlines.

I've got no pics, but I also got the magnets for the control cover installed.
 
Unfounded fears, once again, I got all four screws on the first try, seems like they are pretty well lined up.
20170813_194017_zpsb80fin7h.jpg


I've got a few curves to fix on the body, then I'll start relaxing the corners a bit. I think the back will get a small radius roundover the front will just get sandpaper relief.
 
It's been pointed out that my title here is misleading, I thought about that for a minute and indeed my idea for this bass has shifted as I've executed. I originally thought this would be completely carved out from the inside except for the center beam, and have cut outs on the face, so it really looked acoustic. As I've worked the wood I've adjusted that vision a bit. It still has a carved top, but it's not as hollow as I thought I would make it and it won't have cutouts in it. I think it will look very clean having only a bridge and two knobs on the top. I'm tempted to wire it direct and have no knobs, but I know I wouldn't be happy without at least a volume knob. Passive tone knobs kind of leave me wanting more, but I think for a piezo based instrument a tone knob is a necessity. Maybe I'll wire it direct at first and see if I like it. Long story short, let's agree this is a chambered piezo based four string rather than an A/E.

I got an hour or so with the scraper this morning, I probably need another hour or two with the scraper and another hour or two with sanding paper and I should be ready for Tru Oil.
20170814_083852_zpsuyef8plb.jpg


The first buffer I ordered off Amazon got canceled somehow, they said it wasn't in stock even though I got a tracking number from USPS. I ordered a second one that was $20 cheaper than the first one (same Bartolini model). It gets here today or tomorrow.

On the bridge I think I'll mount it, tune it up, set the intonation then drill for the piezo wires, that way the holes will be directly under the string saddles and relatively invisible.

My wife says I should take the lower points off the headstock. I may do that, or I may put it together then decide on that later.
 

Latest posts