• TalkBass has been independent since 1998. Add your voice.
    Create a free account to reply to discussions, view embedded media, and browse with fewer display ads.
    Join freeLog in
    Want zero display ads or expanded classifieds tools? Compare plans.

Any advice for a frankenbass P build?

Hey all,

I just spent the morning ordering parts for a P-Bass build. I’ve got two classes wrapping up next week so this is my between-semesters reward/project.

I’ve got a Squier VM Jaguar Bass (regular scale) already and wanted a passive P to go with it. I had a lousy experience with an SX P already (broken truss rod) and was looking at the Xaviere Ps, but didn’t like that Fender necks are apparently unswappable in those bodies. I then realized I could build my own with a used neck and hand-picked parts for about the same money.

I’ve got some basic skills and have done pg, pu, neck, tuner swaps in the past. The one thing I haven’t done and am nervous about is fitting a bridge to a new (blank) body.

Further, I’d welcome any advice from those of you who do this frequently – potential mistakes, stuff to watch out for, etc.

Here’s what I’ve got on the way:

  • GFS P body (paulownia, Ivory finish) - $55
  • 2009 Squier CV P neck (incl. tuners) - $70 used, eBay
  • Fender 62 RI P pickup - $40 used, eBay
  • Generic wiring harness/pots - $10
  • Wilkinson vintage style bridge, brass saddles - $12
  • Fender neck plate - $10
  • Fender P pu cover - $10
  • Tort pickguard - $15
  • Strap buttons - $5

Cheers,
Drew
 
That does sound like a fun project. Something that I would add is some shielding. It is an easy job, especially when you are starting from scratch. I have built a gaggle of parts basses and, in my opinion, the shielding makes a big difference. I have built some without and while they work OK at home, there are some places (like our practice space) where the electrical interference from things like cheap lighting that make them buzz like electric hedge trimmers. Shielding is easy and pretty cheap.
 
That does sound like a fun project. Something that I would add is some shielding. It is an easy job, especially when you are starting from scratch. I have built a gaggle of parts basses and, in my opinion, the shielding makes a big difference. I have built some without and while they work OK at home, there are some places (like our practice space) where the electrical interference from things like cheap lighting that make them buzz like electric hedge trimmers. Shielding is easy and pretty cheap.

Great, thanks! Just ordered up 6' of copper tape.

Can you comment on placement/alignment of the bridge? I've seen a thread or two on here but it's difficult to step through without a loose bridge, body and neck in front of me.

It is particularly difficult to get this right, or just a measure twice/drill once type of job?
 
I have never added a bridge to a blank body. All of mine were used bodies from parted-out basses. I think you have the right idea though with the measure twice plan.
If I did this, I would make a template from an existing body from the pickup cavity.

Check this out - Invalid Link Removed

 
Put a piece of masking tape on the body front from the bottom strap button to the neck pocket, then draw a center-line on the tape from the middle of the button hole to the middle of the neck pocket with a sharp pencil or pen. Pre-adjust the bridge so its saddles are about in the middle of their travel and hold the bridge so the saddles are 34" from the nut (34" scale...) and centered on your center-line, mark the hole location for the mounting screws. After marking where the holes need to be drilled you can remove the center-line marking tape and drill your holes and you're ready to attach the bridge.

This is a basic description, search Youtube you should be able to find some useful videos, and check out Invalid Link Removed they have a lot of videos but none of an electric guitar bridge install on a new body... Measure many times , tape up the whole front of the bass if you must. Just drill the right size hole in the right place... then screw it together. (The correct hole size for a given screw may be slightly larger for hard woods and/or slightly smaller for soft woods so ask questions when you know what wood the body is and what size the screws are, I always run the screws in and out once before attempting to attach the bridge, pick guard, strap button, etc. so you know you are going to be able to tighten them without breaking them)
 
I re-read your first post and this is a medium density wood. My experience has been that bass bridges usually mount with #6 screws so if this is right I will be able to tell you the right size drill bit after going out to the garage and measuring #6 screw... I'll post back tomorrow...


I am not familiar with the Wilkinson vintage style bridge but imagine they would fasten like a vintage?? not sure as I am not familiar with it, my Fender P bass came with #6 x 3/4" screws for the bridge fastener.

Some luthier/woodworker type knows this off the top of their head... pilot hole size for a #6 screw into a medium hard wood........?
 
You may have to invest in a set of number drills to have the correct size for the holes. A 1-60 set is $25ish from Harbor Freight. Just in case you aren't familiar with drill bit sizing, there are 4 different methods of sizing bits (that I know of...). Fractional (most of us have seen these), number sizes (1-60 and 61-80, for smaller holes), letter sizes (A-Z, a little larger), and metric (all sizes). There is very little overlap so if you are in a business that requires drilling precision holes you probably know about most of this and have at least 4 different drill indexes in your shop... A serious guitar repairman should probably have a number set 1-60 imo.

I have a Franken P and love it.
 
Whoa, that's a lot of good information. Thank you.

The Wilkinson looks very much like a regular vintage 4-saddle. I grabbed it because it had brass saddles at about the same price as the usual Asian knockoff bridges: [Invalid or Expired Link Removed]
Looks like five screws on this one.

Good information on the numbered bits. I just have the usual fractional kits but don't mind a trip to HF. I can load up on cheap 9V batteries while I'm there!

Looks like I'll need a long bit to drill a hole for the bridge ground. I see different lengths cited, any idea what's "correct" and commonly available?

Thanks!
 
Looks like I'll need a long bit to drill a hole for the bridge ground. I see different lengths cited, any idea what's "correct" and commonly available?

Thanks!


Somewhere around 1/8", 5/32", or 3/16" (max) sounds about right. Another way to look at it is just big enough to put the single conductor wire through and not much bigger (smaller is easier to drill). 6" long might work but for safety I would want a longer bit to keep the drill motor away from the guitar body. Firmly mount the body in a bench vise or clamp to a bench, beam, or immovable object... I would drill that using a hand held electric drill going slowly and watching carefully to get the angle right. Start by drilling straight into the body under the bridge, then once in that hole (1/4"ish) move the drill to the angle into the control cavity. This avoids the drill wanting to "walk" sideways as you begin drilling. Keep this hole away from the bridge mounting screw holes.
 
My P basses have been my tinker toy(s) over the years. I have tried every pick-up I could find and eventually went back to stock (Leo really did get it right...). During this time (about 30 years, from '75 to '05ish) I changed pick-ups, bridges, tuners, strap locks, and painted the body at least a dozen times. The first bridge install I did after one of the paint jobs (the holes were filled requiring re-positioning everything) the strings were off to one side of the fret board and not centered properly over the pick-ups. :( So I carefully measured how much it had to move and re-drilled the holes. Good news was that the bridge was very close and after the new holes were drilled (slightly more challenging second time around...) the old holes were covered by the base of the bridge. (Yay!) Problem/error solved/fixed. If at first you don't succeed try again.

Oh, I was mistaken about the length of my P bass bridge screws, they are 1" long. And IMO the right drill size would be either a #36 (0.1065") or a 7/64" (0.1094"). If you use the 7/64" bit don't wiggle as you drill because that is about as big as I would want the holes to be for starters. Run the screw(s) in and out of the hole(s) once for each hole without the bridge just to make final assembly easier.
 
If, by chance the holes seem to tight to get the screws into... then try a #35 drill (0.110"), then a #34 (0.111"), and if necessary a #33 (0.113"), etc. You may have noticed that as the number sizes go down the diameter goes up... It might also be a good idea to pick up a decimal equivalent chart (or keep it on a tab of your computer browser) for translating the number sizes into inch sizes (always in thousandths of an inch (0.XXX").
 
Guys, thanks again for all your help.

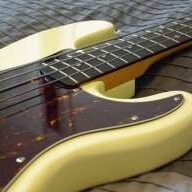
Completed the build today, and I'm pretty happy with it. The GFS body kinda sucked, which I detailed in another thread, but not badly enough to send it back.

The only real issues I encountered were that my super-long drill bit was unwieldy and started cutting at a too-deep angle. I would have drilled the bridge ground hole through the back of the body. Until I decide how to deal with it, I grounded the bridge with a strip of copper tape. The body's neck pocket was a mess and my woodworking skills are poor, so there's some gap between the neck and pocket. Had to sand the sides down and add my own "mickey mouse" ears to get the corners in.

Sounds pretty good, though. :)

IMGP4553_zps5f55555c.jpg


IMGP4567_zps5a8caf92.jpg


IMGP4570_zpsa0679672.jpg


IMGP4573_zps696fbfbb.jpg


IMGP4577_zps4a83ad16.jpg


IMGP4580_zpsc6d9225c.jpg


IMGP4585_zps4cc70f0a.jpg