• TalkBass has been independent since 1998. Add your voice.
    Create a free account to reply to discussions, view embedded media, and browse with fewer display ads.
    Join freeLog in
    Want zero display ads or expanded classifieds tools? Compare plans.

basses for newbies (SX batch build thread)

Status
Not open for further replies.
Ok. . . edited my post. . . "niche" it is. I was wondering when the grammar police would show up :rollno:

#10 is on the bench and at the front of my mind is the issue we are experiencing in the field with #11 being "too smooth and ballsy". . .. really? is there such thing?

This one is already PLEK'd with the stock electronics in place, so the next step was to strip it to replace the guts.

p323136566-5.jpg


I had to plug all the holes again to get the pickups settled in better. I take the opportunity to switch out to the pickup screws supplied by Nordstrand because I have tons of them now, and I'm running low on the stock SX pickup screws. The Nordstrand ones are a bit thinner which makes them non-compatible, but I figure in the future, you can go from a smaller screw to a larger one most of the time without much trouble, but it doesn't work the other way around.

p348421336-5.jpg


Shielding goes in. I've had cleaner ones, but this is 100% functional. Maybe an off day or I was just too tired.

p166268568-5.jpg


the jack plate was interesting. it is painted, and I rely on the jack plate to make contact with the foil to ground my shield system. I sanded off the back side of the small jack plate. Just for safety, I stuck another ground wire in the jack when I wired up just in case I needed to make a dedicated ground to the foil in the control cavity. . . so, I managed to stuff 7x 22 gauge wires into that little solder lug this time. . . I know, I know. . . one of these days I should not star ground one of these basses because it'll probably be easier, and many people who know better than I do indicate that it makes no difference in noise rejection whatsoever.

p279044002-6.jpg


The harness is roughed in.

p478751506-5.jpg


Ok. . . while I was doing all the other stuff, I was thinking about what I was going to do about the treble response. I ended up not doing any of the schemes I thought about earlier. I have a few pots in my stash that measure significantly higher than the other ones (250K rated). One of them is 290K and the other one is 270K. I decided instead of jumping all the way to 500K, I'd try the 290K on the P-bass neck pickup and the 270K on the bridge NJ4SE pup. I also had one 500K push/pull pot in the stack, so I used that on the tone knob. This should nudge my treble response just slightly.

Then, I remembered the stock NP4 pickup and the reasons I went about mucking with a custom one. I thought the treble was too open, and revealed way too much "unnecessary information" like string and finger noise. I always had the tone cranked down. I also thought it lacked low end presence particularly on the low notes and it sounded too grindy and hollow for me. These all seemed to be characteristics that might actually help my cause in this P/J configuration. I was looking to put a bit of grind and grit into the instrument and put back a little top end snap. So, I got out bass #7 and commandeered the stock NP4 that it was running because my suspicion was that the custom "chunger" p-bass pup would sound better in that bass anyways. I switched out the pickup covers because Nordstrand changed recently to some really nice bead blasted rounded-corner covers. #7 had the original square glossy ones, but since the P/J is in a set, I had to use the new ones on the new bass.
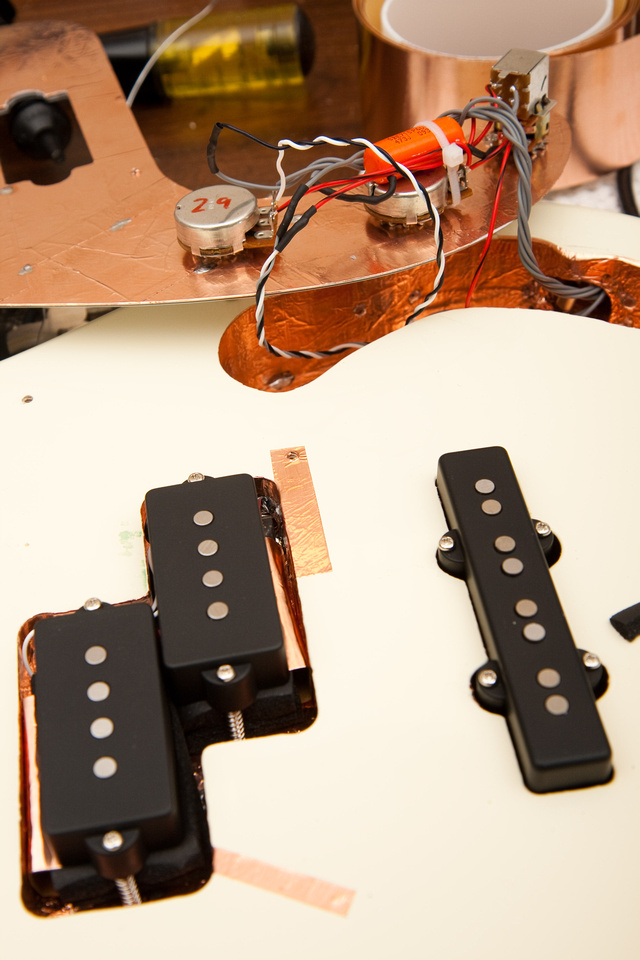
While installing the new pup in #7, I went ahead and grounded the alnico pole pieces except I thought of a trick to ensure I don't ground the pickup output lugs in the process:

p503710016-6.jpg


A little piece of electrical tape is all that's needed. Now I don't have to be so anal about the position of the copper tape under the pup.

And, stock Nordstrand NPJ4SE setup going into #10 with 290K, 270K, 500K pots.

p491201452-6.jpg


The wiring is still not as clean as I would like it to be. . . it's somewhere between "super great" and "bring dishonor to your family". At any rate, it will get the job done.

p151003520-5.jpg


Next, I cleaned up the nut a bit. 1/2 the action is on the nut side. Don't want to leave any performance potential untapped on that side of the neck.

p534218426-5.jpg


And, there you have it. . . #10 ready to roll.

p358891975-5.jpg


Initial impressions on the tone. . . I achieved a snappier top end, and the bass can now grind a bit more than the previous one. It still has a nice roundness and bounce to the bottom end but it has been reduced some. I still find the neck pickup solo'd does not sound quite like a P-bass, but in this case, I'm getting a lot more bite out of it than the previous configuration. Whether that's due to the pots or the pickup, I'm not sure. All factors are probably nudging it in the right direction. The bridge pup soloed sounds more like I'm used to from a jazz bass. The 500K tone pot starts its roll off more gradually than the 250K one. To get into the meat of the roll-off, you have to turn 1/2 way, but there is a lot of fine control at the 1st half of the rotation.

I think there has been some success here, and some more testing is in order. 1 more p-bass to go before I hit the studio again. I'm really looking forward to some more sound clips to analyze.

Onward!
 
Ok. . . edited my post. . . "niche" it is. I was wondering when the grammar police would show up :rollno:

#10 is on the bench and at the front of my mind is the issue we are experiencing in the field with #11 being "too smooth and ballsy". . .. really? is there such thing?

Too smooth? That's impressive!

Then, I remembered the stock NP4 pickup and the reasons I went about mucking with a custom one. I thought the treble was too open, and revealed way too much "unnecessary information" like string and finger noise. I always had the tone cranked down. I also thought it lacked low end presence particularly on the low notes and it sounded too grindy and hollow for me. These all seemed to be characteristics that might actually help my cause in this P/J configuration. I was looking to put a bit of grind and grit into the instrument and put back a little top end snap. So, I got out bass #7 and commandeered the stock NP4 that it was running because my suspicion was that the custom "chunger" p-bass pup would sound better in that bass anyways. I switched out the pickup covers because Nordstrand changed recently to some really nice bead blasted rounded-corner covers. #7 had the original square glossy ones, but since the P/J is in a set, I had to use the new ones on the new bass.

p491201452-6.jpg


Makes me want an NP4 more than ever now.


The wiring is still not as clean as I would like it to be. . . it's somewhere between "super great" and "bring dishonor to your family". At any rate, it will get the job done.

This made me laugh.

Chinese labor is fun to watch :D
 
I think there has been some success here, and some more testing is in order. 1 more p-bass to go before I hit the studio again. I'm really looking forward to some more sound clips to analyze.

Onward!

Chunger.
Not to change the subject from P-basses or anything, but I have a question relating way back to the start of this thread regarding your use of neck inserts. Over in the "SX club" there is a discussion about inserts and the improvement of bass tone thereby. But be that as it may, my question (having just placed an order for a box of inserts) is why you chose the ones you did. I already mentioned that I found 8-32 is the correct size to fit the neck parts, but my question hast to do with the fact that EZ-LOK makes two kinds of inserts. One type is listed as for "soft wood" which are the ones you used. The other are listed for "hard wood" and are little brass [or stainless steel] tubes with threads all round the outside instead to the protruding "wings". To me the neck maple is a "hard" wood!

So my question is why did you choose the "soft wood" style and did you have any problem with those splitting wood or chipping it out? One thing I did like was the "soft" type are turned in with an allen key while the "hard" type use a screwdriver which seems a bit hokey to me. What was your thinking? (or experience)?
 
Chunger.
Not to change the subject from P-basses or anything, but I have a question relating way back to the start of this thread regarding your use of neck inserts. Over in the "SX club" there is a discussion about inserts and the improvement of bass tone thereby. But be that as it may, my question (having just placed an order for a box of inserts) is why you chose the ones you did. I already mentioned that I found 8-32 is the correct size to fit the neck parts, but my question hast to do with the fact that EZ-LOK makes two kinds of inserts. One type is listed as for "soft wood" which are the ones you used. The other are listed for "hard wood" and are little brass [or stainless steel] tubes with threads all round the outside instead to the protruding "wings". To me the neck maple is a "hard" wood!

So my question is why did you choose the "soft wood" style and did you have any problem with those splitting wood or chipping it out? One thing I did like was the "soft" type are turned in with an allen key while the "hard" type use a screwdriver which seems a bit hokey to me. What was your thinking? (or experience)?

There are a couple of reasons for the EZ Lok ones I chose. . . I heard that brass is a bit soft and there was risk of stripping the threads. I saw that as a possibility given the "hack" nature of my installation methods. Alignment is not always going to be dead nuts on. I find these inserts gravitate towards center and vertical during installation better than a few other popular options. I have McFeely's SS inserts as well. It is really difficult to get a one of those other SS inserts to seat straight without chucking it in a drill press and spinning it in by hand right after you drill the hole in the neck with a drill press. Given the wonkey way SX assembles these basses, the screw holes in the body are NEVER straight. These EZ lok inserts allow me to follow the non-straight path with a hand-drilled hole better than other options. The reason I chose the model with the breaks in the threads is I figure maple is hard. . . you can't just "push" all that wood from the threads out without risking splitting. I thought the notches give a place for the excess wood to go, and the threads kindof cut their way into the wood.

Another reason I used these is they require a slightly smaller hole than the McFeely's insert. This gives me an extra safety margin. If i muck up one of the EZ lok inserts, I can slightly enlarge the hole and go for a McFeely's SS insert before resorting to re-plugging the neck and starting over. . . and I did this once with #1 way back in the beginning of the thread. I cracked an EZ-lok insert and had to grind it out. I was then able to enlarge the hold and use a SS insert and not have to plug and re-drill.

Given my tools and the SX basses, I think this is a good setup. Are there better ones? probably. I also wasn't greasing my threads in the 1st few basses. Perhaps brass is not an issue at all and thread damage a non-issue when greased.
 
I've got a Squier P that I picked up on CL a month or so back that I'm going to put a Mighty Mite fretless neck on once it arrives from eBay. I'm interested in trying inserts out, and have only a handheld drill and some other non-powered hand tools.

How much will a place like Home Depot or Lowes take me for if I just want a few inserts and screws (let's say 10, in case I screw up, and for practice on another neck)? Is there a certain place to find them online that won't screw me over on shipping costs? What numbers should I like for when getting these things?

Can you use candlewax or maybe lemon oil to lube the threads?

This thread is a mega inspiration, and I think the original Squier neck is going to be my experimental go-to neck once I get fret and nut working tools.

 
Given my tools and the SX basses, I think this is a good setup. Are there better ones? probably. I also wasn't greasing my threads in the 1st few basses. Perhaps brass is not an issue at all and thread damage a non-issue when greased.

Just spent a couple of hours fooling with E-Z LOK inserts. GET READY FOR A RANT!!!

[Please note: No real basses were harmed in these experiments!]

Just what is it with companies that never try the things they are trying to sell, anyway? What kind of incompetent clowns run EZ-LOK? Glad to see they are doing their part to shove all American jobs overseas and keep the economy in the dumper!

What has me going? Well, it's those brass inserts. No not the ones Chunger used (more on that later) but rather the brass ones for "hard wood". I got them in the 4-40 size to give inserts for panel removals without stripping screw holes. Key features of these inserts (recommended for "HARD" wood)

1. Recommended hole size is clearly too small as probability of snapping the screwdriver slot on insertion is nearly unity. This is true even if you use a precision reamer on the holes to size them perfectly.

2. When going gets tough corners of brass crumble away leaving no way to either insert of remove the device.

3. They ALWAYS look hokey when inserted as even if you don't break the slot away the top still gets scratched and chewed from the inserting screwdriver.

4. They are impossible to insert straight and even if you DO, by the time they reach the proper depth in the hole they have turned themselves at an angle.

5. I used gorilla glue to both lube the insertion and lock them in place, it helps but above problems still remain though to a lesser degree. But you have to be careful not to use too much glue or it expands and fills the center threaded hole!

6. I tried hard maple and Oak, neither proved any better. Maybe they would work better on a softer "hard" wood...like say Celotex!

7. The recommended hole size is IMPOSSIBLE to use! I went with 1/64th oversize (17/64) and it still got tight as you neared full placement but still somehow the inserts felt loose, as if they might screw out later! And to even get the over-sized holes to work right you have to precision ream them to insure they are the proper (incorrect) size!

8. The Slot in the top really makes them look bad when inserted in wood. The fact that they are all crooked means you have to screw them below flush so the panel can't be pulled down nice and tight against the top of the insert and will probably bend in as panels are usually soft plastic.

The bottom line is that these inserts (4-40 "hard wood") are useless frauds. They are worthless for bass use. If you had a big enough bag of them you probably could use it to weight down a body or something... E-Z LOK ought to call themselves "Hosed Lok"!

[end rant]

Then after all that, I got out one of those little 8-32 jobbies Chunger used on the necks. Stuck it on an allen wrench shoved it in a recommended sized hole in hard maple (that was not even reamed or anything) and Lo, it screwed right in, perfectly straight and true, nice and tight and down just slightly recessed from top of wood like you'd want. SO perfect. SO easy! Probably was the result of some kind of design accident at E-Z LOK. Or maybe I just never understood that hard maple was a "soft" wood?

For TheEmptyCell let me note that ACE hardware has these inserts (The ones that worked like Chunger used) if you just want a few. I'm not totally sure what I paid but my list of parts here shows nothing over 40 cents each, so it's that price or lower. They are in all those boxes of various screws and bolts and are in the box marked "furniture parts". Yeah, Bass Guitar! That's MY idea of "furniture"!

And lastly, not giving up on the 4-40 panel screw problem OR E-Z LOK, I note that they make some kind of "split" inserts that you jam it into a hole in the wood and then when you put a screw in it pushes the halves apart to wedge the threaded insert in place. Looks promising. I'm going to try those next...

Sigh.
 
I've got a Squier P that I picked up on CL a month or so back that I'm going to put a Mighty Mite fretless neck on once it arrives from eBay. I'm interested in trying inserts out, and have only a handheld drill and some other non-powered hand tools.

How much will a place like Home Depot or Lowes take me for if I just want a few inserts and screws (let's say 10, in case I screw up, and for practice on another neck)? Is there a certain place to find them online that won't screw me over on shipping costs? What numbers should I like for when getting these things?

Can you use candlewax or maybe lemon oil to lube the threads?

This thread is a mega inspiration, and I think the original Squier neck is going to be my experimental go-to neck once I get fret and nut working tools.

I've listed the exact part numbers for the EZ-lok inserts I'm using, and you can find the Stainless Steel 1 1/2" screws online at McMaster-Carr. If you are not able to find what you need, or just don't want to deal with hunting everything down in quantities you'll probably not use, send me an email and I can sell some to you (a lot of people have bought them). I have not had any complaints on the back end from people using the inserts I'm using even though it's a pretty hairy operation drilling on your neck, so I feel this setup is about as easy as it gets when it comes to ease of installation.

I think Bassbenj is finding that out. These inserts looked like they would work well on maple. I bought a few options when I started out, and these installed the easiest and are holding well. Of course, I don't take my necks on and off that often after the bass is set. Bassbenj seems to have some slightly different aesthetic and functionality preferences than I do which is cool. He'll have to find some other parts that might work more optimally for him. I stopped looking pretty much after I found something that worked with a certain amount of consistency, and have discovered some helpful installation methods to make it a bit less scary, but I'm very interested in hearing about different ways to do it!
 
1. Recommended hole size is clearly too small as probability of snapping the screwdriver slot on insertion is nearly unity. This is true even if you use a precision reamer on the holes to size them perfectly.

2. When going gets tough corners of brass crumble away leaving no way to either insert of remove the device.


Sigh.

note: that screwdriver slot is not really a screwdriver slot, there is a special tool that goes into the insert and has tabs on each side to push on the brass corners. Jamming a flat head in there will guarantee it to be crushed
Always use another insert jammed onto a bolt as an insert tool, if you don't have the proper tool.
 
note: that screwdriver slot is not really a screwdriver slot, there is a special tool that goes into the insert and has tabs on each side to push on the brass corners. Jamming a flat head in there will guarantee it to be crushed
Always use another insert jammed onto a bolt as an insert tool, if you don't have the proper tool.

I think you are right, although the factory clearly recommends a screwdriver for installation as well as their tool. Apparently they never bothered to try to install any of these in "hard wood" before selling them.

And I did try the bolt/insert insertion method. Started out OK but snapped the bolt as the going got tough. These are only 4-40 screws.

I just ordered some of the press in and expand type inserts. I'm sure they wont hold as well as the screw in ones, but hey, these are not for necks. The ones Chunger used seem clearly the answer for that! This is for holding pickguards and access panels on. So that shouldn't take much force. All you'd need is for them not to work loose.

Time will tell.
 
More progress tonight. . . boy was it warm today in the Bay Area. This is one of those days I am so happy I installed A/C just for the hell of it when I built my addition.

This is the last of the basses PLEK'd to this point!

#13, here we go.

I started off from the front this time and tuned up the nut slots. They were really high on this bass:

p238174227-5.jpg


Then, I sanded the tool marks off of the frets that the PLEK cutter head leaves. I then polish the frets with my dremel.

p106636239-5.jpg


From initial observations, this bass looked to have been shielded. This is the first peek inside to see what we have. It looks like a really nice shield job actually, and some sort of aluminum foil solution on the pickguard that looks quite functional. The stock electronics were re-installed after shielding by the previous owner.

p309313552-5.jpg


This is probably part of the reason this bass sounded like such crap when played as it came. . . the magnet had fallen off one of the pickups, and it was non-functional. That'll mess with your tone.

p154515784-5.jpg


Here's an interesting thing. . . the shield job was done very properly. If you opt not to make a copper foil tunnel like I like to do, you should connect the control cavity shield to the pickup cavity shield with a ground wire, and this was done on this bass with a short jumper wire soldered directly to the foil shield.

p228876711-6.jpg


I opted to take that jumper wire out and make my usual foil tunnel just for kicks and giggles.

p468582681-5.jpg


Shielding is complete. I thought about leaving the aluminum foil on the pickguard, but decided to lift a small corner to see how easy it would come off because I know sometimes, it can be a real pain if the adhesive used is really strong. This stuff came right off, so I decided to strip it all, use adhesive remover (goo gone) to strip the adhesive residue off, and put a fresh layer of copper foil on the back of the pickguard. The aluminum foil probably would have been 100% functional, but I guess I'm a bit OCD. Stewart McDonald tape was used on the rest of the original owner's shield job, so the adhesive is conductive, and the existing scheme probably would have worked fine, but I tack soldered all the seams as well.

p97999243-5.jpg


I went for a different variation on the wiring on this one. . . seemed to work well.

p257888560-5.jpg


I ended up having to plug the pickups screw holes on this bass as well. Here I am marking the location of the new holes with the outer strings installed for reference. I find it easy to make this mark with a hammer and nail. Then, when I go back with a drill, it's easy to follow the shallow hole that the nail created without walking.

p215538466-5.jpg


I then start my new screws in to make sure they are going in straight.

p37369760-6.jpg


All wired up with the "chunger" custom Nordstrands installed.

p520198332-5.jpg


And, #13 is ready to roll :bassist:

p508626964-5.jpg


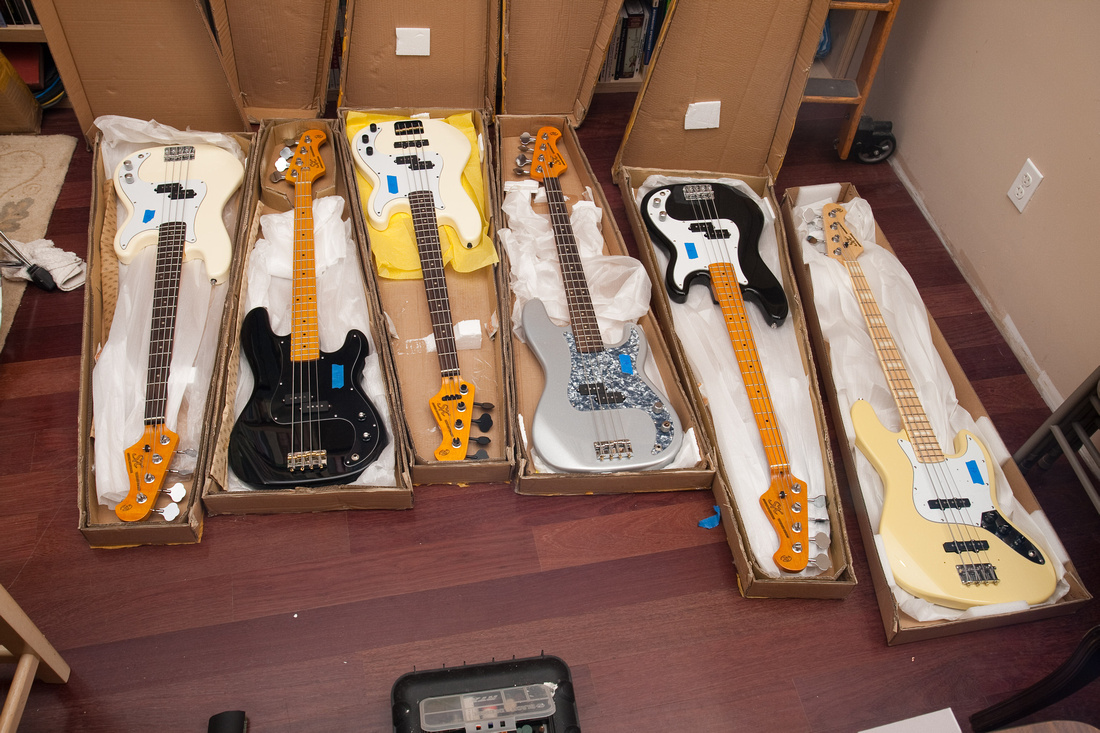
It feels good to have this batch of PLEK'd instruments all finished out and completely modded. Certainly the speed of the builds has increased. Shielding and wiring are still taking up a bit of time as well as fixes to a lot of small details on the SX's. I'm really hoping my spec bass production batch will eliminate a lot of this hole plugging, nut adjusting, bridge/neck re-alignment, and other niggly details that eat up time. One of the main things I'm really happy about is the improvement in average instrument playability. Picking up the "worst" instruments in the pile, I am still extremely happy with the consistency in playability. These are certainly up for the task at hand and more than fulfill the original design goals. Well, I have completed another phase of the project. I just need to get audio samples and test data from these basses, and then, I can see if the world is ready to buy some of these at the price I'm offering them at. Time will tell. Tentative studio date is set to 10/7/2010. We'll be tracking some new songs for test clips this time and performances will be better now that we know we may have to track over 100 mixes of various bass configurations on top of the basic drum track.

So, 'til next time, choose your weapon. . . they all play great!
p29476181-5.jpg


5 more SX's to go. . . I will now start prepping those for PLEK, and then, after that, I will be all done with SX and will have my sights set on the production batch.
 
More progress tonight. . . boy was it warm today in the Bay Area. This is one of those days I am so happy I installed A/C just for the hell of it when I built my addition.

This is the last of the basses PLEK'd to this point!

#13, here we go.

[snip fine photos and report]

Great progress Chunger! I just wanted to say I'm making some progress too. I started with my G&L Tribute as my first "Chungerize" project. First order of business was to put inserts in the body to hold the bridge on. As everybody knows the G&L heavy bridge is just held on by two smallish wood screws and tends to pull away from the body unless you string through-body.

So using Chunger's neck insert method I drilled the old screw holes and installed inserts. Went like a champ! I used a tiny dab of epoxy as anal insurance against pull-out. As my first insert job it was pretty scary! I really did not want to create a nasty on my $600 bass! But things went great. A little grease on the threads, a quick drill through the holes in the bridge so they pass 8-32 screws, and two socket head flat head screws and that bridge is really DOWN on that bass body. I love it! When I get my nerve up I can go for my "real" MIA G&L next! I think oval head chrome screws would look better, but the flatheads aren't bad. And anyway my ovals are on back order for a while.

So while I was waiting for my 4-40 split inserts to arrive I decided to go over the frets. They were amazingly level, but starting to get worn from the mileage on this bass. Also they were starting to get dark from oxidation. So I got out the Dremel and gave them a good polishing and then cleaned and rubbed the fretboard down with my usual lemon oil polish. Looks like a million! I can see an order is going to have to go to Stew-mac for some fret working tools!

So when the 4-40 inserts come and IF they work, the plan is to finish the bass with inserts on the access panel (where the battery is) and also on the pickups! I ordered some long 4-40 socket head cap screws for the pickups. I noticed that the heads of the wood screws being used now are all buggered up from adjusting pickup height just a few times. And while I'm at it I might as well take out the springs under the pickups and put in foam and the "Chunger copper flap" for grounding. Yeah, I like that method!

That's where I am now. Chunger seems to have got us all going with this. After this "trial run" I'll start on my really valuable basses... namely by SX 6 strings and the new SX ash body 5er that I have two necks for!
 
Those P basses all look great! I'd be happy with anyone of them. Wonder how they compare to that $1200 MIA Fender P I've been eyeballing at GC...I wouldn't be surprised if one of these Chunger Ps played better!
You bet. Chunger has eliminated most of the things that make the SXes inferior to the Fenders, and added some things: (good nut work; PLEKing; threaded neck inserts; realigned and vastly superior pickups; new bridge; cavity shielding; new pots and wiring; level frets). What did I leave out?:D
 
Those P basses all look great! I'd be happy with anyone of them. Wonder how they compare to that $1200 MIA Fender P I've been eyeballing at GC...I wouldn't be surprised if one of these Chunger Ps played better!

OK. . . the MIA Fender should not be taken for granted, but I really do feel one of mine will be more dialed. Fender is a formidable company and has all the advantages of scale. Let's look at the MIA advantages first:

1. Hardware: specifically tuners will be superior on the MIA Fender. The bridge will also be better. I'm not sure if the MIA bridges have a way to prevent side/side saddle movement, but if they did, the bridge would be an improvement. If they have stayed with the traditional bridge, functionally, there will be no difference, but aesthetically, the MIA piece will probably look better.

2. Fit/finish: The finish on the MIA will likely be better, and there MAY be fewer gaps and small boo boo's. Generally, the QC is better on Fender's flagship models than from the SX factory in China.

3. Fret wire: The SX's have soft fret wire. Not much I can do about that one.

4. Neck: OK, the neck is a toss-up. The Fender MIA models have graphite reinforcement rods and the SX's do not. The Fenders, however trend towards thinner necks than the SX profile. I'd say advantage Fender on neck stability, but toss-up in terms of tone. The individual bass will have more of an influence on that than the spec.

OK. . . looking at the 'Chunger bass's advantages:

1. PLEK or hand-leveling: THE most important factor in my opinion in achieving optimum playability from an instrument. Because of this alone, the Chunger build in probably 90% of cases will be able to outplay a MIA Fender off the rack. If you play with high enough action though, this point becomes less important.

2. Electronics/pickups: The Nordstrands are a top tier boutique pickup and they stand above the rest in terms of tone and feel. . . now others have had really good success with the top tier Fender pups as well, so it may be an issue of voicing preference, but I have not found a better p-bass pup than what I'm running (very subjective).

3. Shielding: Fenders buzz. . . mine do so a lot less. An effort has been made on the MIA fenders to shield and reduce noise. EVERY effort has been made on the "chunger" builds to do so as utility in the studio was of primary concern in the development of these basses.

4. Grading/audio samples: You do not know where any given Fender stacks up against others when you walk into a showroom. The "chunger" builds are all evaluated and ranked against the others in the batch by people who know what to listen for and rated among others in the batch. Audio samples are also provided letting you know exactly how the instrument sounds prior to purchase.. . again, this is subjective, but certain instruments do stand out.

5. The nut varies on my builds. I replace the nut with a Graphtech one IF the original plastic one is damaged or at the request of the buyer. However, all of the nut slots are tuned to give best action possible whether stock or custom.

6. Price. . . the most expensive of this batch of builds is still just a bit over 1/2 the cost of the MIA and that's taking into consideration P/J and premium grade.

7. Parts alignment. . . It still boggles me how a flagship model instrument can come with neck and pickups grossly mis-aligned and neck pocket gaps. This happens often in the MIA, MIM, and Squier Fenders. Even though the issue is also prevalent in SX basses, my builds have accounted for this and the problem instruments have been adjusted to a better tolerance.

If I felt there is a better value out there, I'd stop. Certainly, I feel if you go up to a Lakland Skyline, the only advantage the Chunger bass would have is price and "documentation" (audio clips) as ALL OTHER areas of the Lakland would be superior in terms of build quality. Granted one of the overachieving premium grade ones may outplay a top tier instrument just by luck of the draw the same way an "off the rack" vintage production Fender sometimes just sounds/feels awesome. The way I see it, you can either tighten up your specs (weights, density, etc.) and cull out sub-standard components to elevate the average performance of your end product to a very high level like the premium builders do, or, you can grade what comes out the end of the production process to figure out which ones work better than others and are subsequently worth more to the end user. I choose the latter option.

Come the production batch, the gloves come off as I get a say in the QC and product spec.

IMO that is :hiding:
 
Come the production batch, the gloves come off as I get a say in the QC and product spec.

IMO that is :hiding:
Yeah..once that batch comes out I may no longer be able to justify spending so much more on a Fender MIA. Any P basses expected in that batch? I don't have the money right now anyway so I might as well wait until your production batch comes out when I have the money to impulse buy...I mean carefully plan my purchase:hiding:
 
Re: Chunger's (and others') observation that a soloed p pickup in a p-j configuration does not sound the same as a standard p. I've been thinking about this because I just added a neck pup to a (sort of) p-bass and I'm experiencing the same thing. My thought for your builds, Chunger, is to use the push/pull pot to take the bridge pup in/out of the circuit. I'd rather have a pure p tone at my fingertips instead of a p-j in series. maybe that's just me, though.
 
Re: Chunger's (and others') observation that a soloed p pickup in a p-j configuration does not sound the same as a standard p. I've been thinking about this because I just added a neck pup to a (sort of) p-bass and I'm experiencing the same thing. My thought for your builds, Chunger, is to use the push/pull pot to take the bridge pup in/out of the circuit. I'd rather have a pure p tone at my fingertips instead of a p-j in series. maybe that's just me, though.

Let me suggest someone try the following P/J wiring mod.

The idea is to change the vol/vol arrangement so as to allow the bass to go to a normal P wiring when the J is zeroed. It will be different because instead of a volume for each pickup you'll have a master volume and a volume for the J. Personally that solves the usual vol/vol problem of needing to tweak TWO pots to change your volume level and maintain your mix proportions.

This is sort of hard to describe without some kind of drawing, but I'll try. Each volume pot has three ears. The center one is the slider. The other two are the ends of the resistor the slider slides on. OK. Start with the J pickup. Ground goes to one outside ear and "hot" goes to the other outside ear of the "J" volume pot. The slider of that pot goes to the ground wire of the P pickups (series). . Ground side of the J also goes to ground on the output jack. "hot" from the P pickups goes to the outside ear of the master vol pot. The other outside ear is grounded to jack ground and J ground. The slider goes to the "tip" or "hot" of the output jack. That's it. Tone circuit goes to "hot" of jack as usual.

If you draw this out you'll notice that when the J pot is zeroed, the P circuit now reverts to the standard P configuration which should keep the voicing. Note that this puts P/J in series instead of parallel like a standard P/J bass.

I haven't tried this myself but it seems to me like it would work.
 
Attention all thread readers. . . if you've read this far, forget everything you just read, and go buy this for $499 (free shipping):

http://bass-guitars.musiciansfriend.com/product/Lakland-Skyline-4401-4String-Bass?sku=517708

p484077827.jpg


If unhappy with it, give me a call and I can put a pair of Norstrand big singles in there and an Audere preamp. I have no idea how they're selling this cheap. Sweet. . . i think I just put myself out of business :rollno: Gotta say, that is some downright crazy pricing.
 
Status
Not open for further replies.