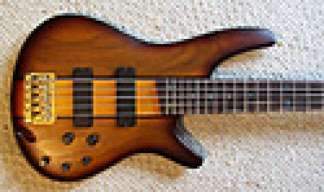
The only thing about those reds is that they really conceal the grain and that's some gorgeous grain. You have nothing you need to hide on that body.

TalkBass has been independent since 1998. Add your voice.
Create a free account to reply to discussions, view embedded media, and browse with fewer display ads.
Join free Log in
Want zero display ads or expanded classifieds tools? Compare plans.

Yeah, red's the way to go, I think. Good job on the routing!
Practice on scrap! I would personally dye it warm brown, sand back, wash a light wheat colour to add warmth and then go red. I would hate to see this go pink.msl:
followed your build from the very beginning...im usually more a fender type of guy but your design is amazing...everything fits...the fingerboard...the pickguard...and of course the flamed maple top in red,
personally i think the pearl pickguard would fit better with clou stain nr 154.
 Think I need to see the colours on a test piece in real life to really decide.. they only cost 5 euro each...
The only thing about those reds is that they really conceal the grain and that's some gorgeous grain. You have nothing you need to hide on that body.

Am I the only one who wants to see this one finished with a clear high gloss lacquer?


Thanks for the advice. Warm brown as in nr. 156 from the above chart? Or darker? Not sure I can get such a wheat colour, but I sure did plan to stain it dark (almost black?), sand back and dye it red afterwards, to enhance the flame in the maple.

Thanks!
Didn't know that. Would that still be the case if I stain it dark and sand that back on beforehand?


 I can't wait!
If the dyes are pretty cheap, buy a bunch because you can always mix and match. 152 looks like a nice candidate for a thin wash coat thinned out with the appropriate solvent (or water, which is technically a solvent I guess). I know you know this of course, but test out as many different combinations as you can on scrap.
My gut says a warm "Walnut-ish" brown for the figure accent because I find black can easily look too artificial and you quickly lose that 3D-ness turning beautiful figured Maple into something resembling a photo finish or a veneer. Most dyeing schedules seem to lose a lot of that natural chatoyance in figured Maple. I'd probably try tinted oils to maintain it, but this isn't my build of course. After sanding back the accent coat, a wash coat of wheat softens the remaining dye and provide a warmer base over which the final red goes.
(...)
I'm not familiar with the staining/sanding/re-staining process, but these other guys seem knowledgable about that. I made my comment solely on looking at the samples - you can see the grain beneath the lighter colors but not beneath the reds - they look fairly opaque. As others have suggested, experimenting on scrap wood is the way to go.
There is also a wealth of info on finishing here:
Wood Finishes
I built the site but the info is from a variety of master woodworkers.
If anyone has good photos about the dying/staining/sanding/re-staining process I'd be glad to add it to the finishing site.
 . I have found some good videos on the topic too, so I have enough material to study!
 I just went trough all the 20 page hoping that i could see the finished bass!
Can't wait for you to finish it.... I am usually not into fancy boutique basses and flame tops, but your work is amazing!
Will you be taking orders? Any idea of price range?
, but my pace is too slow to present the finished bass already... sorry. That's also the reason I do not take orders yet. I would very, very much like to do so, but my current speed of about 8 months from concept to where I am right now isn't realistic I guess. Two things could speed me up: buy some extra tools like a planer, thicknesser and a bandsaw and the fact that my prototype of the Paradox is more or less finished, so I wouldn't have to reinvent all this.Someone posted a video in another thread about enhancing the grain and figure....he said that you can enhance the reds with a concentrated version of the red. He said something about black leaving the grain to highlighted, but in a bad way...
The bright red will look so hot rod
update please!....cant wait to see this bass finished
 ... but I did not have any time last few weeks. I had a small holiday, which I enjoyed very much by the way, lots and lots of work to be done (luckily, I like my job too) and some other social activities; all together reducing my shop time to zero.
Link Removed
That made me smile again, so it helped

Link Removed
Link Removed
Link Removed
Link Removed
Don't you just love it when a plan comes together?
I haven't checked in here lately. You definitely have a plan coming together.
Might I say that I am drooling over here.
You, Sir, do very VERY nice work.


This one is really coming together, Rob! I always appreciate original designs in the LC, but it's not too often that I GAS for them... I want to play that! Especially if it was finished in transparent red
. One question by the way, I've been around here for a few years now, and I know very well what GAS means, but what does it stand for? 
roberthabraken said:Thanks! Great to have another vote for the transparent red, I need that
In guitar world it's 'gear acquisition syndrome' so i'd imagine it's the same for basses.
Btw, did you design the black swirly thing in your avatar? It's really cool, is it an f-hole or is it painted?
Oh, and I too would love to see this red, keep up the excellent work!
. And thanks for the explanation on the term GAS. Yes, the bass in my avatar is my first build, not as fluent as this one in terms of design, but it came out well enough to start another one . What you're seeing in my avatar are the custom f-holes, it's not painted, but a real chambered body. See my portfolio for more pics (use the blue arrows when hovering over the pictures to navigate and click on the center of the picture to see the build log): Invalid Link Removed. This site needs an update, I'm not too happy with the usability aspect, but that has to wait..
roberthabraken said:Thanks, another vote for red, great
Actually I quite like the layout of your site.
I'm still undecided about whether I should do custom f-holes on my first build or not, you can check it out here: http://www.talkbass.com/forum/f101/first-eub-build-879652/
Maybe you can offer some advice? Thanks
Joe
Btw, this is one of the coolest basses I've ever seen


