• TalkBass has been independent since 1998. Add your voice.
    Create a free account to reply to discussions, view embedded media, and browse with fewer display ads.
    Join freeLog in
    Want zero display ads or expanded classifieds tools? Compare plans.

CNC fretboard G-code generator

Another day, another function. This time I added a trace capability, where it will move the spindle to the four corners of the fretboard before it starts cutting. I added this because I wanted to cut the fretboards to line up with the grain lines, but this meant getting awfully close (about 1 mm) to the edge of the blank. Tracing the perimeter allowed me to make sure the cut board would actually fit within the blanks.

Over the past two days I have cut four fretboards and they all turned out great:
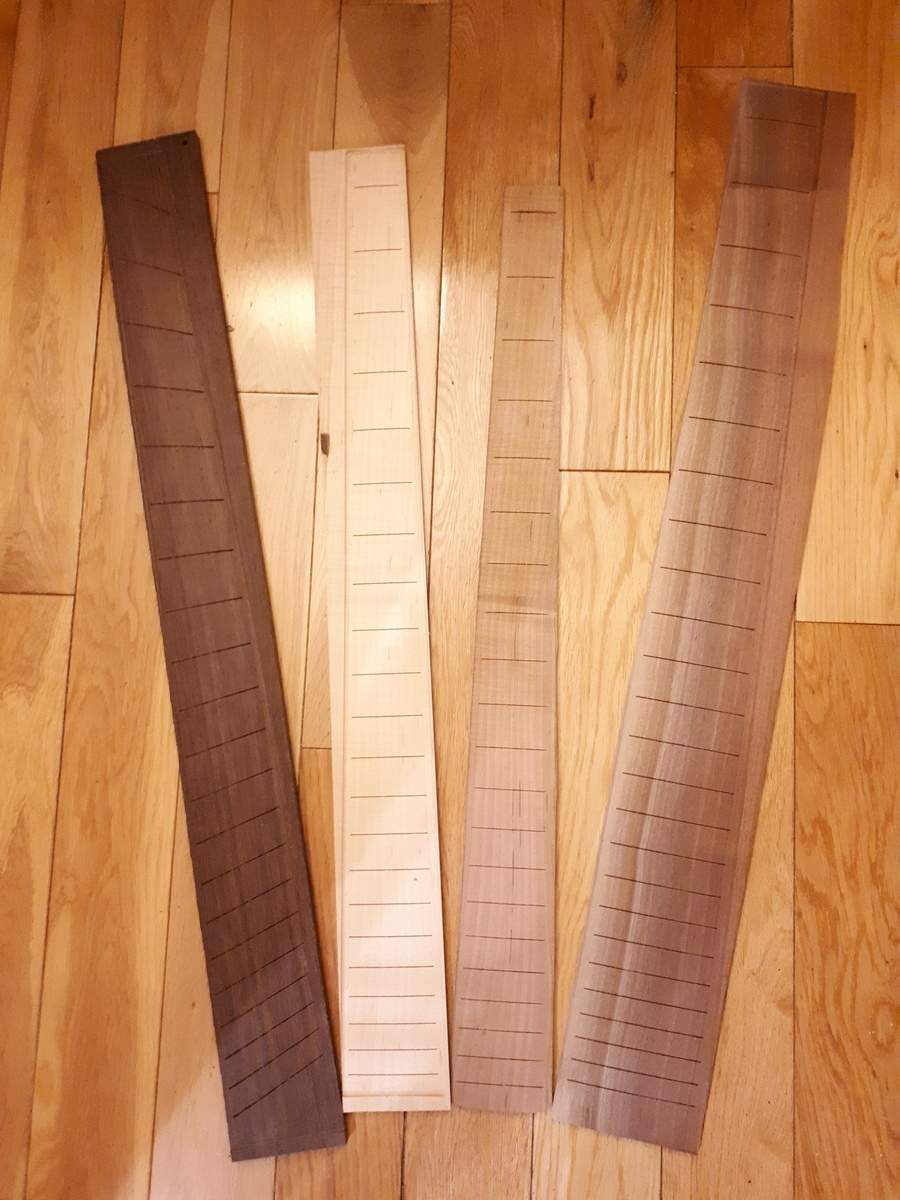
20220220_225358.jpg


From left to right: 5 string wenge multiscale compound radius, 4 string maple single scale 21 fret compound radius, 4 string roasted maple single scale 20 fret compound radius, 6 string walnut single scale 24 fret compound radius.

That's also 85 fret slots on my 0.6 mm (0.024") end mill, so it seems like the feed rates are also OK for reasonable durability.

Since this seems to working well for me I linked the code below in post #79 for anyone else who wants to try.
 
Last edited:
Here is a close-up of the wenge board:
20220220_225124.jpg


This is a 7.25" radius at the nut and a 21.9" radius at the bridge with 0.5 mm surfacing pass spacing, which worked out to 153 passes and took about an hour at 2000 mm/min. That should be pretty easy to sand smooth, which makes me happy! :D

Because I used an upcut mill there is a bit of fuzz at the top of the fret slots but that should sand off easily too.

However, before any of that can happen I need to free the boards from the blanks on the table saw, which will probably wait until spring with some warmer weather.
 
Looking good, Jeff!

How about cutting the perimeter deeper, down to leaving maybe 0.050" of wood left? Do it as the last step. Then you could literally break off the excess wood and clean up the excess flash with a sanding block. No need for any tablesaw work.
 
Looking good, Jeff!

How about cutting the perimeter deeper, down to leaving maybe 0.050" of wood left? Do it as the last step. Then you could literally break off the excess wood and clean up the excess flash with a sanding block. No need for any tablesaw work.

Definitely a possibility. For now the engraving runs right along the board edge with no tool compensation, so would need to add that to do any kind of cutting. However, the main reason I haven't done that yet is that, at least for bolt on necks and my process, the heel of the neck determines the shape/length of the end of the fretboard itself so I really don't want to cut the heel end of the board to length until it is fitted to the neck. I suppose I could just add a bit of extra length to the board to allow for final trimming. Hmmm... sounds like the next thing I'll add!
 
Yeah, the point is, if you've already got the board locked down in the machine, and the slots and radius are cut accurately in relation to the grain, then you should go ahead and cut the perimeter accurately too before disturbing the setup. You can leave some excess for trimming, if you want, but at least that excess will be a known amount, and be accurately positioned in relation to everything else. When you are finished cutting everything else, stop the spindle, change the bit, and run a Perimeter subroutine which cuts a deep groove in several passes. Down to paper thin. Pull the board out of the machine, and score around the groove with a knife to trim off the excess.

I think I've seen Rob Allen do that, cutting out headstock and body perimeters. I do a similar thing with my (non-CNC) pin router. As the final step when routing a body top or back, I rout a deep groove all around the perimeter, down to 1/16" thickness. Then I take it around through the bandsaw, down the middle of the groove, to separate the waste wood. And a light touch on the edge sander to remove the little flashing at the bottom edge.
 
Things are hopefully pretty self-explanatory but post any question here and I will do my best to answer them.

Hey @Jeff Siddall - I sent you these questions in a PM, but maybe having this documented would help other CNC novices (like me) who are going to use your program in the future:
1) what is "neck twist"? I just have never heard that term before
2) when I put the fretboard blank on the machine, where is the zero point?
 
Hey @Jeff Siddall - I sent you these questions in a PM, but maybe having this documented would help other CNC novices (like me) who are going to use your program in the future:
1) what is "neck twist"? I just have never heard that term before
2) when I put the fretboard blank on the machine, where is the zero point?

1. Neck twist is to do something like a Torzal:

Torzal Guitars | Custom Ergonomic Electric Bass Guitars

Not likely something that most people want but someday I plan to build one, and I figured it might be interesting to see if I could create a fretboard script for it.

2. The origin is on the fretboard centerline at the zero fret (or inside face of the nut) at the top surface of the fretboard.

I tried running the script on my mac and getting this error:
Traceback (most recent call last):
File "/Users/*username*/Downloads/fretboard/fretboard.py", line 6, in <module>
from geometer import *
ModuleNotFoundError: No module named 'geometer'

You will need the geometer module. You should be able to install it by running something like:

pip install geometer

The docs here have more info if you run into problems:

Installing Python Modules — Python 3.10.7 documentation

Good luck, and feel free to post more if you have any other questions!
 
  • Like
Reactions: Jisch
I got it to generate the gcode! It's late and I'll likely try that tomorrow morning. I'll be honest, getting everything installed pushed my computer skill envelope, but always good when you figure something out!

Glad to hear you have success -- or at least something to try on your CNC!

Yes, I sometime forget that the prerequisites are often the hard part of this. I added a couple of steps to the instructions above in post #61 but let me know if there were any extra steps I missed and I will make further updates.
 
  • Like
Reactions: T_Bone_TL
Glad to hear you have success -- or at least something to try on your CNC!

Yes, I sometime forget that the prerequisites are often the hard part of this. I added a couple of steps to the instructions above in post #61 but let me know if there were any extra steps I missed and I will make further updates.
The other problem I had was the file where the script was looking for the fretboard.txt file, I hate the mac filing "system", so it's probably entirely user error. I ended up putting the .py and the .txt files into the user directory after seeing that's where the script was looking and it worked fine. I can't count the number of times I've tried to find files and even with the search function they are seemingly nowhere, then after fighting my way through I find them even though search can't find them.
 
The other problem I had was the file where the script was looking for the fretboard.txt file, I hate the mac filing "system", so it's probably entirely user error. I ended up putting the .py and the .txt files into the user directory after seeing that's where the script was looking and it worked fine. I can't count the number of times I've tried to find files and even with the search function they are seemingly nowhere, then after fighting my way through I find them even though search can't find them.

Yes "helpfully" hiding things seems to be a trend. I find it is worst on my phone. None of the apps seem to have a standard place to put things, and will never tell you where they do.

I added one more thing to the instructions above, and I will add it here too in case it is useful:

"If you want to see what the G-code will do, CAMotics is a handy cross-platform tool to simulate the CNC operations."​
 
  • Like
Reactions: Jisch
ok, latest problem. The code generated is fretboard.ngc. My machine (ShapeokoXL) doesn't recognize that file type. I looked online and someone suggested that ngc and nc file types are the same, just a different name. I changed the name of the file to fretboard.nc. When I load it into the CAM software I get an error "Error Loading File: Bad characters in gcode file". I'll need to research what other differences there might be, or if you can offer any ideas? Thanks.
 
ok, latest problem. The code generated is fretboard.ngc. My machine (ShapeokoXL) doesn't recognize that file type. I looked online and someone suggested that ngc and nc file types are the same, just a different name. I changed the name of the file to fretboard.nc. When I load it into the CAM software I get an error "Error Loading File: Bad characters in gcode file". I'll need to research what other differences there might be, or if you can offer any ideas? Thanks.

G-code is just a text file so the extension really doesn't matter. If your software likes nc then just rename it to that.

Regarding the "bad characters" I can give you some things to try, just PM me.
 
I am starting on my twisted neck build and need to make some improvements to the fretboard generator script. The original script did everything in a single layer, since most fretboards only need a mm or two taken off the edges. However, on twisted necks, it is typically more like 25 mm (an inch) which would usually be bad to try in one pass!

Yesterday I reworked the code a bit to support a maximum layer depth value in the settings file. It determines where a cut would exceed the maximum layer depth and adds extra passes to ensure nothing exceeds the maximum layer depth. Here is a screenshot of a simple fretboard where the cuts near the edges of the board would have been deeper than the maximum so an extra set of passes, highlighted in blue, were added:
upload_2023-7-13_10-21-17.png


Since this seems to be working well for me I will post the code for anyone else who wants to try:
Script:
fretboard.py

Configuration file:
fretboard-settings.txt

Before running this python needs to be installed. See:
Download Python

The script also requires the geometer module. Install it by running something like:
pip install geometer

Download both files above into a folder and then edit in the fretboard details in the fretboard-settings.txt file. Then generate the G-code by running:
python fretboard.py > fretboard.ngc

After a few seconds the G-code will be generated into the fretboard.ngc file.

If you want to see what the G-code will do, CAMotics is a handy cross-platform tool to simulate the CNC operations.

Things are hopefully pretty self-explanatory but post any question here and I will do my best to answer them.
 
Last edited:
  • Like
Reactions: T_Bone_TL
I just read through the thread, very nice work @Jeff Siddall ! Being a software engineer by trade, working mostly in python, I really appreciate the work you did here! And twisting the fretboard is a whole new level there...

Going back to basics, I understand that having a straight fretboard under each string means that the fretboard will be a slice of cone where the top and bottom radiuses depend on the string spacing at the nut and bridge, on top of the base radius you choose at the nut, right?
My intuition tells me that this works also if the strings are not regularly spaced, when the e and a strings are farther apart than d and g, is this correct?

Another thought I had was that I usually lower the frets a nudge on the bridge end of the fretboard, so I'm wondering if the curved fretboard path can also be desirable. By computing the hyperbola equations (in other words, staying with conic maths), one could maybe make a fretboard with a custom fall-off...
 
  • Like
Reactions: Jeff Siddall