
Enjoy the benefits of a premium membership!
Upgrade Account
-
TalkBass has been independent since 1998. Add your voice.
Create a free account to reply to discussions, view embedded media, and browse with fewer display ads.
Join free Log in
Want zero display ads or expanded classifieds tools? Compare plans.
You are using an out of date browser. It may not display this or other websites correctly.
You should upgrade or use an alternative browser.
You should upgrade or use an alternative browser.
Drake Custom 5 string build
- Thread starter Drake Custom
- Start date
More options
Who Replied?

- Aug 24, 2010
- 440
- 1,082
- Disclosures
- Builder/Owner:Drake Custom Bass Guitars
I am back today with some shots of my high tech neck carving jig which consists of a piece of wood and two sqeeze clamps. Oh and a vice. Everybody has some sort of vice right? Mechanical or otherwise yeah?
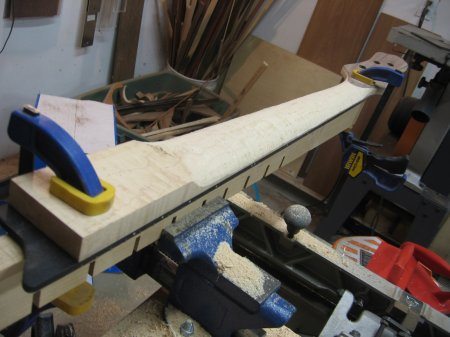
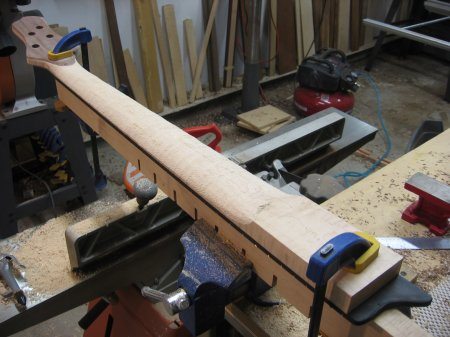
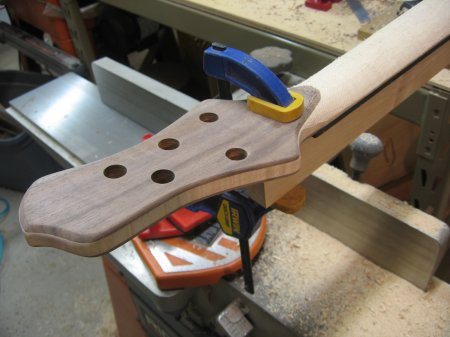
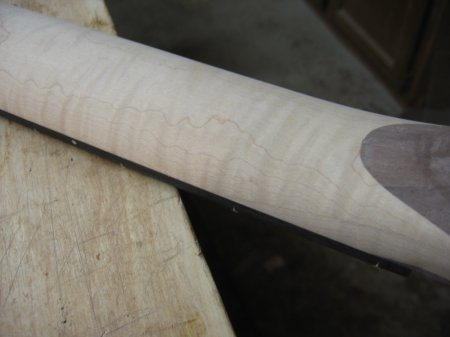
As you can see I just simply lock a 1 inch by 3 inch piece of wood into my vice with sqeeze clamps. This way I can carve with rasps, scrapers, and sanding blocks down both sides. Sometimes I have to reverse the setup to dress up one side or the other. This method works well for me.
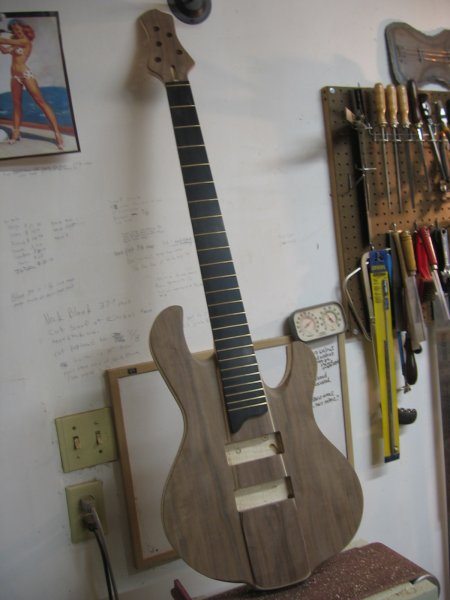
Here is what the bass looked like at that stage of the game.
Sorry, pressed for time, but I will have more progress shots this weekend
As you can see I just simply lock a 1 inch by 3 inch piece of wood into my vice with sqeeze clamps. This way I can carve with rasps, scrapers, and sanding blocks down both sides. Sometimes I have to reverse the setup to dress up one side or the other. This method works well for me.
Here is what the bass looked like at that stage of the game.
Sorry, pressed for time, but I will have more progress shots this weekend

- Aug 15, 2011
- 571
- 171
- Disclosures
- Owner/Luthier:RoseBud Basses & Guitars LLC
That raised section is really cool, (by cool, I mean good looking  ). You builds are so clean and crisp. Its always a pleasure to see what youre up to
). You builds are so clean and crisp. Its always a pleasure to see what youre up to
- Aug 24, 2010
- 440
- 1,082
- Disclosures
- Builder/Owner:Drake Custom Bass Guitars
I just got back from a long trip and thought I would show everyone the carving that has been completed on my 5 string bass.
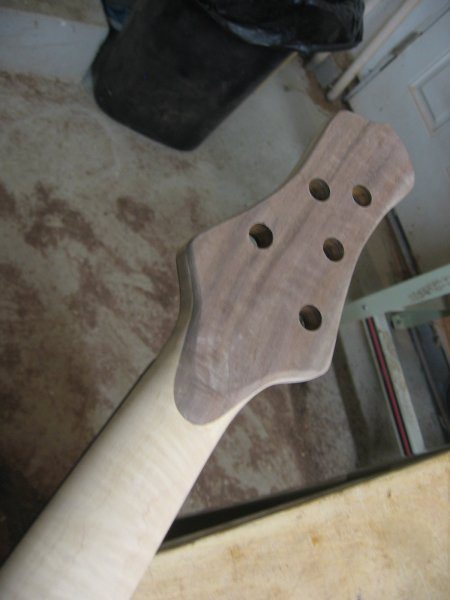
Here I sanded out some of the rasp marks and am into the final shaping of the neck. I take a lot of time to get every little dip and tool mark out of the neck.
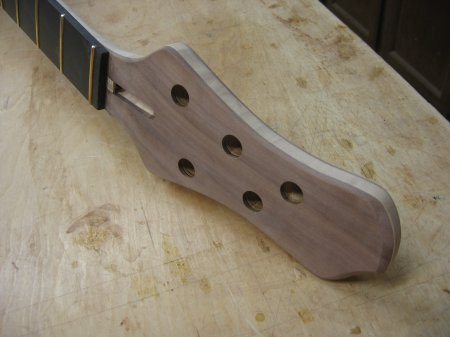
I started carving the edges and ends of my headstocks years ago after a bad chip out incident. I had to sand down the edge to get throught the problem area and I decided to shape the end a little. I thought it looked good so I just kept on doing my headstocks this way.
And below are some pics of the body carving.
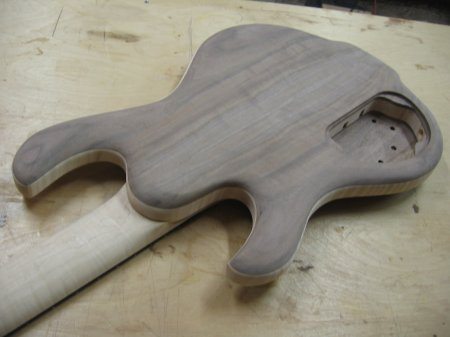
She would look good as a set neck bass but I will probably make her a bolt on.
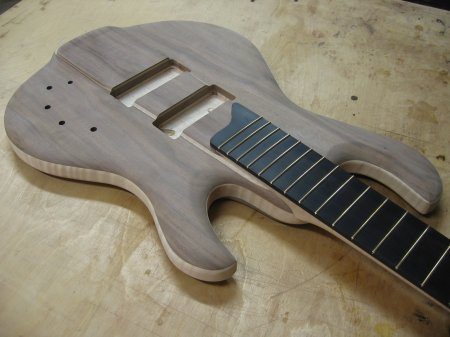
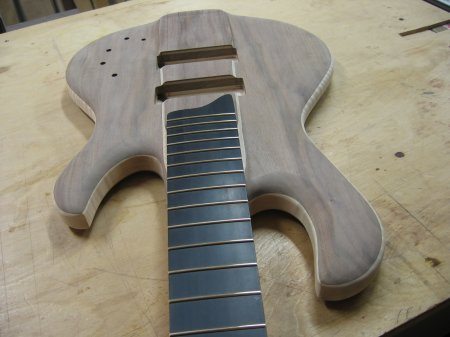
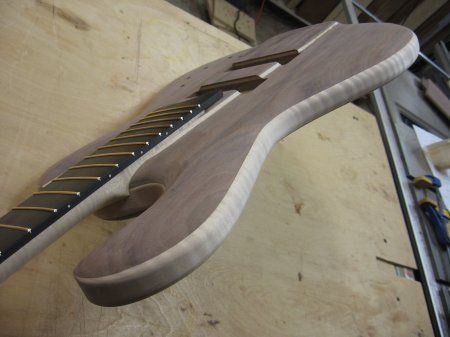
Here you can see the Curly Maple pretty well. She will dazzle when finished.
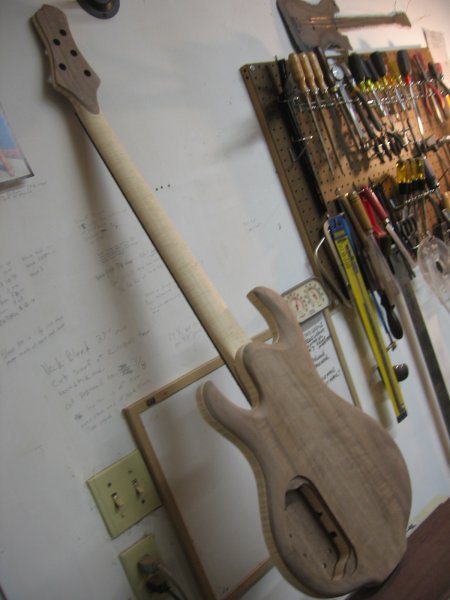
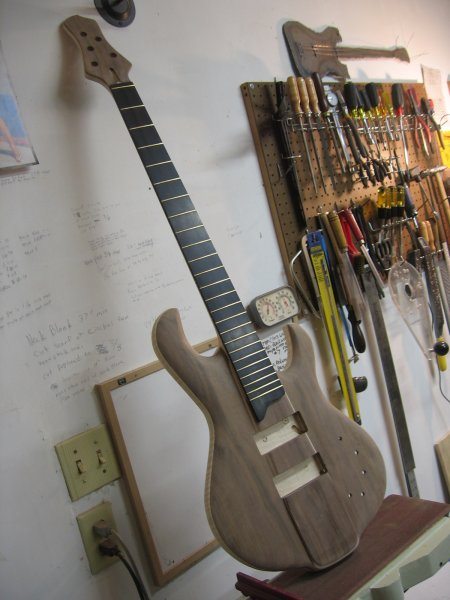
And this is pretty much how she is at the moment. I have a few things to do while I wait for the custom bridge to arrive. I got one bridge but the piezo saddles had an issue with the spacing. Hipshot is making me an A style bridge to replace the one with the design issue.
I hope to have more to show you all soon.
Thanks for taking the time to check my build.
Here I sanded out some of the rasp marks and am into the final shaping of the neck. I take a lot of time to get every little dip and tool mark out of the neck.
I started carving the edges and ends of my headstocks years ago after a bad chip out incident. I had to sand down the edge to get throught the problem area and I decided to shape the end a little. I thought it looked good so I just kept on doing my headstocks this way.
And below are some pics of the body carving.
She would look good as a set neck bass but I will probably make her a bolt on.
Here you can see the Curly Maple pretty well. She will dazzle when finished.
And this is pretty much how she is at the moment. I have a few things to do while I wait for the custom bridge to arrive. I got one bridge but the piezo saddles had an issue with the spacing. Hipshot is making me an A style bridge to replace the one with the design issue.
I hope to have more to show you all soon.
Thanks for taking the time to check my build.


Your attention to detail is admirable and inspiring, Mr. Drake.
+1
- Aug 24, 2010
- 440
- 1,082
- Disclosures
- Builder/Owner:Drake Custom Bass Guitars
Thanks guys.
I am sorry that this build has stalled while the new bridge is being made. Since the order is for a gold colored tray it takes a little longer to make as they have to send it out for plating. It should be here anytime and I can get it planted and do a pre-finish assembly. I never apply finish an instrument until I have assembled it to make sure everything goes together correctly. I will be applying a new style finish that I have spent the summer testing out. I plan to cover the process in detail over the next few weeks. Check back soon.
I am sorry that this build has stalled while the new bridge is being made. Since the order is for a gold colored tray it takes a little longer to make as they have to send it out for plating. It should be here anytime and I can get it planted and do a pre-finish assembly. I never apply finish an instrument until I have assembled it to make sure everything goes together correctly. I will be applying a new style finish that I have spent the summer testing out. I plan to cover the process in detail over the next few weeks. Check back soon.

Andrew, start machining your own bridges! 
Seriously though guys, Andrew builds BEAUTIFUL stuff. I'm a happy camper with Invalid Link Removed.
Seriously though guys, Andrew builds BEAUTIFUL stuff. I'm a happy camper with Invalid Link Removed.
- Aug 24, 2010
- 440
- 1,082
- Disclosures
- Builder/Owner:Drake Custom Bass Guitars
Thanks everyone.
I actually could machine my own bridges but the plating would be difficult for me. Hipshot has been very good to me and are usually right on time but this time I threw them a curveball with specs that are not standard. They have not had much of a call for the piezo loaded B style in this spacing and in gold tone.
This is the bridge I received. It was ordered as a .669 spacing with piezo loaded saddles. I also had them shave off .10 of an inch from the sides to reduce some weight and allow me to continue the rounded over edges of the raised center cap. I had noticed that the bridge looked kind of odd so I did not drill the mounting holes or the string-thru holes, but just tacked the bridge in the right place with two small screws. I could see very quick that this was not going to work.
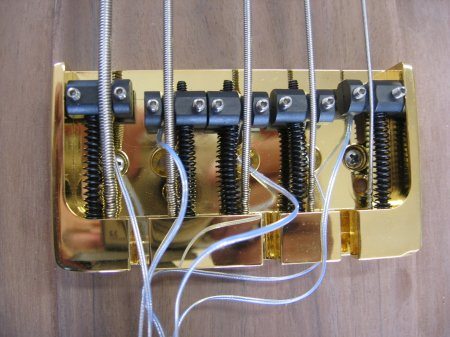
I called and spoke with my rep at Hipshot. I sent this pic to them. Once they saw the problem they set out making it right with me no worries. They are great folks to work with and any time I have had an issue they have always fixed it pretty quick.
The standard hardware I mostly order is pretty easy and quick for them to do and I get it in a week most times. Custom orders take longer and it is not uncommon to have a bit of a delay. It is important for builders to really know what specs they require for a project and to be very clear about said specs when ordering. There are people at Hipshot who take orders and there are people who know the products very well and understand special customized features. So if you are going to order something that is special in some way, ask to speak with a tech before placing the order. It will save everyone some time.
Hipshot is now making me a piezo loaded, gold/black toned, A style bridge to replace the B style. They said that the spacing I ordered with the piezo feature has hardly ever been ordered before so they were not aware of this issue. The bridge would have been done by now except that it needs to be plated. I can understand that they don't want to have just one bridge sent out for plating. So they must wait until they get enough of an order to make it worth while. Therefore it has taken a whole month now but I look for it to arrive any day now. FYI Hipshot hardware finished in black or satin chrome is finished in house and is very quick. Shiny chrome and gold takes longer.
I just want to state that my customer has been very cool about all of this. We originally talked about having the bass completed in three months and it could have been but things do happen and I don't let a bass go out if I do not think it is exactly right. I do not do deadlines and don't guarantee dates of completion for this very reason.
I actually could machine my own bridges but the plating would be difficult for me. Hipshot has been very good to me and are usually right on time but this time I threw them a curveball with specs that are not standard. They have not had much of a call for the piezo loaded B style in this spacing and in gold tone.
This is the bridge I received. It was ordered as a .669 spacing with piezo loaded saddles. I also had them shave off .10 of an inch from the sides to reduce some weight and allow me to continue the rounded over edges of the raised center cap. I had noticed that the bridge looked kind of odd so I did not drill the mounting holes or the string-thru holes, but just tacked the bridge in the right place with two small screws. I could see very quick that this was not going to work.
I called and spoke with my rep at Hipshot. I sent this pic to them. Once they saw the problem they set out making it right with me no worries. They are great folks to work with and any time I have had an issue they have always fixed it pretty quick.
The standard hardware I mostly order is pretty easy and quick for them to do and I get it in a week most times. Custom orders take longer and it is not uncommon to have a bit of a delay. It is important for builders to really know what specs they require for a project and to be very clear about said specs when ordering. There are people at Hipshot who take orders and there are people who know the products very well and understand special customized features. So if you are going to order something that is special in some way, ask to speak with a tech before placing the order. It will save everyone some time.
Hipshot is now making me a piezo loaded, gold/black toned, A style bridge to replace the B style. They said that the spacing I ordered with the piezo feature has hardly ever been ordered before so they were not aware of this issue. The bridge would have been done by now except that it needs to be plated. I can understand that they don't want to have just one bridge sent out for plating. So they must wait until they get enough of an order to make it worth while. Therefore it has taken a whole month now but I look for it to arrive any day now. FYI Hipshot hardware finished in black or satin chrome is finished in house and is very quick. Shiny chrome and gold takes longer.
I just want to state that my customer has been very cool about all of this. We originally talked about having the bass completed in three months and it could have been but things do happen and I don't let a bass go out if I do not think it is exactly right. I do not do deadlines and don't guarantee dates of completion for this very reason.


excuse my ignorance... what is the issue exactly?
Uneven string spacing?
- Aug 24, 2010
- 440
- 1,082
- Disclosures
- Builder/Owner:Drake Custom Bass Guitars
At last the replacement bridge is here! I received the Hipshot A style bridge just this last Thursday and was able to get some progress made on this bass. I have completed several other instruments while waiting for this but now she will get my full attention.
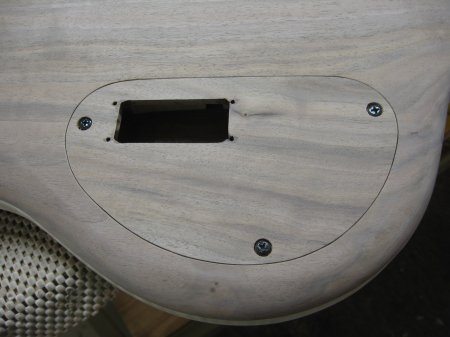
One of the things I did while waiting was to make this cavity cover for the bass. The customer wanted the battery box inside the cover plate if possible. After making a wooden model of the preamp and using some junk pots to see what kind of room I would have, I was able to locate a spot for the battery box. There is just enough room where the box will not come in contact with the other bits inside the cavity. I have decided to use battery boxes for all may basses with piezo (Ghost) systems as the battery life is shorter than with my other active components. Also every time someone messes with the inside while changing batteries, the more chance of damage to the very fragile piezo wires. I have had to replace too many wires for customer's basses so I am making it so that the cavity does not have to be open but for cleaning of pots.
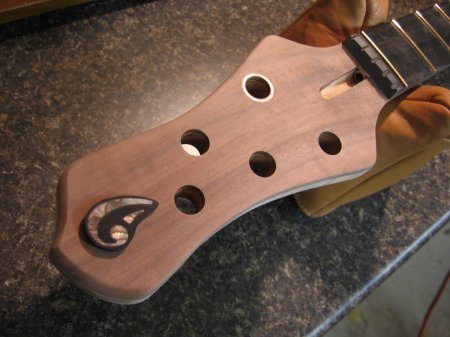
Also while waiting for the bridge we worked on the peghead inlay. Here is the inlay that Rosie made for the headstock. It is abalone shell set into Ebony.
As I have said in the past, we do it this way so that if a mistake is made then we can just make another inlay. It is much easier to inlay the larger completed inlay than the small pieces into the headstock. There would be a larger screw up factor with that. Plus I like the look of the contrasting wood around the inlay. You will see the finished inlay later.
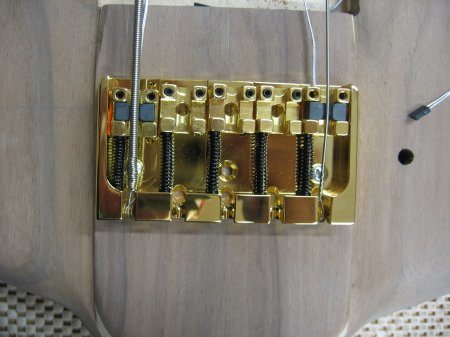
And here is the elusive Hipshot bridge in it's natural habitat. To do a mount up and centering I took off the piezo saddle pups to prevent damage to them. I then used two old damaged saddles to help put some strings on to help me in centering.
I mounted the bridge with some small screws that hold it just enough to put some old strings on. I never trust spec drawings on the websites for bridge mounting holes. You would be surprised how often I have to move the bridge a tiny bit off center to compensate for bridge holes that are not perfectly centered on the bridge. I set everything off the neck and center line but I usually have to compensate a little. Not anything that you can see but fine measuring devices can.
I then marked the areas where the piezo wires will go through and went to the drill press.
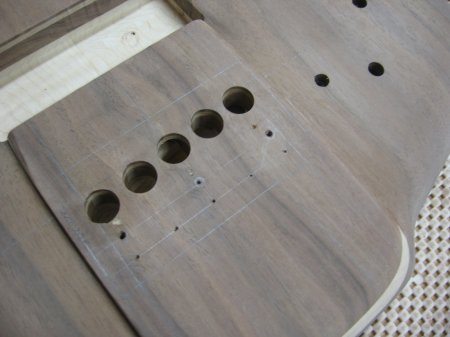
You remember that I had routed a channel for the piezo wiring prior to gluing on the top. I needed to drill down to connect with that channel so I just checked, re-checked, and drilled down along my projected intonation line. I found the channel on every hole. I started with the 1st string as it is closest to the intonation line. Then I could see which way the channel is going with each new hole. I then marked the string through holes and went back to the drill press.
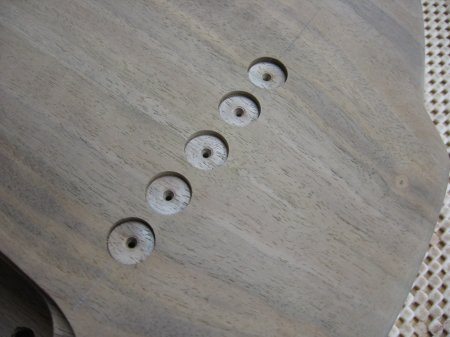
I drilled the string through holes from the front of the bass with a 1/8 inch taper bit. I set the stop so that the bit stops at the drill press table surface. This way I have a very small hole on the backside that my 1/2 forstner bit's spike fits into perfectly. Then I can accurately drill, from the back side, these little recesses for the ferrules.
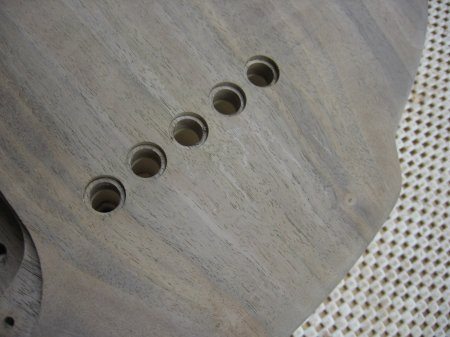
Then with a 3/8 inch brad tip bit I was able to center onto the center hole and drill the hole for the ferrule shaft.
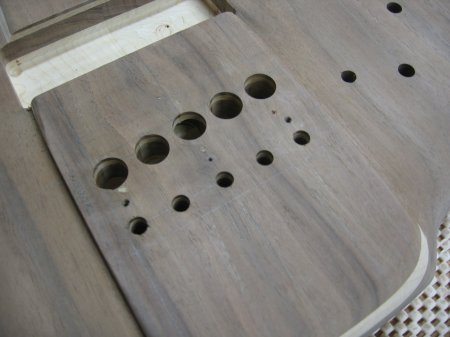
I then flipped the bass over and drilled the string through holes just wider than the hole in the bridge. This allows the string to pass through the body easily and allows you to insert a punch to help remove a ferrule if you ever need to. I like things that I can take apart and work on without damage to it.
Next time I will show the pre-finish assembly with the pickups, tuners, bridge in place and strung up to check once again that all is well. Then on to finishing.
One of the things I did while waiting was to make this cavity cover for the bass. The customer wanted the battery box inside the cover plate if possible. After making a wooden model of the preamp and using some junk pots to see what kind of room I would have, I was able to locate a spot for the battery box. There is just enough room where the box will not come in contact with the other bits inside the cavity. I have decided to use battery boxes for all may basses with piezo (Ghost) systems as the battery life is shorter than with my other active components. Also every time someone messes with the inside while changing batteries, the more chance of damage to the very fragile piezo wires. I have had to replace too many wires for customer's basses so I am making it so that the cavity does not have to be open but for cleaning of pots.
Also while waiting for the bridge we worked on the peghead inlay. Here is the inlay that Rosie made for the headstock. It is abalone shell set into Ebony.
As I have said in the past, we do it this way so that if a mistake is made then we can just make another inlay. It is much easier to inlay the larger completed inlay than the small pieces into the headstock. There would be a larger screw up factor with that. Plus I like the look of the contrasting wood around the inlay. You will see the finished inlay later.
And here is the elusive Hipshot bridge in it's natural habitat. To do a mount up and centering I took off the piezo saddle pups to prevent damage to them. I then used two old damaged saddles to help put some strings on to help me in centering.
I mounted the bridge with some small screws that hold it just enough to put some old strings on. I never trust spec drawings on the websites for bridge mounting holes. You would be surprised how often I have to move the bridge a tiny bit off center to compensate for bridge holes that are not perfectly centered on the bridge. I set everything off the neck and center line but I usually have to compensate a little. Not anything that you can see but fine measuring devices can.
I then marked the areas where the piezo wires will go through and went to the drill press.
You remember that I had routed a channel for the piezo wiring prior to gluing on the top. I needed to drill down to connect with that channel so I just checked, re-checked, and drilled down along my projected intonation line. I found the channel on every hole. I started with the 1st string as it is closest to the intonation line. Then I could see which way the channel is going with each new hole. I then marked the string through holes and went back to the drill press.
I drilled the string through holes from the front of the bass with a 1/8 inch taper bit. I set the stop so that the bit stops at the drill press table surface. This way I have a very small hole on the backside that my 1/2 forstner bit's spike fits into perfectly. Then I can accurately drill, from the back side, these little recesses for the ferrules.
Then with a 3/8 inch brad tip bit I was able to center onto the center hole and drill the hole for the ferrule shaft.
I then flipped the bass over and drilled the string through holes just wider than the hole in the bridge. This allows the string to pass through the body easily and allows you to insert a punch to help remove a ferrule if you ever need to. I like things that I can take apart and work on without damage to it.
Next time I will show the pre-finish assembly with the pickups, tuners, bridge in place and strung up to check once again that all is well. Then on to finishing.
- Aug 24, 2010
- 440
- 1,082
- Disclosures
- Builder/Owner:Drake Custom Bass Guitars
I know it has been awhile since I posted any progress. The new bridge arrived after a month and a half so now I can do a pre-finish assembly. It has taken two months longer than we thought to get her to this stage.
The customer has decided on a tru-oil finish so it will be a few weeks more before she can be shipped out. The tru-oil dries very quickly but a complete cure of the oil may take an extra week or two. Until that point it is too easy to scratch it.
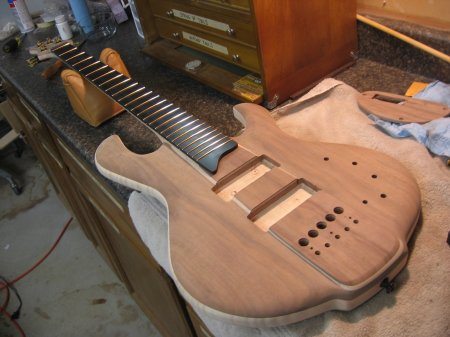
Here she is on the bench with her neck attached with all of the screws. I will be putting the tuners, bridge, strings and pups on so that I can make sure everything is lined up correctly and that nothing has changed over the last month.
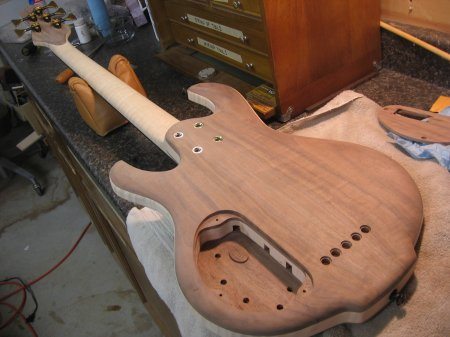

Alas the new bridge. This is the Hipshot A style bridge in .669 spacing and with the piezo loaded saddles. Fits great and looks good as well. Everything looks well aligned.
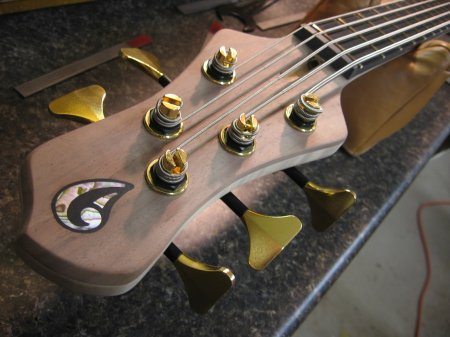
The tuners are a two tone gold/black special order that they do for me once in awhile. We will be stringing the bass up with Ernie Ball tapewound strings when we finally string her up but for now I am using these old junk strings that I keep around for this type of thing.
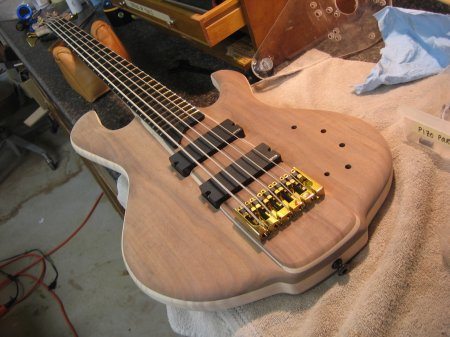
And now some shots of the bass out in the sun. Just wait until you see her with finish on.
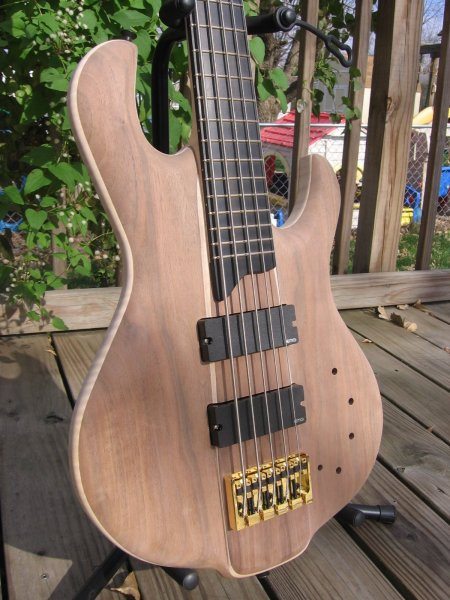
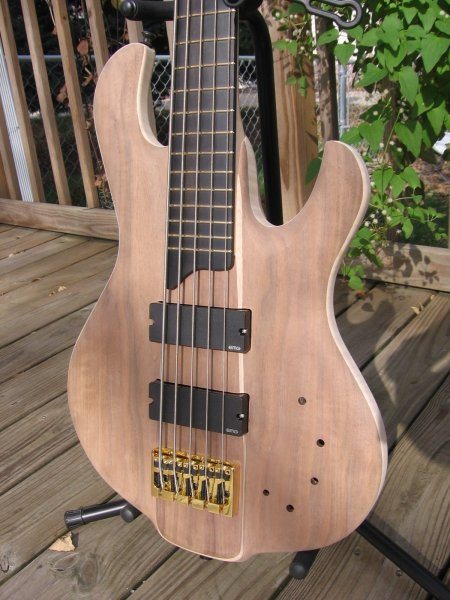
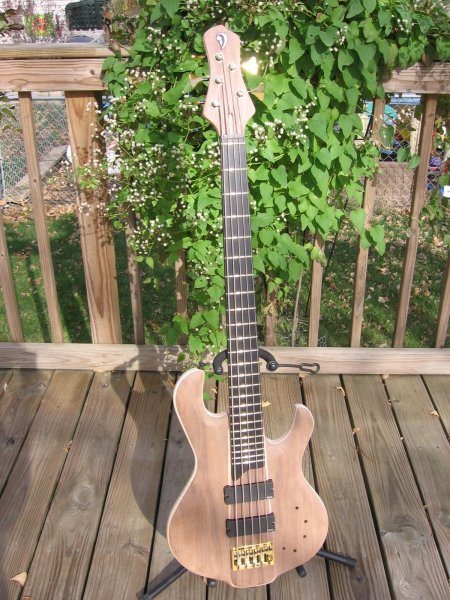
Well I have had fun testing the bass but now it is time to take her apart and start filling the pores for finish. I will show that next post.
The customer has decided on a tru-oil finish so it will be a few weeks more before she can be shipped out. The tru-oil dries very quickly but a complete cure of the oil may take an extra week or two. Until that point it is too easy to scratch it.
Here she is on the bench with her neck attached with all of the screws. I will be putting the tuners, bridge, strings and pups on so that I can make sure everything is lined up correctly and that nothing has changed over the last month.
Alas the new bridge. This is the Hipshot A style bridge in .669 spacing and with the piezo loaded saddles. Fits great and looks good as well. Everything looks well aligned.
The tuners are a two tone gold/black special order that they do for me once in awhile. We will be stringing the bass up with Ernie Ball tapewound strings when we finally string her up but for now I am using these old junk strings that I keep around for this type of thing.
And now some shots of the bass out in the sun. Just wait until you see her with finish on.
Well I have had fun testing the bass but now it is time to take her apart and start filling the pores for finish. I will show that next post.

SaintMez
Commercial User
- Jan 3, 2010
- 428
- 59
- Disclosures
- Blood Brothers Guitars - Luthier, Porter Guitars - Contractor

- Aug 24, 2010
- 440
- 1,082
- Disclosures
- Builder/Owner:Drake Custom Bass Guitars
At this time I am in the finish stage of the build. I have completed the pre-finish assembly as I posted last time and I now am ready to fill the pores of the Walnut. This will save me a ton of time and finish.
The customer has selected a Tru-oil finish for this bass. As most people know Tru-oil is a gun stock finish made with linseed oil and plastic resins that cure into a very durable finish. Tru-oil is actually a polymerized oil that is more like a varnish than oil. It cures rather quickly and can have a beautiful look to it if some care is taken during application. There is tons of articles and "how-to's" on the web so I will not bore you with it all, but for those who do not have a spray booth and want a nice looking durable finish...you may wish to give it a try.
I once used just plain wiping varnish but I noticed many of my instruments, after a couple of years of playing, showed a lot of patina. Some players love that broke in used look and some do not. I have since changed to where I use either Tru-oil (for a glossy sheen finish) or a catalyzed waterbased urethane for my endurance finishes. I promise I will cover the WB urethane in detail next time I post a build. (I have found a way to get that nice deep rich color with the speed and ease of waterbased products that can be applied in doors without spray equipment.) But for this bass we are going with the polymerized oil.
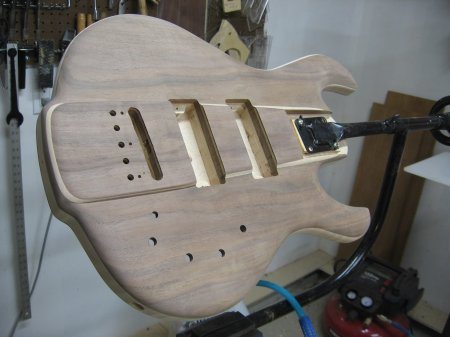
Here we are with the disassembled bass bracketed and mounted in my Stew Mac finishing stand. I have sanded the finger oils and any marks out of the wood from the pre-finish assembly. I have also wiped the wood down with naphtha and let it dry. I prepared the neck and electronics cavity cover the same way.
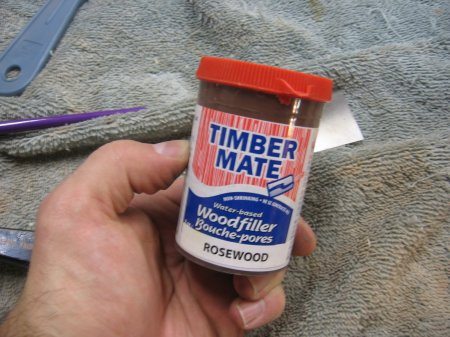
Next I use this Timber Mate brand waterbased pore filler. It is rated for any type of finsh so I have no worry of oil over waterbased issues. I like this filler as if it ever dries out all you have to do is add some water and it is as good as the day it was first opened. You can get it at Stew Mac.
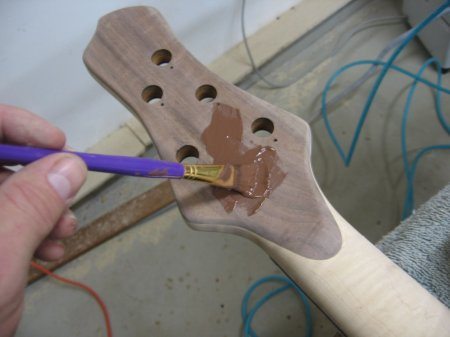
I mix up some of the filler with some water to make it flow a little easier. I just mix it in a cup and until it is like pudding. I use a small artist brush to dab it onto the headstock. I then brush across the grain until the whole surface is covered. I avoid the Maple sections as they are tight grained and do not need filled pores. I also want to avoid having the pigment in the filler from staining the Maple. I did get some on the Maple and I am pleased to report that it had no effect on the Maple as far as staining. But why do it if I can avoid it.
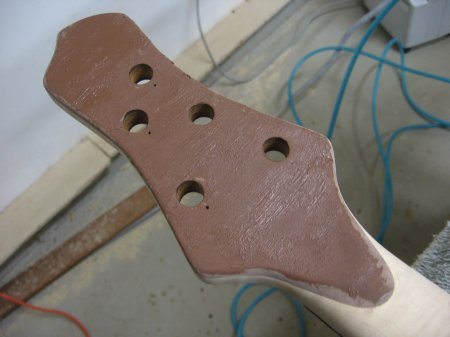
After the area is coated....
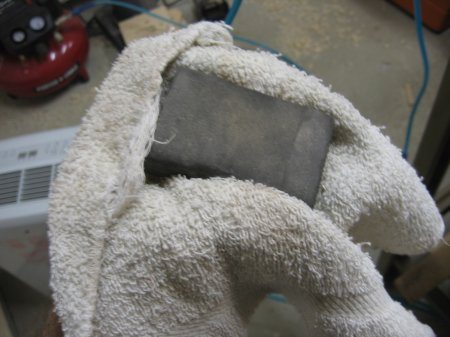
......I wrap an old washcloth around a rubber block and use it to rub off any excess filler. I don't even allow the filler to fully set up. The filler dries completely in like 30 minutes so you do have to keep moving.
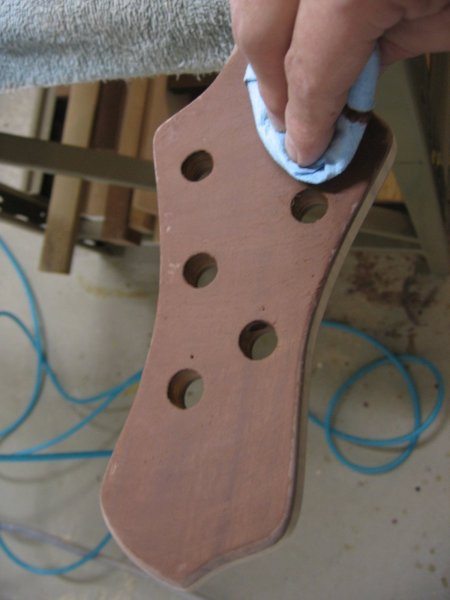
I finish it off with a shop towel. If the filler has dried too fast I may dampen the towel. The water does raise some grain but I will have to sand away any filler left on the surface so I can knock off the rasied grain as well.
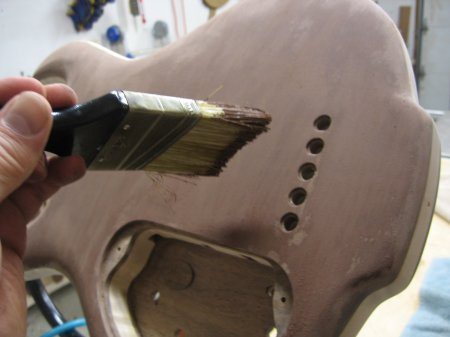
For the bigger areas I used a larger brush. I avoid getting too much into the ferrule holes and neck mounting holes as you do have to scrape it out later. If I didn't then finish will make the filler as hard as a rock creating more work.
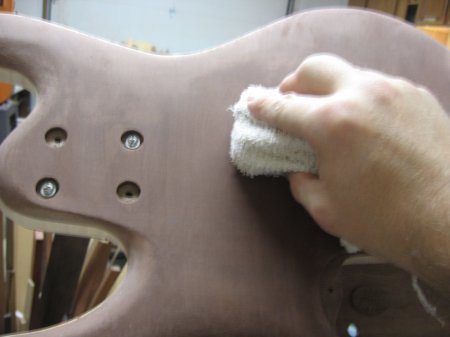
And the same block and towel to wipe the extra filler off.
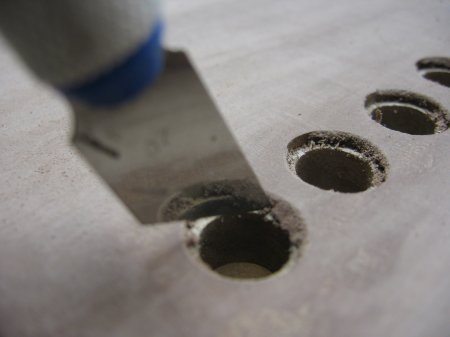
Now I said that I tried to avoid getting filler into the holes but I always do anyway, so here is the time to scrape it out.
After the filler has cured I sanded with 320 grit paper and then with 600 grit to make the surface as flat and scratch free as I could. I did the whole process of blowing off the dust and then wiping once again with naphtha. The look of the wood was so that I could not even see that any filler had ever been on the instrument. That is the goal. If there ever is any open pores left, I apply a little more filler and then sand and remove dust as before.
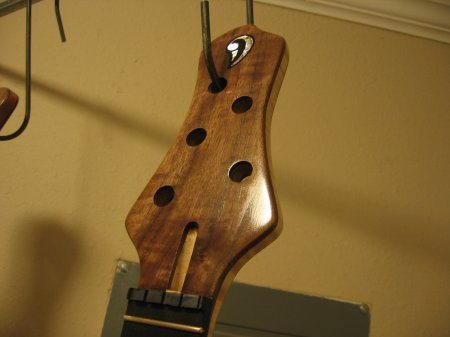
The first coats of tru-oil. I followed the same basic techniques that I use for all of my finishes. I ball up a paper shop towel and then wrap it in another shop towel to use as an applicator. I pour some finish into a dish and dip and blot the finish onto the wood. The effect is like sponge painting and you will be surprised how much it looks like a sprayed finish when you are done. This works well with the tru-oil as the oil seems to level itself out very nicely with no wipe marks. This first two coats are to build up the finish. I do one coat and wait one day. Then I buff with fine grit plastic steel wool pads made by 3M. After the second coat I wait 3 days so that the finish has plenty of time to cure.
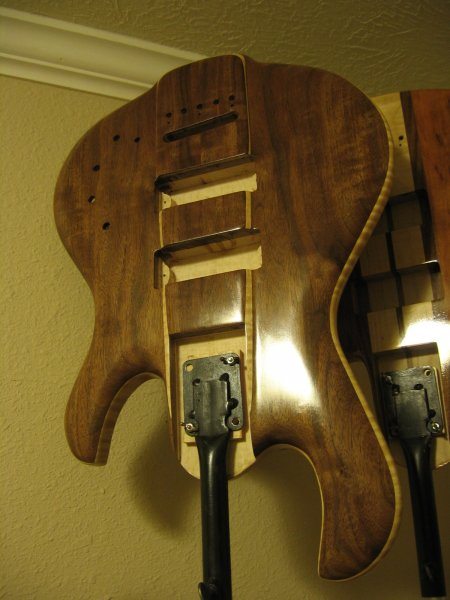
Then all other coats to be applied will be applied like you would normally apply tru-oil. Very thin coats. Probably 12 or so with some light sanding with micro mesh in between.
Next time I will have some more photos after a few coats. She will be looking pretty sweet by then.
Thanks for checking out my build.
The customer has selected a Tru-oil finish for this bass. As most people know Tru-oil is a gun stock finish made with linseed oil and plastic resins that cure into a very durable finish. Tru-oil is actually a polymerized oil that is more like a varnish than oil. It cures rather quickly and can have a beautiful look to it if some care is taken during application. There is tons of articles and "how-to's" on the web so I will not bore you with it all, but for those who do not have a spray booth and want a nice looking durable finish...you may wish to give it a try.
I once used just plain wiping varnish but I noticed many of my instruments, after a couple of years of playing, showed a lot of patina. Some players love that broke in used look and some do not. I have since changed to where I use either Tru-oil (for a glossy sheen finish) or a catalyzed waterbased urethane for my endurance finishes. I promise I will cover the WB urethane in detail next time I post a build. (I have found a way to get that nice deep rich color with the speed and ease of waterbased products that can be applied in doors without spray equipment.) But for this bass we are going with the polymerized oil.
Here we are with the disassembled bass bracketed and mounted in my Stew Mac finishing stand. I have sanded the finger oils and any marks out of the wood from the pre-finish assembly. I have also wiped the wood down with naphtha and let it dry. I prepared the neck and electronics cavity cover the same way.
Next I use this Timber Mate brand waterbased pore filler. It is rated for any type of finsh so I have no worry of oil over waterbased issues. I like this filler as if it ever dries out all you have to do is add some water and it is as good as the day it was first opened. You can get it at Stew Mac.
I mix up some of the filler with some water to make it flow a little easier. I just mix it in a cup and until it is like pudding. I use a small artist brush to dab it onto the headstock. I then brush across the grain until the whole surface is covered. I avoid the Maple sections as they are tight grained and do not need filled pores. I also want to avoid having the pigment in the filler from staining the Maple. I did get some on the Maple and I am pleased to report that it had no effect on the Maple as far as staining. But why do it if I can avoid it.
After the area is coated....
......I wrap an old washcloth around a rubber block and use it to rub off any excess filler. I don't even allow the filler to fully set up. The filler dries completely in like 30 minutes so you do have to keep moving.
I finish it off with a shop towel. If the filler has dried too fast I may dampen the towel. The water does raise some grain but I will have to sand away any filler left on the surface so I can knock off the rasied grain as well.
For the bigger areas I used a larger brush. I avoid getting too much into the ferrule holes and neck mounting holes as you do have to scrape it out later. If I didn't then finish will make the filler as hard as a rock creating more work.
And the same block and towel to wipe the extra filler off.
Now I said that I tried to avoid getting filler into the holes but I always do anyway, so here is the time to scrape it out.
After the filler has cured I sanded with 320 grit paper and then with 600 grit to make the surface as flat and scratch free as I could. I did the whole process of blowing off the dust and then wiping once again with naphtha. The look of the wood was so that I could not even see that any filler had ever been on the instrument. That is the goal. If there ever is any open pores left, I apply a little more filler and then sand and remove dust as before.
The first coats of tru-oil. I followed the same basic techniques that I use for all of my finishes. I ball up a paper shop towel and then wrap it in another shop towel to use as an applicator. I pour some finish into a dish and dip and blot the finish onto the wood. The effect is like sponge painting and you will be surprised how much it looks like a sprayed finish when you are done. This works well with the tru-oil as the oil seems to level itself out very nicely with no wipe marks. This first two coats are to build up the finish. I do one coat and wait one day. Then I buff with fine grit plastic steel wool pads made by 3M. After the second coat I wait 3 days so that the finish has plenty of time to cure.
Then all other coats to be applied will be applied like you would normally apply tru-oil. Very thin coats. Probably 12 or so with some light sanding with micro mesh in between.
Next time I will have some more photos after a few coats. She will be looking pretty sweet by then.
Thanks for checking out my build.



