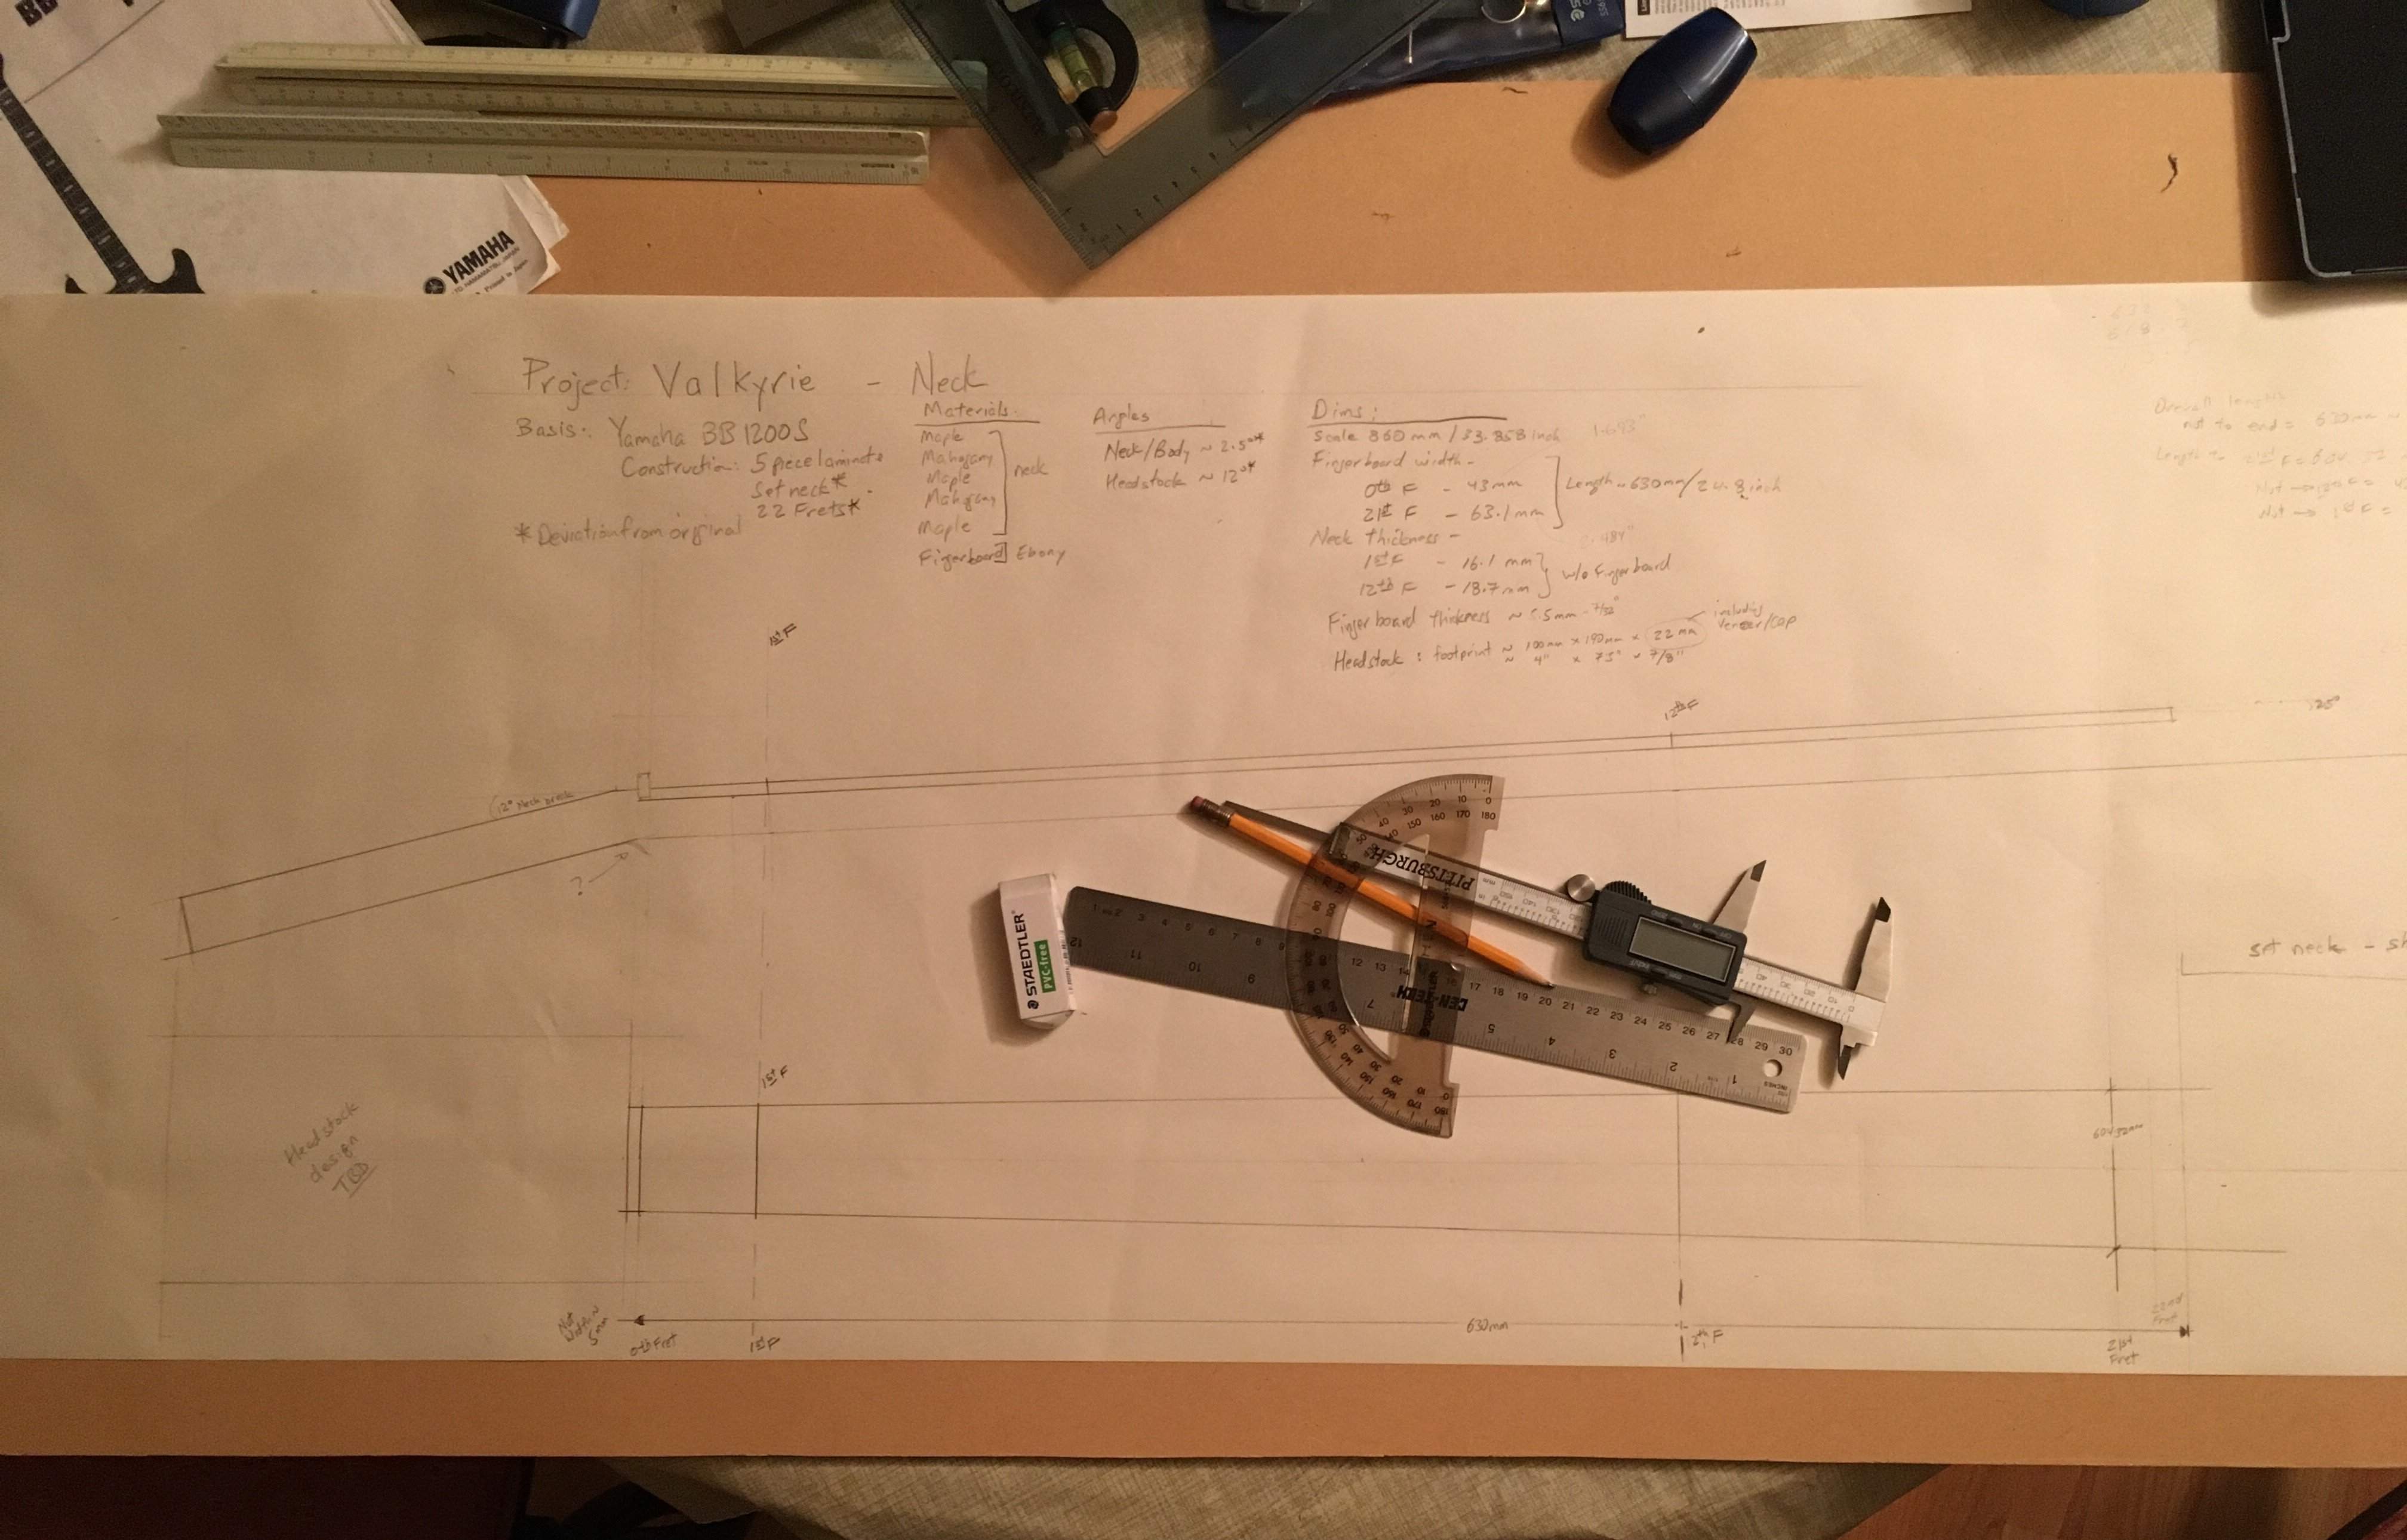
Getting started on a new build, first build. A strange build, some might think. Will be a semi hollow body, 4 string, 34"-scale. Using ES335 plans/design as basis for body, and Yamaha BB1200S as basis for neck. Just started on the full-size design.drawing of the neck. Thinking ahead about the body top/bottom--- contemplating between multi laminate pressed vs carved.

Enjoy the benefits of a premium membership!
Upgrade Account
-
TalkBass has been independent since 1998. Add your voice.
Create a free account to reply to discussions, view embedded media, and browse with fewer display ads.
Join free Log in
Want zero display ads or expanded classifieds tools? Compare plans.
You are using an out of date browser. It may not display this or other websites correctly.
You should upgrade or use an alternative browser.
You should upgrade or use an alternative browser.
ES-335 bass build
- Thread starter 83_Silberpfeil
- Start date
More options
Who Replied?

Thanks for the comment and the like @Beej --- please do provide chime in if you see something that can be done better, more easily, or correctly!Cool idea, I'll be following this build...
Worked on it a wee bit more and got some progress --- it's a long 3 day weekend, no school tomorrow LOL.
Modifying the Epi Dot design. You can see my pencil lines (sometimes) and also the red strike outs.
Schaller tuners/pegs coming in next week.
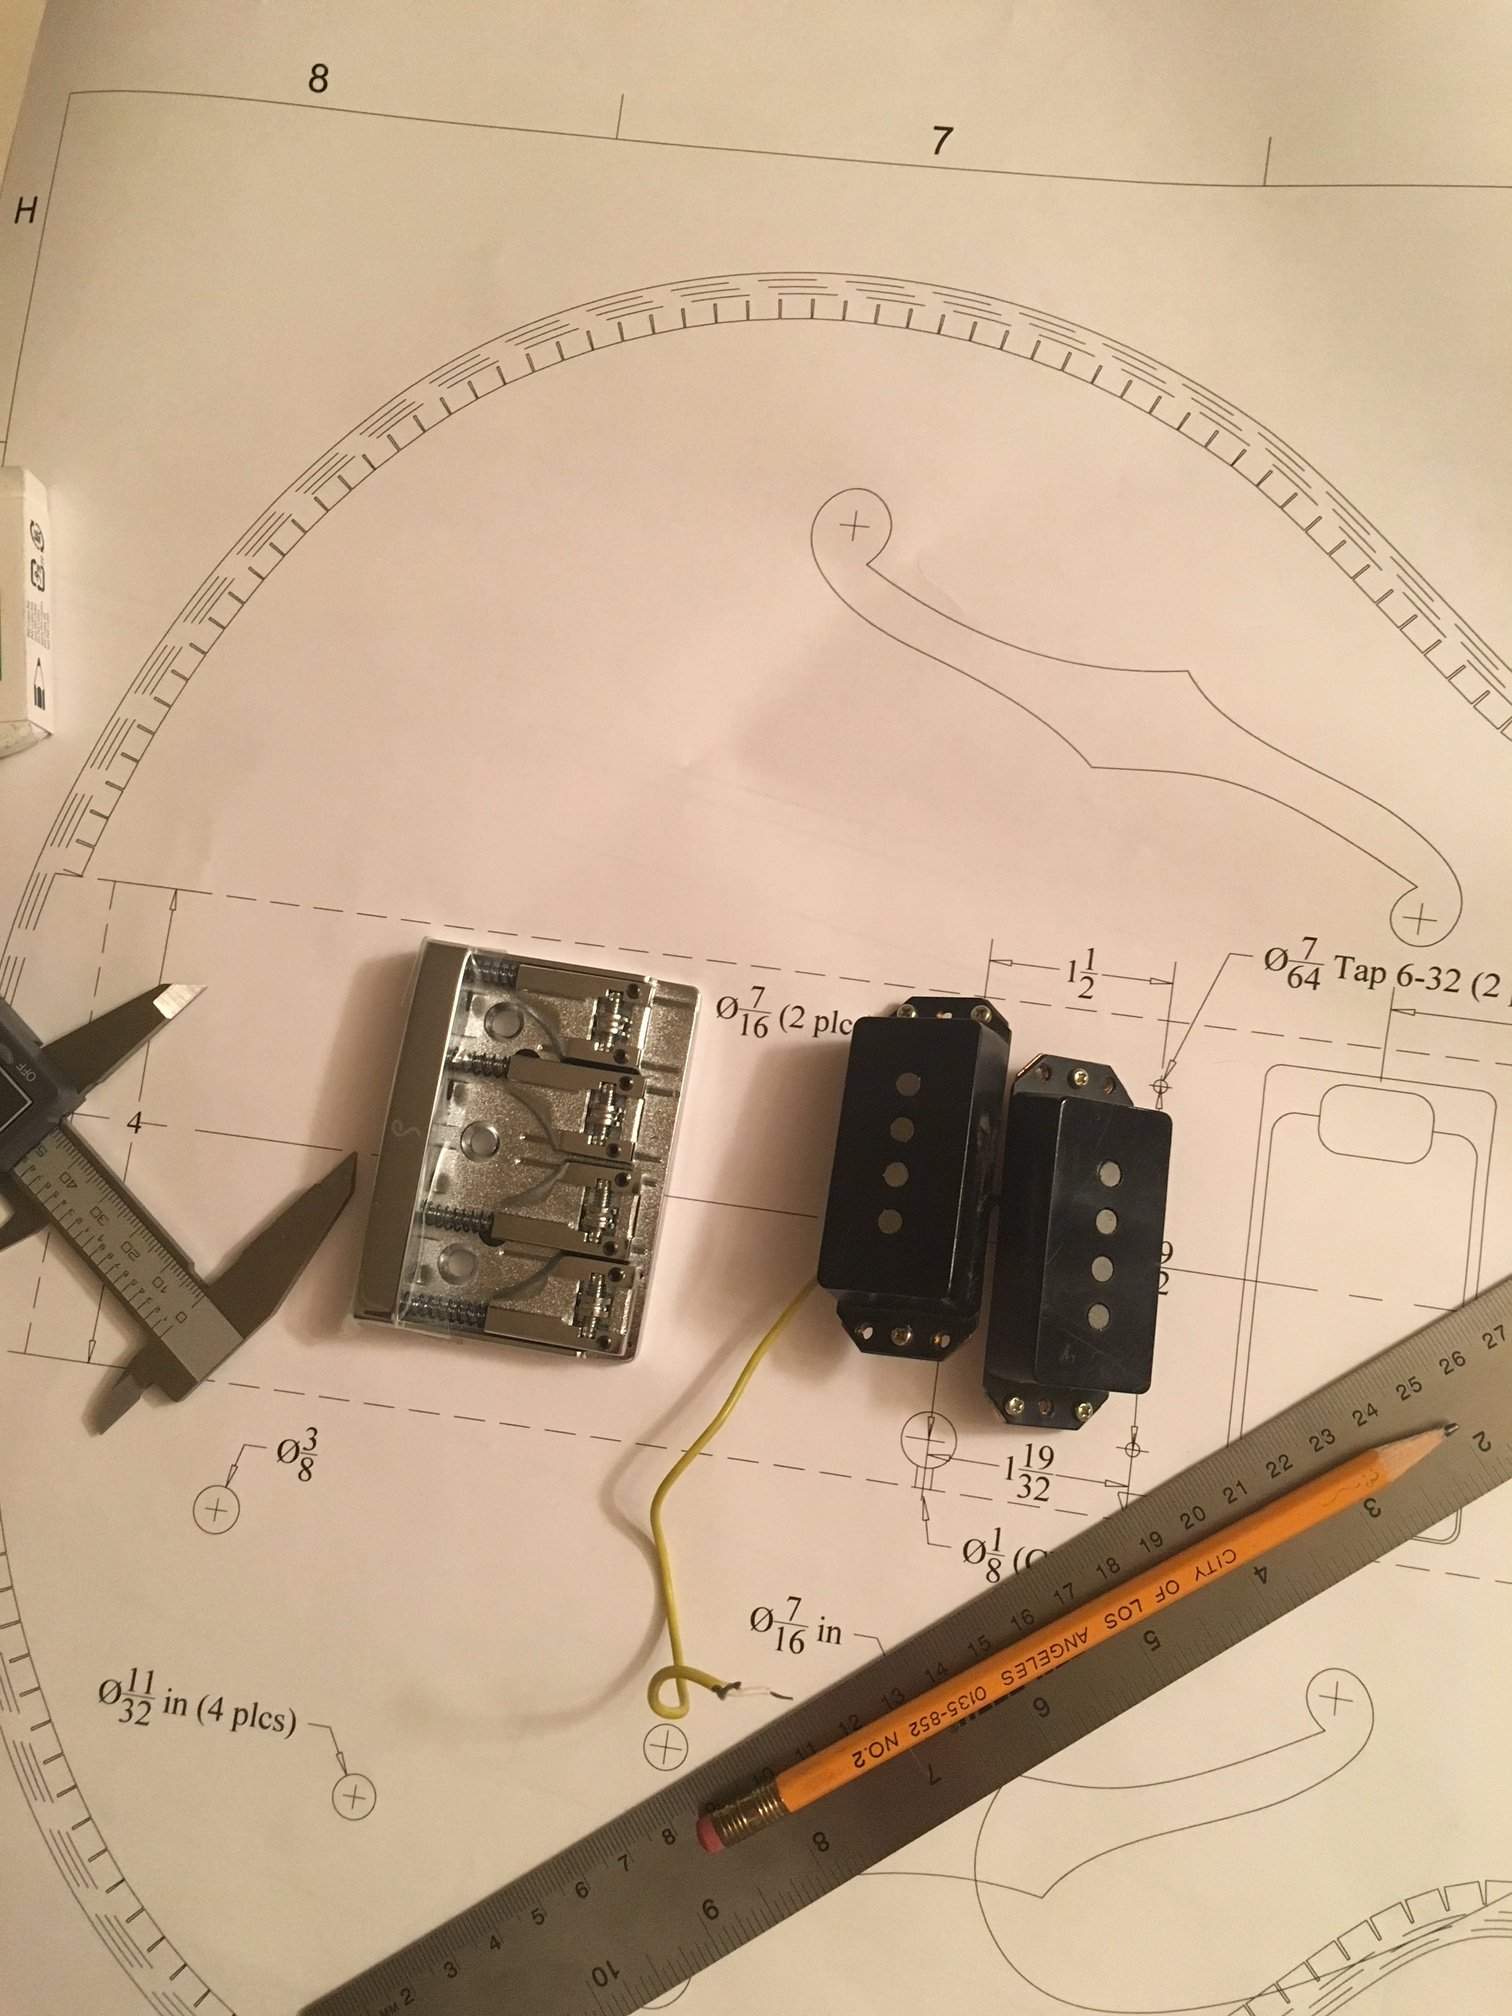
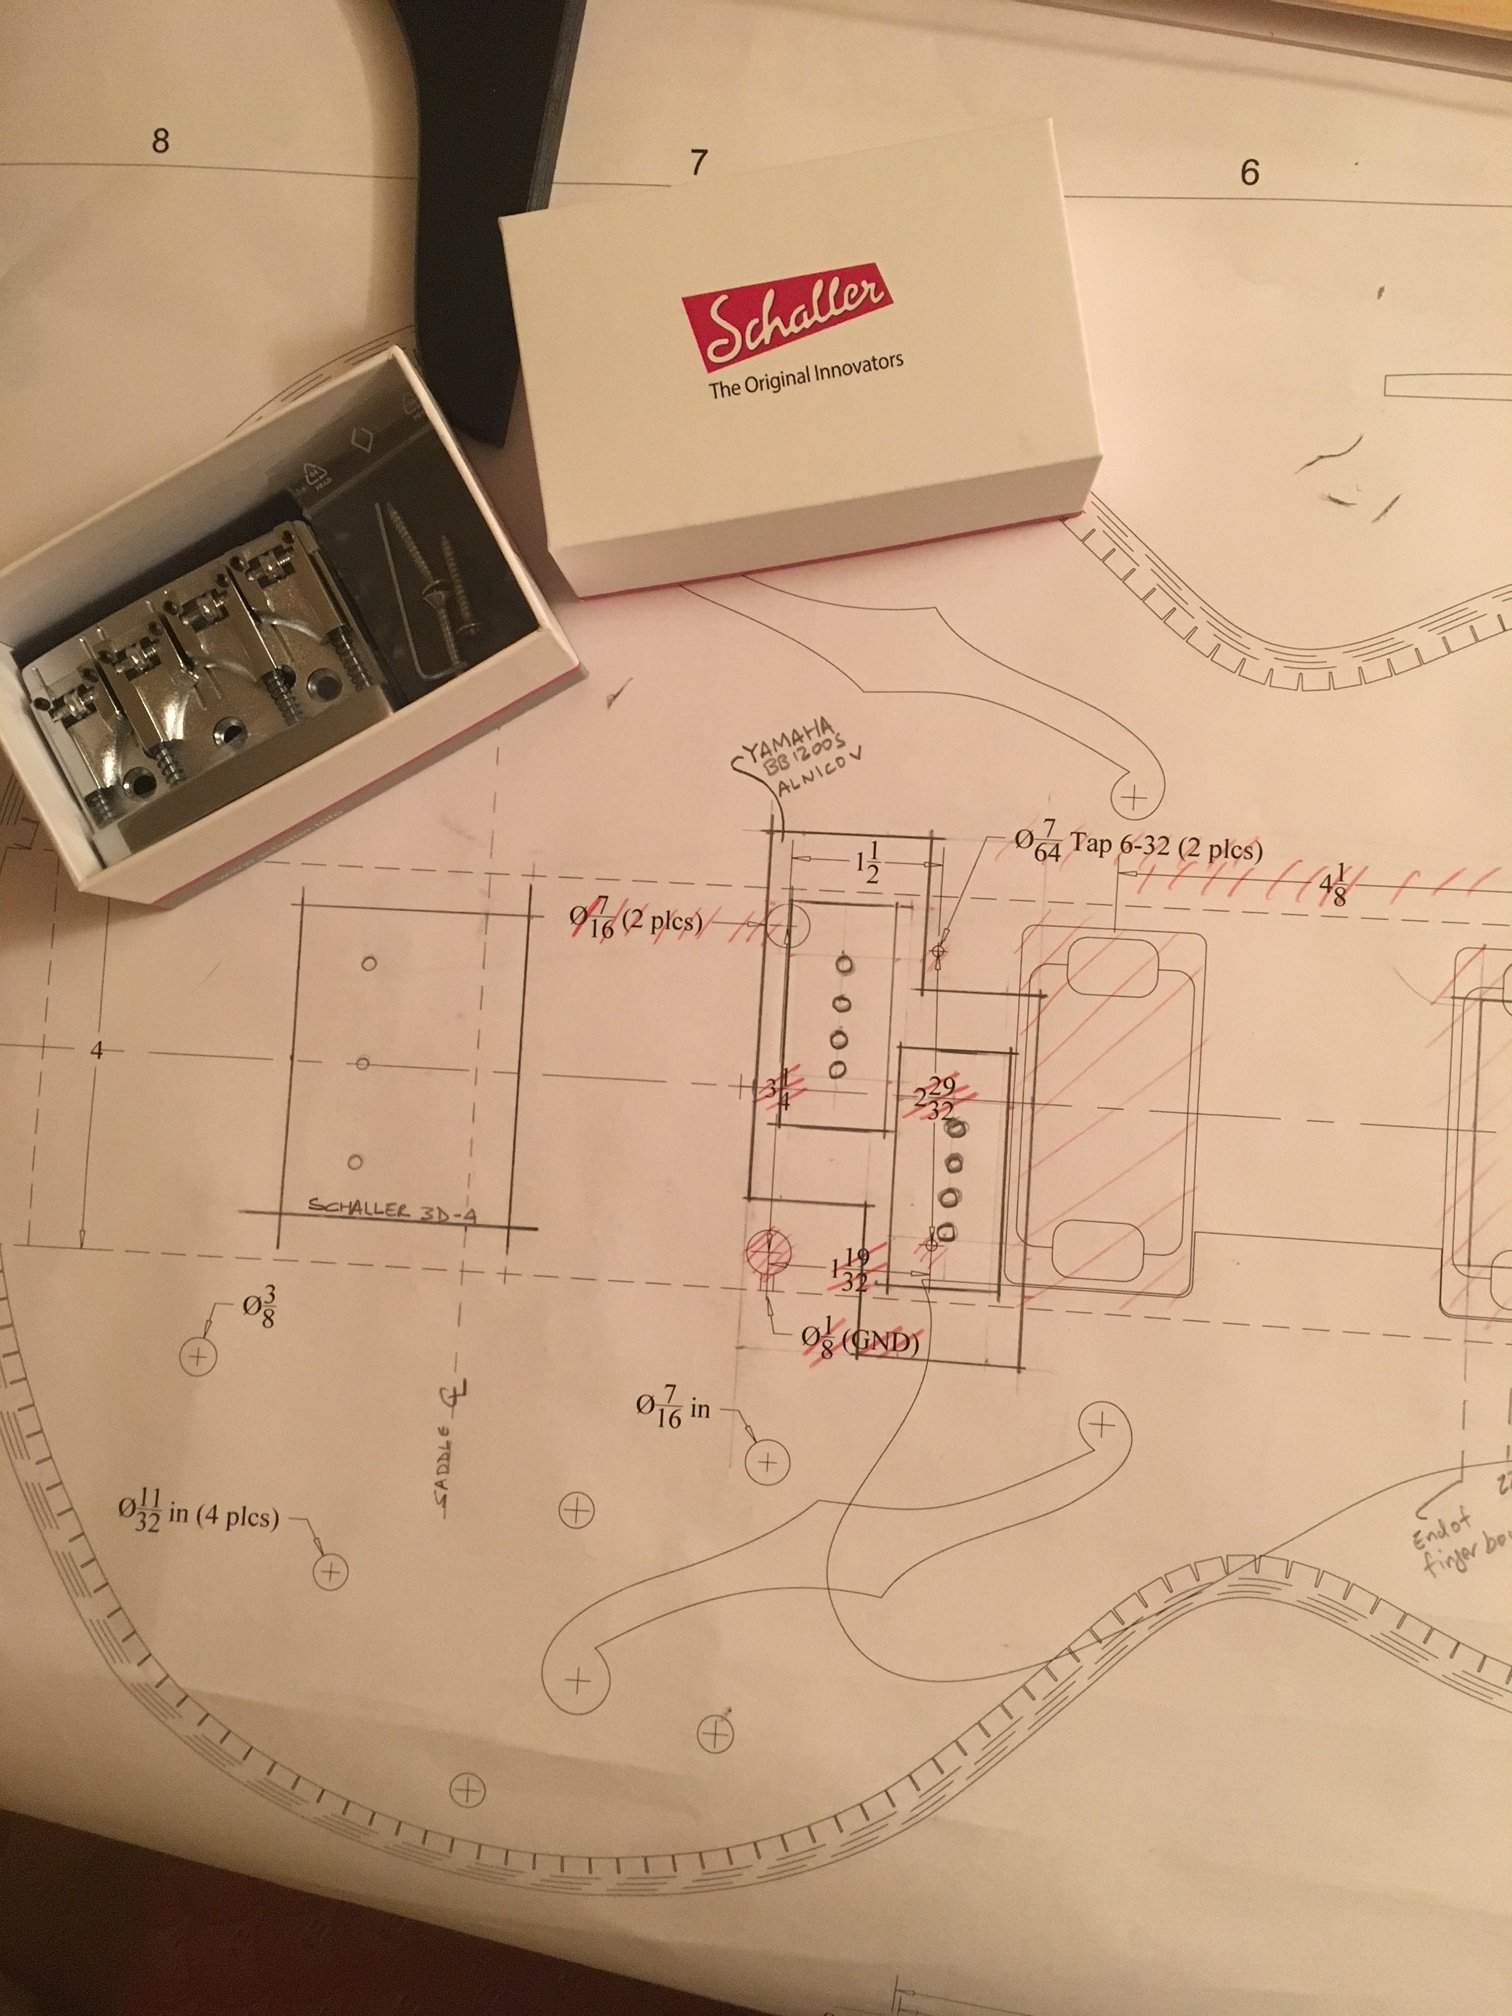
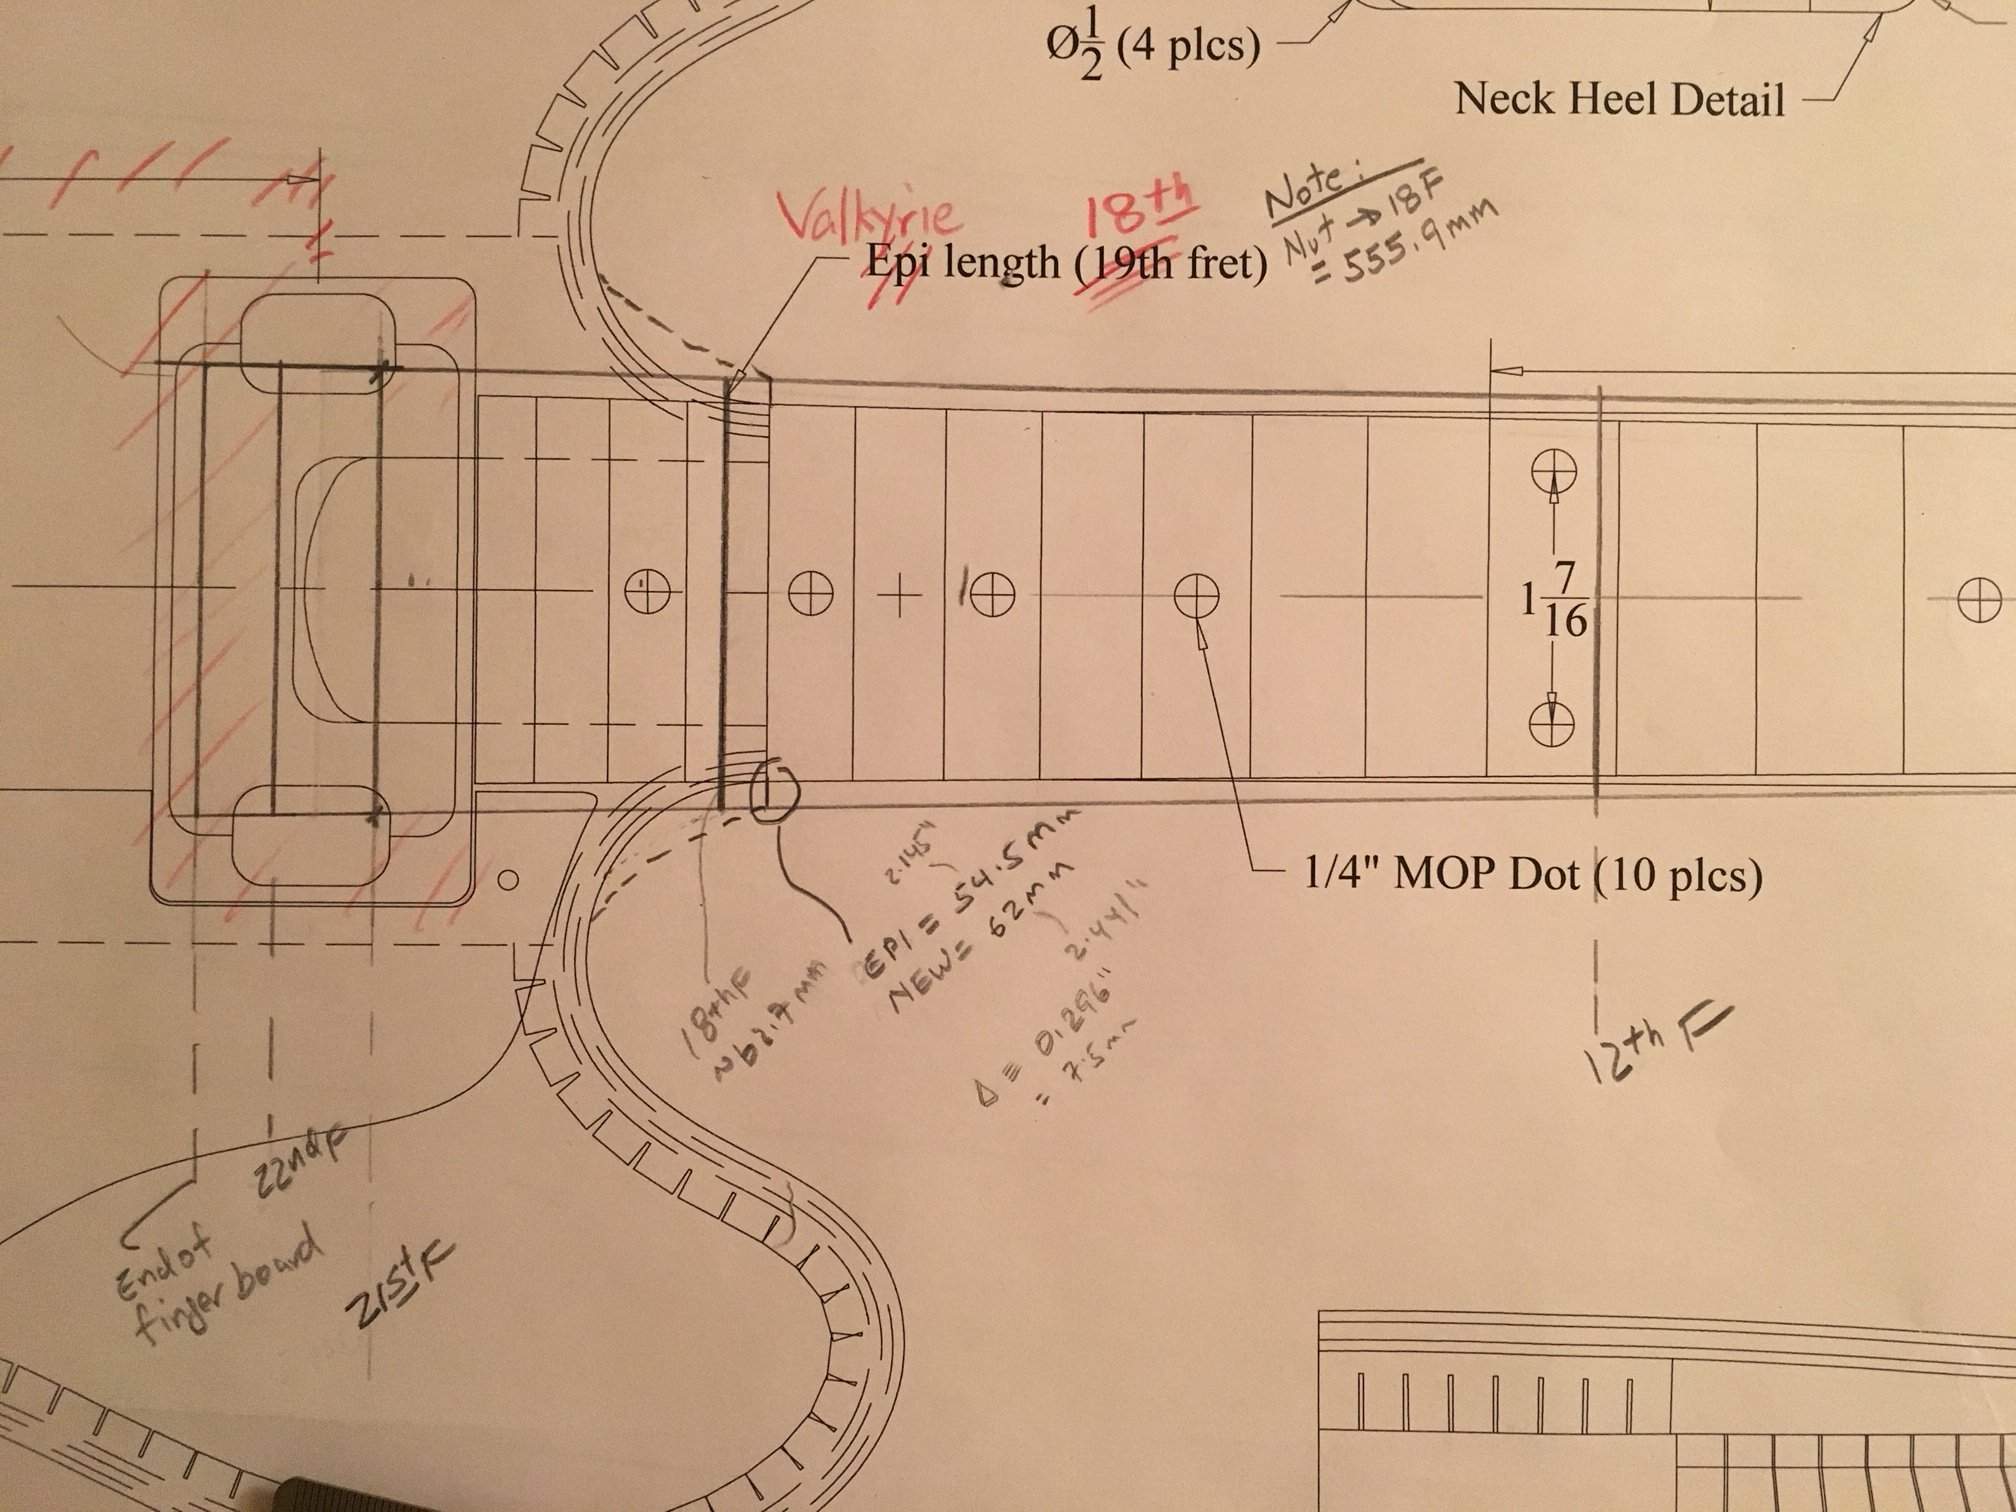
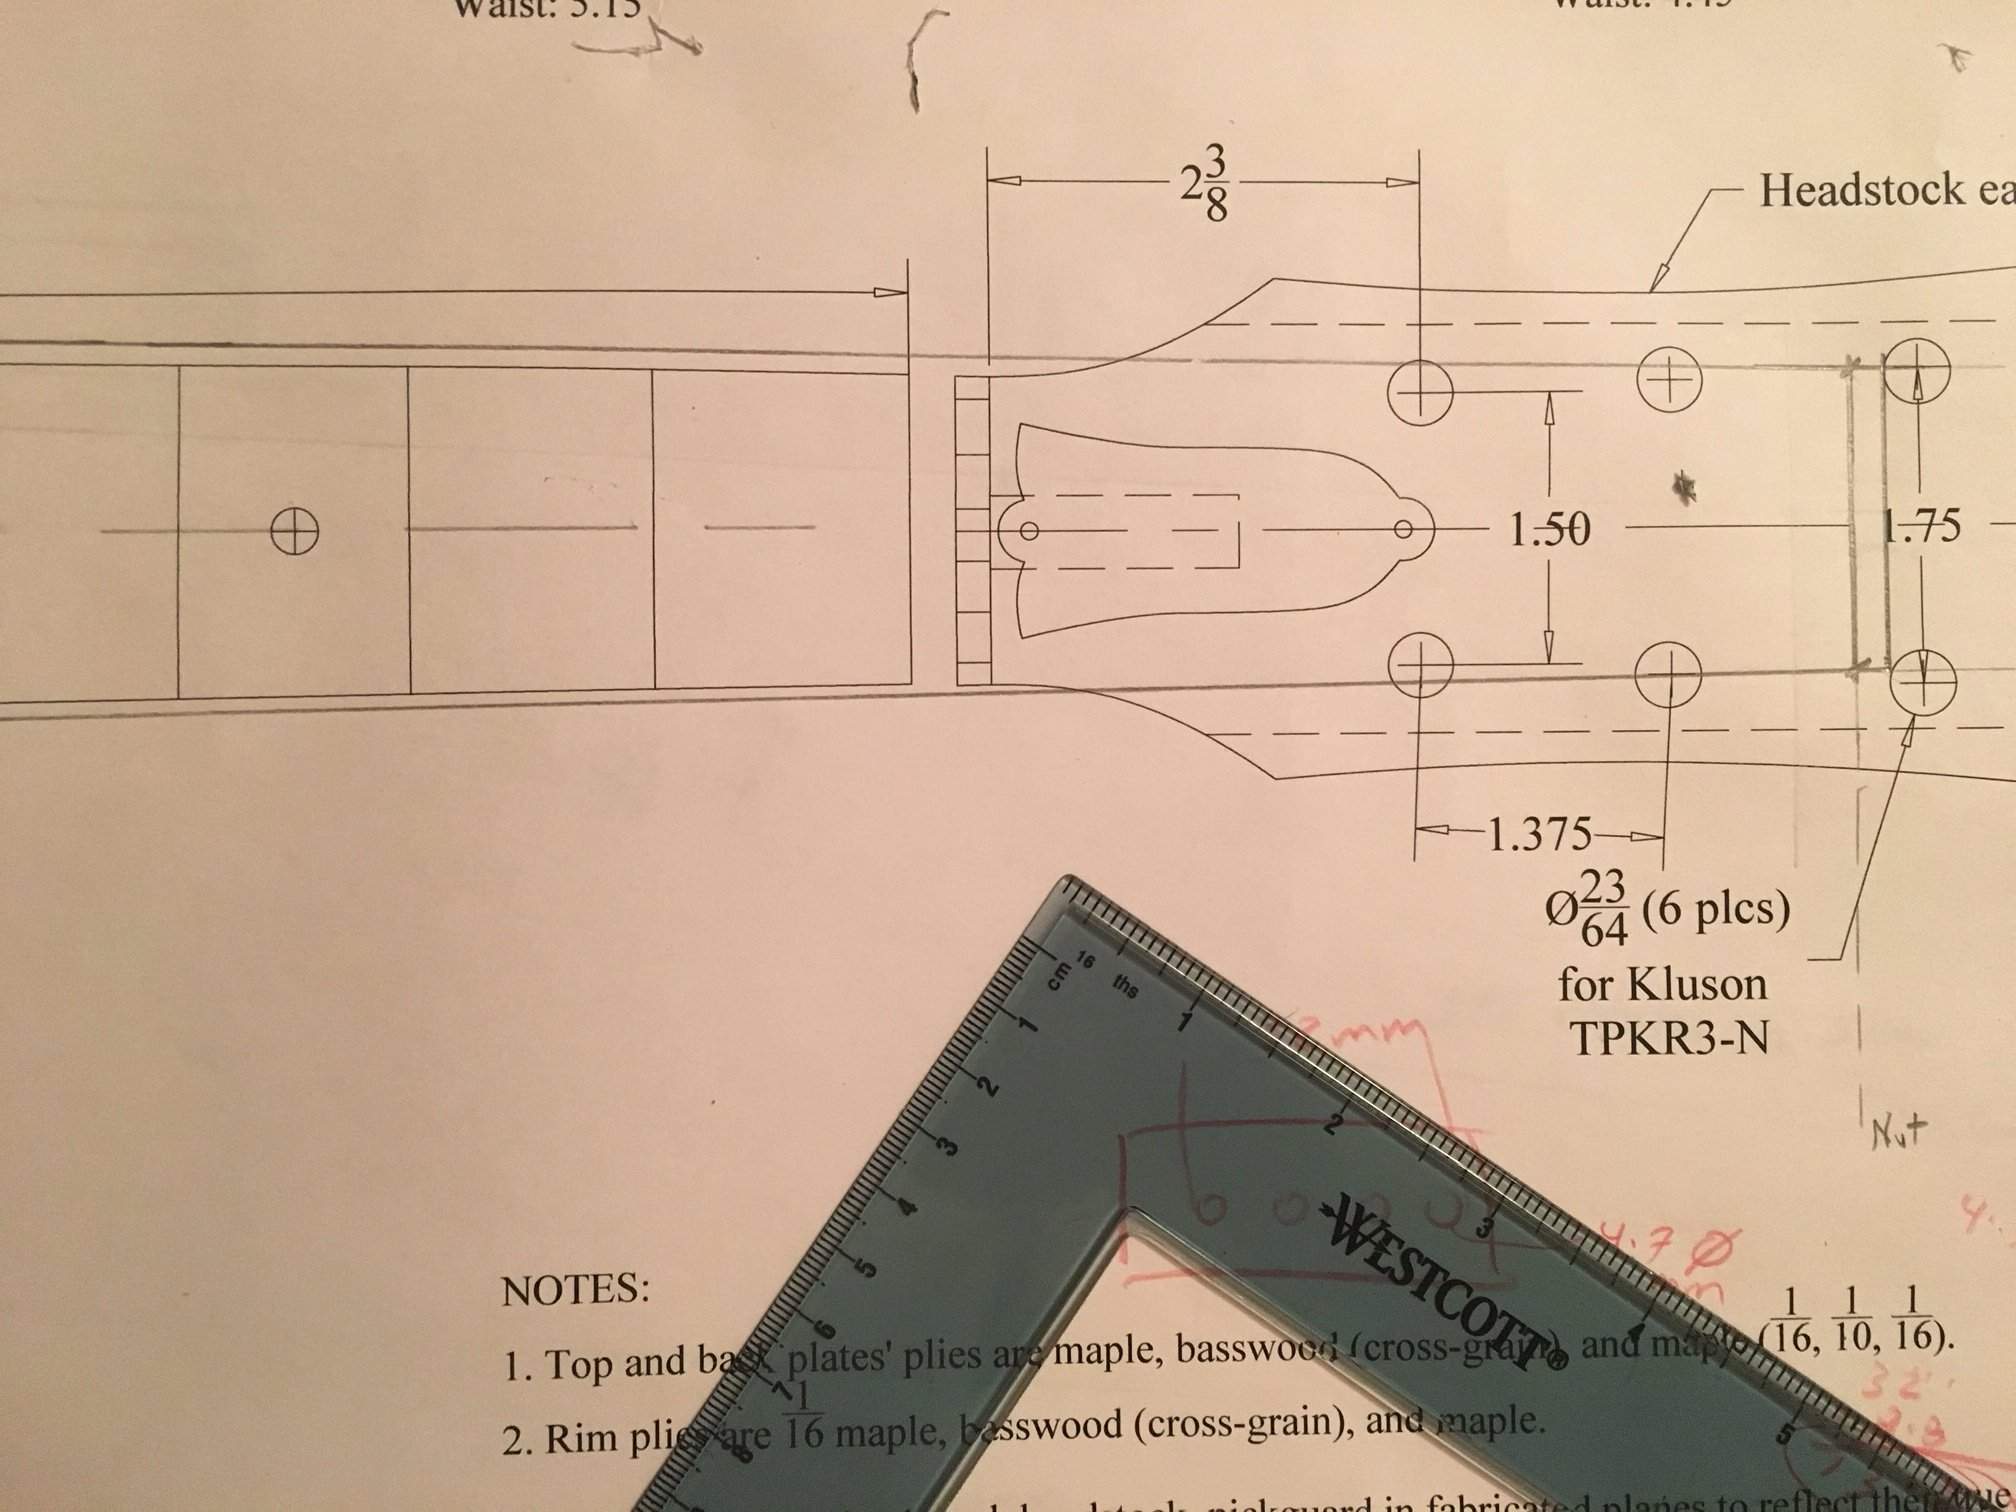
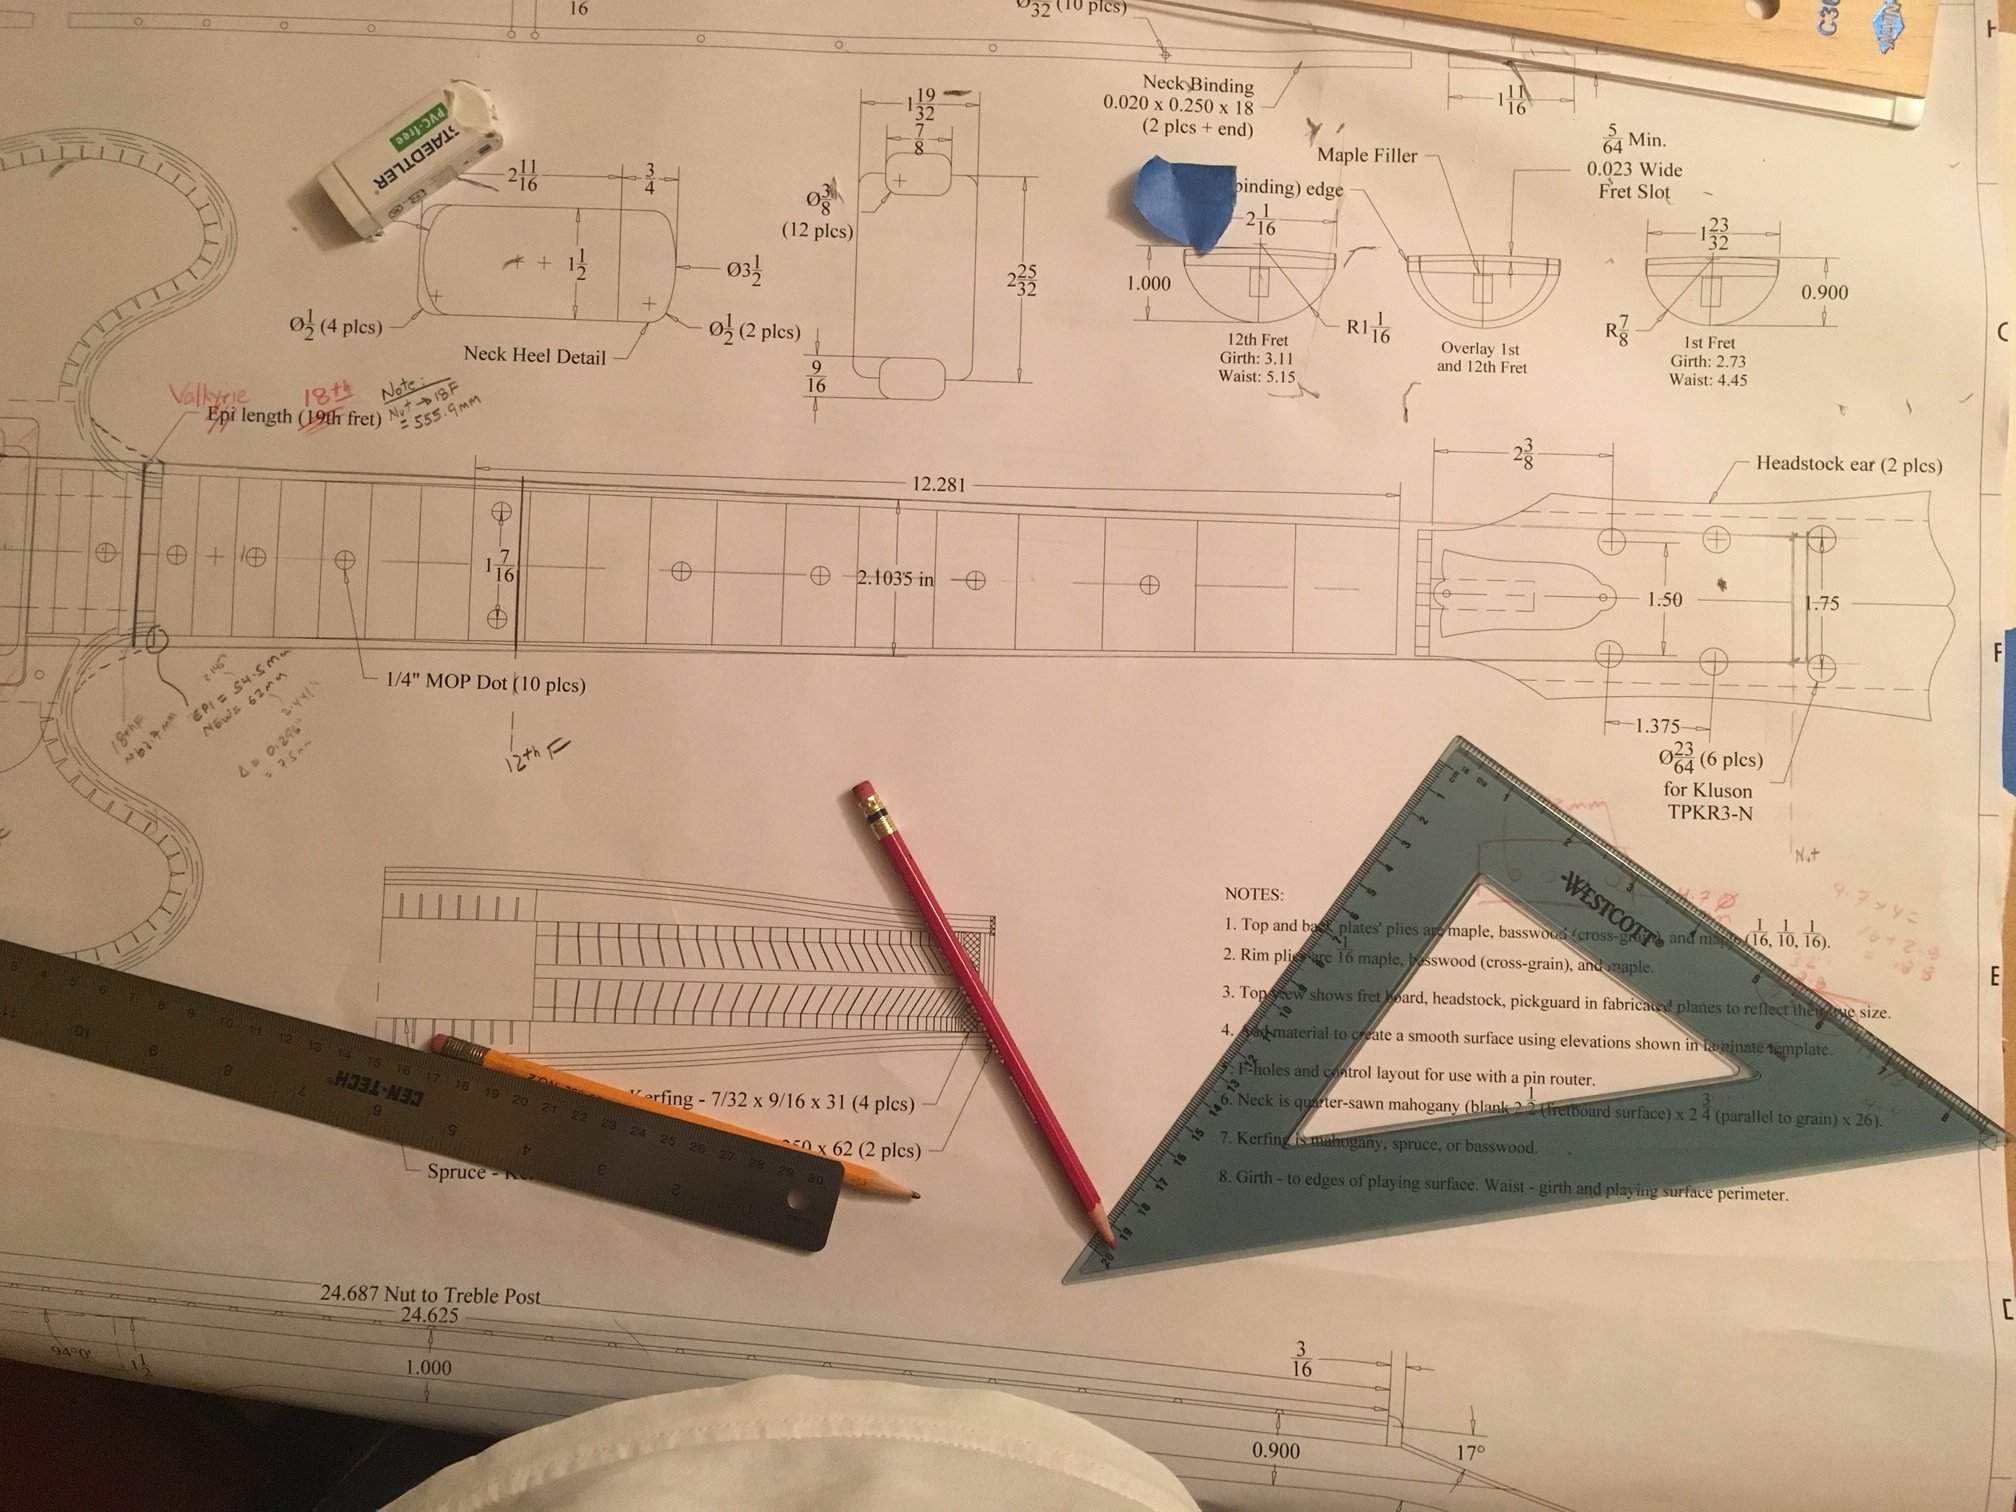
Modifying the Epi Dot design. You can see my pencil lines (sometimes) and also the red strike outs.
Schaller tuners/pegs coming in next week.

It's good to see that you are drawing out your instrument in great detail. That's important, because it forces you to figure out all the little problems and make all the little decisions about how things are going to fit together. That's what engineering is. There's an old saying that you can ignore engineering if you like, but it's not going to ignore you. The more details you figure out up front, the fewer problems you'll have with your project.
Are you an engineering student? What software are you using?
Are you an engineering student? What software are you using?
Thanks for the comment and advice Bruce! Everything you said, I am experiencing already. Lots of thinking while drafting thus far. If you look carefully, there's quite a bit of eraser marks and bits on the plan. So, lots of errors being made, and corrected on paper.
I should have used quotations when I said "no school tomorrow" --- that was meant to be work, in a cheeky way. I was an engineering student many years ago, and practiced engineering at professional level as well. I am in software now.
I am drawing/drafting by hand using the tools you see on the pics. I use an HP calculator and MS Excel.
I looked into OnShape, Solidworks, LibreCad, etc -- all claiming to be so easy to use. But they are really not. They are all about packing in the features/functions, but have no sense of user interface/design.
Finally, I've been following some of your threads about your shop in Filmore. Would be interested in making a visit one of these days --- do you work there on weekends?
I should have used quotations when I said "no school tomorrow" --- that was meant to be work, in a cheeky way. I was an engineering student many years ago, and practiced engineering at professional level as well. I am in software now.
I am drawing/drafting by hand using the tools you see on the pics. I use an HP calculator and MS Excel.
I looked into OnShape, Solidworks, LibreCad, etc -- all claiming to be so easy to use. But they are really not. They are all about packing in the features/functions, but have no sense of user interface/design.
Finally, I've been following some of your threads about your shop in Filmore. Would be interested in making a visit one of these days --- do you work there on weekends?
It's good to see that you are drawing out your instrument in great detail. That's important, because it forces you to figure out all the little problems and make all the little decisions about how things are going to fit together. That's what engineering is. There's an old saying that you can ignore engineering if you like, but it's not going to ignore you. The more details you figure out up front, the fewer problems you'll have with your project.
Are you an engineering student? What software are you using?
QUESTION for the luthiers here --- top and bottom thickness for 335-type semi-hollowbody.
The design/drawings that I have (based on Epi Dot) has the top/bottom thickness at 0.225" (approx. 29/128") -- this looks to be based on the multilayer laminate steam-pressed top.
If I hand carved the top/bottom (or used a router) from a solid plate, would the final thickness need to be thicker?
Thanks!
The design/drawings that I have (based on Epi Dot) has the top/bottom thickness at 0.225" (approx. 29/128") -- this looks to be based on the multilayer laminate steam-pressed top.
If I hand carved the top/bottom (or used a router) from a solid plate, would the final thickness need to be thicker?
Thanks!

I just looked at lutherie forums on the thickness of viola and violin plates, the back plates tend to be thicker by 1-2mm ranging from 4.8-7mm in the middle to 1.7mm at the ends. It definitely depends on what support you are planing to build in and how the instrument is used, but at .225" (5.7mm) you are in the viola ranges. If you want the piece of wood to contribute acoustically and resonate somehow, I wouldn't go thicker. If this doesn't matter, you can stay on the safe side probably.
Thanks for the advice @b3e . Very interesting to get perspective from electric bass' distant cousins viola and violin --- all 4-stringers.
I would say that my intent for top/back wood contribution to the acoustics/tone is minimal. So, thinking about 6.0 ~ 6.5 mm range. Edges/perimeter will have kerfings to support top/bottom. Middle will have a center block --- not sure if center block will run the full length (neck to bottom/trough?) or just partial. Either way, there will be ample support for the top/back down the middle.
I would say that my intent for top/back wood contribution to the acoustics/tone is minimal. So, thinking about 6.0 ~ 6.5 mm range. Edges/perimeter will have kerfings to support top/bottom. Middle will have a center block --- not sure if center block will run the full length (neck to bottom/trough?) or just partial. Either way, there will be ample support for the top/back down the middle.
I just looked at lutherie forums on the thickness of viola and violin plates, the back plates tend to be thicker by 1-2mm ranging from 4.8-7mm in the middle to 1.7mm at the ends. It definitely depends on what support you are planing to build in and how the instrument is used, but at .225" (5.7mm) you are in the viola ranges. If you want the piece of wood to contribute acoustically and resonate somehow, I wouldn't go thicker. If this doesn't matter, you can stay on the safe side probably.
I would assume, the centerblock and gives you a lot of rigidity here and the top and back has less tension than on bowed instruments. Also the plates would lack support only in the wings and should be much stiffer than lets say on a viola, so my thinking is - there is no need for going thicker. I may be mistaken though, so I hope some experience archtop builders will chime in here

As this is electric and there will be a solid center block thickness is required mostly for strength. The thickness you indicated from the drawing is probably the finished thickness they got from the laminate/pressing procedure. It should be fine up to 0.250" if you want. Viola's (and all violin family) don't really relate as the tops and back actually vary in thickness from the Center to the edge and have a complex recurve around the periphery. You don't need that as you are making an electric. I have done an arch top based on a 1932 Martin C3 that started at almost 5/16 at the center and progressed to 1/8" inside of the purfling.
Thanks @Slidlow for your feedback also. Very reassuring to get your perspective and that of @b3e I will shoot for 6 ~ 6.5 mm range.
Now at the moment, I am thinking through these Qs:
1) Do I need to redraw the arch contour lines for the top?
2) If yes, how to redraw
3) Do I need to do same for the back/bottom piece also --- if I don't would it look or feel awkward where top and back don't have same contours?
You can see here on my revised plan that my pick-up and bridge are not in the same position as the original Epi Dot design. I will position bridge and p/u much farther back (as it is a full scale 34"). Pick ups are the grey/green boxes. The red border around them is the pick up collar/frame
By the way @Bruce Johnson --- this was done with Adobe Acrobat PDF editor.
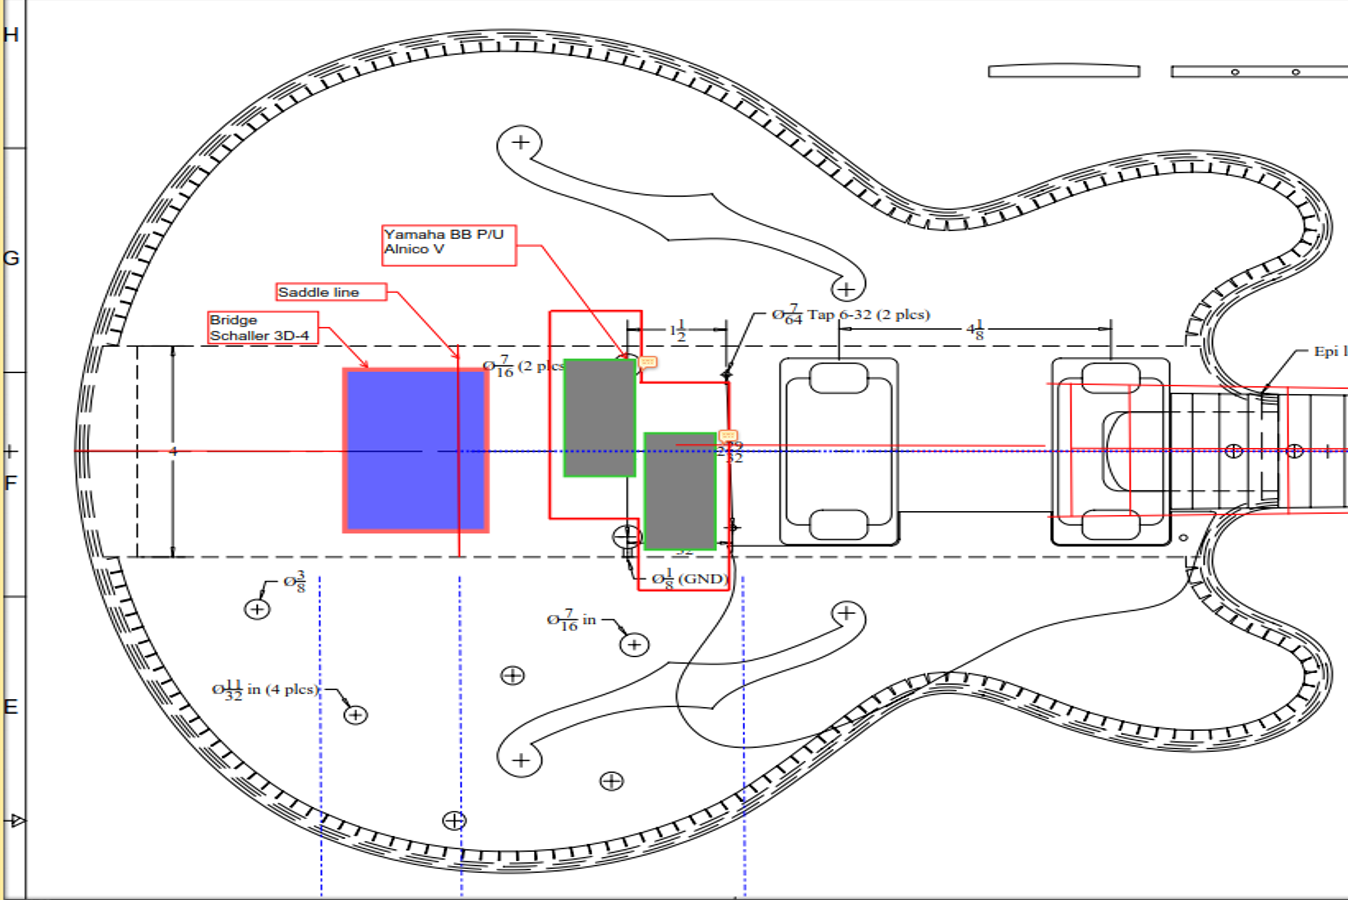
AND, here are the original arch contour lines for the Epi Dot design...
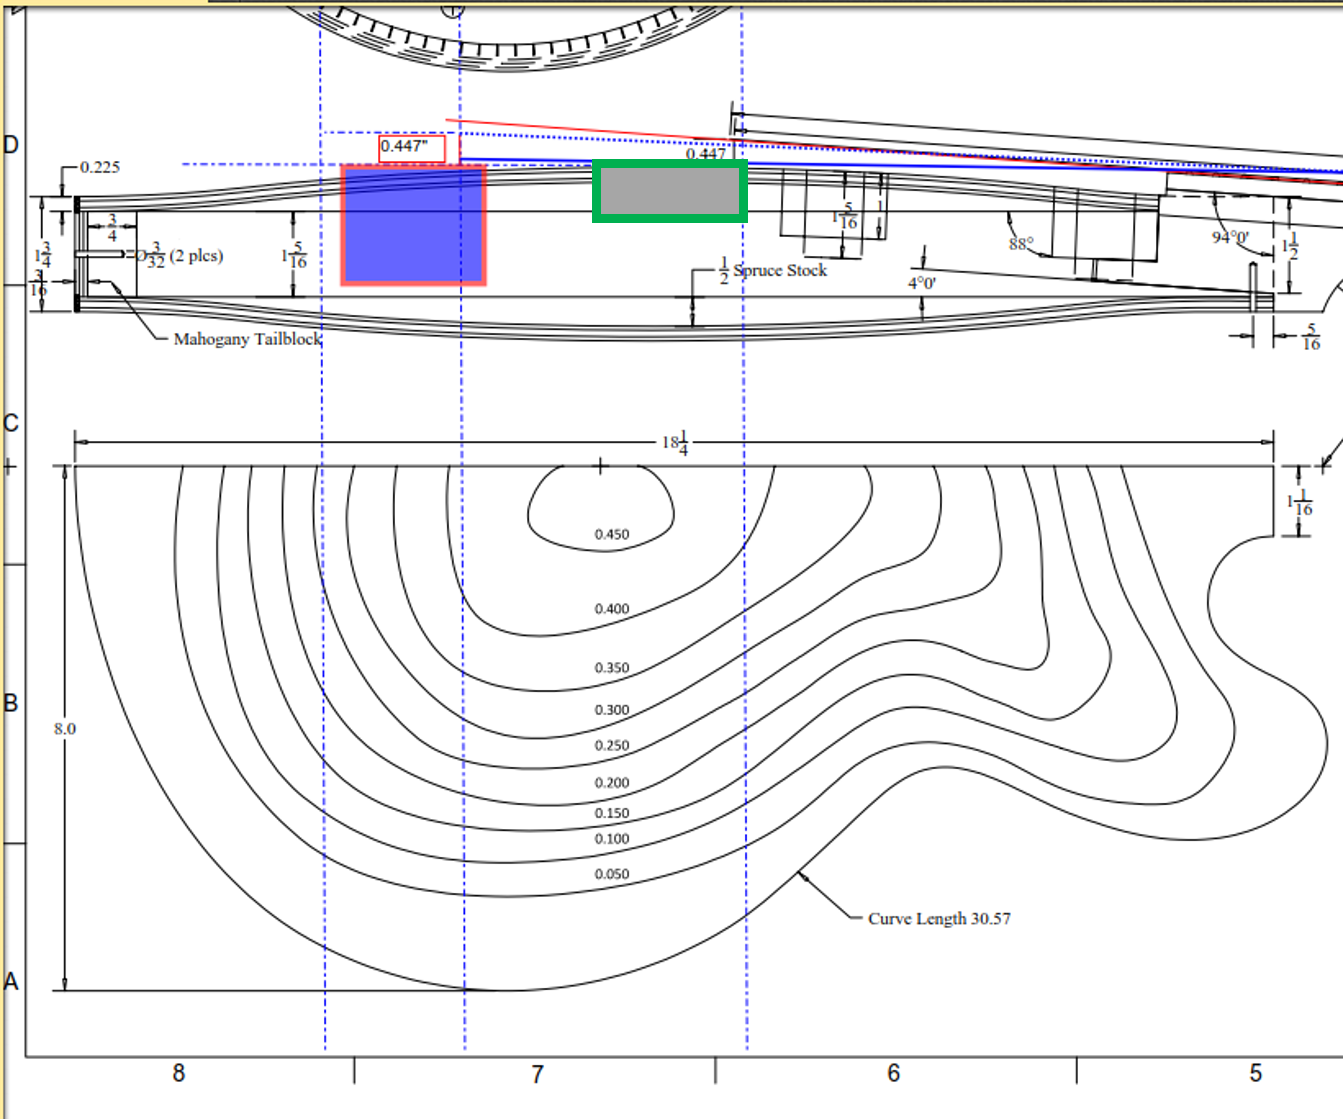
1: Do I need to redraw the contour lines --- as show below so that the bridge rests on the highpoint?

Now at the moment, I am thinking through these Qs:
1) Do I need to redraw the arch contour lines for the top?
2) If yes, how to redraw
3) Do I need to do same for the back/bottom piece also --- if I don't would it look or feel awkward where top and back don't have same contours?
You can see here on my revised plan that my pick-up and bridge are not in the same position as the original Epi Dot design. I will position bridge and p/u much farther back (as it is a full scale 34"). Pick ups are the grey/green boxes. The red border around them is the pick up collar/frame
By the way @Bruce Johnson --- this was done with Adobe Acrobat PDF editor.
AND, here are the original arch contour lines for the Epi Dot design...
1: Do I need to redraw the contour lines --- as show below so that the bridge rests on the highpoint?
Fingerboard/Nut/Headstock question --- I was looking at the fingerboard radius-ing and slotting service at LMMI.COM. There is a dropdown selection for "Space Behind Nut", where the options range from 0.25" ~ 1.00", while there is no option to select 0" or no space behind nut.
Is it very uncommon for a bass to have a fingerboard that ends at the NUT, and the Nut is seated all the way down to the neck wood or perhaps headstock wood?
Fingerboard Slotting/Radiusing Service
Here's a pic of a bass where the fingerboard ends at the nut (as described above), and the nut seats either on the neck or on the headstock, kind of hard to tell with the dark pic.
Thanks!
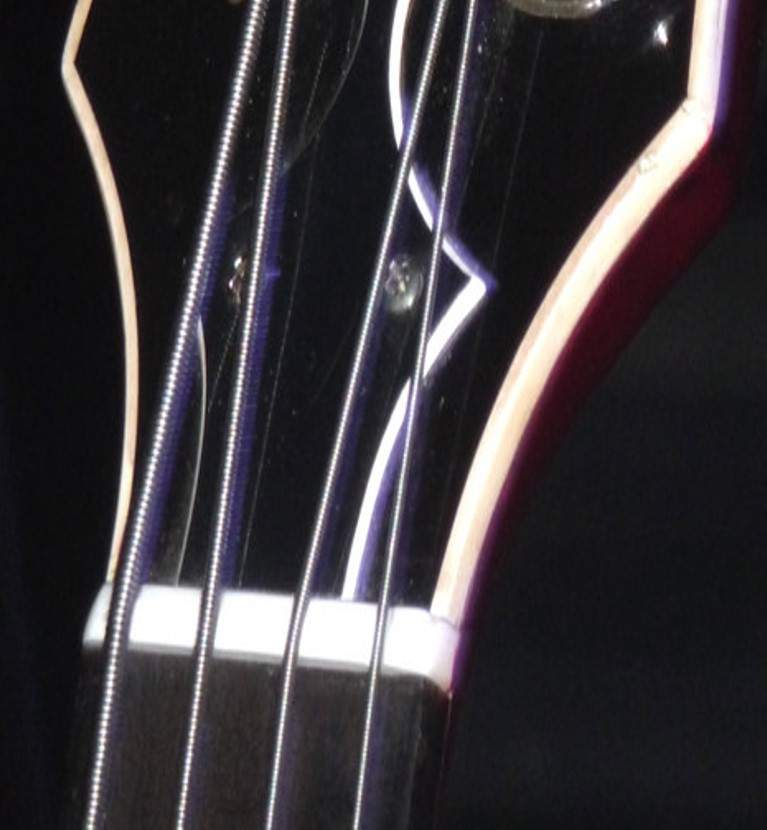
Is it very uncommon for a bass to have a fingerboard that ends at the NUT, and the Nut is seated all the way down to the neck wood or perhaps headstock wood?
Fingerboard Slotting/Radiusing Service
Here's a pic of a bass where the fingerboard ends at the nut (as described above), and the nut seats either on the neck or on the headstock, kind of hard to tell with the dark pic.
Thanks!
No, that's actually the more common way to fit the nut.
The two most common ways to fit the nut to the fingerboard are "shelf" style and "slot" style. Shelf style is what you've shown above. The fingerboard is cut off right at the "0" line, and the nut seats on the neck wood, right up against the end of the fingerboard. This style is used on most instruments that aren't Fenders.
Slot style is Fender-style. They rout a 1/8" wide slot in the fingerboard, about 0.100" deep. The side of the slot towards the frets is exactly on the "0" line. The nut blank is 1/8" wide (thick) and it is glued right down into the slot. The fingerboard usually extends about 3/8" beyond the back side of the nut. The bottom of the slot is usually cut flat, straight across. But on some model Fenders, it's curved, following the radius of the fingerboard. In that case, the bottom of the nut also needs to be trimmed to that curve. Slot style nut installations are used on almost all Fenders, and many Fender-copy instruments.
On a slotted fingerboard you get from LMI, they cut you a "0" slot so that you know exactly where it is in relation to the other slots. If you want to do a slot style nut, you specify the fingerboard with about 1/2" of extra wood beyond the "0" slot. Then, when you get it, you cut (or file) the 1/8" wide slot for the nut right on the outboard side of the "0" slot. It's very important that you don't harm the inboard (toward the frets) wall of the "0" slot. That's the precision surface that you need to maintain for proper intonation.
If you want to do a shelf style nut, you trim off the extra wood beyond the "0" slot. You have to do that carefully. You must maintain that inboard side wall of the "0" slot. Don't just bandsaw right down the "0" slot. You can use a fretsaw carefully, right in the slot. Or, bandsaw outboard of the slot, and then carefully block sand back until you are just touching the inboard side wall.
The two most common ways to fit the nut to the fingerboard are "shelf" style and "slot" style. Shelf style is what you've shown above. The fingerboard is cut off right at the "0" line, and the nut seats on the neck wood, right up against the end of the fingerboard. This style is used on most instruments that aren't Fenders.
Slot style is Fender-style. They rout a 1/8" wide slot in the fingerboard, about 0.100" deep. The side of the slot towards the frets is exactly on the "0" line. The nut blank is 1/8" wide (thick) and it is glued right down into the slot. The fingerboard usually extends about 3/8" beyond the back side of the nut. The bottom of the slot is usually cut flat, straight across. But on some model Fenders, it's curved, following the radius of the fingerboard. In that case, the bottom of the nut also needs to be trimmed to that curve. Slot style nut installations are used on almost all Fenders, and many Fender-copy instruments.
On a slotted fingerboard you get from LMI, they cut you a "0" slot so that you know exactly where it is in relation to the other slots. If you want to do a slot style nut, you specify the fingerboard with about 1/2" of extra wood beyond the "0" slot. Then, when you get it, you cut (or file) the 1/8" wide slot for the nut right on the outboard side of the "0" slot. It's very important that you don't harm the inboard (toward the frets) wall of the "0" slot. That's the precision surface that you need to maintain for proper intonation.
If you want to do a shelf style nut, you trim off the extra wood beyond the "0" slot. You have to do that carefully. You must maintain that inboard side wall of the "0" slot. Don't just bandsaw right down the "0" slot. You can use a fretsaw carefully, right in the slot. Or, bandsaw outboard of the slot, and then carefully block sand back until you are just touching the inboard side wall.
Alright, more design, specs, and planning. This time, the neck blank. Will be a 5 piece laminate using hard maple and mahogany. Will add another 1/2" or so of Hard Maple on each side for the head stock end.
Q: does it truly make a difference, whether I use African Mahogany, or Genuine/Honduran Mahogany? I've found the Genuine/Honduran is generally more difficult to find and also pricier.
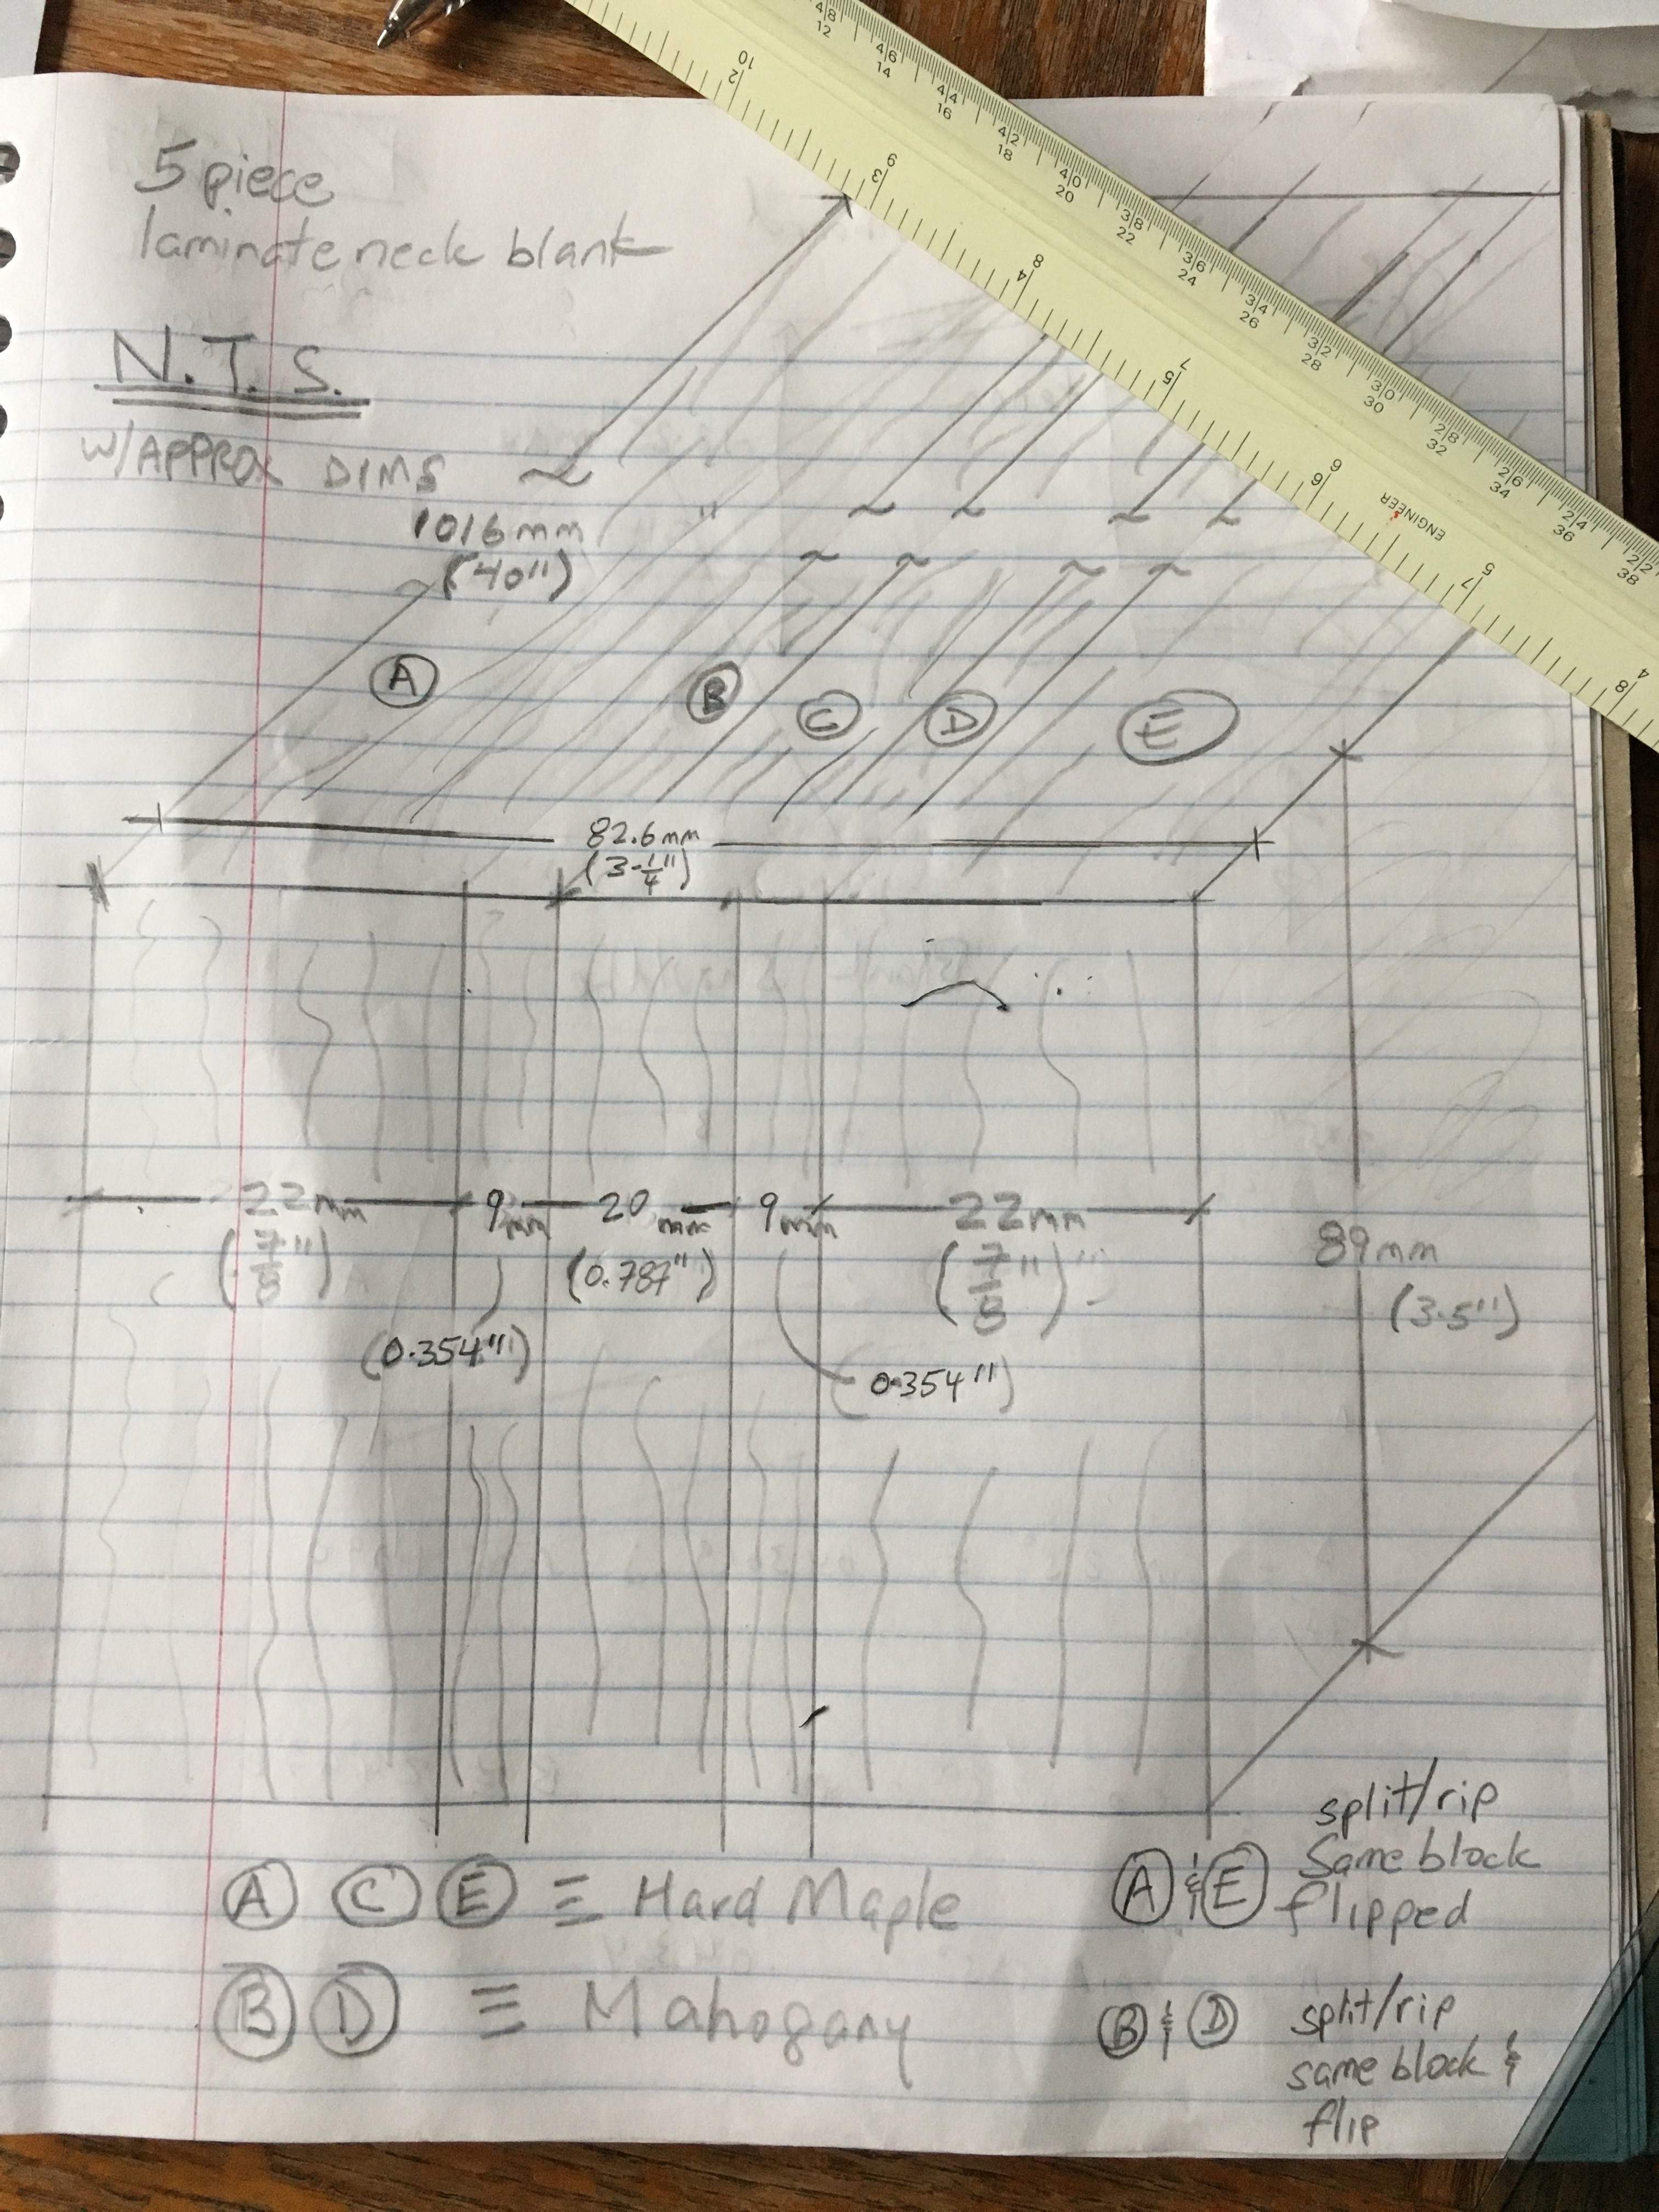
Q: does it truly make a difference, whether I use African Mahogany, or Genuine/Honduran Mahogany? I've found the Genuine/Honduran is generally more difficult to find and also pricier.
Hi, go with the African mahogany. It is actually more dense and stronger then the Honduran and will give you a better neck. When I do build a laminated neck I like to taper the center piece to avoid having the outer pieces thin out too much at the nut. I bit more work but I believe it adds to the overall asthetics.Q: does it truly make a difference, whether I use African Mahogany, or Genuine/Honduran Mahogany? I've found the Genuine/Honduran is generally more difficult to find and also pricier.
Thanks Sidlow!!!
"more dense and stronger" --- I am sold! The idea of tapered center makes total sense, again --- I never even considered it. I'll give it lots of thought and determine if I can pull it off. I'm a first time builder, so not very confident with anything that is not a right angle, LOL. I'll check back on my Yamaha BB1200S to see if the center piece on that neck is also tappered.
"more dense and stronger" --- I am sold! The idea of tapered center makes total sense, again --- I never even considered it. I'll give it lots of thought and determine if I can pull it off. I'm a first time builder, so not very confident with anything that is not a right angle, LOL. I'll check back on my Yamaha BB1200S to see if the center piece on that neck is also tappered.
Hi, go with the African mahogany. It is actually more dense and stronger then the Honduran and will give you a better neck. When I do build a laminated neck I like to taper the center piece to avoid having the outer pieces thin out too much at the nut. I bit more work but I believe it adds to the overall asthetics./QUOTE]

I'm guessing there's a bit of Peter Hook going into this design?

HI there, I was thinking about your question regarding changing the arch on the top. I probably wouldn't change it and position the pickup at the high point. What I would consider is a stud mounted bridge or bridge/ tailpiece. I don't believe Schaller make their really neat version anymore but Hipshot have a Gibson replacement version and there is Warwick with their bridge and tailpiece. I have one of the Schallers I have been saving for something similar to what you are doing.


