• TalkBass has been independent since 1998. Add your voice.
    Create a free account to reply to discussions, view embedded media, and browse with fewer display ads.
    Join freeLog in
    Want zero display ads or expanded classifieds tools? Compare plans.

Fingerboard Radiusing Fixture: Upgrades & Improvements

Bruce Johnson

Gold Supporting Member
Commercial User
Feb 4, 2011
16,057
56,933
70
Fillmore, CA
www.xstrange.com
Disclosures
Professional Luthier
Another one of my classic bass-building machines is due for some upgrades and improvements.

The Fingerboard Radiusing Fixture is.....a fixture/machine made specifically for cutting the radiused top surface of bass and guitar fingerboards. It can cut the surface on a fingerboard blank, or on a fingerboard that's already glued onto a neck. It also can be used to rout off a fingerboard that needs to be replaced.

I built my original Fingerboard Radiusing Fixture around 1993. I still have that one stashed in a corner here. I built this 2nd gen version around 1997. It's still in use today. I've radiused maybe 2000 fingerboards with it over the years. All of the basses I've built, and many necks and fingerboards for various Luthier clients. This fixture has been a workhorse.
IMG_6155B.jpg


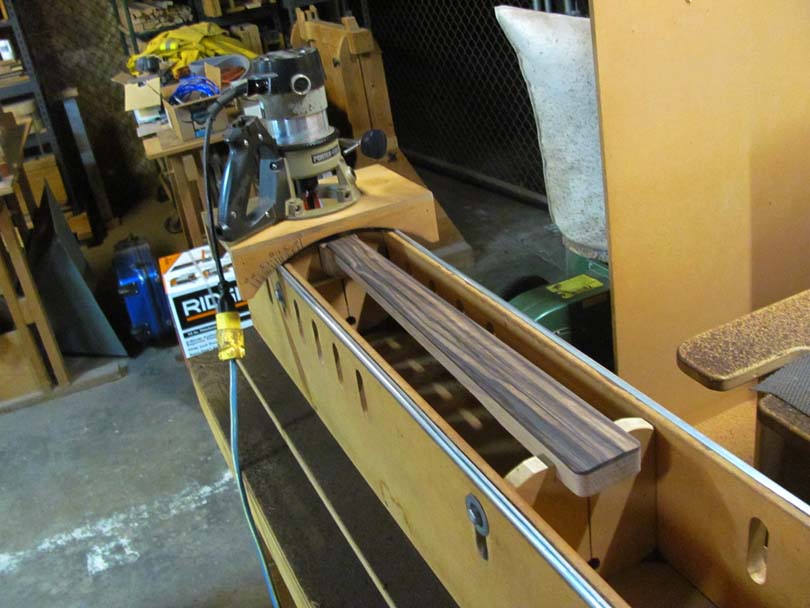
Here it is around 2014, radiusing the fingerboard on one of my AMB-2 Scroll Basses.

You can see the basics of how it works. The neck is clamped and aligned carefully between two long parallel side boards. Round aluminum rods are epoxied into the top outer edges of the side boards. A standard router is mounted to a special base with a curved bottom, which slides on the aluminum rods. I've made up different router bases to cut different fingerboard radiuses, from 20" down to 4". That's the 7 1/4" radius base on there in this picture.

The router has a 3/4" flat bottom bit in it. The technique is to slide the router in straight passes down the neck and back, rolling it over a few degrees every pass. It cuts the surface accurately and very flat, as a series of narrow facets.

IMG_6156B.jpg


Here's a better view of the system of clamping blocks that hold the neck in place. I've got a whole shelf full of clamping blocks under the fixture, for fitting all different sizes and types of necks.

IMG_7915B.jpg


Here's a picture from 2022, cutting a 7 1/4" radius on one of my SSB necks.

IMG_2390D.jpg


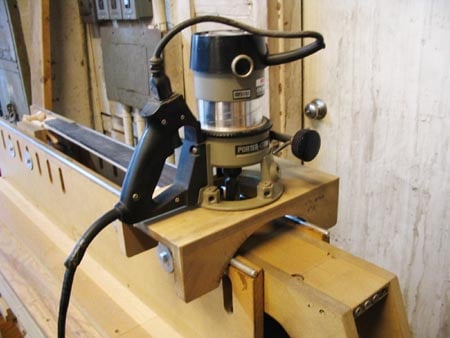
Here's a picture from around 2006, cutting a 4" radius on one of my Series IV Scroll Basses.
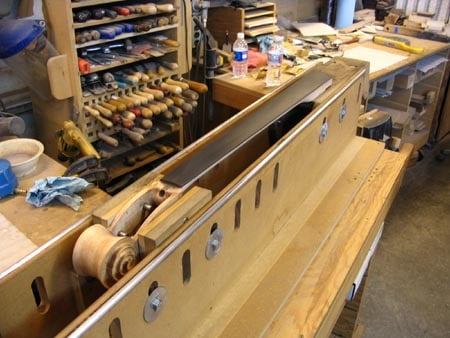
IMG_2392D.jpg


To do a radius that small, the fixture gets reassembled to mount the side plates closer together.

That's a quick history and overview of the Fingerboard Radiusing Fixture. Coming up, I'm adding some features and improvements to it. Some of them are immediate, to make it more efficient at radiusing individual fingerboards (for customers). And I'm thinking out some longer term bigger upgrades.

Plus, eventually, a special new radiusing fixture to use in my pin routers. I'll also cover that in this thread.
 
Last edited:
After building my first neck/bass, I think can say that such a tool is one of the most important. If I (hopefully) ever find the time to build another bass, I will build such a fixture first.
How do you get the radius into the router bases?
 
How do you get the radius into the router bases?

I was just about to answer that.

Here's what one of the router bases looks like:

IMG_0254B.jpg


It's a flat rectangle of 1/2" MDF with a center hole and bolt hole pattern for the router to attach to. The sides are a matching pair of blocks of 3/4" MDF with the radius on the bottom edge.

This particular base is for cutting a 12" radius. But note that it's marked 12 1/4" Actual Radius. That's the actual radius of the curves on the base. The base is designed for the router bit to hang down 1/4" below the curve of the base. So, the bit will cut a 12" radius on the fingerboard.

All the bases are done this way; the radius of the base blocks is 1/4" larger than the fingerboard radius.

IMG_0255B.jpg


This particular base, for 12" radius, has probably cut 1500 fingerboards over nearly 30 years.......

IMG_0256B.jpg


Here are the others, lined up on a shelf next to the routing bench.

So how did I cut the radiuses on the blocks? On the first few, I cut and shaped them by hand. I used a beam compass to draw the radius on the MDF block, rough sawed them on the bandsaw, and smoothed them out to the line on a drum sander and with files.

IMG_0257B.jpg


Then, a few years later, I made up this radius block routing fixture. This thing uses a standard hand router and is adjustable to any radius from about 4" to 20". I just found it yesterday afternoon when I was shuffling some old fixtures over into Unit 16. I think it's from around 1997.

IMG_0258B.jpg


Maybe you can see approximately how it works. The adjustable pivot block on the upper piece hooks on the adjustable pin block on the base.

If I remember right, I used this fixture to make up the radiused blocks for most of the other size bases.

I also used it to make up some long radius sanding blocks. A stack of MDF blocks held together with long bolts.

This shows the router bases for the Fingerboard Radiusing Fixture, as they are now. But....I've got some ideas for an improved design.......I may just build a new sliding carriage on this fixture, with a whole new set of bases. Probably not right away. These have been working pretty well for a long time.
 
The challenge for version 3 is to make compound radiuses!

Hah, yeah, that gets asked regularly. Yes, you could make up a variant of this fixture to cut compound radius fingerboards. A little more complicated, but it could be done. I haven't bothered, because I'm mostly focused on making electric basses.

15 years ago, when I was machining guitar necks by the hundreds for my late buddy Mike Lipe, he would sometimes get orders for compound radius fingerboards, like a 12"-16" compound. For them, I would use my fixture to cut the fingerboard to a straight 16" radius. Then Mike would use a straight sanding beam to shape the headstock end to 12" and blend the radius tapering back to 16" at the heel. Very little wood being removed, it only took him a few minutes. It wasn't worth the trouble to make up the special fixture to do them.

And that's what I would do if someone insisted on a compound radius bass fingerboard. Cut the main radius on the fixture, and hand finish the compound shape with a long beam sanding block.

If one of you is interested in making up your own routing fixture for cutting compound radius fingerboards, I'll talk you through the design.

Like my other threads about my various machines and fixtures, I'm showing them in detail here to give you guys ideas. Yes, you can build fixtures like this for your own use. They really aren't that difficult to build, once you understand how they have to work.
 
Last edited:
That's the history. Now for some upgrades and improvements to the Fingerboard Radiusing Fixture.

The first thing I'm doing is building a better holding fixture for holding bare fingerboards. Fingerboards, not attached to a neck. In the past, I didn't do that many bare fingerboards. Building necks for myself or for clients, I almost always prefer to glue the fingerboard on the neck, and radius it and slot it on the neck. When I did occasionally need to radius a bare fingerboard, I have several "dummy necks"; wood blanks about the size of bass and guitar necks. I'd tape or screw the fingerboard onto the dummy neck and set it up in the fixture as if it were a neck. It worked, but was some extra setup time.

Now, I'm getting a flow of jobs radiusing and slotting fingerboards from Luthiers who had been getting this done by LMII. I need to upgrade my fixture and process to do these more efficiently.

IMG_0237B.jpg


Here's what I built: A sub-fixture that slips inside the Fingerboard Radiusing Fixture, which is made to mount plain fingerboards quicker.

If you noticed my other thread about the upgrades to my Fret Slotting Saw, I made a holding fixture on its sled, and a simple flat 3" wide board of MDF bolts down to the top of it. The fingerboard will be pinned and taped down to that flat strip.

Well, that same MDF strip, with the fingerboard attached to it, will also bolt right down to this new holding fixture, in the Fingerboard Radiusing Fixture. It has the same two 1/4-20 T-nuts at 28" spacing. So, I can attach a fingerboard to the MDF strip, and go right from the radiusing operation to the slotting operation, with it still attached.

And for some real efficiency, I could make up a batch of the MDF strips, attach a fingerboard to each one, and run the whole batch through both machines. Without having to change either of the machines' settings. That's the whole point: quick change fixtures.

IMG_0238B.jpg


This holding sub-fixture is just made from MDF boards. As usual. Two sides and a top, made to slide down between the side plates of the radiusing fixture. At each end is a maple block with a jacking screw; a 3/8-16 threaded rod and a knob. I buy them from McMasters.

IMG_0239B.jpg


The jacking screw threads through a 3/8-16 T-nut in the bottom of the maple block. The purpose of the jucking screws is to raise and lower the two ends of the fixture; the fine adjustment of the thickness that the fingerboard will be cut to.

IMG_0240B.jpg


Here's the test fit. It's a nice sliding fit between the side plates, keeping the top surface parallel to the rails side-to-side. After adjusting the height at each end with the jacking screws, I'll tighten the two cross bolts which will clamp the side plates against it and lock it in place for the cut. All looks good.

IMG_0241B.jpg


I made it with enough range of adjustment in vertical height to handle any radius from 4" to flat. Yes, I can also cut a flat fingerboard on here, bringing it down to a specified thickness.

IMG_0242B.jpg


With that done, the next improvement was to put a better set of casters on the Fingerboard Radiusing Fixture. The old casters didn't have brake/locks, and it was kind of annoying to be trying to radius a fingerboard and have the whole rig start rolling across the floor! I've been getting these casters from Amazon which are really nice and surprisingly inexpensive; $21/set. I've already put them on 6 of my machines, and I really like them.

So, I unloaded all the junk from the shelves of the old fixture, and flipped it over on its back. A shiny new set of casters. Now it rolls easily and locks to a stop.

IMG_0249B.jpg


I loaded it back up with all its old parts (after dusting them off...) and rolled it down the hall at high speed into its new home in Unit 16.

Next up: I'm going to put it work radiusing a batch of fingerboards for customers. Then walk three steps and slap 'em into the Fret Slotting Saw.

I'll test out how these upgrades work. Then I've got some more ideas for upgrades.....
 
Last edited:
Have you ever built a vacuum setup for holding workpieces? I've been tossing it around, but don't really want to invest a bunch of time if it would not be reliable enough to hold things precisely.

Yes, I have. About two years ago I tried to build a vacuum hold down system, specifically for holding down bare fingerboards in this fixture and the Slotting Saw. I bought a decent vacuum pump and made up a prototype fixture.......And I couldn't get it to work well at all, to my surprise. I have some experience with vacuum hold-down fixtures, and my buddy Rob Allen, down the hall, uses them extensively in his CNC machine. But I made a couple of attempts at the fixture, and I couldn't get it to seal well enough to hold the fingerboard down. I set it aside. I still have the pump and all the parts here. I've had a few more thoughts on how to do the seals, so I may go back and try again eventually.

For now, a vacuum hold-down system for holding bare fingerboards doesn't seem to be worth the trouble.
 
A quick test run of the freshly-upgraded Fingerboard Radiusing Fixture and the also freshly-upgraded Fret Slotting Saw. And the new fingerboard holding board that fits both machines.

I grabbed a cut-off strip of maple from the scrap pile, about 1 1/4" wide x 1/4" thick, planed smooth on one side, rough sawn on the other. It will be my test piece, to try out the radiusing and slotting process.

IMG_0259B.jpg


I decided that my normal method for mounting blank fingerboards will be a single pin and strips of double-sided tape. The pin will be down at the nut end, and will make sure the fingerboard will not move. I drill a single 1/8" hole in the fingerboard, on the centerline, in the extra wood beyond the zero slot. I made the pin in the holding board from 1/8" aluminum rod, lightly tapering it at the tip. I used aluminum so that, in case I hit it with a router bit or saw blade, it won't hurt them.

IMG_0260B.jpg


Five cross-wise strips of double-sided tape to hold the fingerboard down. I'm using FastCap Edge Banding Tape, my favorite.

IMG_0261B.jpg


And there's the skinny maple test fingerboard, pushed down on the pin and stuck down securely on the tape. It ain't goin' nowhere, as they say.

IMG_0262B.jpg


And I bolted it right down to the new holding fixture in the Fingerboard Radiusing Fixture. Which is waiting right next to the routing bench....

IMG_0263B.jpg


I set the height and final thickness of the fingerboard, turning the adjusting knob in the bottom of the fixture, and checking against the 12" radius gauge. The gauge straddles the rails, and the flat of the screw head will be the finished thickness in the center of the fingerboard. I have a set of these gauges, one for each radius base.

IMG_0264B.jpg


Same thing at the other end. This is how I can set the thickness taper of the fingerboard. I commonly cut most bass fingerboards to 0.220" thick at the Zero and 0.240" thick at the heel. But I can adjust that here, if the job needs something different.

IMG_0265B.jpg


Cutting the top surface to 12" radius in a single depth setting, three passes down and back, tilting the router. Simple, fast and accurate.

IMG_0266B.jpg


And then I unbolted the holder board from the radiusing fixture, walked to the other end of Unit 16, and bolted it down to the fixture in the Fret Slotting Saw. This is getting exciting.

I'll pick this up over on the Fret Slotting Saw thread.......
 
Can I just say...

Bruce's jigs and fixtures are just as sexy and artistic as any Fodera.

:wideyed: Aw, come on....My fixtures are functional and utilitarian! MDF and aluminum.

In that past, I have built tools and machines for clients, which did have some style and beauty and fine hardwoods in them....Here's a custom fret slotting saw that I built some years back for a distinguished Luthier:

13B.jpg


14B.jpg


18B.jpg
 
:wideyed: Aw, come on....My fixtures are functional and utilitarian! MDF and aluminum.

In that past, I have built tools and machines for clients, which did have some style and beauty and fine hardwoods in them....Here's a custom fret slotting saw that I built some years back for a distinguished Luthier:

View attachment 5419479

View attachment 5419480

View attachment 5419481

So the saw follows the radius of the fretboard?
This is the coolest fret slotting saw I have ever seen!
 
  • Like
Reactions: Barticus
So the saw follows the radius of the fretboard?
This is the coolest fret slotting saw I have ever seen!

Yes, the requirement for this saw was that he wanted to cut the slots after the fingerboard was fully painted and buffed.....The sawing process couldn't make any marks on the finish. The curved aluminum shoe rests gently on the fingerboard, and the saw slides on that upper Delrin block to set the radius and slot depth.

These are $2K necks that go into $5K guitars.
 
More modifications & upgrades to the Fingerboard Radiusing Fixture! The R & D on our machines never stops here in the Secret Underground Lab.

When Jeremy was radiusing that rosewood fingerboard yesterday, we had one problem. As he started making the cuts of the radiused surface, he noticed that it was tilted; one edge of the fingerboard was just a little bit thicker than the other. He hit the Emergency Stop button and summoned Management! That would be me. We examined it with rulers and measuring devices, and discovered one part that was out of line, a little off center. Fixed that, took another cut. Better, but still just a little bit....tilted. We shimmed it and fudged it a bit more, and he finished the radiusing down to the final thickness. It came out fine. With some messing around.

But we didn't really figure out what was going on. Everything seemed like it was centered and square. But the radius was coming out tilted. I don't know whether the problem was with the position of the rails in the fixture, or the curve in the router base, or what. But I had that pair of 3 5/8" wide ebony boards coming up, and they definitely could not be cut tilted.

I thought about it overnight, and decided to add a Tilt adjustment to the fixture holding the fingerboard.

IMG_0302B.jpg


Here's the holding fixture, pulled out of the radiusing fixture, turned upside down on the bench. I unscrewed the two side plates and used a small hand plane to put a slight bevel on the top edges of them. Then screwed them back on.....

IMG_0305B.jpg


Then I trimmed 1/8" off each end of the two maple blocks with the adjusting screws, and screwed them back in place. This pulled the two side plates in, making a slight taper.

IMG_0306B.jpg


Set back in the fixture, now the holding fixture can rock side-to-side a small amount. Like this.

IMG_0307B.jpg


Then I added a pair of opposing adjusting screws to the side walls of the main fixture.......

IMG_0308B.jpg


T-nuts on the inside, pressed into shallow counterbores made with a Forstner bit.

IMG_0309B.jpg


And there it is, back together. Now I can finely adjust the side-to-side tilt of the fingerboard with those two knobs. Without disassembling anything or changing any settings. Hopefully, this should solve the problem.

I'll find out on those two ebony fingerboards coming up........

This is the reason why I (almost) always build fixtures with screws......So they can be quickly taken apart, modified, and put back together. This whole mod took about 45 minutes.
 
Last edited:
Catching up on the documentation:

Here's one of my fingerboard radiusing & slotting jobs for a customer. It's a pair of ebony fingerboards, 35" scale x 24 frets x 3 5/8" wide. The customer had the ebony sent to me directly from the wood supplier.

IMG_0280B.jpg


These boards came through rough sawn on both sides, unlike the ones we all used to get from LMI. I laid out the centerline and width with white pencil, and bandsawed them to width...

IMG_0281B.jpg


Then ran them through my small Delta planer, to get them to both sides approximately flat. This little planer is the loudest machine I own! And there's a nice pile of ebony dust on the floor.....

IMG_0282B.jpg


Looking at that pile of ebony chips, I wonder if I should mix in a pint of West Systems, and cast up some of my own synthetic ebony fingerboards........

IMG_0310B.jpg


Mounting the two ebony blanks to my two extra-long holder boards. I put a small 1/8" aluminum pin in each holder board, near one end. Then drilled a single 1/8" hole in each ebony blank......

IMG_0311B.jpg


Five quick strips of FastCap tape........

IMG_0312B.jpg


And the boards are stuck down securely. The pins make sure they can't move at all.

IMG_0313B.jpg


The holder boards fasten down into the Fingerboard radiusing Fixture with two screws. These fingerboards get a 20" radius. I mounted the 20" radius base on the router and started dialing in the height and thickness that the fingerboard will be cut to.

IMG_0314B.jpg


I did one quick pass with the router.......and you can see why I decided to add the Tilt adjustment......

IMG_0315B.jpg


Dialed in an adjustment, and the 2nd pass leveled it out.........

IMG_0316B.jpg


Continued making light passes to get it down to the final thickness; 0.240"

IMG_0317B.jpg


A quick pass over the surface with the long sanding board and 120 grit paper, to check that the surface is fully cut.......And the radiusing is done! Unbolted this holder board, swapped on the other one, and radiused the other fingerboard. No need to change the settings.

Now the two holder boards, with the ebony fingerboards still attached to them, get walked over to the Fret Slotting Saw.......I'll show the slotting over on that thread.
 

Latest posts




