• TalkBass has been independent since 1998. Add your voice.
    Create a free account to reply to discussions, view embedded media, and browse with fewer display ads.
    Join freeLog in
    Want zero display ads or expanded classifieds tools? Compare plans.

Five String Fretless Violin Bass Build

Thanks everyone. Here's the next batch of pics.

Next up, I glued the top together and cut it to shape, then I laid out where the f-holes would go and marked them by cutting out paper patterns and gluing them onto the top. I cut out the f-holes, then I glued the top on to the chambered out body.

Invalid Link Removed
Link Removed
Invalid Link Removed

In this last picture you can see where I blacked out the insides of the chamber before I glued on the top. Don't want to see any raw wood in there when it's done.

That's all for now. I'll try to get some more pics up before bed tonight.
 
  • Like
Reactions: vmabus
Thanks everyone. Here's the next batch of pics.

Next up, I glued the top together and cut it to shape, then I laid out where the f-holes would go and marked them by cutting out paper patterns and gluing them onto the top. I cut out the f-holes, then I glued the top on to the chambered out body.

Invalid Link Removed
Link Removed
Invalid Link Removed

In this last picture you can see where I blacked out the insides of the chamber before I glued on the top. Don't want to see any raw wood in there when it's done.

That's all for now. I'll try to get some more pics up before bed tonight.

You free handed that F-hole with a router? That's amazing work man, you make me feel like I am cheating with my scroll saw
 
  • Like
Reactions: moonshinegtrs
Next set of pics is routing for the pickups. First I hog it out with a forstner bit then clean it up with the router.

Link Removed

I had to square up the corners by hand with a file.

Invalid Link Removed

Then I installed threaded brass inserts for the pickup adjustment screws.

Invalid Link Removed

The neck pickup was right up against the end of the neck so I had to jack up my template on some wooden blocks.

Link Removed

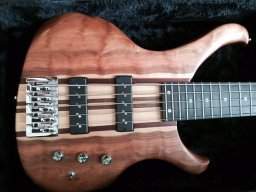
Both pickups done. The knobs are just resting on top. Next set of pics will be drilling the holes for them and the rest of the electrical components.

Invalid Link Removed

More tomorrow.
 
  • Like
Reactions: vmabus
Any chance we could get some sound clips when done?

I shipped the bass last Saturday to it's owner, however I did take it to a house jam at a friends house a few weeks ago when I finished it. I know he records everything so I can check and see if he has anything usable. Most likely it's going to sound like a bunch of 50 somethings playing in some guys living room, because that's what it was. :D

Edit: Just spoke with my friend and he's going to put some vids up on you tube so I should have links in a day or two.
 
You free handed that F-hole with a router? That's amazing work man, you make me feel like I am cheating with my scroll saw

I have to agree. I think any time I tried to free hand any router cut, I just turned the piece into saw dust. Even with a template, I get shaky. What kind of router did you use? It looks like a small laminate trimmer type from the picture?
 
Here we go with the next set of pics.

I laid out where the controls go and started with a forstner bit to recess them a little bit.

Invalid Link Removed[/IMG]

Then I drilled out the middles with a smaller forstner bit.

Invalid Link Removed

Tim wanted the front to be as clean as possible so I used stacked pots, one for each pickup, tone on bottom, vol on top. The knobs are from BBG.

Link Removed

Then I made a hole on the side for the jack plate. The plate will cover the big hole where I will feed in the pots and wire everything up once the back is glued on.

Invalid Link Removed

I made the jack plate from a cutoff piece of ebony from the fretboard and gave it a test fitting.

Invalid Link Removed

The jack is right between where the pots will be. Sweet!

Invalid Link Removed

I routed a small channel and preinstalled hook up wire for the pickups. This will make things much easier once the back is glued on.

Link Removed

I glued a very thin cover over the channel so the wires aren't loose on the inside of the bass. Then I lined the control cavity with copper shielding tape.

Invalid Link Removed

Then I glued on the back.

Invalid Link Removed

That's all for now, more to come later.
 
  • Like
Reactions: vmabus
I have to agree. I think any time I tried to free hand any router cut, I just turned the piece into saw dust. Even with a template, I get shaky. What kind of router did you use? It looks like a small laminate trimmer type from the picture?

Yes it's a very small and very cheap trim router from Harbor Freight. I think the brand is Chicago Tools. IIRC I only paid about $35-$40 dollars for it. If I burn it up I'll just go get another one.

And thank you for the compliment. We have a mutual admiration society going here because I have been keeping track of your Leafenbacker build too. Beautiful work mapleglo.
 
Yes it's a very small and very cheap trim router from Harbor Freight. I think the brand is Chicago Tools. IIRC I only paid about $35-$40 dollars for it. If I burn it up I'll just go get another one.

And thank you for the compliment. We have a mutual admiration society going here because I have been keeping track of your Leafenbacker build too. Beautiful work mapleglo.

Thank you :) I'll have to try one of those Harbor Freight trim routers.
 
You are making quick work of this project man, and it is looking very good.

I cant help but think how good this bass would look with Delano Xtender pickups in it. The oval shape seems like it would fit that body perfectly.
 
You are making quick work of this project man, and it is looking very good.

I cant help but think how good this bass would look with Delano Xtender pickups in it. The oval shape seems like it would fit that body perfectly.

I would like you to think I could work this fast but I have to fess up. :D

I think you might have missed a couple posts where I mentioned that the bass is done and shipped already and I am just sharing the build here for those of us here that don't do facebook.

The original build thread was on my facebook page, but I'll let you look through the thread and find the link if you are so inclined, or you could wait for the end of this thread and be surprised.;)