
Enjoy the benefits of a premium membership!
Upgrade Account
-
TalkBass has been independent since 1998. Add your voice.
Create a free account to reply to discussions, view embedded media, and browse with fewer display ads.
Join free Log in
Want zero display ads or expanded classifieds tools? Compare plans.
You are using an out of date browser. It may not display this or other websites correctly.
You should upgrade or use an alternative browser.
You should upgrade or use an alternative browser.
Four-string fretless semi-hollow half-build
- Thread starter ctmullins
- Start date
More options
Who Replied?
- Apr 18, 2008
- 16,015
- 1
- 31,728
- Disclosures
- I'm highly opinionated and extremely self-assured


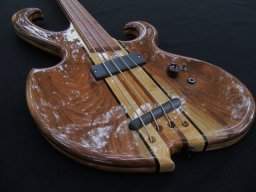
Could you go into more detail about how you set up (angle?) and drilled for your string-thru set-up? I love how you did that. I am trying to plan out my first build and that is a feature I want, and a floating bridge too! Thanks ...Today I drilled for my "integrated tailpiece". Even using my portable drill press, one of the holes isn't quite lined up right. Oh well...
Link Removed
I went ahead and installed the string ferrules, because I'm a little impatient, and I want to go ahead and string it up once just to see how it sounds so far!
Link Removed
Next up is a whole lot of tedious finish sanding, and shaping the floating bridge. I'm not going to tint it, as much as I do like a tint on quilted maple. I'm just going to apply a decent number of coats of Formby's Tung Oil, which apparently also includes some varnish for protection. I'm going for a "natural" vibe with this one.
I'm really enjoying working with the sapele. It's hard enough to be durable, but not so hard as to make progress difficult. And it has such a nice ribbon figure!
- Apr 18, 2008
- 16,015
- 1
- 31,728
- Disclosures
- I'm highly opinionated and extremely self-assured
Could you go into more detail about how you set up (angle?) and drilled for your string-thru set-up? I love how you did that. I am trying to plan out my first build and that is a feature I want, and a floating bridge too! Thanks ...
Sure thing.
Even though many people swear that stringing through the body does nothing for the tone, I really like the idea of the strings having a firm anchor in the body. However, I don't like the almost-90-degree bend in the string that a traditional rear-loading string-thru setup demands. So I chose to mount the ferrules in the side (edge?) of the body, and use a 45-degree angle instead.
Here's a quick MS Word picture showing the geometry - I think of it as an isosceles right triangle displaced by the ferrule depth:
Choose your ferrule locations, and drill for them as you normally would. Then measure your distances, and mark the top where the strings will exit. If you try to start off drilling at 45 degrees, you'll risk the bit wandering, so I began the holes with the bit perpendicular to the body, just deep enough to keep the tip of the bit in position, then switched to 45 degrees. If you want, you can put a piece of tape on the bit to mark the distance that it should travel (the hypotenuse of the right triangle). If you measured correctly, the tip of the bit will poke through in the ferrule hole. It doesn't have to be perfect; you can smooth the wood in this location with a small round file, and the ferrule will hide any ugliness anyway.
Last edited:

Even though many people swear that stringing through the body does nothing for the tone, I really like the idea of the strings having a firm anchor in the body. However, I don't like the almost-90-degree bend in the string that a traditional rear-loading string-thru setup demands. So I chose to mount the ferrules in the side (edge?) of the body, and use a 45-degree angle instead.
I think the difference in string-thru vs. top load is due to the break angle over the saddle.
I like the aesthetic a lot. I think it would be interesting to chamfer the back bottom, so that the ferrule is inline with the string coming through the body.
- Apr 18, 2008
- 16,015
- 1
- 31,728
- Disclosures
- I'm highly opinionated and extremely self-assured
Okay, I have it wired up, and have been plunking on it for the last week or so. A few issues:
1. I'm running the piezo cable through a [Invalid or Expired Link Removed]. The output of the buffer is wired to a 1Meg volume pot. Each of the Nordstrands are wired to their own 500K volume pot. The three volume pots are wired to the jack in parallel, a la your typical Jazz Bass (with the side lugs going to hot on the jack). Even with the buffer, the Nordstrands easily overpower the piezo. I've asked Walter if he might be interested in building a PZP-1 with a bit of gain added; we'll see what he says.
2. Pots. I'm using audio taper pots, because that's what conventional wisdom says is appropriate for volume controls. Conventional wisdom seems to be dead wrong. I have some linear taper pots on order, and will install them soon.
3. Shielding. The Nordstrands buzz like crazy! Admittedly, my bedroom is a noisy environment for any bass, with lots of electronics and fluorescent lighting creating RF interference. And I still need to break out the multimeter and double-check all of my connections. But my big question today is: How the heck do you shield a hollow-body? Right now I have a large section of copper tape on the back side of the maple cap, and another on the back side of the cavity cover, and a small strip connecting the two. But I just don't know the EE theory behind it. Does shielding only work if you completely enclose the electronics on all sides with the shielding tape? If so, I'm out of luck...
Even with these issues, I'm enjoying it. It has a nice mellow sound to it (surprise), and blending in the piezo does add a neat uprighty character. But no sound clips until I get this buzzing sorted out!
1. I'm running the piezo cable through a [Invalid or Expired Link Removed]. The output of the buffer is wired to a 1Meg volume pot. Each of the Nordstrands are wired to their own 500K volume pot. The three volume pots are wired to the jack in parallel, a la your typical Jazz Bass (with the side lugs going to hot on the jack). Even with the buffer, the Nordstrands easily overpower the piezo. I've asked Walter if he might be interested in building a PZP-1 with a bit of gain added; we'll see what he says.
2. Pots. I'm using audio taper pots, because that's what conventional wisdom says is appropriate for volume controls. Conventional wisdom seems to be dead wrong. I have some linear taper pots on order, and will install them soon.
3. Shielding. The Nordstrands buzz like crazy! Admittedly, my bedroom is a noisy environment for any bass, with lots of electronics and fluorescent lighting creating RF interference. And I still need to break out the multimeter and double-check all of my connections. But my big question today is: How the heck do you shield a hollow-body? Right now I have a large section of copper tape on the back side of the maple cap, and another on the back side of the cavity cover, and a small strip connecting the two. But I just don't know the EE theory behind it. Does shielding only work if you completely enclose the electronics on all sides with the shielding tape? If so, I'm out of luck...
Even with these issues, I'm enjoying it. It has a nice mellow sound to it (surprise), and blending in the piezo does add a neat uprighty character. But no sound clips until I get this buzzing sorted out!
CT: Thanks for the info - it's actually a bit more involved than I thought it would be so I'm glad I asked. What set-up or tool did you use to assure the 45 degree angle for the drill bit?Sure thing.
Even though many people swear that stringing through the body does nothing for the tone, I really like the idea of the strings having a firm anchor in the body. However, I don't like the almost-90-degree bend in the string that a traditional rear-loading string-thru setup demands. So I chose to mount the ferrules in the side (edge?) of the body, and use a 45-degree angle instead.
Here's a quick MS Word picture showing the geometry - I think of it as an isosceles right triangle displaced by the ferrule depth.
Choose your ferrule locations, and drill for them as you normally would. Then measure your distances, and mark the top where the strings will exit. If you try to start off drilling at 45 degrees, you'll risk the bit wandering, so I began the holes with the bit perpendicular to the body, just deep enough to keep the tip of the bit in position, then switched to 45 degrees. If you want, you can put a piece of tape on the bit to mark the distance that it should travel (the hypotenuse of the right triangle). If you measured correctly, the tip of the bit will poke through in the ferrule hole. It doesn't have to be perfect; you can smooth the wood in this location with a small round file, and the ferrule will hide any ugliness anyway.
Like you, I have a Carvin neck assembly, but mine is a fretted thru-neck with the older style headstock (traditional) they no longer offer. Again, like you, I don't care for the in-line look as much as a split design. Someone had attached very small body wings to it and then lost interest in the project. I bought it ($122) for the neck assembly really, and then cut off the body wings which are made out of nice woods, but way too small for my taste. (It's a 5-string.)
Oh, by the way, my double-handled Shinto rasp arrived 2 days ago. What a kool tool! Can't wait to try it out on something. Only $28 on Ebay. Thanks for the tip about that too ...
Keep up the good work ...
- Apr 18, 2008
- 16,015
- 1
- 31,728
- Disclosures
- I'm highly opinionated and extremely self-assured
1. I'm running the piezo cable through a [Invalid or Expired Link Removed]. The output of the buffer is wired to a 1Meg volume pot. Each of the Nordstrands are wired to their own 500K volume pot. The three volume pots are wired to the jack in parallel, a la your typical Jazz Bass (with the side lugs going to hot on the jack). Even with the buffer, the Nordstrands easily overpower the piezo. I've asked Walter if he might be interested in building a PZP-1 with a bit of gain added; we'll see what he says.
Walter is interested in doing this, but he's busy right now, so it won't happen right away. Cool on him, though!
2. Pots. I'm using audio taper pots, because that's what conventional wisdom says is appropriate for volume controls. Conventional wisdom seems to be dead wrong. I have some linear taper pots on order, and will install them soon.
They came in, so I installed them last night. Soldering is not my favorite task. My log taper pots are Alpha from StewMac, my linear taper pots are CTS from AllParts. Turns out the CTS pots have a thicker shaft than the Alpha pots, so I had to drill out the holes a bit. More involved than just a straight swap. The CTS pots are pretty stiff, but I guess that's okay. I do like the linear taper better for blending multiple passive pickups.
3. Shielding. The Nordstrands buzz like crazy! Admittedly, my bedroom is a noisy environment for any bass, with lots of electronics and fluorescent lighting creating RF interference. And I still need to break out the multimeter and double-check all of my connections. But my big question today is: How the heck do you shield a hollow-body? Right now I have a large section of copper tape on the back side of the maple cap, and another on the back side of the cavity cover, and a small strip connecting the two. But I just don't know the EE theory behind it. Does shielding only work if you completely enclose the electronics on all sides with the shielding tape? If so, I'm out of luck...
The multimeter showed a couple of spots where, even though the copper foil was overlapped, there was little or no conductivity between the pieces. A couple of spots of solder took care of that. After I re-potted (ha ha), fixed the shielding, and reassembled, it is much quieter. Still not perfect, but much quieter. I'll continue to assess over the next few days.

- Apr 18, 2008
- 16,015
- 1
- 31,728
- Disclosures
- I'm highly opinionated and extremely self-assured
Okay, I've been plunking on this baby for the last few weeks, and I reached the point where I was ready to share with the rest of you. First, let me say that a good portion of my buzzing problem must have been due to the various fluorescent lights, dimmers, and electronic gizmos in my bedroom. I recorded the following sound clips by the light of a single incandescent bulb, with the bass plugged into my PreSonus Inspire A/D box, going directly into a GarageBand "No Effects" track. Recorded this way, the buzzing is nonexistent, except when one of the single-coil Nordstrands is soloed. Downsampled to 192kbps MP3s. Action is rather low, with almost no relief in the neck, so my playing is a bit clacky. Please excuse the muffed notes!
Neck solo
Bridge solo
Neck & bridge
Invalid Link Removed
Neck & Piezo
Bridge & Piezo
Neck, Bridge & Piezo
To my ears, the neck soloed has a nice, tubby, almost P-bass roundness to it - I like to think that's partly due to the wide aperture of the Big Singles. The solo bridge has that nasal sound that we associate with a lot of jazz, while both of them together sound modern and a bit scooped to me. The piezo alone suffers from lower output than the mags, but blending the piezo in with the mags gives quite a bit of fingerboard character. Neat!
(Edit: Wow - has it really been three months since the beginning of this project?)
Neck solo
Bridge solo
Neck & bridge
Invalid Link Removed
Neck & Piezo
Bridge & Piezo
Neck, Bridge & Piezo
To my ears, the neck soloed has a nice, tubby, almost P-bass roundness to it - I like to think that's partly due to the wide aperture of the Big Singles. The solo bridge has that nasal sound that we associate with a lot of jazz, while both of them together sound modern and a bit scooped to me. The piezo alone suffers from lower output than the mags, but blending the piezo in with the mags gives quite a bit of fingerboard character. Neat!
(Edit: Wow - has it really been three months since the beginning of this project?)
Last edited:
Nice!
Congrats! That is a home run.
The bass sound great.
You have to love garageband and how easy it is to do stuff.
Congrats! That is a home run.
The bass sound great.
You have to love garageband and how easy it is to do stuff.
- Apr 18, 2008
- 16,015
- 1
- 31,728
- Disclosures
- I'm highly opinionated and extremely self-assured
- Apr 18, 2008
- 16,015
- 1
- 31,728
- Disclosures
- I'm highly opinionated and extremely self-assured
Dammit. Just noticed all the photos are gone. Must have been due to some changes made at my ISP. I'll reload them all tonight...
- Apr 18, 2008
- 16,015
- 1
- 31,728
- Disclosures
- I'm highly opinionated and extremely self-assured


