

Enjoy the benefits of a premium membership!
Upgrade Account
-
TalkBass has been independent since 1998. Add your voice.
Create a free account to reply to discussions, view embedded media, and browse with fewer display ads.
Join free Log in
Want zero display ads or expanded classifieds tools? Compare plans.
You are using an out of date browser. It may not display this or other websites correctly.
You should upgrade or use an alternative browser.
You should upgrade or use an alternative browser.
Fretless 5 comp/showcase - the "*@#$ Cancer" Bass
- Thread starter Kev2007
- Start date
More options
Who Replied?Ha Ha, I don't understand what he said...
But it doesn't matter. This thing is way cool!
Oh, sorry. I'm going to carve or contour the top to the arched shape I want, then scoop out the back side of the top to the thickness(es) I want. The scooping part is called graduating. (That was the part you didn't get, right?)
Glad you like the build.
Kev

Oh, sorry. I'm going to carve or contour the top to the arched shape I want, then scoop out the back side of the top to the thickness(es) I want. The scooping part is called graduating. (That was the part you didn't get, right?)
Glad you like the build.
Kev
Yes, indeed, now I see.. but I also wondered what you did with your top or what we're looking at in the last picture. Seems you routed a kind of channel freehand?
Yes, indeed, now I see.. but I also wondered what you did with your top or what we're looking at in the last picture. Seems you routed a kind of channel freehand?
Yep, I did a couple of passes freehand under the Safe-T Planer with the piece flat to get the edge thickness down from about 5/8" to about 1/4". That area around the edge would be carved away anyway, so this gives me a really clean reference point to which I can carve. I can see how my original description was confusing.

Yep, I did a couple of passes freehand under the Safe-T Planer with the piece flat to get the edge thickness down from about 5/8" to about 1/4". That area around the edge would be carved away anyway, so this gives me a really clean reference point to which I can carve. I can see how my original description was confusing.
Aaah.. now I see! I was kinda fooled by the picture. You didn't route a channel, but you've planed the edges down to their final thickness, preparing carving the inner space.
I find it quite amusing to follow your build, especially because your building method is an original one from my point of view. Keep up the very nice work!

Drake Custom
Commercial User
- Aug 24, 2010
- 440
- 1,083
- Disclosures
- Builder/Owner:Drake Custom Bass Guitars
Very clever build. I like your design and think that you should keep the volute with or without the back being veneered. My vote is to veneer the back because I always like to do that but Mizio is right. It looks great without as well.
I have been wanting to buy a Saf-T planer for awhile but was not sure it would work well. It seems that it does so I will give one a go.
Awesome build, keep up the good work!
I have been wanting to buy a Saf-T planer for awhile but was not sure it would work well. It seems that it does so I will give one a go.
Awesome build, keep up the good work!
Hey Kev:
I'm loving your build. What part of the GWN are you in?
Real close to you - I'm north of St. Marys, living in the middle of a field.
 When I'm done you can check it out if you'd like.
I have been wanting to buy a Saf-T planer for awhile but was not sure it would work well. It seems that it does so I will give one a go.
Thanks for the input, I'm having a lot of fun building this.
I was wondering if the Safe-T planer would be worth it, but I keep finding more uses for it. The only issue is that it sprays chips everywhere. I can't figure out how to build a collection device that won't interfere with the feed of the wood. If anyone has any big ideas about that....?

You got me. Depending which way you're feeding the wood, they fly totally different directions. Most annoying is when they keep slamming into your arm.Thanks for the input, I'm having a lot of fun building this.
I was wondering if the Safe-T planer would be worth it, but I keep finding more uses for it. The only issue is that it sprays chips everywhere. I can't figure out how to build a collection device that won't interfere with the feed of the wood. If anyone has any big ideas about that....?

adam.beauchene
Commercial User
Thanks for the input, I'm having a lot of fun building this.
I was wondering if the Safe-T planer would be worth it, but I keep finding more uses for it. The only issue is that it sprays chips everywhere. I can't figure out how to build a collection device that won't interfere with the feed of the wood. If anyone has any big ideas about that....?
It's an extremely useful tool. Once you've used it a while you'll figure out how to feed it so that the chip go generally in the same direction. I just hang up a sheet to stop the shrapnel, and I put my shop-vac on blow and tape the nozzle near the cutter head to keep the table clear.


Looking swell, brother. I love your attitude and I'm so inspired by your positive outlook. Good luck!
Well, it's been too long since I updated this thread. Treatments, gigs, being a Dad, life in general...you know...
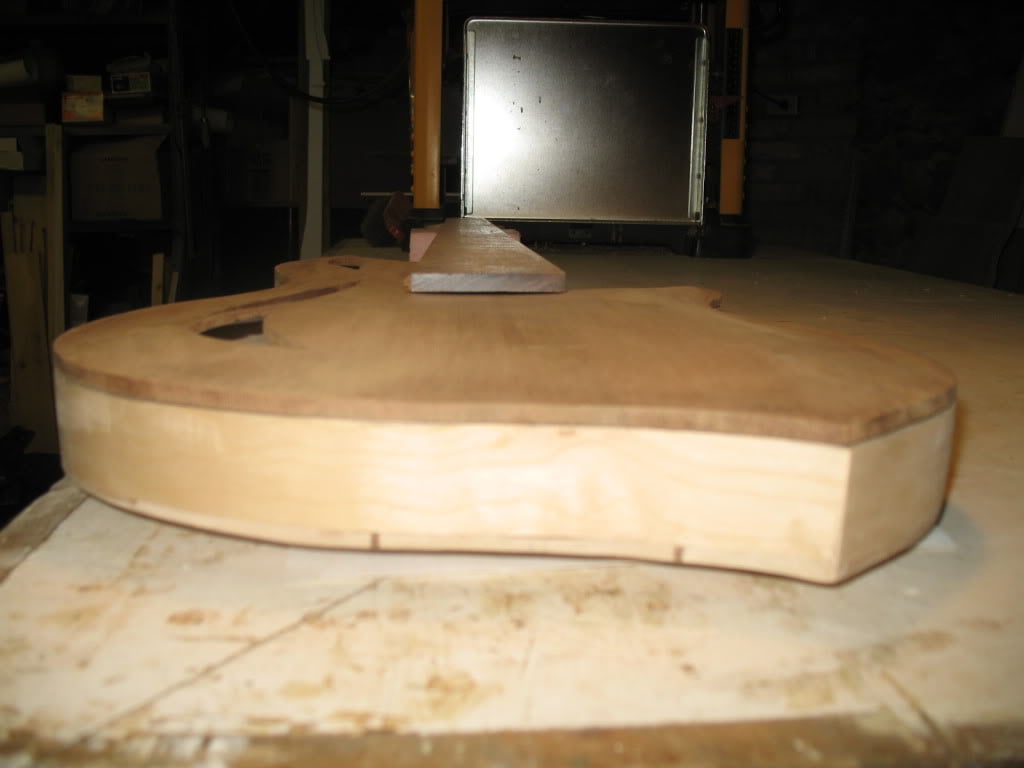
So - I began scratching my head about something about a week ago. Measurements confirmed - I miscalculated the thickness need for the transition block. For a regular slab bass (solid body) it would have been perfect, but I needed more 'height' where the body meets the neck to accomodate the arching. Like, about 5/16", which is kind of a lot to fake. Don't know how I blew this, but I did, and it's far too late to add onto the tranny block. So, the only thing I could think of was to add to the top (fretboard side) of the neck. I could cheat a bit on this by making a wedge, which would give me a bit more neck angle. So that's what I did - you can see it sitting on top here:
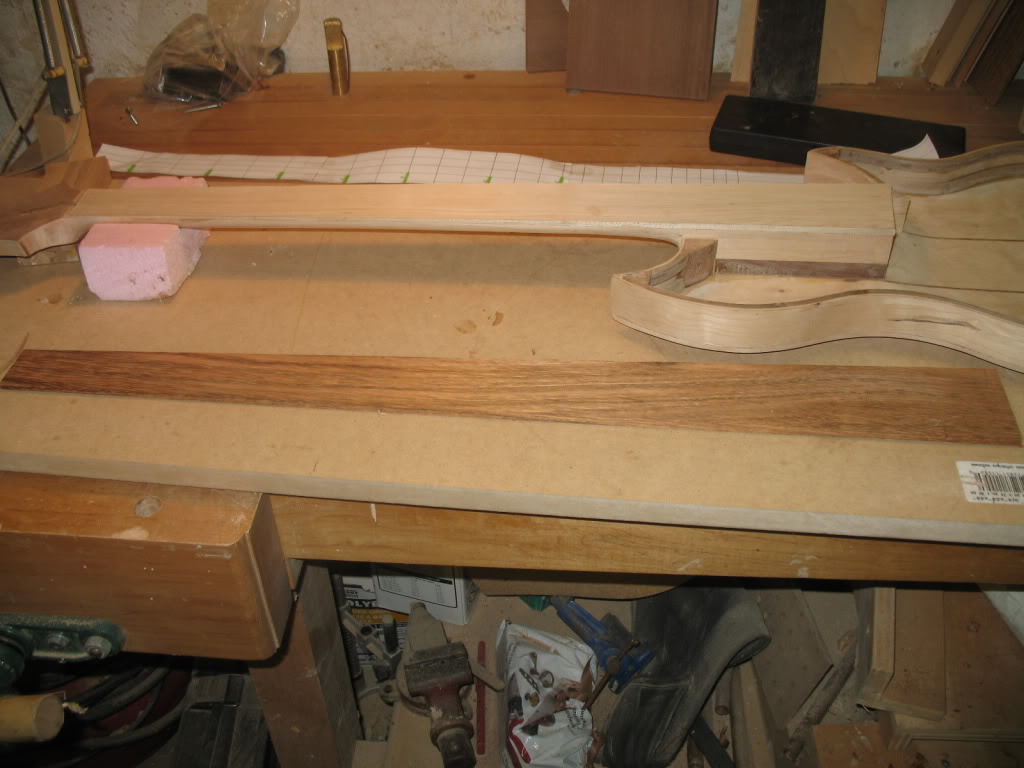
I also cut a new fretboard, tapered into a wedge shape as well, to add even more angle, so now we're good to go in terms of neck and height. The good and the bad of this all? - good is that I think I carved the neck a wee bit too thin for my liking, and the extra wood feels great now. The bad - I wonder if, with this extra lumber on top of the truss rod, if it'll be more difficult to adjust. Hoping not...
So now on to the top plate. I contoured the top first, then scribed my funky hole thingies onto it with the template and an Xacto(TM) knife.
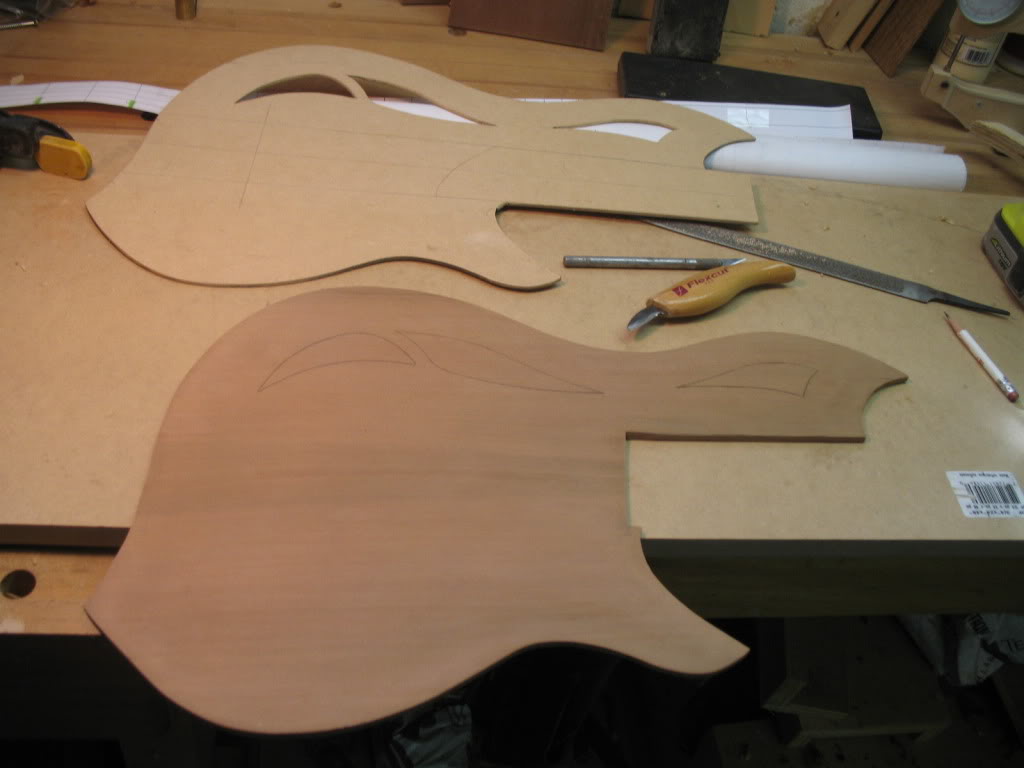
Now, just scoop out the stuff that looks like it shouldn't be there...

Here's my main ally in graduating the top; Very precise, great heft, and cute. I graduated to about 2.5mm through most of it, will take it down a further .5mm or so by the end. I left it a tad thicker under where the bridge will rest.
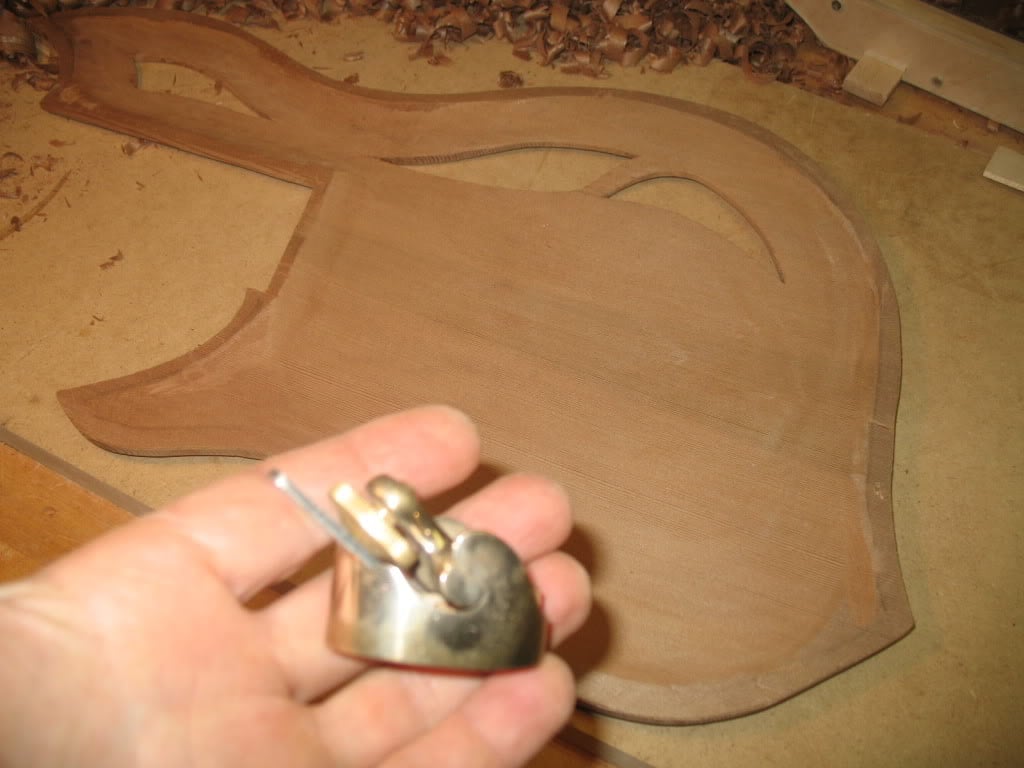
And here's the amount I scooped out.
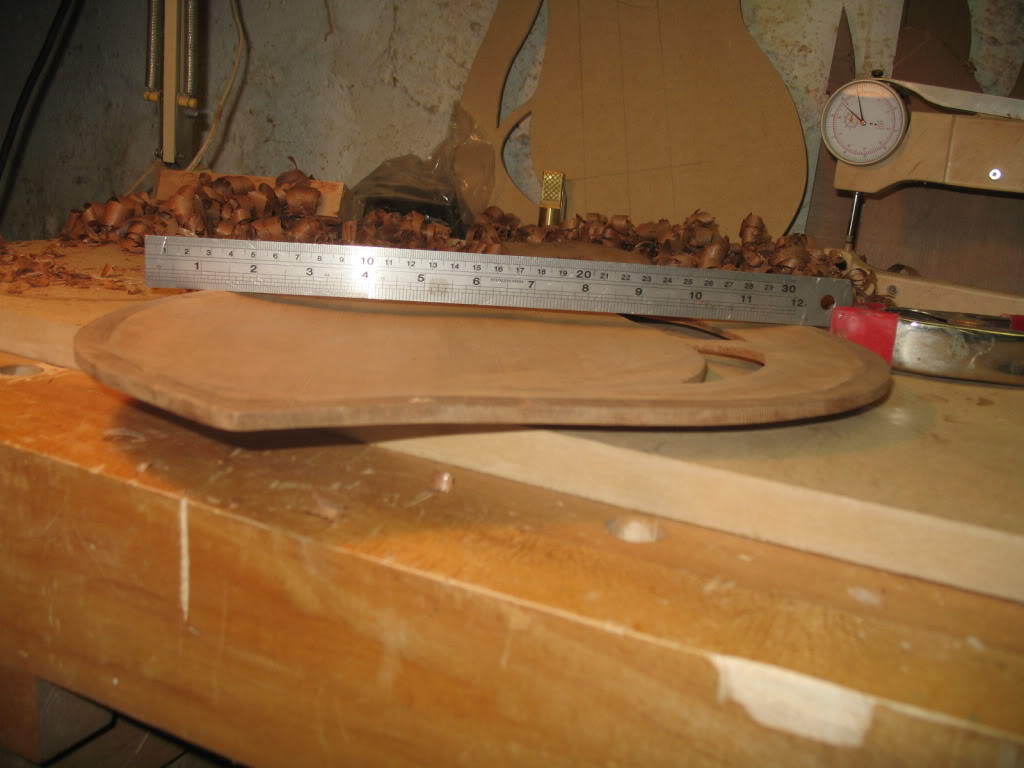
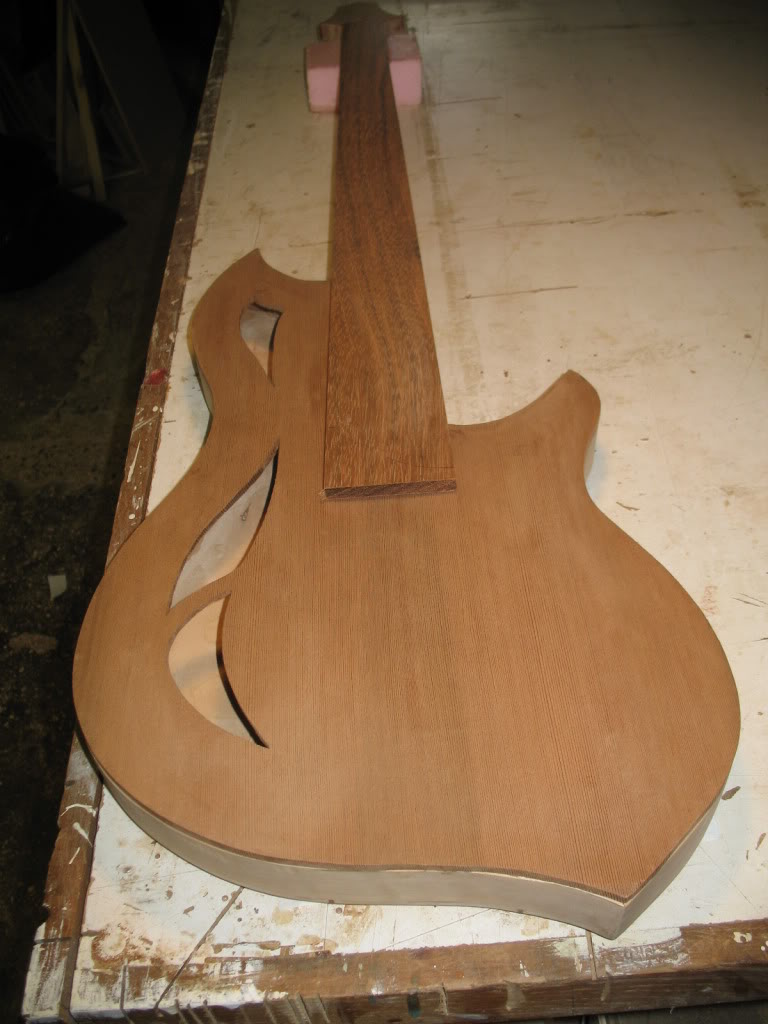
As you can see, I cut the funky sound holes out, and I'm quite pleased with how they look. At one point I had considered leaving the top solid (no holes), but I think it looks a lot groovier with the holes. And since this instrument will respond acoustically I think it's important to have somewhere for the sound to escape.
So here it is, resting peacefully, with the fretboard and top on (not glued)
And here's an overhead shot.
So that's where she lies. Tomorrow I'll hopefully get the minimal fret markers into the fretboard and the board trimmed.
Thanks for watching,
Kev
So - I began scratching my head about something about a week ago. Measurements confirmed - I miscalculated the thickness need for the transition block. For a regular slab bass (solid body) it would have been perfect, but I needed more 'height' where the body meets the neck to accomodate the arching.
Like, about 5/16", which is kind of a lot to fake. Don't know how I blew this, but I did, and it's far too late to add onto the tranny block. So, the only thing I could think of was to add to the top (fretboard side) of the neck. I could cheat a bit on this by making a wedge, which would give me a bit more neck angle. So that's what I did - you can see it sitting on top here:I also cut a new fretboard, tapered into a wedge shape as well, to add even more angle, so now we're good to go in terms of neck and height. The good and the bad of this all? - good is that I think I carved the neck a wee bit too thin for my liking, and the extra wood feels great now. The bad - I wonder if, with this extra lumber on top of the truss rod, if it'll be more difficult to adjust. Hoping not...
So now on to the top plate. I contoured the top first, then scribed my funky hole thingies onto it with the template and an Xacto(TM) knife.
Now, just scoop out the stuff that looks like it shouldn't be there...
Here's my main ally in graduating the top; Very precise, great heft, and cute.
I graduated to about 2.5mm through most of it, will take it down a further .5mm or so by the end. I left it a tad thicker under where the bridge will rest.And here's the amount I scooped out.
As you can see, I cut the funky sound holes out, and I'm quite pleased with how they look. At one point I had considered leaving the top solid (no holes), but I think it looks a lot groovier with the holes. And since this instrument will respond acoustically I think it's important to have somewhere for the sound to escape.
So here it is, resting peacefully, with the fretboard and top on (not glued)
And here's an overhead shot.
So that's where she lies. Tomorrow I'll hopefully get the minimal fret markers into the fretboard and the board trimmed.
Thanks for watching,
Kev
Drake Custom
Commercial User
- Aug 24, 2010
- 440
- 1,083
- Disclosures
- Builder/Owner:Drake Custom Bass Guitars
Kev,
I love the sound hole design. This bass is looking pretty sweet. You probably have stated back in your earlier posts, but what are thinking the finished weight will be? I have to build a very light fretless 4 string in the near future and may go with something like this design instead of just using light weight Swamp Ash.
Keep up the great build.
I love the sound hole design. This bass is looking pretty sweet. You probably have stated back in your earlier posts, but what are thinking the finished weight will be? I have to build a very light fretless 4 string in the near future and may go with something like this design instead of just using light weight Swamp Ash.
Keep up the great build.

Kev, I have been reading the posts, and, WOW!!!
I comend you on your fight, the current results from your tests, and this absolutely beautiful build! I also commned you on trying and learning! You are doing a bang-up job!!! I cannot wait for the end results and I appreciate your sharing your methods and your story. I hope I can learn many things from your experience as I, also, am learning.
Looking forward to the finished product!
Thumpin_P
I comend you on your fight, the current results from your tests, and this absolutely beautiful build! I also commned you on trying and learning! You are doing a bang-up job!!! I cannot wait for the end results and I appreciate your sharing your methods and your story. I hope I can learn many things from your experience as I, also, am learning.
Looking forward to the finished product!
Thumpin_P
Kev,
I love the sound hole design. This bass is looking pretty sweet. You probably have stated back in your earlier posts, but what are thinking the finished weight will be? I have to build a very light fretless 4 string in the near future and may go with something like this design instead of just using light weight Swamp Ash.
Keep up the great build.
Thanks! It's lots of fun learning, though a little scary learning as I go. I know that everyone says "get the Hiscock book, read such-and-such", but I've found that scouring the threads and pictures on TB LC has been more useful than any book I've read over the years. This is a fantastic and inspiring site, what the internet should truly be.
Weight: no idea, but it's light. Really light for me, but I'm used to my Warwick NT Thumb 5. Before I added the wedge on top of the neck it was balancing well holding the upper horn, but I'm wondering with the extra maple wedge and the slightly thicker fboard now if it'll be a bit divey. Ultralite tuners should help, but with a wood bridge and minimal electronics at the body end I don't know how much that will counterbalance. I've always planned to move the strap buttom around the side from centre to help. Maybe I should go all Alembic on it, adding some lead near the tail to add weight.
I'll weigh it when I get a bit further on with the build.
adam.beauchene
Commercial User
Looks great, Kev. I like the design, it's really grown on me. I still want to build a set of those clamps, too
Okay, the to-do list on this is still long, but I'm gaining on it.
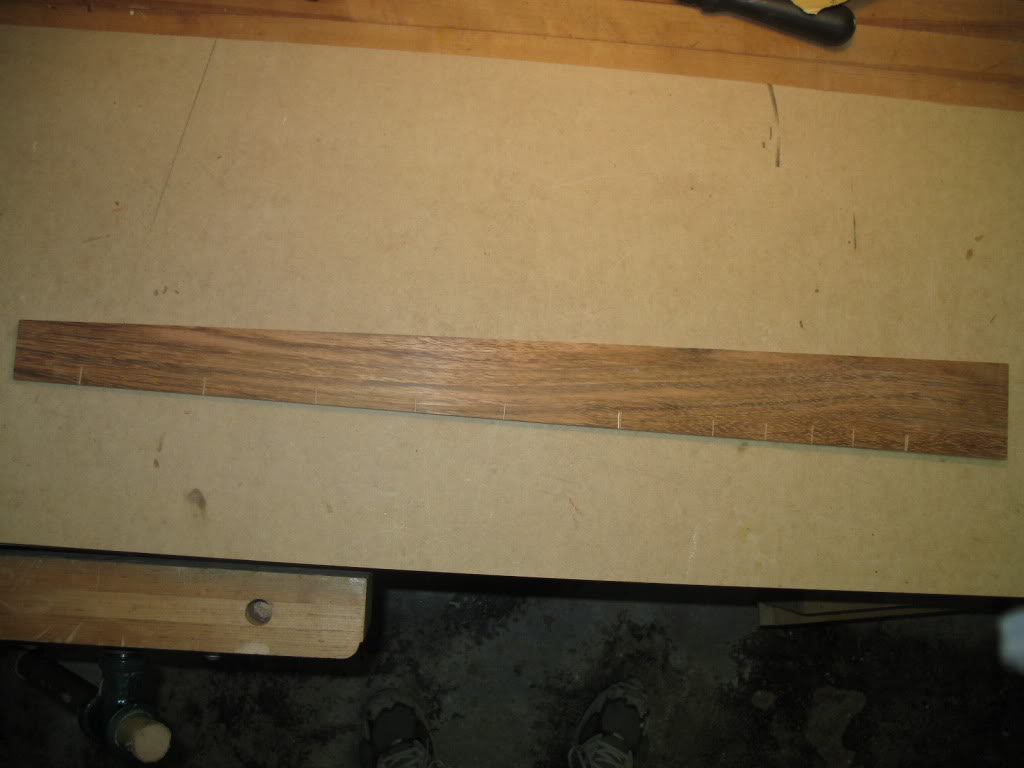
I got the markers into the new fretboard (can we call it 'fingerboard' for a fretless?). Nothing too remarkable about them - I want minimal visual help, so I'm keeping them subtle. I grabbed the strips from a piece of veneer I had lying around - I think it's maple. Hopefully the thin but lightly shaded markers will be enough. Black would have been more subtle but less visible. Sorry about the crappy photo, I'll take a better one soon.
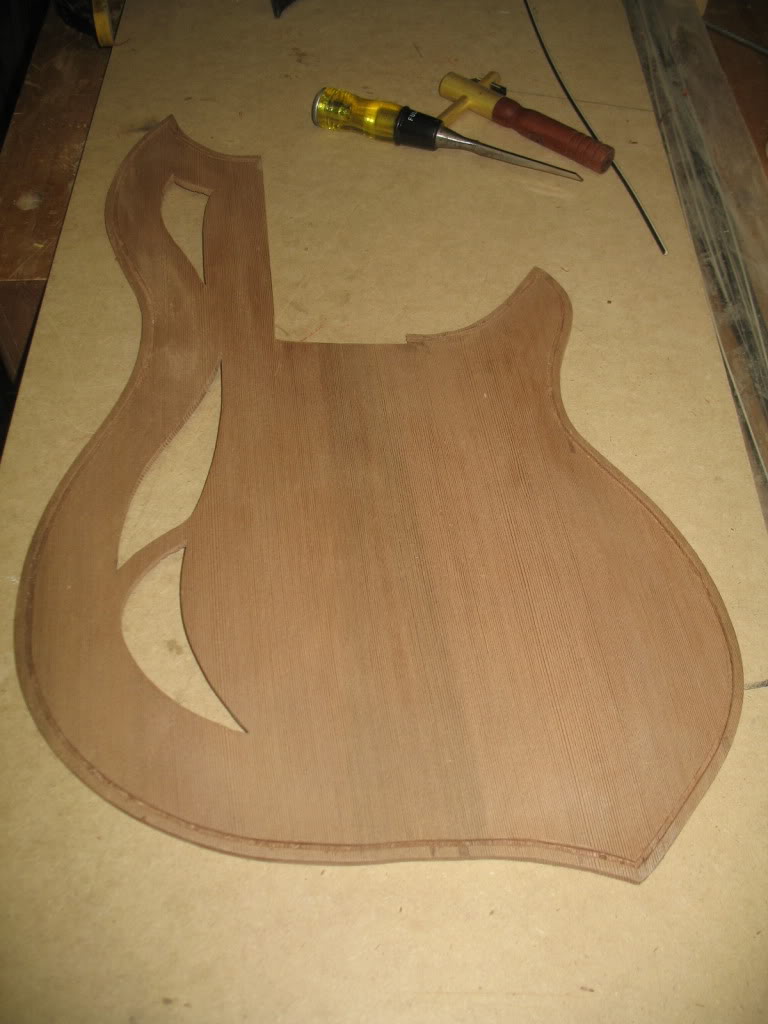
So, as with everything else on this build, I'm learning as I go. Today was 'learn how to do purfling' day. I have some D-bass purfling here from my erstwhile travel bass project, so I thought this would be a great project to begin to learn that skill. I also think the top needed a bit of dressing up. Turned out not bad. Some specialised tools for this part - you'll see the purfling cutter (more of a scriber) near the bottom of the photo, and my DIY purfling pick ground from an old beat up 1/4" chisel. First, I scribed the channels:
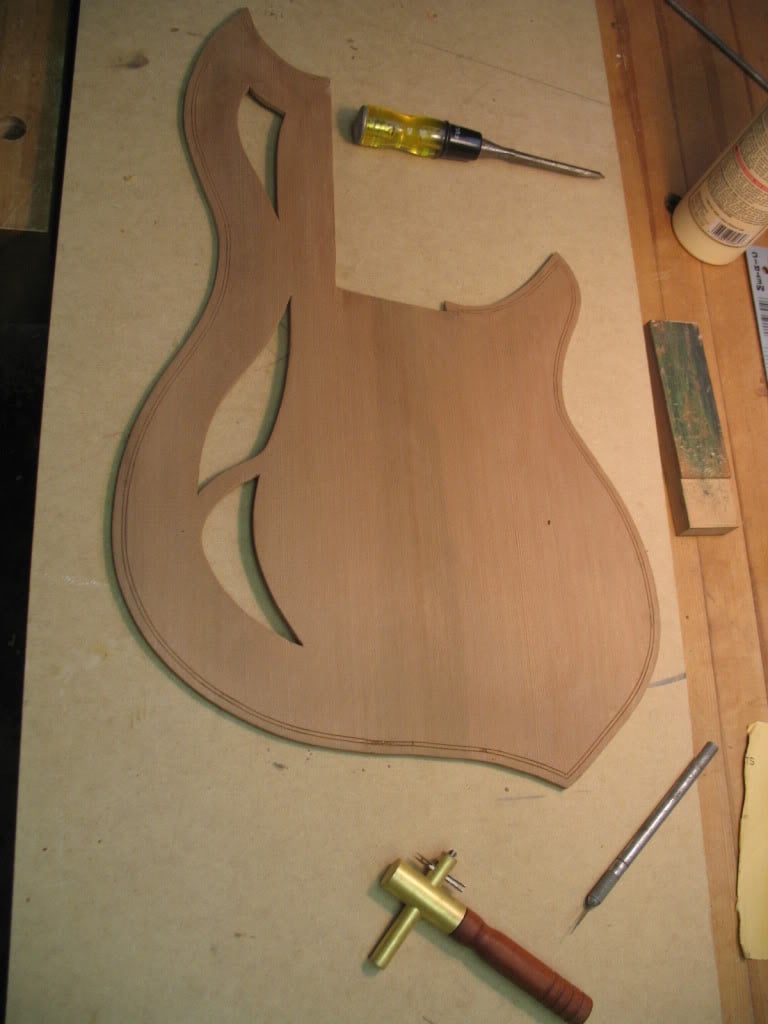
Then, using a sharp knife do deepen the lines, I created the channel. Then the pick scoops out the wood - carefully!
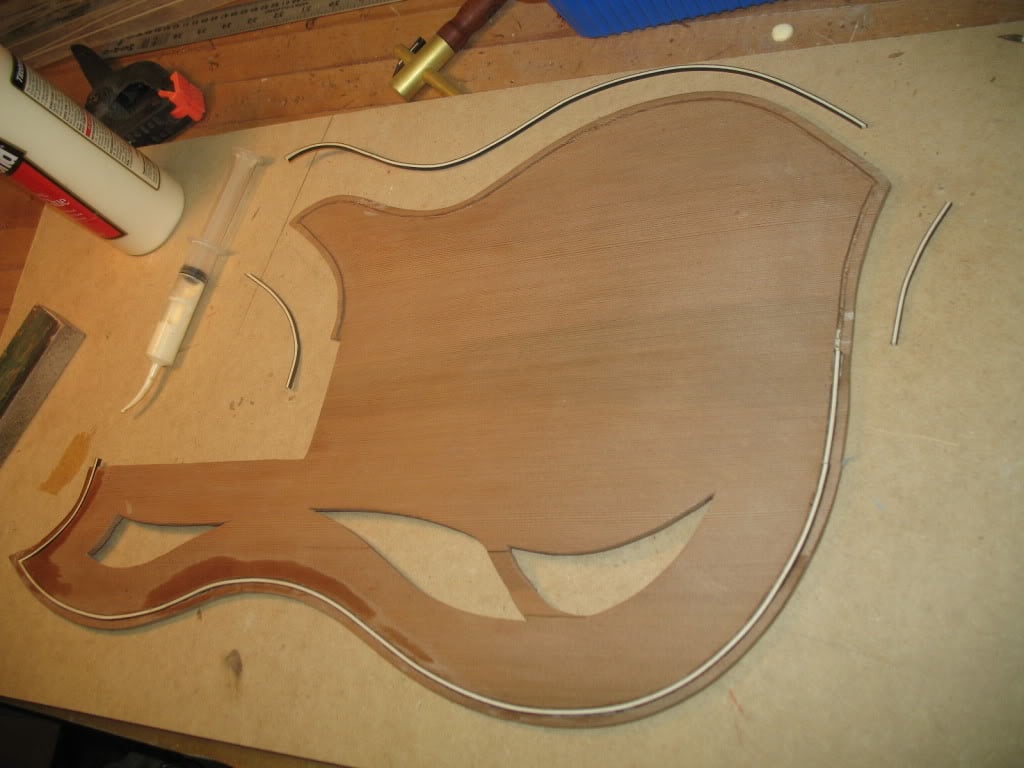
The purfling (I think it's pear/ebony) gets bent to the right shape on my bending iron, then glued in.
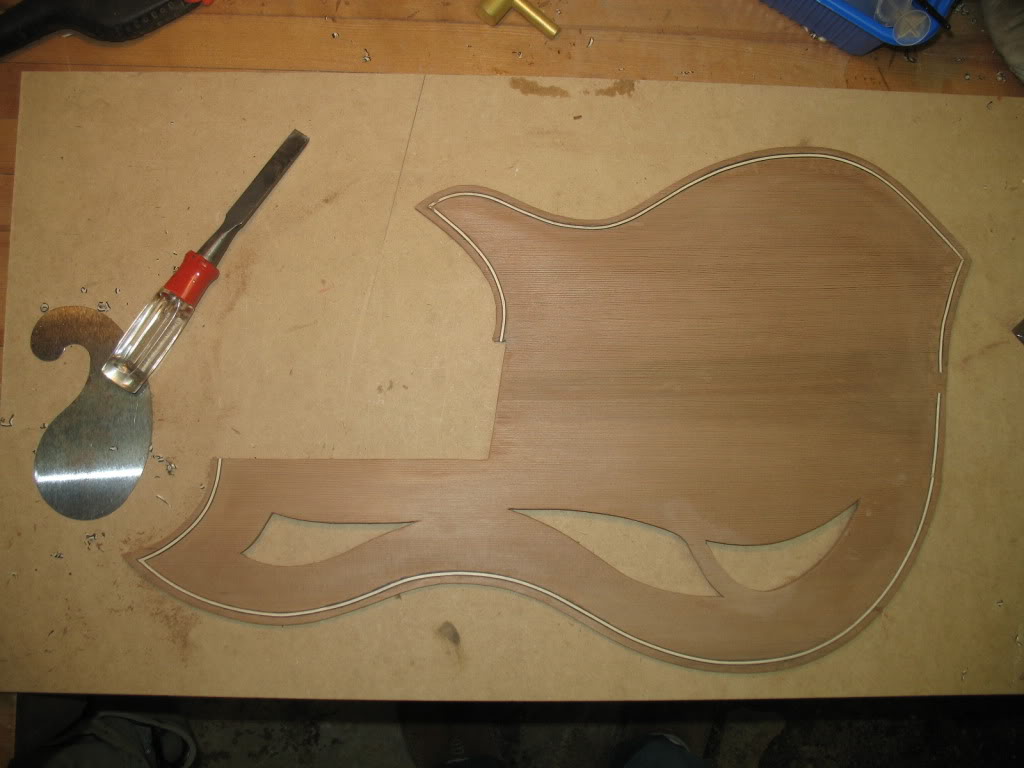
Et voila, it gets scraped and sanded down flush (still a lot of sanding dust in this photo), and there you have it - racing stripes! The gap near the tail end is deliberate - a big chunk of the top plate there will be cut out to accomodate the tailpiece/string anchor.
Like almost everything else on this build, it was a fun learning experience and I know I'd do a better job next time. But, there's always got to be a first time.
Thanks for watching,
Kev
I got the markers into the new fretboard (can we call it 'fingerboard' for a fretless?). Nothing too remarkable about them - I want minimal visual help, so I'm keeping them subtle. I grabbed the strips from a piece of veneer I had lying around - I think it's maple. Hopefully the thin but lightly shaded markers will be enough. Black would have been more subtle but less visible. Sorry about the crappy photo, I'll take a better one soon.
So, as with everything else on this build, I'm learning as I go. Today was 'learn how to do purfling' day. I have some D-bass purfling here from my erstwhile travel bass project, so I thought this would be a great project to begin to learn that skill. I also think the top needed a bit of dressing up. Turned out not bad. Some specialised tools for this part - you'll see the purfling cutter (more of a scriber) near the bottom of the photo, and my DIY purfling pick ground from an old beat up 1/4" chisel. First, I scribed the channels:
Then, using a sharp knife do deepen the lines, I created the channel. Then the pick scoops out the wood - carefully!
The purfling (I think it's pear/ebony) gets bent to the right shape on my bending iron, then glued in.
Et voila, it gets scraped and sanded down flush (still a lot of sanding dust in this photo), and there you have it - racing stripes! The gap near the tail end is deliberate - a big chunk of the top plate there will be cut out to accomodate the tailpiece/string anchor.
Like almost everything else on this build, it was a fun learning experience and I know I'd do a better job next time. But, there's always got to be a first time.
Thanks for watching,
Kev


