I really really like your idea for the body. Looks amazing. Def gonna follow this build. Good luck friend.

Enjoy the benefits of a premium membership!
Upgrade Account
-
TalkBass has been independent since 1998. Add your voice.
Create a free account to reply to discussions, view embedded media, and browse with fewer display ads.
Join free Log in
Want zero display ads or expanded classifieds tools? Compare plans.
You are using an out of date browser. It may not display this or other websites correctly.
You should upgrade or use an alternative browser.
You should upgrade or use an alternative browser.
Fretless 5 comp/showcase - the "*@#$ Cancer" Bass
- Thread starter Kev2007
- Start date
More options
Who Replied?i agree with the methods and execution being far more important, that was the whole idea behind mandatory journals, but in my opinion that cherry is beautiful and should absolutly sing in hollow body form!
This whole project and thread has to be one of the coolest and most interesting things I've read in many moon. Kev may be inventing a custom/signature line of the future. He could probably take a dozen orders just from the people reading the story!
- Pete
- Pete

- Jan 28, 2009
- 2,929
- 4,152
- Disclosures
- Owner: Moonshine Custom Guitars
It's been awhile since I checked in... Dude! I really like what you've been doing. It's a great build, one of the most interesting that I've seen.
I can't wait to see it completed.
Great Job Kev!
Moonshine
I can't wait to see it completed.
Great Job Kev!
Moonshine

Musiclogic
Commercial User
- Aug 6, 2005
- 6,505
- 75
- 60
- Disclosures
- Owner/Builder: HJC Customs USA, The Cool Lute, C G O

Hey all, I'm back. Well, I never was too far away. I've been banging away at this while life goes on: gigging, parenting, treatments, etc. I've finally had a chance to really take a good look at the other showcase builds. Wow.  Talk about talent. I'm just happy to be in the show with them. Stunning woods, design, execution... I'm totally the student here, and delighted to be a part of this.
So, what the heck have I done? Well, I got the truss and CF slots routed, with only one wee slip:
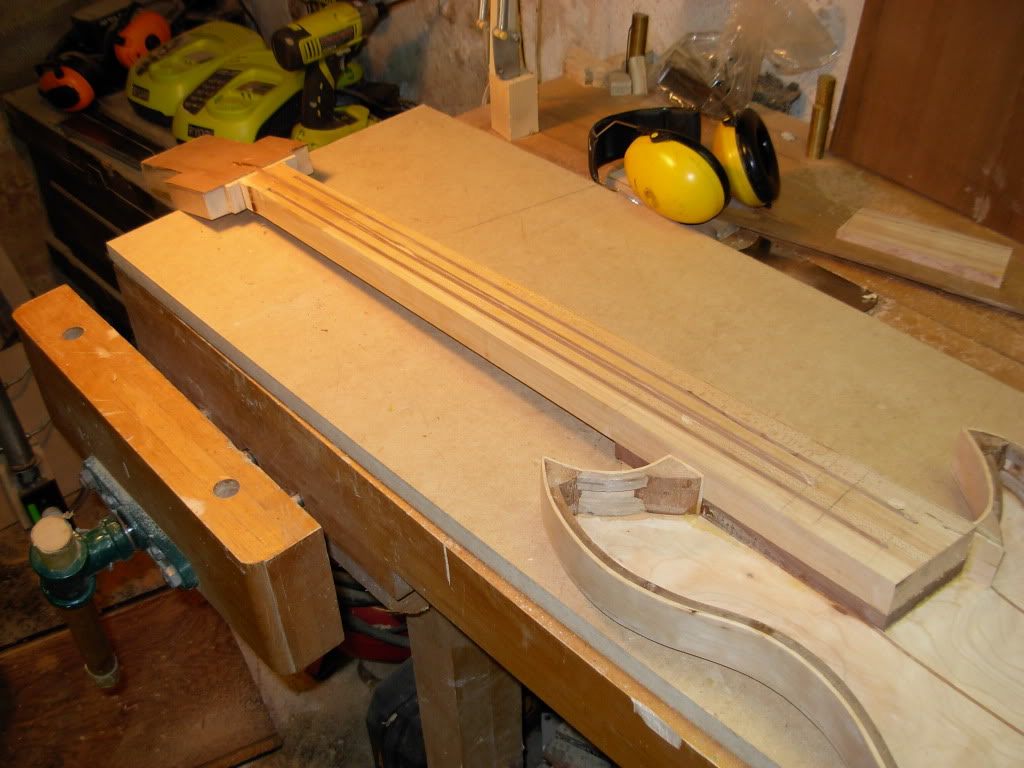
Also made some veneer from the cedar top stock and glued it and some wings on the headstock.
Then, because I couldn't think of any way to delay it, I glued the tapered neck and walnut transition block onto the back:
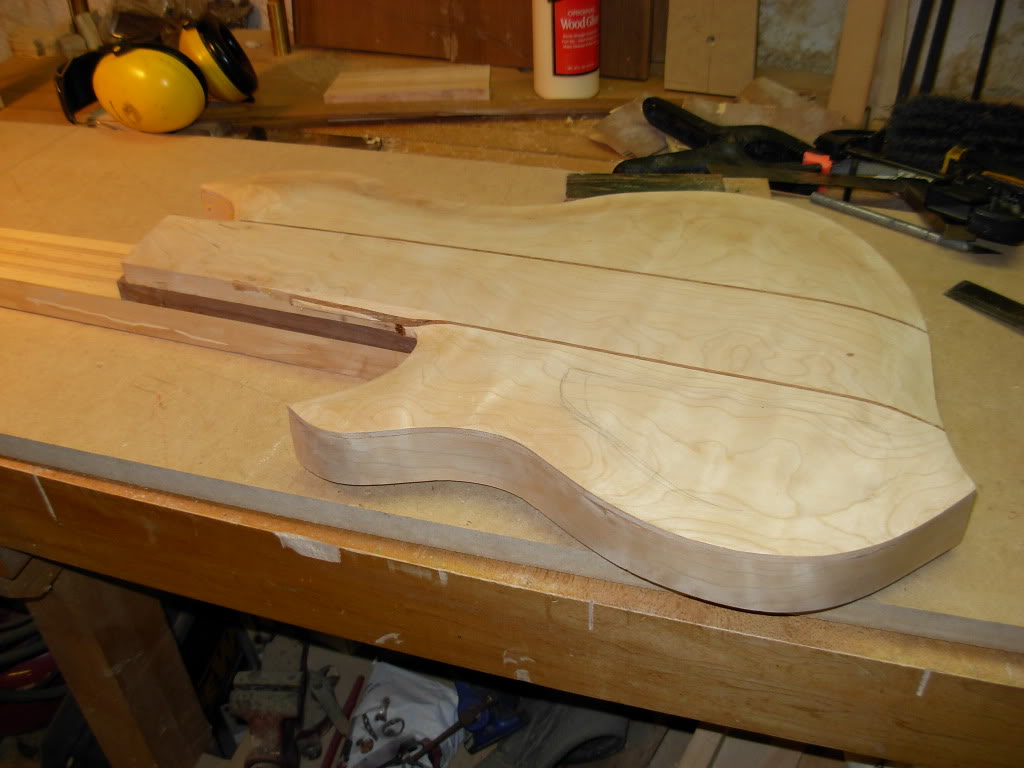
Now it's time to start shaping the neck and transition area:
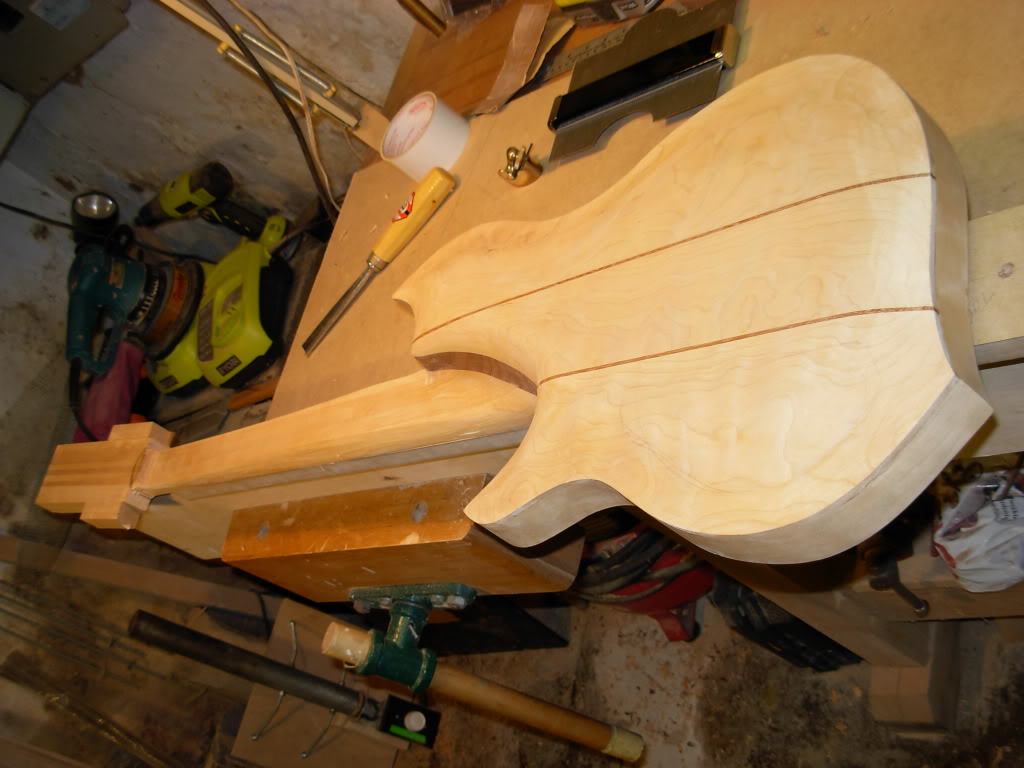
So the neck and transition area are partially shaped now. I'm pretty happy with how it's going, though I've got some repairs to make due to errant file strokes, block plane heel whacking the body, etc. There are also a couple of worm holes in the maple that decided to reveal themsleves in the side if the neck. What's your favourite way of mixing DIY wood filler? I've been saving some sanding dust for that purpose.
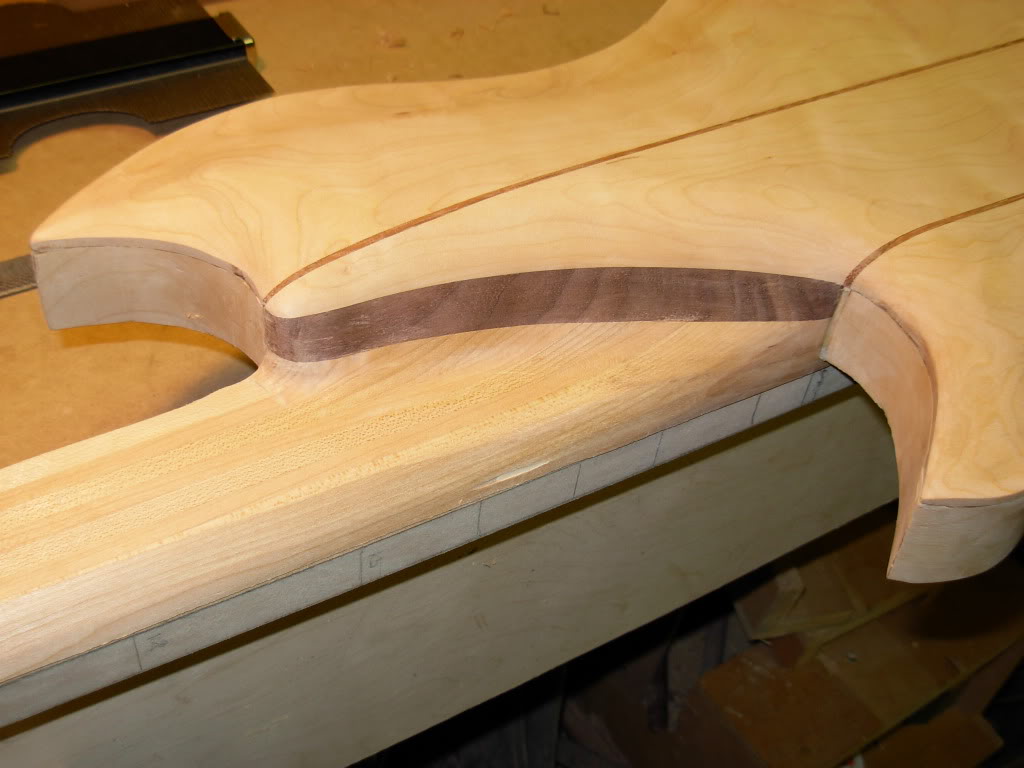
Here's the partially shaped tranny area. I need to go deeper into the neck to tie into the neck taper smoothly:
I've almost finalised the headstock shape, and that will be the next step after the neck is more or less done. Most of this has been done with hand tools, which I think are the best way to 'feel' the wood.
In case you're keeping score, there was finally some good news from my latest CT scan. The tumour in my colon is gone (???) , and some of the cancerous lymph nodes are shrinking. Encouraging. I'll continue chemo for another 8 weeks and then we'll see where it's at then. I've no doubt that playing, building and other creative acts have helped a lot in the battle, so thanks for watching!
Kev
Talk about talent. I'm just happy to be in the show with them. Stunning woods, design, execution... I'm totally the student here, and delighted to be a part of this.So, what the heck have I done? Well, I got the truss and CF slots routed, with only one wee slip:
Also made some veneer from the cedar top stock and glued it and some wings on the headstock.
Then, because I couldn't think of any way to delay it, I glued the tapered neck and walnut transition block onto the back:
Now it's time to start shaping the neck and transition area:
So the neck and transition area are partially shaped now. I'm pretty happy with how it's going, though I've got some repairs to make due to errant file strokes, block plane heel whacking the body, etc. There are also a couple of worm holes in the maple that decided to reveal themsleves in the side if the neck. What's your favourite way of mixing DIY wood filler? I've been saving some sanding dust for that purpose.
Here's the partially shaped tranny area. I need to go deeper into the neck to tie into the neck taper smoothly:
I've almost finalised the headstock shape, and that will be the next step after the neck is more or less done. Most of this has been done with hand tools, which I think are the best way to 'feel' the wood.
In case you're keeping score, there was finally some good news from my latest CT scan. The tumour in my colon is gone (???)
, and some of the cancerous lymph nodes are shrinking. Encouraging. I'll continue chemo for another 8 weeks and then we'll see where it's at then. I've no doubt that playing, building and other creative acts have helped a lot in the battle, so thanks for watching!Kev
This keeps looking better and better all the time. It is even more impressive that you are doing chemo while working on it!
lowsound
lowsound
this is one of my favs in the comp.
theres alot of wood porn in the builds, but these woods are nice, the process is very inspiring; and coming together very clean;
good job bro!
theres alot of wood porn in the builds, but these woods are nice, the process is very inspiring; and coming together very clean;
good job bro!
More shaping today! First, I made a hardboard template of the headstock shape, cut out and carefully finessed the outline. I traced the outline onto the headstock, rough cut the shape with a jigsaw, then attached the template to the headstock with carpet tape. A big fat template bit on the router table cut it to final size, with surprisingly little burning. I then thicknessed the headstock to about 5/8" on ye olde Saf-T Planer.
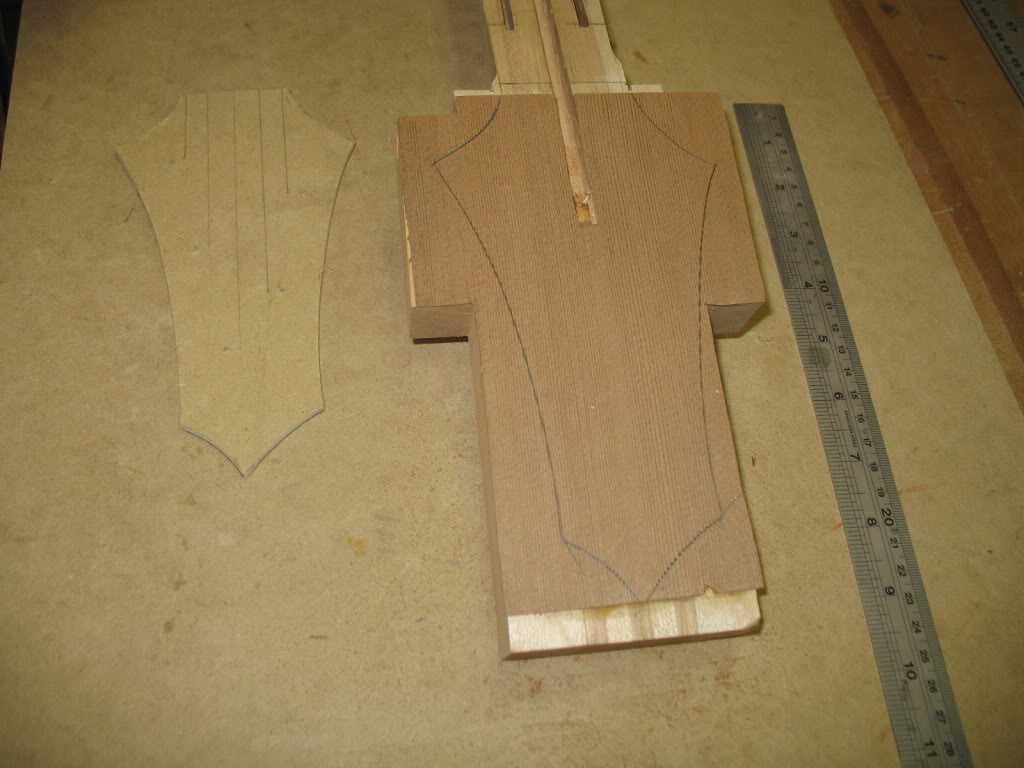
I guess I forgot to take a picture of the finished top side of the headstock. That'll come soon enough.
So, with the headstock finally shaped, I could finish shaping the neck and carve the volute. As so many here attest, that job is very pleasurable. Still more final sanding and tweaking to do, but the majority of this is done. Here's the volute carved:
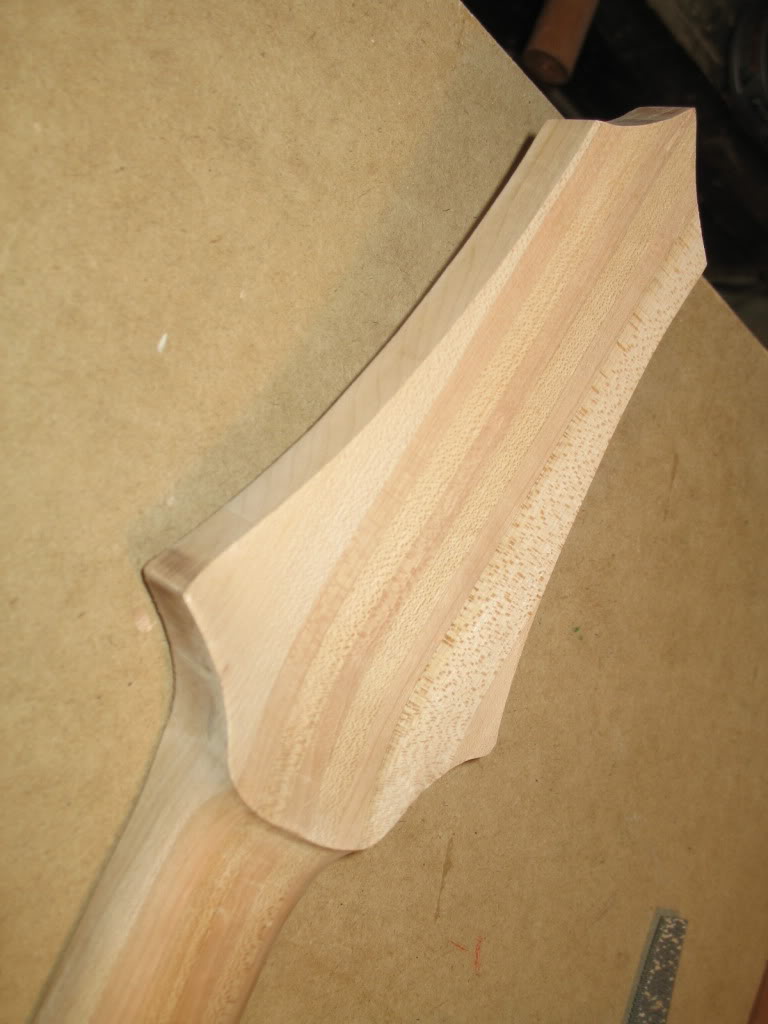
I'm not 100% sure if I like the volute - none of my axes have them, so it looks a little odd to me. "Honey, does this volute make my ass look fat?" I was going to glue some birdseye maple veneer onto the back of the headstock, but I'm wondering now if that's overkill. Opinions?
So here's the 'back side' of the bass more of less done. Still need to cut out the access hatch, which promises to be a tale in itself.
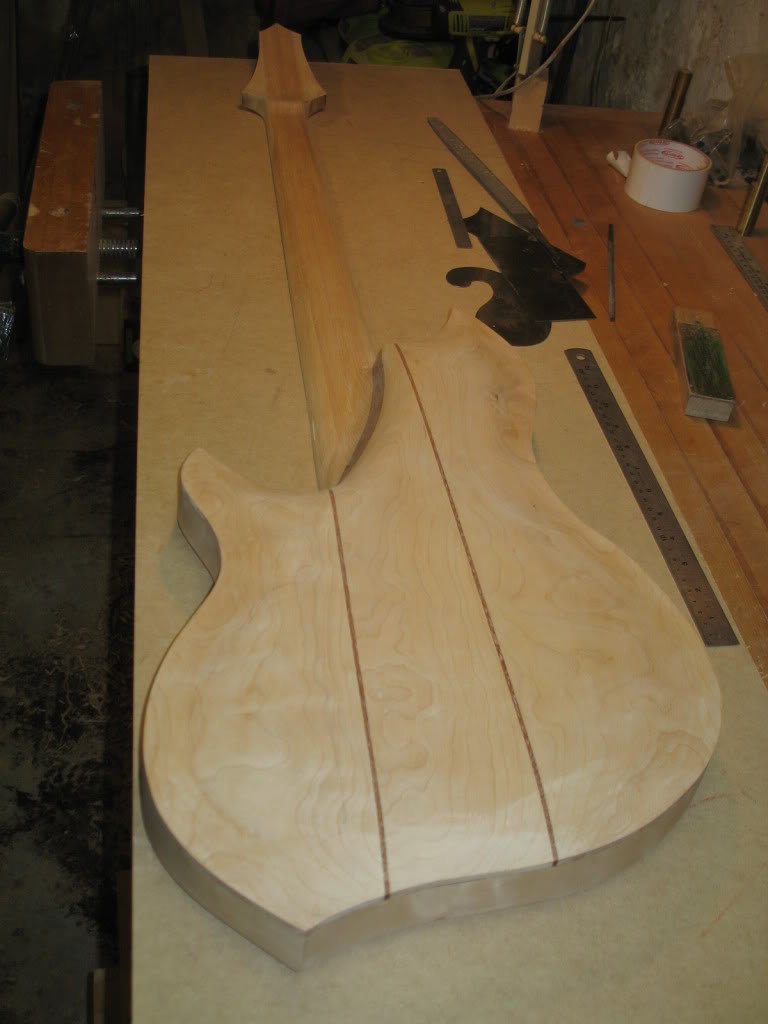
And, here's the transition area and back:
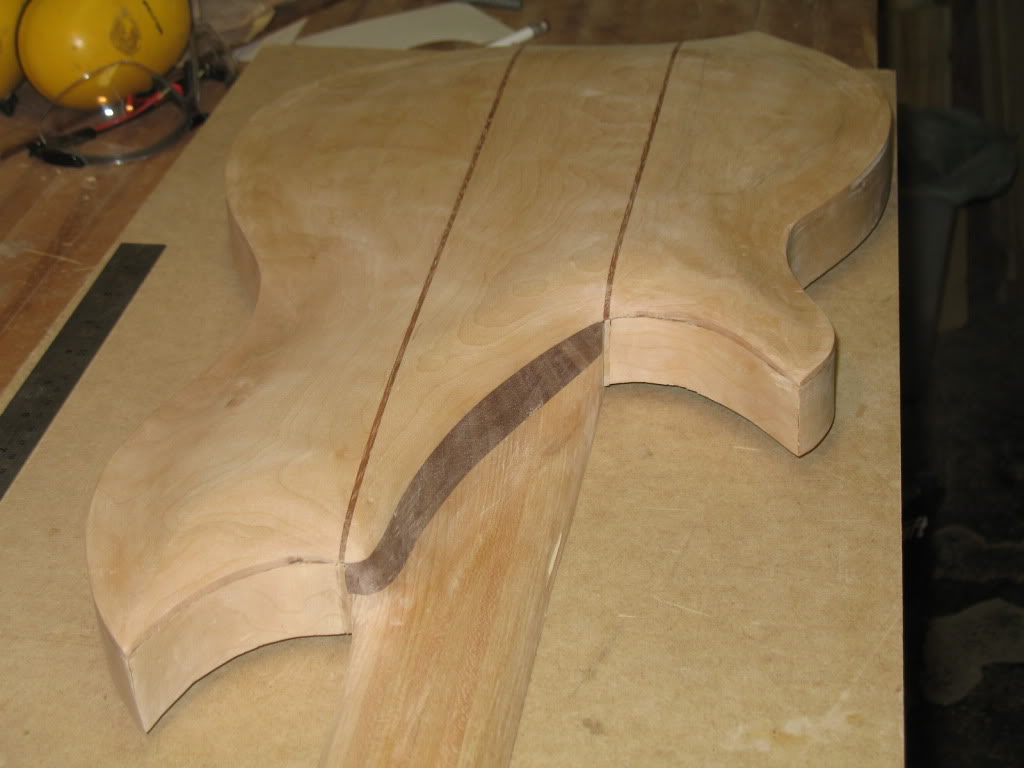
So, lots of little scrapes and such to sand out, but I'm fairly pleased with it. There's that point where you look and suddenly realise "hey - a bass!".
Next, glue in the CF rods (I should have done it already, oops), some fretboard sizing, and on to carving the top!
Thanks for watching,
Kev
I guess I forgot to take a picture of the finished top side of the headstock. That'll come soon enough.
So, with the headstock finally shaped, I could finish shaping the neck and carve the volute. As so many here attest, that job is very pleasurable. Still more final sanding and tweaking to do, but the majority of this is done. Here's the volute carved:
I'm not 100% sure if I like the volute - none of my axes have them, so it looks a little odd to me. "Honey, does this volute make my ass look fat?"
I was going to glue some birdseye maple veneer onto the back of the headstock, but I'm wondering now if that's overkill. Opinions?So here's the 'back side' of the bass more of less done. Still need to cut out the access hatch, which promises to be a tale in itself.
And, here's the transition area and back:
So, lots of little scrapes and such to sand out, but I'm fairly pleased with it. There's that point where you look and suddenly realise "hey - a bass!".
Next, glue in the CF rods (I should have done it already, oops), some fretboard sizing, and on to carving the top!
Thanks for watching,
Kev


adam.beauchene
Commercial User
Man, this is turning out to be a cool bass. And I could go either way on a veneer on the back of the headstock, it looks pretty cool now.


hey Kev! Welcome back  the bass looks sweet!
The volute looks good, I'd keep it. But it needs to be a bit slimmer and curvey, to so flat at the bottom edge. Look at the curve between the lower horn and the neck joint, that's the kind of shape I'd go for.
Personally I wouldn't add a veneer at the back of the head stock. It will look good, no doubt. But, IMHO, the beauty and true nature of your build is in its inspired simplicity. That's a very fragile balance... Resist temptation
the bass looks sweet!The volute looks good, I'd keep it. But it needs to be a bit slimmer and curvey, to so flat at the bottom edge. Look at the curve between the lower horn and the neck joint, that's the kind of shape I'd go for.
Personally I wouldn't add a veneer at the back of the head stock. It will look good, no doubt. But, IMHO, the beauty and true nature of your build is in its inspired simplicity. That's a very fragile balance...
Resist temptation Thanks, everyone, for the comments and encouragement. You're dead-on, miziomix, sometimes 'less is more', and thanks for reminding me of that. There's always the danger of slapping on more wood or whatever 'because I can'.
And, less is also less work.
And, less is also less work.

Your work astonishes me, it's a wonderful build and nice to see something different to all those (chambered) solid body axes.
More puttering today. I began by doing the final thicknessing of the fretboard with 'Homer', my DIY thickness sander.
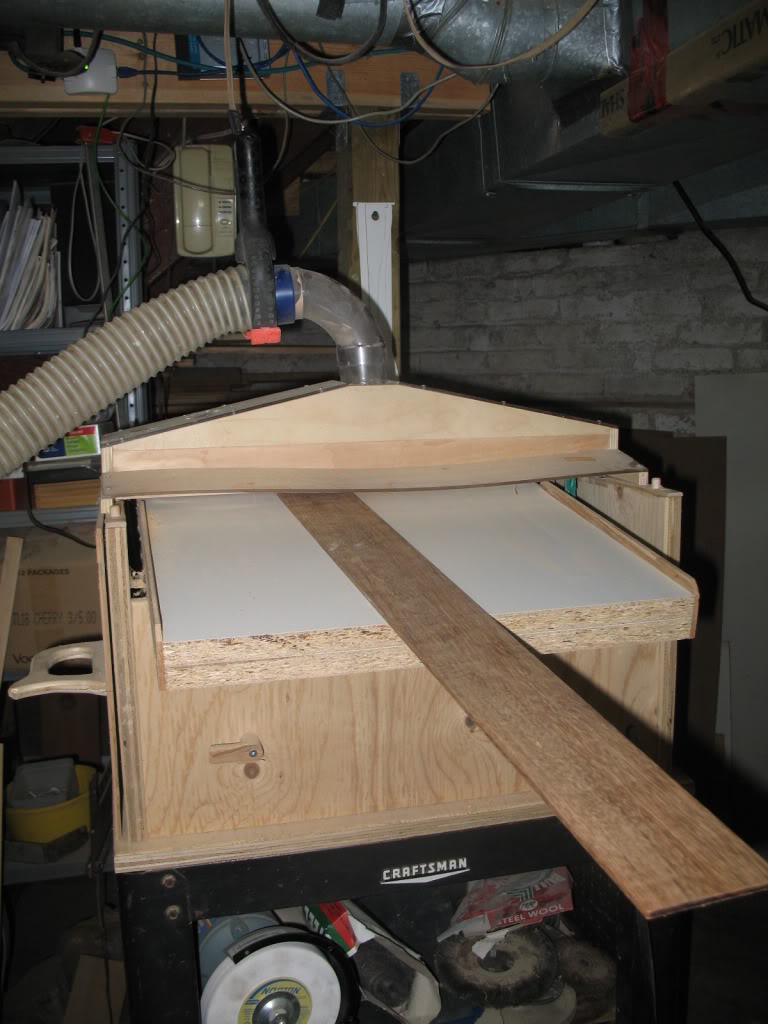
Board goes onto the template with carpet tape, and the big template bit on the router table tapers it perfectly. That fboard template has come in so useful in this build.
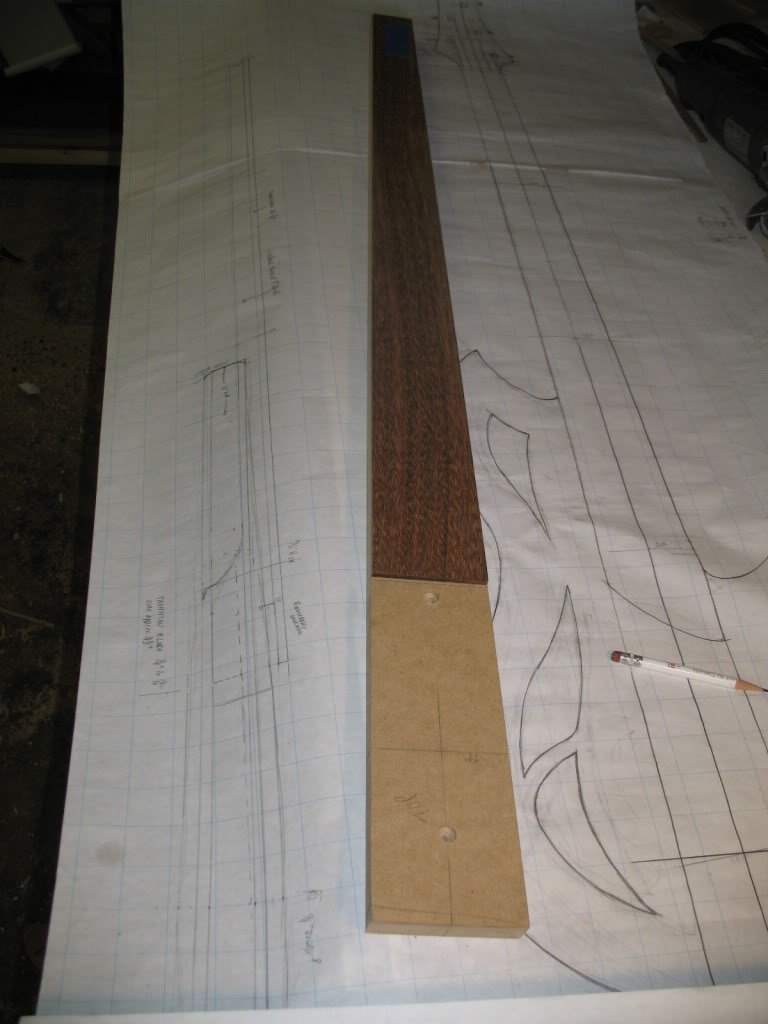
I then made a radius sanding block out of some scrap, stuck on some 120g and sanded the radius. It's only an 18 deg radius, so more or less flat.

Time to to turn attention to the top. I so love this 1/4 sawn WR cedar. The grain is straight and tight and beautiful. Anyway, I made a high-tech template to fit the top to the body. Impressive, huh?
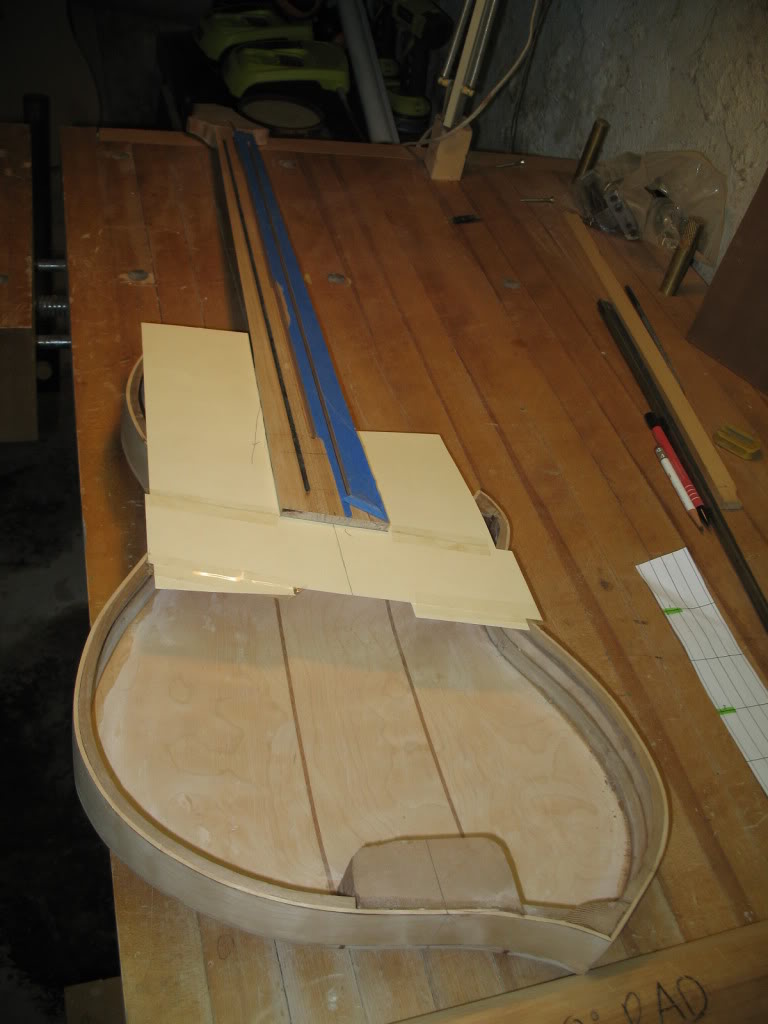
Rought cut the top to the template tracing about 1/16" proud of the edge, and fitted the top. Then I ran the edges under the Safe-T planer to final thickness (about 1/4"). I'll contour the top down to this thickness.
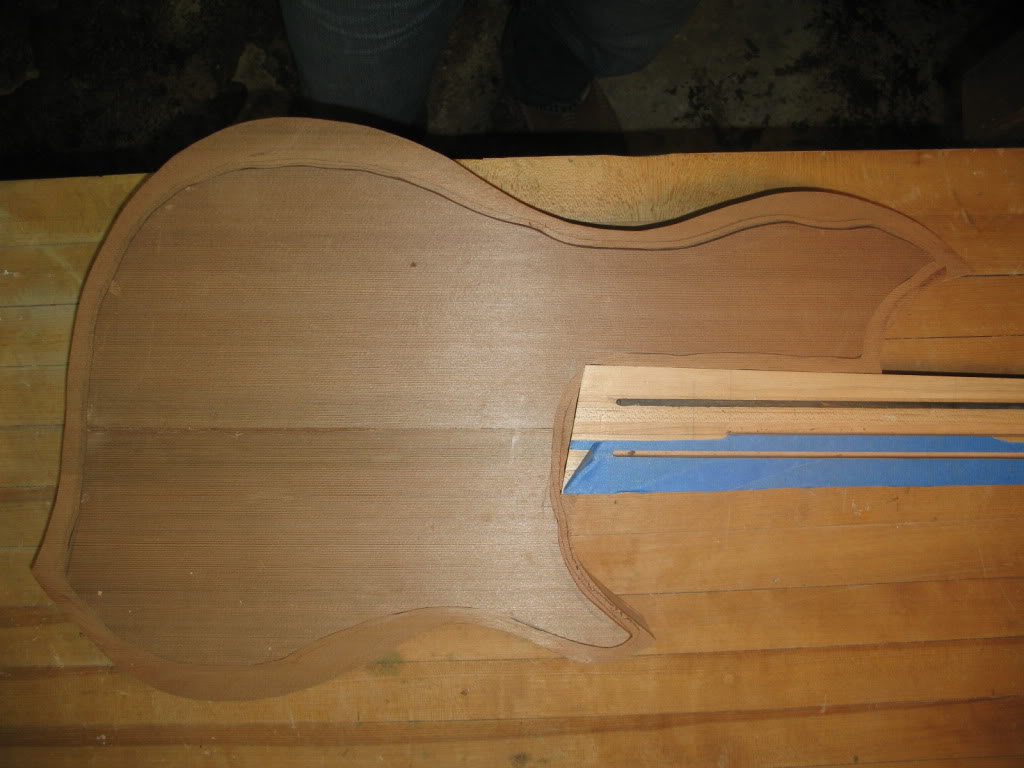
So the next step is to carve and then graduate the top, which will be really fun. After that just 1000000 more things to do to complete...
Thanks for watching,
Kev
Board goes onto the template with carpet tape, and the big template bit on the router table tapers it perfectly. That fboard template has come in so useful in this build.
I then made a radius sanding block out of some scrap, stuck on some 120g and sanded the radius. It's only an 18 deg radius, so more or less flat.
Time to to turn attention to the top. I so love this 1/4 sawn WR cedar. The grain is straight and tight and beautiful. Anyway, I made a high-tech template to fit the top to the body. Impressive, huh?
Rought cut the top to the template tracing about 1/16" proud of the edge, and fitted the top. Then I ran the edges under the Safe-T planer to final thickness (about 1/4"). I'll contour the top down to this thickness.
So the next step is to carve and then graduate the top, which will be really fun. After that just 1000000 more things to do to complete...
Thanks for watching,
Kev
Ha Ha, I don't understand what he said...
But it doesn't matter. This thing is way cool!
+1
me too


