I replaced a fretboard awhile back and have been trying to shape the board for lowish action without buzzing. I keep running into the issue of buzzing on the lowest 1 or 2 notes. Is this a sign of some specific problem I need to address? Of course I can keep raising saddles to make it go away but not sure why I can get nice action on the rest of the neck but not down at the low end.

Enjoy the benefits of a premium membership!
Upgrade Account
-
TalkBass has been independent since 1998. Add your voice.
Create a free account to reply to discussions, view embedded media, and browse with fewer display ads.
Join free Log in
Want zero display ads or expanded classifieds tools? Compare plans.
You are using an out of date browser. It may not display this or other websites correctly.
You should upgrade or use an alternative browser.
You should upgrade or use an alternative browser.
Fretless setup - buzzing on lowest notes
- Thread starter skycruiser
- Start date
More options
Who Replied?
I don't really have an answer but I've had success with my nut slots being very low. My strings barely avoid touching the Fingerboard as they leave the nut. From there I have the fingerboard almost flat with just a hair of relief.


Turnaround
Commercial User

I'll try to measure it and post it later today.Nut too deep?

I'll try to measure it and post it later today.

also, some pics might be helpful. plus: then we get pics!

Turnaround
Commercial User
The OP said the first 1 or 2 notes buzz. if the nut was too deep only open strings would buzz.Nut too deep?
Turnaround
Commercial User

Could be the nut is low but sounds like it may be a slight bump/hump on the board? You could try a piece of paper over the nut or raise the saddle height

- Apr 18, 2008
- 16,019
- 1
- 31,736
- Disclosures
- I'm highly opinionated and extremely self-assured
I loosened the truss rod a little and I was able to improve the setup. Not having a capo, I taped down the strings at around the 12th fret position, pressed down on the 1st fret position, and tried to measure the relief with my feeler gauge. First time to try to do this so I'm not sure how well it was done, but I was getting around .006 to .007". I was also able to check the space between the strings and the fingerboard at the nut. It is around 0.030 to 0.032". What is recommended spacing spacing for a fretless?
When I set this neck up the last time, I felt like I needed more relief but couldn't resolve the buzzing issue even with the truss rod completely loose. So yesterday I finally got around to working on this again. I tightened the truss rod to get a visible bow in the neck. I didn't try to measure anything but would guess when holding a straight edge along the neck I had 2-3 mm space at either end above the fingerboard. Then I sanded the fingerboard back down "flat" along the string-paths, maintaining the radius as well as I could. So this is my first attempt to set it up now that it should have the ability to set the relief. I'm just not that good at measuring it and not even sure what to set it to.
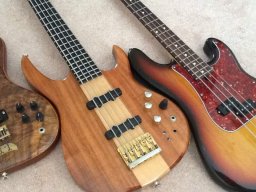
This is the bass - a Squier Vintage Modified, 2008, originally a "Jaco" style bass with no pickguard. A previous owner did a hack-job pickguard install - looked terrible because he made some very crude cuts to force one to fit. My dad and I made this green one to use those holes but with a better fit to the neck and control plate. Also made a black one. The original fingerboard was lined ebonol. The previous owner had sanded it down to deal with setup issues (maybe this same issue I have - not able to get enough relief). We replaced it with a macassar ebony board. Not perfect but not too bad either. No markers yet besides some little pieces of tape I stuck on the side to mark a few positions.


I've been going back and forth with this neck and a fretted CV neck. If I can get a good setup with the fretless I'd like to keep it on since it is the original and I like trying to play fretless.
When I set this neck up the last time, I felt like I needed more relief but couldn't resolve the buzzing issue even with the truss rod completely loose. So yesterday I finally got around to working on this again. I tightened the truss rod to get a visible bow in the neck. I didn't try to measure anything but would guess when holding a straight edge along the neck I had 2-3 mm space at either end above the fingerboard. Then I sanded the fingerboard back down "flat" along the string-paths, maintaining the radius as well as I could. So this is my first attempt to set it up now that it should have the ability to set the relief. I'm just not that good at measuring it and not even sure what to set it to.
This is the bass - a Squier Vintage Modified, 2008, originally a "Jaco" style bass with no pickguard. A previous owner did a hack-job pickguard install - looked terrible because he made some very crude cuts to force one to fit. My dad and I made this green one to use those holes but with a better fit to the neck and control plate. Also made a black one. The original fingerboard was lined ebonol. The previous owner had sanded it down to deal with setup issues (maybe this same issue I have - not able to get enough relief). We replaced it with a macassar ebony board. Not perfect but not too bad either. No markers yet besides some little pieces of tape I stuck on the side to mark a few positions.
I've been going back and forth with this neck and a fretted CV neck. If I can get a good setup with the fretless I'd like to keep it on since it is the original and I like trying to play fretless.
Searching this site I've finding suggestions of string height at the nut of .010" to 0.020", so if this is typical mine is a bit on the high side. I don't have proper nut files but I'll see if I can come up with something to take the slots down. That might help my action and what feels like a "short" first fret or 2.
Turnaround
Commercial User
On a fretless, the strings at the nut should not be touching the fingerboard. Somewhere around .010" is good.
To lower the slots, wrap some fine sandpaper around a drill bit and use that as a file. To get the right drill size, do a trial fit - wrap sandpaper around a drill bit and see if it fits the slot.
To lower the slots, wrap some fine sandpaper around a drill bit and use that as a file. To get the right drill size, do a trial fit - wrap sandpaper around a drill bit and see if it fits the slot.
First, the caveat: I'm no builder, just a guy with a bit of DIY experience.I loosened the truss rod a little and I was able to improve the setup. Not having a capo, I taped down the strings at around the 12th fret position, pressed down on the 1st fret position, and tried to measure the relief with my feeler gauge. First time to try to do this so I'm not sure how well it was done, but I was getting around .006 to .007". I was also able to check the space between the strings and the fingerboard at the nut. It is around 0.030 to 0.032". What is recommended spacing spacing for a fretless?
When I set this neck up the last time, I felt like I needed more relief but couldn't resolve the buzzing issue even with the truss rod completely loose. So yesterday I finally got around to working on this again. I tightened the truss rod to get a visible bow in the neck. I didn't try to measure anything but would guess when holding a straight edge along the neck I had 2-3 mm space at either end above the fingerboard. Then I sanded the fingerboard back down "flat" along the string-paths, maintaining the radius as well as I could. So this is my first attempt to set it up now that it should have the ability to set the relief. I'm just not that good at measuring it and not even sure what to set it to.
This is the bass - a Squier Vintage Modified, 2008, originally a "Jaco" style bass with no pickguard. A previous owner did a hack-job pickguard install - looked terrible because he made some very crude cuts to force one to fit. My dad and I made this green one to use those holes but with a better fit to the neck and control plate. Also made a black one. The original fingerboard was lined ebonol. The previous owner had sanded it down to deal with setup issues (maybe this same issue I have - not able to get enough relief). We replaced it with a macassar ebony board. Not perfect but not too bad either. No markers yet besides some little pieces of tape I stuck on the side to mark a few positions.
View attachment 4670056 View attachment 4670057 View attachment 4670058
I've been going back and forth with this neck and a fretted CV neck. If I can get a good setup with the fretless I'd like to keep it on since it is the original and I like trying to play fretless.
From what you're saying, it doesn't sound like you've done a proper set-up / neck leveling / radiusing. This isn't meant as a hsrsh, critical comment, so please don't take it that way.
If you don't have a capo, I'm assuming you also don't have a leveling beam and/or a radius sanding block/beam.
To get really good action requires much closer tolerances than a visibly flat neck and trying as best as you can to keep the radius when sanding along the string paths. It also sounds like the neck you started with was in questionable condition.
Also, if I'm not mistaken, if you're getting buzzing when fretting at the first or second "fret" it's a sign of something else going on. Action at the nut shouldn't impact that. Someone please correct me if I'm wrong.
Whatever the problem ends up being, I'm wishing you success and learning as you fix it.
First, the caveat: I'm no builder, just a guy with a bit of DIY experience.
From what you're saying, it doesn't sound like you've done a proper set-up / neck leveling / radiusing. This isn't meant as a hsrsh, critical comment, so please don't take it that way.
If you don't have a capo, I'm assuming you also don't have a leveling beam and/or a radius sanding block/beam.
To get really good action requires much closer tolerances than a visibly flat neck and trying as best as you can to keep the radius when sanding along the string paths. It also sounds like the neck you started with was in questionable condition.
Also, if I'm not mistaken, if you're getting buzzing when fretting at the first or second "fret" it's a sign of something else going on. Action at the nut shouldn't impact that. Someone please correct me if I'm wrong.
Whatever the problem ends up being, I'm wishing you success and learning as you fix it.
Thanks for the comments - all are appreciated.
I've discussed sanding in other threads here and I'm using an approach that was recommended. I purchased a machined-surface level for sanding. I apply sandpaper strips by first putting a layer of blue painter's tape, then I superglue strips of sandpaper to the tape. This gives me a very straight, flat, 24" sanding beam. I remove the nut and remove the neck from the bass. The method of sanding recommended is not to use a fixed radius, but to sand 4 separate flat "string paths" along the length of the fingerboard. You don't really care about the radius, but you want the path of each string to be perfectly flat. All I can say is I did the best job I could with my tools. I put a small strip of masking tape on each end of the fingerboard and focused sanding along the 4 lines that layout the string paths. I stopped when the sand paper started to get into the tape strips on the end.
I can tell that this time around the uniformity is much better than it was before. And I can always take everything apart and give it another round of sanding if it needs more work. This will not be a perfect bass, but I'm trying to get it playable with reasonable action, and I think I'm getting close. I'm hoping that I'll be able to improve slightly by lowering the nut slots as suggested above.
Edit: re: action at the nut. I don't think it was suggested that that would fix the buzzing issue. The buzzing is either not enough relief or a fingerboard that doesn't have flat string-paths. The action at the nut is just something else that needs to be fixed and will improve playability/action (I hope).
Last edited:
Sweet. Sounds like you're well on your way to getting it sorted and that you've got some of the important tools for the job. I'm rooting for you!Thanks for the comments - all are appreciated.
I've discussed sanding in other threads here and I'm using an approach that was recommended. I purchased a machined-surface level for sanding. I apply sandpaper strips by first putting a layer of blue painter's tape, then I superglue strips of sandpaper to the tape. This gives me a very straight, flat, 24" sanding beam. I remove the nut and remove the neck from the bass. The method of sanding recommended is not to use a fixed radius, but to sand 4 separate flat "string paths" along the length of the fingerboard. You don't really care about the radius, but you want the path of each string to be perfectly flat. All I can say is I did the best job I could with my tools. I put a small strip of masking tape on each end of the fingerboard and focused sanding along the 4 lines that layout the string paths. I stopped when the sand paper started to get into the tape strips on the end.
I can tell that this time around the uniformity is much better than it was before. And I can always take everything apart and give it another round of sanding if it needs more work. This will not be a perfect bass, but I'm trying to get it playable with reasonable action, and I think I'm getting close. I'm hoping that I'll be able to improve slightly by lowering the nut slots as suggested above.
Edit: re: action at the nut. I don't think it was suggested that that would fix the buzzing issue. The buzzing is either not enough relief or a fingerboard that doesn't have flat string-paths. The action at the nut is just something else that needs to be fixed and will improve playability/action (I hope).

I removed the nut and sanded about 10 mils off the bottom. Put it back in and did the rest of the depth adjustment using a couple of tricks from Turnaround (wrapping sandpaper around drill bits). The smallest one I just did with folded sandpaper - too narrow for my smallest bits. I think they are all in the 10-15mil range now and the first fret position feels much better. Before I really had to bend that string down at the nut - much easier now.
I think I'm headed in the right direction and that a little more tweaking I'll have a setup that will work. I'd like to get some permanent side-dots installed, so next step will be figuring out intonation on a fretless (I know there are a lot of tips on elsewhere in the archives). Somewhere I saved some instructions on installing dots - need to dig that back up. Thanks again all for the advice and help.
I think I'm headed in the right direction and that a little more tweaking I'll have a setup that will work. I'd like to get some permanent side-dots installed, so next step will be figuring out intonation on a fretless (I know there are a lot of tips on elsewhere in the archives). Somewhere I saved some instructions on installing dots - need to dig that back up. Thanks again all for the advice and help.

I'd like to get some permanent side-dots installed,
Fret Glo "Fret position markers for Guitar or Bass" | eBay
These aren't permanent, but they seem to stick pretty good. I haven't had one come off yet after a couple of months.
Can't say they actually glow that much, but I haven't really tried to charge them.
Anyway, they were very simple to install and do the job.
As an eBay Associate, TalkBass may earn a commission from qualifying purchases.


