• TalkBass has been independent since 1998. Add your voice.
    Create a free account to reply to discussions, view embedded media, and browse with fewer display ads.
    Join freeLog in
    Want zero display ads or expanded classifieds tools? Compare plans.

Gumtown's DIY 500 watt quad 6.5" bass combo

Here is my current DIY 'thing'..
After years of carting large gear around for gigs, and lifting an awkward shaped powered monitor upstairs to the practice space
I decided it was time to make something....compact, light weight and powerful.

I had always thought small drivers might be the answer, so I chose these 6.5" drivers from a local supplier,
they seem to be copies of KEF or RCF drivers with yellow Kevlar cones, and rated at 125W RMS, 250W Music power.
']

speaker%20specs.png

a 6.5" quad box it is, and a HF horn too (why not).

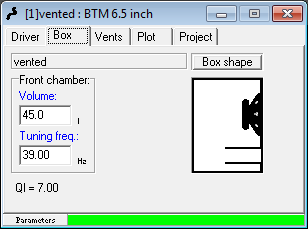
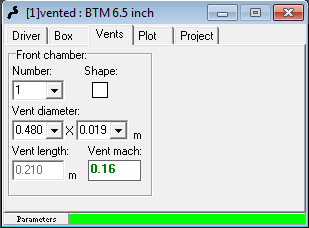
I started fiddling with some box parameters using WinISD, and came up with the required recipie.
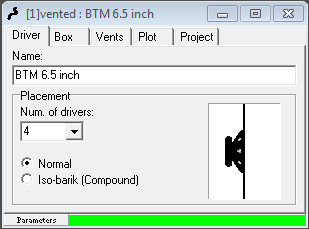
driver_calc.png
box_calc.png
vents_calc.png


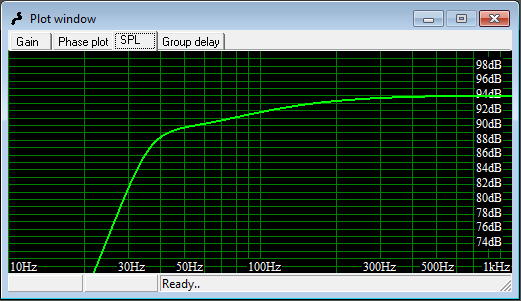
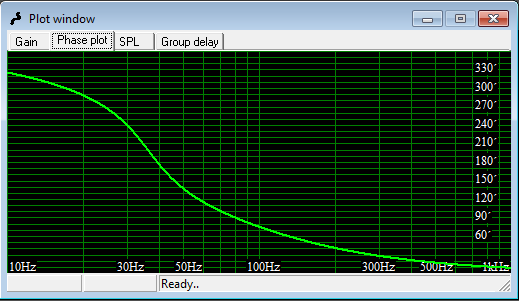
and this was the plot from the give specs and sizes
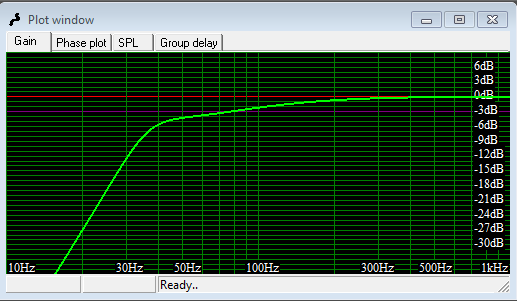
gain_plot.png
SPL_plot.png
phase_plot.png


So I set about with some 18mm 'form ply' (lightweight and dense resin/ply) and made a box to the calc design
']
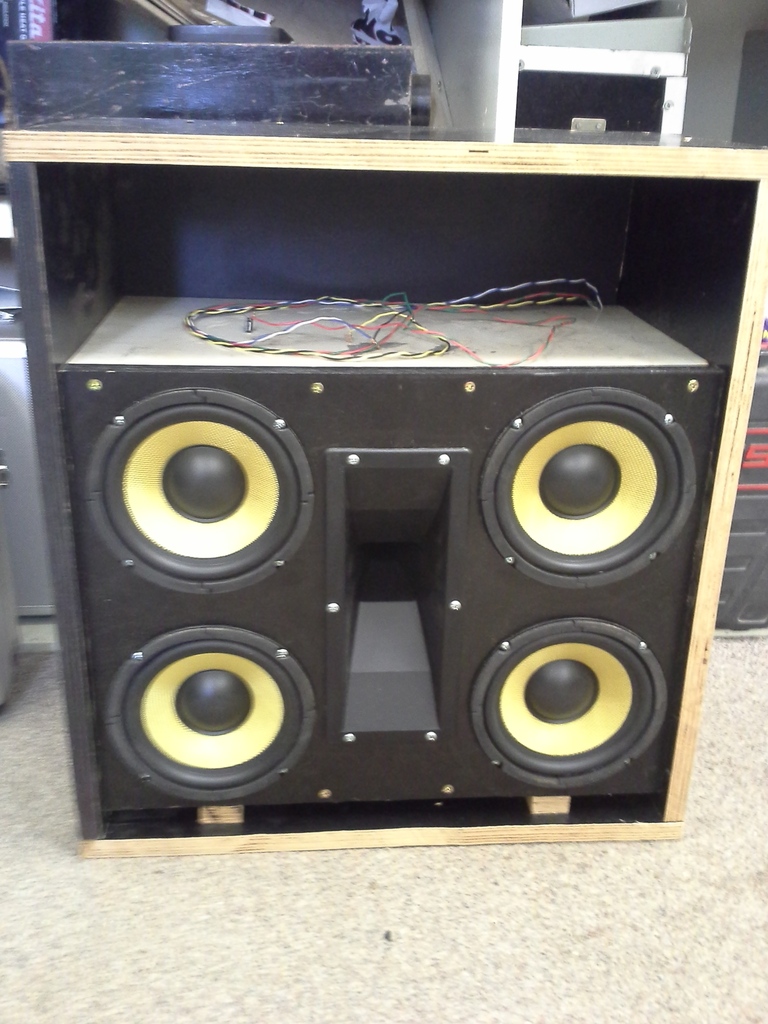
20150310_152214.jpg

meanwhile I had been shopping on eBay for modules and kitsets
requiring a 2 x 350 watt amplifier (run 2 x 8 ohm driver pairs at 4 ohms), a 700watt SMPS (switch mode power supply),
a stereo 6J1 tube buffer preamp (one for the power amp and one for the D.I. out) and parts to build a tube preamp/tone circuit,
which is an Alembic design robbed from Fender, the TMB preamp with bright switch.
']
F-2B_1.jpg


this is pretty much what the 6J1 buffer preamp is
6J1%20preamp.png

and here are the power amp modules being assembled
']
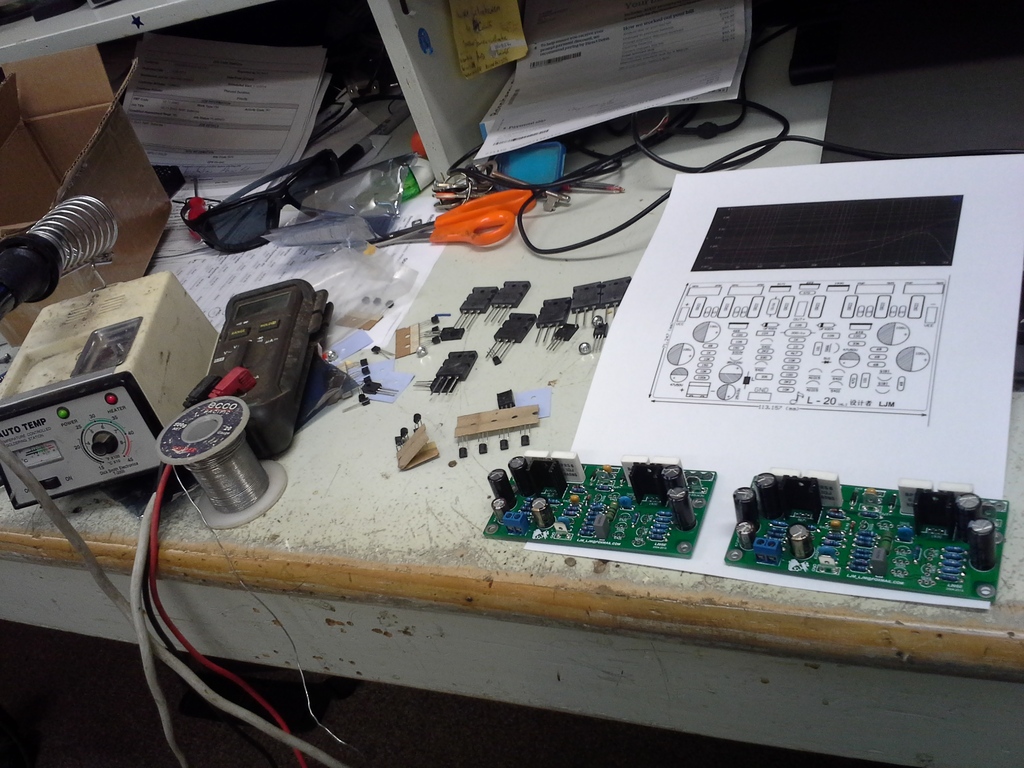
20150310_152155.jpg


Then a dry fit into the top space
']
20150311_174719.jpg

and at last the knobs arrive
']
20150314_135437.jpg


more to come .....
 
Last edited:
  • Like
Reactions: cfsporn
next...

the items are placed onto a gear plate and a 2 U face plate front panel painted black, with the pots and switches drilled in
']
20150324_095050.jpg


top view of the layout
']
20150324_095033.jpg


and a side view
']
20150324_095105.jpg


the top of the box is cut down to a 2 U space, covered in a 'faux leather' vynayl covering from the local fabic store.
a test drive in the garage indicated the two vent fans (one blows in the other sucking out) were not enough to dissipate the amplifier heat,
so another fan was fitted over the heatsink.
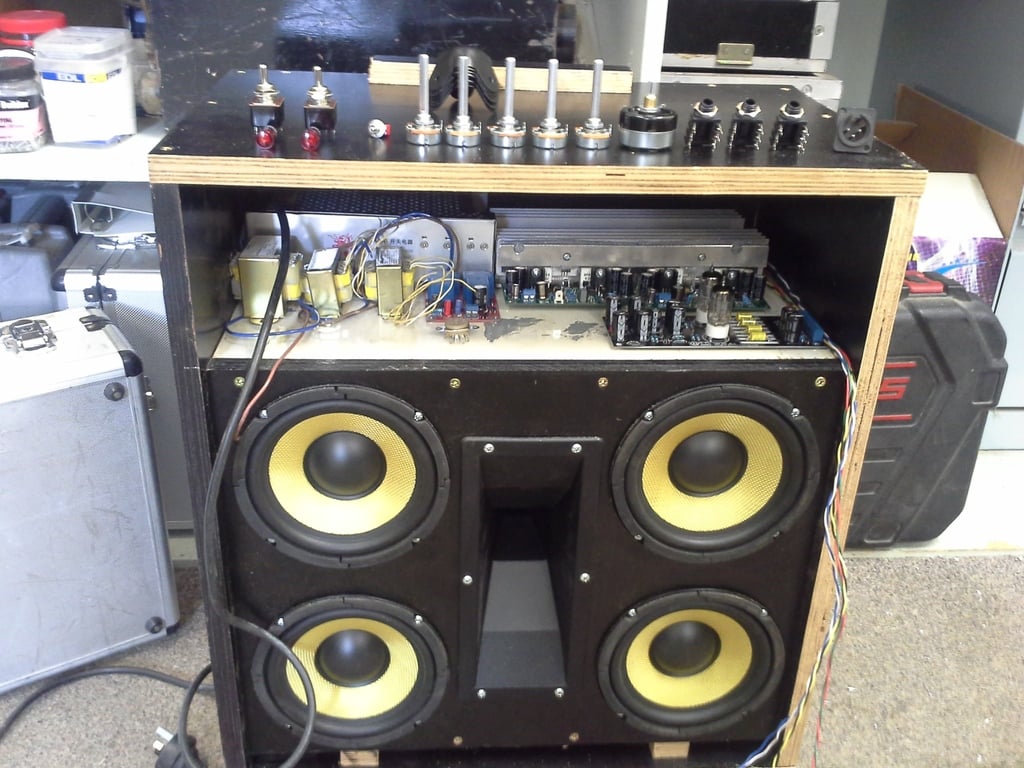
The test drive had astounding results, far exceeding my expectations, the blue leds are fitted behind the tubes, and the front grill with black curtain netting and a fabric 'jolly rodger' fitted with white leds behind the eyes, which are connected across the speaker output, light up as you play.
']
20150325_191444.jpg


Then the big test, we had to skip the last practice before last Friday's gig, so I tested on the night...
Second song after thrashing it for the first song, and .... it died....
The aluminium strap holding the power devices to the heatsink bend out on the ends and the outer devices cooked after lifting off the heatsink..

never mind, I am going to ditch the linear poweramps and am now waiting on delivery of a class D power amp.

the front panel from left to right are fuse - power switch -standby switch - ECC83/12AX7tube view hole - input - Gain - Bass - Mid - Treble - Bright Switch - HF driver switch - Master volume - 6j1 tubes view hole - Send/Return loop - D.I. Out and DI ground lift switch
 
Last edited:
  • Like
Reactions: mpdd
Here are the parts purchased off eBay

500 watt class D amp module
[Invalid or Expired Link Removed]

Switch mode Power supply 50-050 volts + 20-0-20 volts
660W Switching power supply (SMPS)for Power amplifier ±40V~±50V/7A and ±20V/1.5A

speaker protection relay module
1pc 30A Speaker Protection Board for Amplifier DIY User | eBay

6J1 stereo tube preamp/buffer
1pc 6J1 Valve Pre-amp Tube PreAmplifier Kit Assembled Board Audio DIY

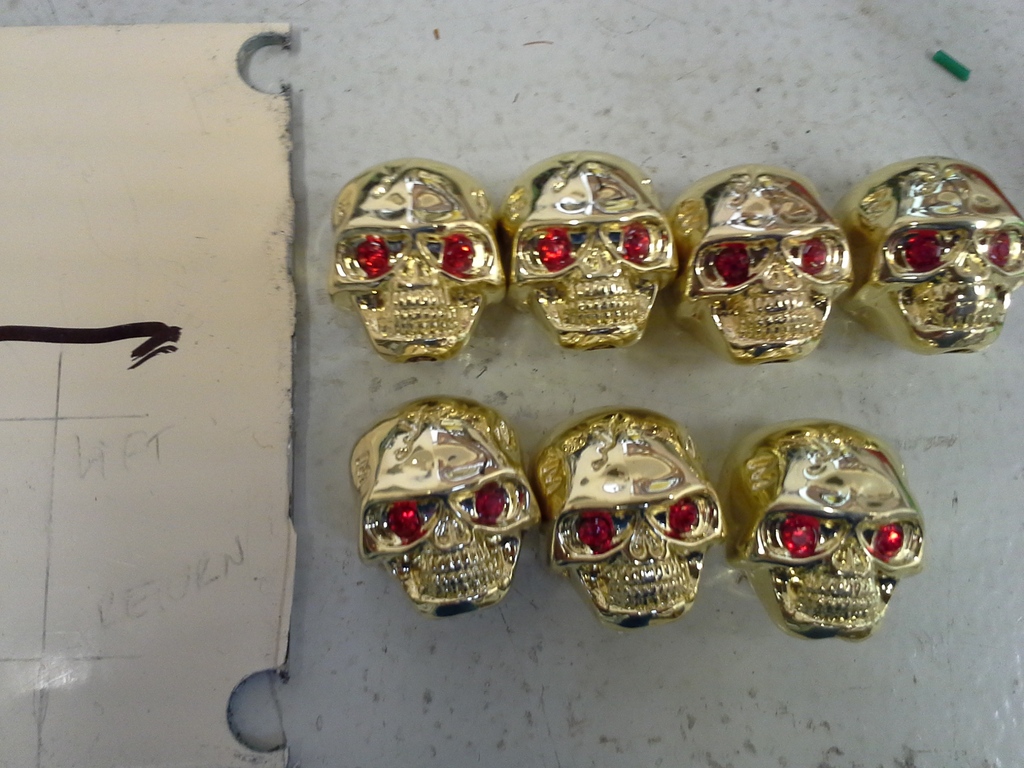
skull knobs
3pcs New Skull Head Guitar Volume Tone Control Knob Guitar Skull Head Knob | eBay

350w + 350w amplifier kit which I have now abandoned
LJM L20SE 350W 350W 4ohm 2SA1943 2SC5200 Kit | eBay

and from my local suppliers

4 x 6.5" Kevlar cone speakers
Surplustronics - Wide Range Kevlar Cone Woofers - 6.5 Inch 125 Watts RMS - 8 Ohms

horn flare
Surplustronics - Horn Flare for HF Drivers - 110mm x 265mm x 170mm 1 3/8 Inch Thread
and piezo driver
Surplustronics - Piezo Horn Driver - Standard Version 1 3/8 thread - 65mm 150Watts Max - 8 Ohm

As for the tube preamps power supplies, the 6J1 module has a built in voltage multiplier, so all it requires is a 12 volt AC supply.
The 12AX7 preamp (which I built from the schematic on vero/strip board) runs the plate voltage at around 160 volt DC,
I used a multi tap transformer (24VA), 12 V AC for the heater, and another smaller 12 volt AC transformer (12VA) fed 'backwards' from the 7.5 volt tapping into the 12 volt secondary and back up to 140 volts AC. That saved having to get a special wound transformer .
(mains voltage is 240 Volts here).
 
As an eBay Associate, TalkBass may earn a commission from qualifying purchases.
And here are the glamor shots

']
20150331_202819.jpg


']
20150331_202844.jpg


']
20150331_202929.jpg


The bass response out of this is phenomenal, it really shakes the walls, and with a really clean crisp top end (as good as a peizo horn gets), I may yet replace the 1" HF driver with a real titanium compression driver.
 
Last edited:
Thanks for sharing all the details. You've put a lot of thought into it. Good to hear that it turned out so well.

I'd want to add an L-pad in front of the horn to help balance the level.

Nice amp!
Thanks !
It did originally have a L-Pad for the horn, it smoked up, so at the moment it just has an on/off switch. It's in the front panel with the tone knobs.

I will have to weigh the combo and see how heavy it is..
 
  • Like
Reactions: beans-on-toast
Then the big test, we had to skip the last practice before last Friday's gig, so I tested on the night...
Second song after thrashing it for the first song, and .... it died....
The aluminium strap holding the power devices to the heatsink bend out on the ends and the outer devices cooked after lifting off the heatsink..

never mind, I am going to ditch the linear poweramps and am now waiting on delivery of a class D power amp.

Ouch! Link Removed

I love seeing how other DIY'ers approach their builds. Lots of stuff in there I never would have thought of, thanks for sharing.
 
Last edited:
Definitely an interesting project. A few observations for a hypothetical "if you were going to do it all over again":

I agree with the guy above who suggested making the amp a separate unit. Helps keep weight down and moving more manageable. But failing that, the way you have a one piece cab and then a front loaded head means it must be pretty tricky to access the insides if you ever need to fix it. An actual chassis (or at least a removable panel on the back could make things more accessible.

And not sure I would go with the fake gator/pirate theme (although the light up eyes are pretty neat). I would have gone with something a little more understated, either a natural finish if the wood was decent enough or something like duratex.

Anyway, definitely a cool prototype at any rate. I'd definitely be curious to hear a sound clip or 2, maybe with a little stereo recorder a few feet back.
 
Definitely an interesting project. A few observations for a hypothetical "if you were going to do it all over again":

I agree with the guy above who suggested making the amp a separate unit. Helps keep weight down and moving more manageable. But failing that, the way you have a one piece cab and then a front loaded head means it must be pretty tricky to access the insides if you ever need to fix it. An actual chassis (or at least a removable panel on the back could make things more accessible.
I have many heads and cabs, and carting around a 400 watt all tube head and heaving it on top of a 8x10 cab is no fun for me anymore,
and lifting gear upstairs to a practice studio each week.
I wanted a combo, because it is easy to carry and place down and play (and I don't have a combo), it is still quite light weight (you can lift it by one of the side handles), compact (it's height is still below my kneecaps).

The internals are easy to access as everything is mounted on a gear plate, and the 2 screws each side are removed and the whole lot slides out the front and can sit on top of the cab for easily working on every part.
Even the two rear fans and IEC mains socket are on the gear plate.

If the amp/cab was separate, it would require another wooden side under the amp, which wouldn't make the total weight any less, you still have to carry both parts, whether they are separate or together.

Definitely an interesting project. A few observations for a hypothetical "if you were going to do it all over again":

And not sure I would go with the fake gator/pirate theme (although the light up eyes are pretty neat). I would have gone with something a little more understated, either a natural finish if the wood was decent enough or something like duratex.
The black 'faux' leather look was a opportunist moment, I was looking in my local fabric/haberdashery store (not that I go there often) and my choices were a bit limited, it was that or floral dress fabric, or some type of shaggy fur stuff.
Duratex would be nice, but it is not easily available in my corner of the world (nor cheap), it's more like I am impatient and wanted to finish it NOW.
Natural finish would have been an option, but the wood used "Form Ply" is a 18mm (3/4") ply/resin compound, it is very strong/dense and very lightweight,
but also has a black resin coating, making a natural finish impossible. The cut edges show the ply grain too, so it had to be a covering, a standard Tolex would have been nice.

As for the pirate theme, it was just the passing thought of the day, I really wanted to show off "flashing eyes",
the front grill is easily removable (Velcro), and the jolly roger + skull knobs can be easily replaced, but for the moment has a novelty factor.

Definitely an interesting project. A few observations for a hypothetical "if you were going to do it all over again":

Anyway, definitely a cool prototype at any rate. I'd definitely be curious to hear a sound clip or 2, maybe with a little stereo recorder a few feet back.

If I were to do it all over again? Yes I would do it the same, except for the amplifier incident, I was originally going to go for tube preamp and class D power amp,
as two opposite ends of the technology scale mixed together. The class A/B amp I used was a distraction from that plan, but once the new class D amp arrives, it will be back on track.
I have just yesterday purchased a new HF driver, a 8 ohm 1" titanium compression driver rated 80watts 400Hz - 20kHz, and a passive crossover, but today have decided to go the bi-amp option.
I am looking at a 100 watt micro single chip amp module on eBay for $12, and will do an active high pass filter for it..
I chose this amp module for the HF driver as it can run off the same shared power supply as the class D amp.
Mini Version TDA7293 100W Mono Amplifier Board | eBay

Thanks for taking an interest in this project, I have yet to draw up the box dimensions if anyone wants to duplicate the project.
I will have to do a recording, both with a stereo field recorder, and also with the tube buffered D.I output.
 
As an eBay Associate, TalkBass may earn a commission from qualifying purchases.
  • Like
Reactions: S-Bigbottom
Thanks !!
Yeah I chose 39Hz because many commercial built cabs don't really respond too well to a low B or C.
This one seems to have quite a good even response over all strings, and I like it when those looow notes shake the dust off the rafters in the shed.

The trade off with the extra low is the perceived loudness drops a bit, but I am hoping to compensate with the 1" horn driver as it can go down to 400Hz, and I will roll off it's higher frequencies using an active 24dB/octave highpass filter at about 600Hz and a 3dB/octave rolloff from about 2.6kHz or there abouts (some experimentation).
 
Last edited: