

Enjoy the benefits of a premium membership!
Upgrade Account
-
TalkBass has been independent since 1998. Add your voice.
Create a free account to reply to discussions, view embedded media, and browse with fewer display ads.
Join free Log in
Want zero display ads or expanded classifieds tools? Compare plans.
You are using an out of date browser. It may not display this or other websites correctly.
You should upgrade or use an alternative browser.
You should upgrade or use an alternative browser.
How Much Wood Would a Woodchuck Chuck...
- Thread starter Bottoms_Up!
- Start date
More options
Who Replied?

I’m intrigued by rivet nuts. You can insert them into plastic with a soldering iron and a slightly smaller hole as shown in this vid at the 4:50’ish mark.
Oops! Would help if I included the video.
So rivets but threaded?
Incidentally, I think going this route could yield some interesting aesthetics as well.

I’m intrigued by rivet nuts. You can insert them into plastic with a soldering iron and a slightly smaller hole as shown in this vid at the 4:50’ish mark.
The problem with that kind of rivet is that they are smooth on the outside, so they are easily pulled out if used like shown in the video. Some rivet nuts have ridges that go along the sides. These ridges are there to prevent the nut from rotating, but won't do much in preventing the nut from pulling out. Rivet nuts are primarily for putting solid threads in thin, usually metal, sheets. Rivets in plastic is risky because the rivet will expand, which often cause the plastic to crack.
What you want are heat set inserts. For example something like this: Metric Inserts Suppliers that sell stuff for 3D printers usually sell these.
Those are melted into place and have ridges on the outside that grabs the plastic. Just be aware that the size of the hole is important. Too large and the nut won't grab properly. Too small and you risk plastic oozing out and potentially clogging the threads.
Also, a strategy to increase strength is to put the nut on the opposite side of the plastic relative to the screw. This way the nut needs to be pulled through the plastic to fail. You can even put in an entire block of metal into the plastic to act as a nut. Since you are layering you could hide everything with the final outer layers.
Another thing to be careful with in plastics are countersunk screws. The screw head can act as a wedge when tightening which could make the plastic crack. HDPE is relatively soft, so this may not be a problem, but be careful.
My sheets are getting cut today with new files that will accommodate heat-set inserts. Excited! I asked my buddy to take a few short vids so I can post here.


Seeing this, and I instantly had the ideal mechanical fastener come to mind.
Simply use the areas where all the layers overlap, drill a through hole and join the layers with sex bolts. They are available in a wide variety of finishes and can be cut to length for the desired total thickness. You can counterbore the holes to recess the "heads", but the heads are usually oval-shaped and almost flat so that isn't even necessary. Sex bolts can be purchased in flat head configuration if a flush mount fastener is desired to use in simple countersunk holes.
(Bolt Depot doesn't show the threads on the male half of the connector, but they are indeed threaded to insert into the matching threaded female portion of the bolt.)
Find them as "Chicago Screws" at McMaster-Carr.
Heat set inserts, rivets, screw in inserts, or any form of adhesive seems a bit of a kludge and problematic for this material. It's similar to sheets sold as kitchen cutting boards (available in different thicknesses) that I've used as machine surfaces and pattern templates. I usually sand it with a 220 grit random orbit sander which makes a lovely matt finish that works for my purposes without being too shiny.
Simply use the areas where all the layers overlap, drill a through hole and join the layers with sex bolts. They are available in a wide variety of finishes and can be cut to length for the desired total thickness. You can counterbore the holes to recess the "heads", but the heads are usually oval-shaped and almost flat so that isn't even necessary. Sex bolts can be purchased in flat head configuration if a flush mount fastener is desired to use in simple countersunk holes.
(Bolt Depot doesn't show the threads on the male half of the connector, but they are indeed threaded to insert into the matching threaded female portion of the bolt.)
Find them as "Chicago Screws" at McMaster-Carr.
Heat set inserts, rivets, screw in inserts, or any form of adhesive seems a bit of a kludge and problematic for this material. It's similar to sheets sold as kitchen cutting boards (available in different thicknesses) that I've used as machine surfaces and pattern templates. I usually sand it with a 220 grit random orbit sander which makes a lovely matt finish that works for my purposes without being too shiny.
Last edited:
Keep in mind that "woodchuck" is a corruption of the American Indian name of this animal, "woochak". So in reality the question should be
How much woo could a woochak chak, if a woochak could chak woo?
How much woo could a woochak chak, if a woochak could chak woo?

That's it! WoochaK!
So, I settled on m3x10mm heat-set inserts and a bunch of m3 bolts of varying sizes. The 10mm length lends me plenty of real estate when I need to place a screw on both sides of the sandwich.
Also made a new legend so I don't get lost. The bridge and the neck joint will provide some decent stability along with the glue, but I threw in a couple strategically placed inserts to keep the sandwich together.
Everything I need for this project has been ordered and trickling in slowly but surely. I opted for Dunlop flush-mount strap buttons as I figured a traditional pin would fail almost immediately. Also found some 3mm plastic plugs to cover the holes that only require a single screw.

So, I settled on m3x10mm heat-set inserts and a bunch of m3 bolts of varying sizes. The 10mm length lends me plenty of real estate when I need to place a screw on both sides of the sandwich.
Also made a new legend so I don't get lost. The bridge and the neck joint will provide some decent stability along with the glue, but I threw in a couple strategically placed inserts to keep the sandwich together.
Everything I need for this project has been ordered and trickling in slowly but surely. I opted for Dunlop flush-mount strap buttons as I figured a traditional pin would fail almost immediately. Also found some 3mm plastic plugs to cover the holes that only require a single screw.
Last edited:
Going to be a fun weekend. Everything I need is in my shop including the cut HDPE, and I must say, the precision of waterjet is nothing short of amazing. Right down to a handful of 2mm pilot holes. Love that I have plenty of scrap to practice with. Anyway, thought I’d update this thread with some inventory


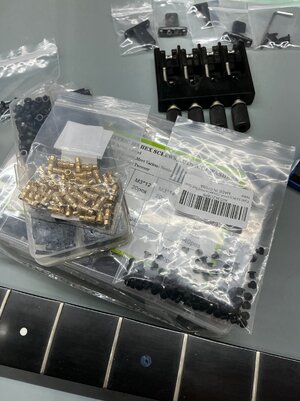


By the way, for just under $80, that Gyker headless bridge is phenomenal. I compared it to the Hipshot I had in my parts drawer and am absolutely floored! It is an exact clone right down to the adjustable string spacing (not sure of the material tho). I might need to stock up on these before word gets out (if it already hasn’t)! In one way, it is superior in that the string-ball sleds are a hair less thick than the the housing, allowing them to slide easier than the Hipshot (which in my experience tend to bind on the body). I added some thrust bearings and it’s as smooth as butter. I am not using the headstock clamp, but it looks like it will do the job nicely.
By the way, for just under $80, that Gyker headless bridge is phenomenal. I compared it to the Hipshot I had in my parts drawer and am absolutely floored! It is an exact clone right down to the adjustable string spacing (not sure of the material tho). I might need to stock up on these before word gets out (if it already hasn’t)! In one way, it is superior in that the string-ball sleds are a hair less thick than the the housing, allowing them to slide easier than the Hipshot (which in my experience tend to bind on the body). I added some thrust bearings and it’s as smooth as butter. I am not using the headstock clamp, but it looks like it will do the job nicely.
Last edited:
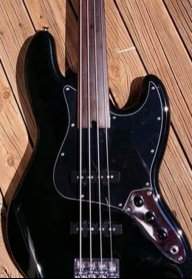
Looking good.
I've been impressed with the quality of some Gyker parts I've used considering the price.
I've been impressed with the quality of some Gyker parts I've used considering the price.
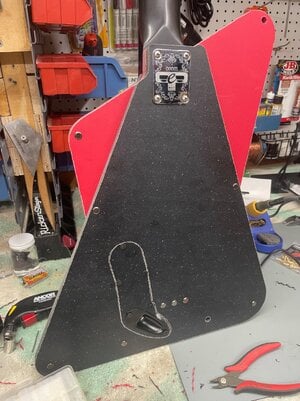
Worked on the Woochak today. Thanks to @rudy4444, I switched gears to those “Chicago Screws.” My attempts to glue the scrap pieces failed miserably and these allow me to secure the sandwich securely. I think I’ll still apply some glue before final assembly just to keep the layers put, but now the Chicago Screws will keep the whole thing from failing. I ended up using the heat-set inserts on the pickup rout and cavity control cover and everything fit like a glove! Very easy and quite satisfying when they sink in. Just need to countersink the holes front and back. Waiting on a few other fasteners from the ‘Zon, so I will next get to work on beheading that neck.
I will say that this thing is quite heavy! With this said, I’m thinking of chambering the areas that are hidden within the sandwich.




I will say that this thing is quite heavy! With this said, I’m thinking of chambering the areas that are hidden within the sandwich.


