• TalkBass has been independent since 1998. Add your voice.
    Create a free account to reply to discussions, view embedded media, and browse with fewer display ads.
    Join freeLog in
    Want zero display ads or expanded classifieds tools? Compare plans.

How Much Wood Would a Woodchuck Chuck...

Bottoms_Up!

For the record, I don't love Raymond.
Apr 14, 2009
1,598
335
63
Worcester, MA
...if a woodchuck could chuck wood?

All of it. I'm chucking all of it. Come to think of it, maybe I'll call this creation "WoodChuck," or "ChuckWood."

I was recently inspired by the plexiglass bass concept pictured below from Brute Bass' site (awesome designs over there BTW...I especially love that “8-Bit” 51-P!).
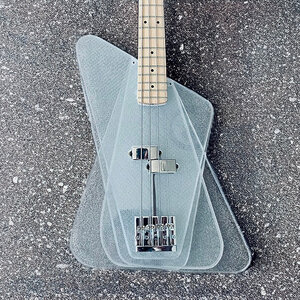
plexigon.jpg

Problem is, plexi is extremely expensive, so I altered my version to 3 layers as opposed to the 4 above and opted for HDPE (high density polyethylene) which is very reasonable (AND colorful). In order to get a standard 1.75" thickness, the top layer will 0.625" (which perfectly accommodates the neck pocket), middle layer is 0.5", and the bottom layer is 0.625". Both 0.625" layers will consist of a 0.125" cap on a 0.5" base so I could design built-in routs.

The design will be headless, and I happen to have an old Moses graphite Jazz neck which I plan on decapitating, so again, zero wood. WoodChuck!

I'm lucky enough to have a pal who owns a waterjet business and he's graciously agreed to run my DXF files through his cutter. I dropped off the HDPE sheets the other day and he's saying he should have everything cut sometime next week.

I'm excited to move forward with this build and will post my progress as it unfolds but for now, here's some renderings:
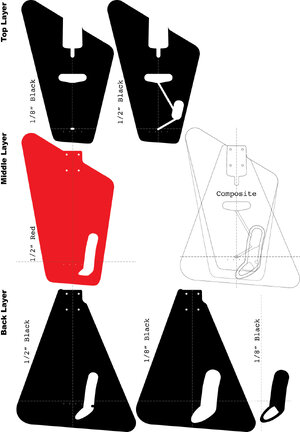
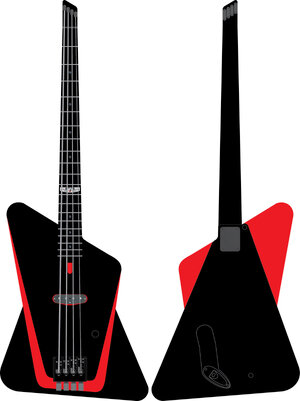
Plexi-Color.jpg

Mockup.jpg

I'm lucky enough to have a pal who owns a waterjet business and he's graciously agreed to run my DXF files through his cutter. I dropped off the HDPE sheets the other day and he's saying he should have everything cut sometime next week.

I'm excited to move forward with this build and will post my progress as it unfolds.
 

Attachments
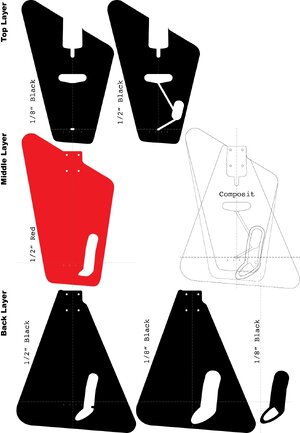
  • Plexi-Color.jpg
    Plexi-Color.jpg
    291.7 KB · Views: 33
  • Mockup.jpg
    Mockup.jpg
    235.2 KB · Views: 28
Last edited:
...if a woodchuck could chuck wood?

All of it. I'm chucking all of it. Come to think of it, maybe I'll call this creation "WoodChuck," or "ChuckWood."

I was recently inspired by the plexiglass bass concept pictured below from Brute Bass' site (awesome designs over there BTW...I especially love their Pixel 51-P!).

View attachment 7216781

Problem is, plexi is extremely expensive, so I altered my version to 3 layers as opposed to the 4 above and opted for HDPE (high density polyethylene) which is very reasonable (AND colorful). In order to get a standard 1.75" thickness, the top layer will 0.625" (which perfectly accommodates the neck pocket), middle layer is 0.5", and the bottom layer is 0.625". Both 0.625" layers will consist of a 0.125" cap on a 0.5" base so I could design built-in routs.

The design will be headless, and I happen to have an old Moses graphite Jazz neck which I plan on decapitating, so again, zero wood. WoodChuck!

'm lucky enough to have a pal who owns a waterjet business and he's graciously agreed to run my DXF files through his cutter. I dropped off the HDPE sheets the other day and he's saying he should have everything cut sometime next week.

I'm excited to move forward with this build and will post my progress as it unfolds but for now, here's some renderings:

View attachment 7216848

View attachment 7216849

I'm lucky enough to have a pal who owns a waterjet business and he's graciously agreed to run my DXF files through his cutter. I dropped off the HDPE sheets the other day and he's saying he should have everything cut sometime next week.

I'm excited to move forward with this build and will post my progress as it unfolds.

How do you plan to attach the layers together? In my experience with HDPE, it's tricky to get any glue to bond to it. Also, it's not very good for threading screws into. You're going to have to work out some mechanical details.
 
I remember back in the Day, when we still made Architectural models, we used plexiglass for the protective cases, like you'd see in a museum. I remember there was some kind of water-thin adhesive we used, wicked into the seams, that didn't seem to cloud or etch the plexiglass, but "welded" it together. Not as familiar with HDPE, but this 3M stuff popped up in a 30 second google search. Looks like you'd have to through-bolt the neck, bridge, pickup, and any control plate screws anyway, could those through-bolts effectively hold it together? The hard part about gluing sheets together like that is getting any air bubbles out. Curious to see what you come up with.
Link Removed
 
I remember back in the Day, when we still made Architectural models, we used plexiglass for the protective cases, like you'd see in a museum. I remember there was some kind of water-thin adhesive we used, wicked into the seams, that didn't seem to cloud or etch the plexiglass, but "welded" it together. Not as familiar with HDPE, but this 3M stuff popped up in a 30 second google search. Looks like you'd have to through-bolt the neck, bridge, pickup, and any control plate screws anyway, could those through-bolts effectively hold it together? The hard part about gluing sheets together like that is getting any air bubbles out. Curious to see what you come up with.
Link Removed
The engineers where I used to work back in the 70s used chloroform as an adhesive to solvent weld plexi
For HDPE you would need heat to weld it together
 
  • Like
Reactions: UntitledProject
Plexiglas/acrylic isn't a problem to glue. HDPE is a different species of plastic. These are the colored sheets that big signs are made of. It's lighter weight and much less expensive than Plexiglas. It's partially foamed, filled with air. It's quite tough and impact-resistant, and the surface skin is very slippery. It's real difficult to get any paint or glue to stick to it. I think the sign makers use contact cement to laminate large surfaces together, and mechanical fasteners to attach it to aluminum frames.

I have some experience with it, from a project many years ago. I still have some random pieces of it here in my stash.
 
  • Like
Reactions: 1n3
I have been researching the HDPE vs glue quandary for the last 2 weeks. I found a couple of good YTs in regard. I’m going the sanding/acetate/n-heptane treatment before using DAP RapidFuse glue. I may even try heat treatment as it reportedly changes the surface tension of the HDPE to make it more accepting to the glue. The DAP resulted in the best tensile strength out of 9 total tests with various name-brand glues (and that just entailed sanding alone). I think the tensile strength should be adequate as I’m not trying to pull the sheets apart. I will also be throwing some strategically placed screws front and back (in addition to the 4 bridge-mount screws) which will go through all layers except the 0.125” outer plates.

With all this said, now I’m worried about the the comment above in regard to screwing HDPE. I will add that the sheets I received seemed very solid/dense and ridged, not at all “foamed, filled with air.” Off to the interwebs to research this.

Nice thing is, I will have plenty of scrap from my sheets to experiment/practice on.
 
Last edited:
  • Like
Reactions: Matt Liebenau
It’s a small sample size but I tried casting some knobs with melted HDPE (various milk jugs and other containers cut up and heated) and they cast ok but like Bruce said they wouldn’t hold a screw. I used Helicoil type inserts in one and that sorta worked. That’s meant as a heads up not discouragement. I genuinely hope you get it figured out and I’ll be following along.
 
  • Like
Reactions: Bottoms_Up!
How do you plan to attach the layers together? In my experience with HDPE, it's tricky to get any glue to bond to it. Also, it's not very good for threading screws into. You're going to have to work out some mechanical details.
It’s very “greasy” isn’t it ?. I’m thinking that some sort of countersunk mechanical fasteners or dowel pins might be required to ensure that things don’t migrate around over time.
 
Why not use a block of aluminum the same thickness as your body panel stack, for a bridge mount, then run a series of flat strips at positions where each body piece has independent support? Drill and tap the strips and screw the body down to those "ribs" anchored to the central block under the bridge. Or maybe line it all up so you could run long bolts through both strips and body panels from top to bottom. Or get really geeky and add a carbon fiber beam or trough to mount the neck to, also anchored on the bridge block..
Maybe use a section of square aluminum tube with a top and bottom plate mechanically attached so you could access the inside, and mount your controls there.
 
I have also toyed with the idea of using double-sided mounting tape. Being in the flexographic printing industry, I have access to industrial “sticky-back” which is designed to hold a photopolymer printing plate onto an aluminum print cylinder of varying circumferences (average being 10”), and last for hundreds of thousands of impression without being permanent. Might be worth a test. Of course, same dilemma applies here. How to get the HDPE to accept the adhesive?
 
  • Like
Reactions: joeLowB
One of the polyethylene manufacturing plants that I worked in also produced and sold this "tie layer" resin for joining dissimilar resins. But, it's designed to be applied using a multilayer extrusion line. This stuff sticks like nothing you've seen. The hours we spent with a wire wheel busting the dregs of it off extruder screws, ugh.

Link Removed

You could call up Technical Services and maybe BS your way into a one pound sample. Tell them something like you're a startup guitar manufacturing company. Then you have some research to do. When you get ready to heat it, either do it outside or evacuate the house and wear a 'real' respirator.
 
  • Like
Reactions: Bottoms_Up!
Use threaded brass or stainless inserts for the screw points.

Commonly used by 3D printers for same purpose.

Sold in bags on the 'zon.

Accept machine screws instead of wood screws. Finer threads, stronger hold.