

Enjoy the benefits of a premium membership!
Upgrade Account
-
TalkBass has been independent since 1998. Add your voice.
Create a free account to reply to discussions, view embedded media, and browse with fewer display ads.
Join free Log in
Want zero display ads or expanded classifieds tools? Compare plans.
You are using an out of date browser. It may not display this or other websites correctly.
You should upgrade or use an alternative browser.
You should upgrade or use an alternative browser.
La Cabronita Hueca Precision Build
- Thread starter MadJack
- Start date
More options
Who Replied?

That will change soon enough. As it gets warmer, the sea breezes from the Atlantic and the Gulf collide over the peninsula and down comes the daily rain. That's when the humidity will soar.I'm surprised the humidity in Florida is that low...
It'll happen here in southeastern NC too. I'm...dreading it.That will change soon enough. As it gets warmer, the sea breezes from the Atlantic and the Gulf collide over the peninsula and down comes the daily rain. That's when the humidity will soar.
It's been a while.
Between the heat, humidity, other projects, family, a tree falling through my roof into my bedroom, and life in general, I was finally able to get back to work on the Cabronita.
Thursday I got around to sanding the primer with a light scuff with P600 grit, then finished out with the P800. I dusted it off then put it away, as it was too cold and damp to paint. The weather wasn't right for painting either, and I had other things to do. I did the same with the headstock too.
By this afternoon the weather finally was appropriate for painting. I wiped it down with the tack cloth and some isopropyl alcohol. I shot a coat, but it was too thin and I had to let it flash over before a recoat. (I know, you don't normally do multiple coats with metallics.) While waiting for it to flash over, a partial oak leaf drifted on the paint by the F-Hole. (Big issue with having no paint booth!) It smudged down into the primer. With nitrocellulose going soft under new coats, it damaged the primer underneath too. It's there for good, unless I decide to sand it all the way down and respray it. Spot sanding metallics isn't recommended, so I just shot the next coat and paid a little more attention to the damaged area.


It turned out better than I thought it would, but it's still visible, just above the F-Hole.
The rest is decent for a rattle can.
Now I have to wait. It's recommended to wait at least 48 hours before clear coating. I'll likely wait a week or two, depending of time to do it and the appropriate weather conditions.
I'm planning to put two to three coats of clear gloss and finish with a coat of satin clear.
Between the heat, humidity, other projects, family, a tree falling through my roof into my bedroom, and life in general, I was finally able to get back to work on the Cabronita.
Thursday I got around to sanding the primer with a light scuff with P600 grit, then finished out with the P800. I dusted it off then put it away, as it was too cold and damp to paint. The weather wasn't right for painting either, and I had other things to do. I did the same with the headstock too.
By this afternoon the weather finally was appropriate for painting. I wiped it down with the tack cloth and some isopropyl alcohol. I shot a coat, but it was too thin and I had to let it flash over before a recoat. (I know, you don't normally do multiple coats with metallics.) While waiting for it to flash over, a partial oak leaf drifted on the paint by the F-Hole. (Big issue with having no paint booth!) It smudged down into the primer. With nitrocellulose going soft under new coats, it damaged the primer underneath too. It's there for good, unless I decide to sand it all the way down and respray it. Spot sanding metallics isn't recommended, so I just shot the next coat and paid a little more attention to the damaged area.
It turned out better than I thought it would, but it's still visible, just above the F-Hole.
The rest is decent for a rattle can.
Now I have to wait. It's recommended to wait at least 48 hours before clear coating. I'll likely wait a week or two, depending of time to do it and the appropriate weather conditions.
I'm planning to put two to three coats of clear gloss and finish with a coat of satin clear.
Last edited:
It's been over 48 hours and I'm still waiting on the color coat to fully cure, but I couldn't resist getting a preview! 


Go, Jack, go!It's been over 48 hours and I'm still waiting on the color coat to fully cure, but I couldn't resist getting a preview!
View attachment 7430380
Last week I put a couple coats of clear on the headstock. Let it cure a couple days, then sanded it with P1200 paper. I sprayed it with another coat. today I applied the waterslide deacals for the headstock.
The headstock waterslide decals in place.

I'll let it set probably until Wednesday, then I can start clear coating both the headstock and body.
The headstock waterslide decals in place.
I'll let it set probably until Wednesday, then I can start clear coating both the headstock and body.
The last few days I have been working on clear coating the headstock and body.
The headstock got about five regular coats of clear over the decals. I did a some leveling wet sanding, to reduce the decal outline. I didn't get far enough and stopped sanding, as I didn't want to get into the decal. I've since applied about four more coats and will try sanding again Tuesday. After that I'll apply a few more coats then wet sand and polish, after the appropriate amount of curing time.
The body got the first couple dusting coats a few days ago. The next day it got it's first couple wet coats, but a got a couple dust spots. Yesterday (>48 hours) I sanded those out. one did pull a tiny spec of color coat with it! I was able to touch it up, by spaying some color in a small plastic cap and touched up the spot. It color corrected the spot, but after a very light spot leveling sanding, it still has a slight indentation. It just so happened at the same area as the damage I previously repaired in the color coat. At least it won't be a white (primer) spot screaming "look at me!"
Today I did a couple wet coats of clear on both the body and the headstock. The can got too low to try to do any more, so I stopped there. It was breezy today, but the temperature was comfortable and I had the windows open. Instead of hanging them outside to outgas, I put them in my work room at the far end of the house, with the windows open. I did that to try to keep the dust and debris from getting into the paint. The smell never got very strong and aired out pretty well.
The next couple days are going to be too cold to paint, but it should be better by Wednesday and Thursday. Looking like rain Friday. It won't hurt to let the paint cure further before the weather cooperates.
The headstock got about five regular coats of clear over the decals. I did a some leveling wet sanding, to reduce the decal outline. I didn't get far enough and stopped sanding, as I didn't want to get into the decal. I've since applied about four more coats and will try sanding again Tuesday. After that I'll apply a few more coats then wet sand and polish, after the appropriate amount of curing time.
The body got the first couple dusting coats a few days ago. The next day it got it's first couple wet coats, but a got a couple dust spots. Yesterday (>48 hours) I sanded those out. one did pull a tiny spec of color coat with it! I was able to touch it up, by spaying some color in a small plastic cap and touched up the spot. It color corrected the spot, but after a very light spot leveling sanding, it still has a slight indentation. It just so happened at the same area as the damage I previously repaired in the color coat. At least it won't be a white (primer) spot screaming "look at me!"
Today I did a couple wet coats of clear on both the body and the headstock. The can got too low to try to do any more, so I stopped there. It was breezy today, but the temperature was comfortable and I had the windows open. Instead of hanging them outside to outgas, I put them in my work room at the far end of the house, with the windows open. I did that to try to keep the dust and debris from getting into the paint. The smell never got very strong and aired out pretty well.
The next couple days are going to be too cold to paint, but it should be better by Wednesday and Thursday. Looking like rain Friday. It won't hurt to let the paint cure further before the weather cooperates.
I shot the last of the clear on the headstock. A few hours after spraying the last coat, I took some sandpaper and sanded the edges of the masking tape and peeled the tape off.

Now for the hard part (for us impatient types ), the waiting. I'm looking at having to wait until the first week of april, then I can dress the edges, flat (wet) sand and polish.
Now for the hard part (for us impatient types
), the waiting. I'm looking at having to wait until the first week of april, then I can dress the edges, flat (wet) sand and polish.
Last edited:
It's been a month.
I did the first wet sanded (with mineral spirits to prevent to wood from expanding) on the body. No new pictures of it at this time.
I did wet sand the headstock face. I wiped it dry and hit it a it with the finer Micro-Mesh pads. Polished it and finally hit the neck with another coat of gunstock wax.

Not perfect, but fairly good for my first attempt at nitrocellulose lacquer, especially since it's a metallic color coat. One scratch, one chipped spot a couple dust spots and a couple places that the metallic flakes didn't level correctly when I sprayed.
I started to hit the body with the Micro-Mesh, but it started to get pills, so I stopped. That can be a sign of the nitro lacquer could use to cure a bit more. the fact it didn't do that on the initial sanding, is likely due to the surface was cured more than the undercoats. I'll wait until Wednesday and wet sand the next finer grit.
I did the first wet sanded (with mineral spirits to prevent to wood from expanding) on the body. No new pictures of it at this time.
I did wet sand the headstock face. I wiped it dry and hit it a it with the finer Micro-Mesh pads. Polished it and finally hit the neck with another coat of gunstock wax.
Not perfect, but fairly good for my first attempt at nitrocellulose lacquer, especially since it's a metallic color coat. One scratch, one chipped spot a couple dust spots and a couple places that the metallic flakes didn't level correctly when I sprayed.
I started to hit the body with the Micro-Mesh, but it started to get pills, so I stopped. That can be a sign of the nitro lacquer could use to cure a bit more. the fact it didn't do that on the initial sanding, is likely due to the surface was cured more than the undercoats. I'll wait until Wednesday and wet sand the next finer grit.
Welp, ahh...
I screwed up!
Tuesday I went to install the tuners. I didn't sufficiently taper/bevel the painted side of the headstock tuner bushing hole.
As I was tapping the bushing in using a piece of plywood between the bushing and small hammer, on the second tap, flecks started coming out from underneath the piece of wood. I lifted the wood and my worst fear came true, they were flecks of paint and clear coat, from all around the bushing hole!
I wasn't up to doing the proper repair (at least not right now) I went beveled the holes even more, ensuring the bushing won't damage the finish from here on.
Anyways, I finished installing the tuners with the damage. The end bushing has the damage.
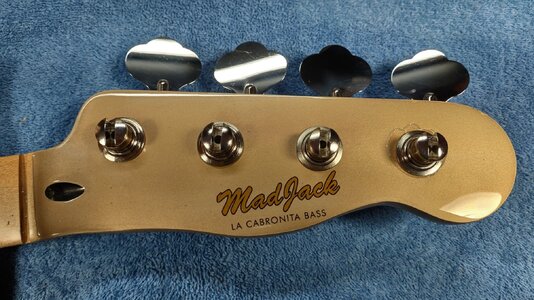
It's not real noticeable from a distance, but it's still sickening knowing it's there, after all the work to get the finish just right as reasonably possible.
Wednesday, I spent much of the day sanding, re-sanding and and sanding more! I had previously wet sanded with P1000 paper wet with mineral spirits. Mineral spirits won't cause the wood to swell and potentially crack the finish, if it gets into the wood. I used MIcroMesh 3200, 4000, 6000, 8000 and finally 12000 grit. When wet sanding with the P1000 paper, I didn't quite sand far enough in many areas and I had to back up and hit those areas with the 2400 MicroMesh and work up from there.
The result is pretty good for a first time doing a bass (guitar) body with aerosol nitrocellulose lacquer and no paint booth to work in.
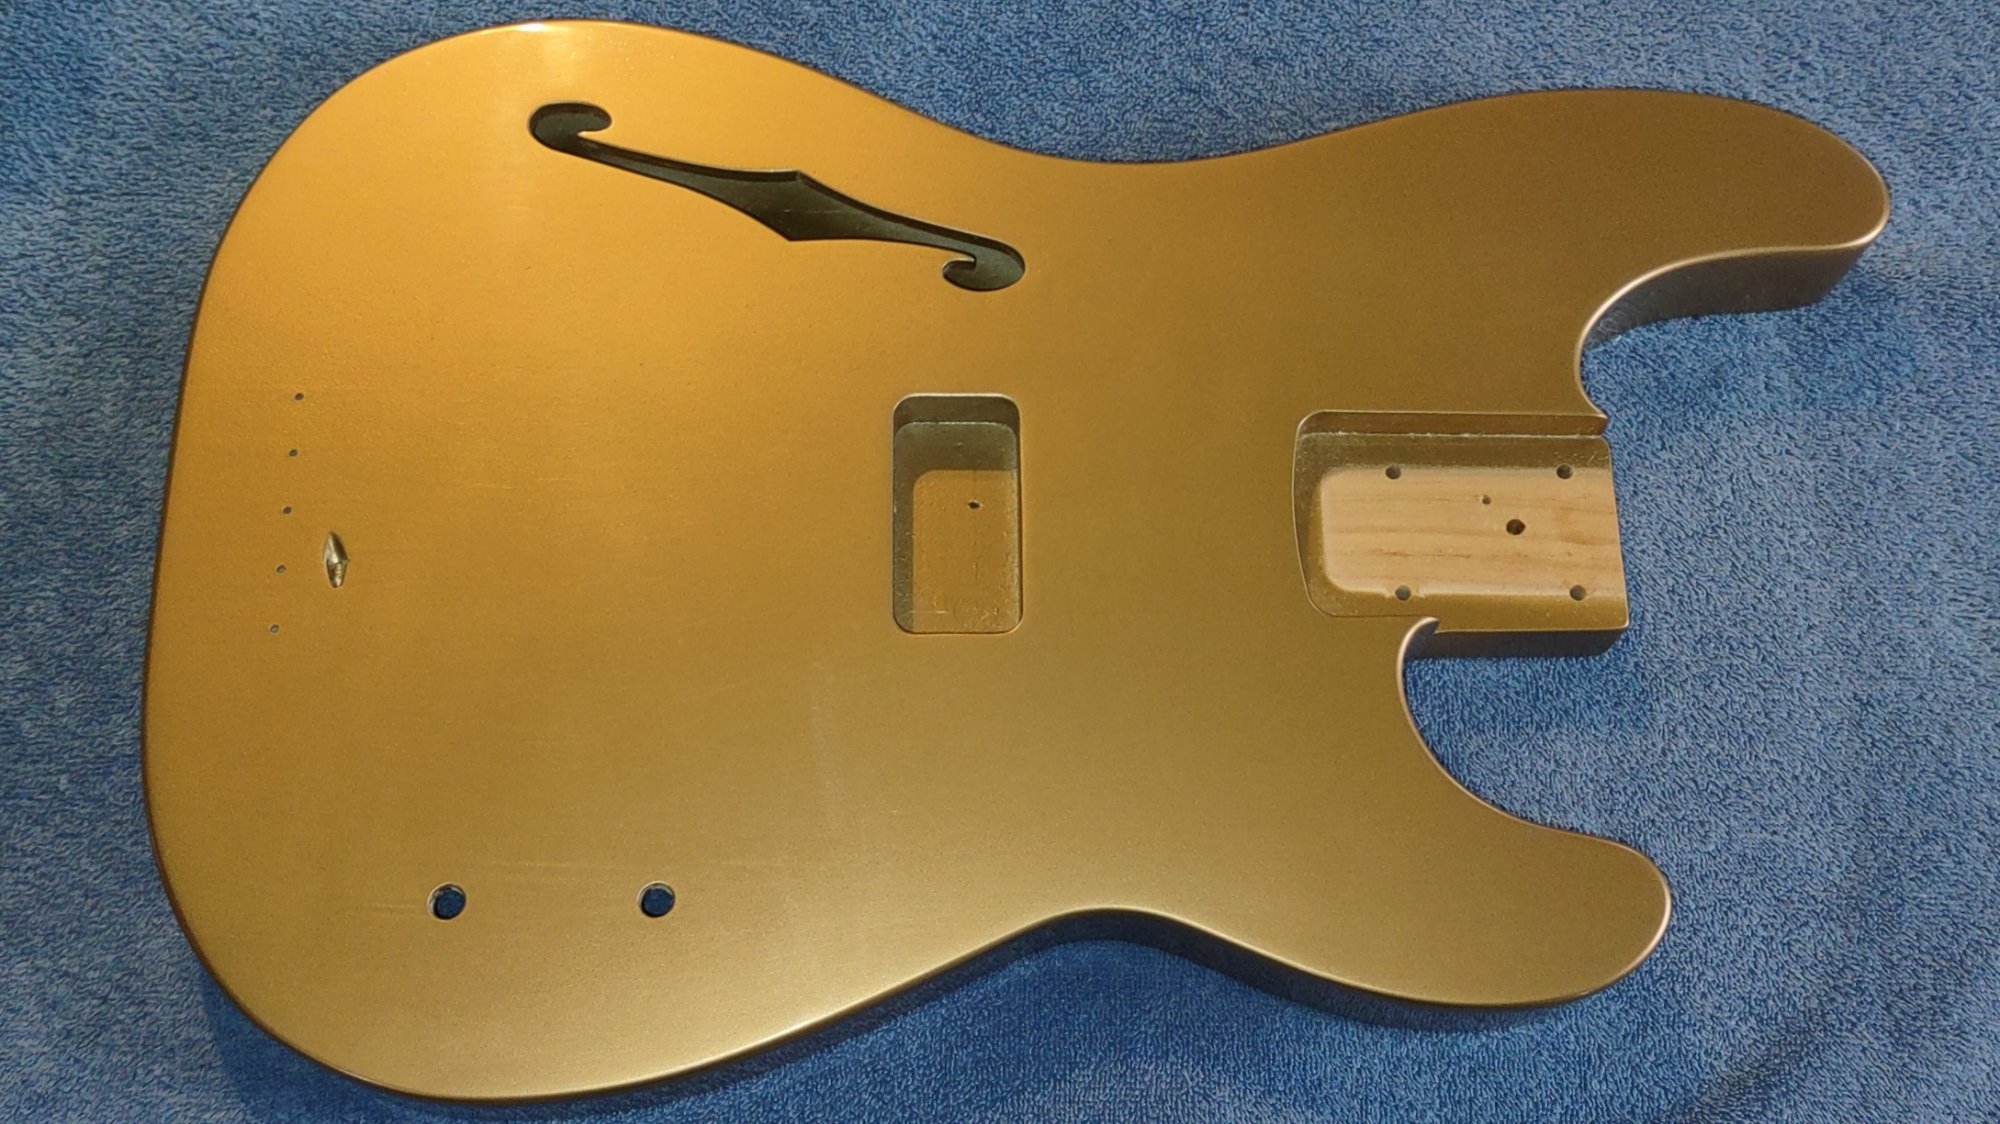
As of right now, I'm charging the batteries on my drill, which I have a set of foam polishing pads. I will start polishing this later afternoon.
I screwed up!
Tuesday I went to install the tuners. I didn't sufficiently taper/bevel the painted side of the headstock tuner bushing hole.
As I was tapping the bushing in using a piece of plywood between the bushing and small hammer, on the second tap, flecks started coming out from underneath the piece of wood. I lifted the wood and my worst fear came true, they were flecks of paint and clear coat, from all around the bushing hole!
I wasn't up to doing the proper repair (at least not right now) I went beveled the holes even more, ensuring the bushing won't damage the finish from here on.
Anyways, I finished installing the tuners with the damage. The end bushing has the damage.
It's not real noticeable from a distance, but it's still sickening knowing it's there, after all the work to get the finish just right as reasonably possible.
Wednesday, I spent much of the day sanding, re-sanding and and sanding more! I had previously wet sanded with P1000 paper wet with mineral spirits. Mineral spirits won't cause the wood to swell and potentially crack the finish, if it gets into the wood. I used MIcroMesh 3200, 4000, 6000, 8000 and finally 12000 grit. When wet sanding with the P1000 paper, I didn't quite sand far enough in many areas and I had to back up and hit those areas with the 2400 MicroMesh and work up from there.
The result is pretty good for a first time doing a bass (guitar) body with aerosol nitrocellulose lacquer and no paint booth to work in.
As of right now, I'm charging the batteries on my drill, which I have a set of foam polishing pads. I will start polishing this later afternoon.
Last edited:
The polishing didn't go too bad! There were a few spots that needed a little extra with the medium compound, but when I got to the fine compound everything went well.

Kind of hard to tell the difference between the finish in this picture and the one above, but this one should help:

Not bad for a first timer. I have seen clearer shines, but this one looks good for a home job.
Kind of hard to tell the difference between the finish in this picture and the one above, but this one should help:
Not bad for a first timer. I have seen clearer shines, but this one looks good for a home job.
I know how gutting it is to get to this point and have a snafu like yours. Had a drill bit go right thru a headstock while installing machine heads, even after taking all necessary precautions. I came real close to punching a hole thru a wall but somehow took a breath and thought it better to not add a broken hand to my misery.
The paint job looks very nice! Hopefully you can fix the chipped paint without to much problem. Looking great so far!
The paint job looks very nice! Hopefully you can fix the chipped paint without to much problem. Looking great so far!
Not quite done. It still needs to be wired internally, strung up, and set up.
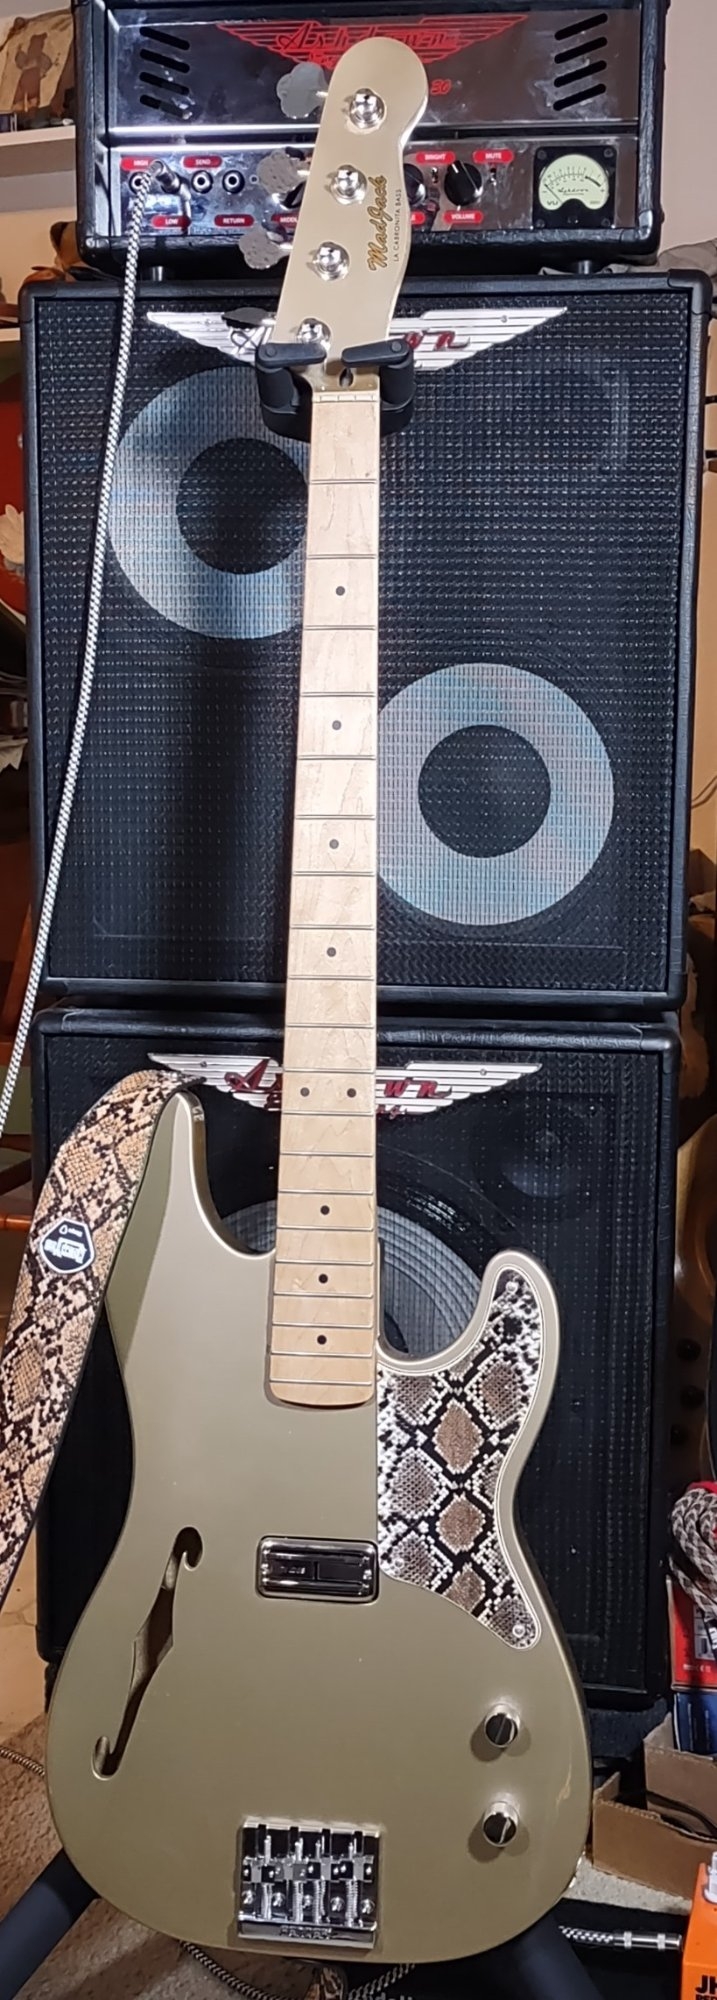
The La Cabronita Hueca Precision Bass build is complete!


It's been a long hard battle to complete it. It's not without it's faults. Of course there is the blowout around the tuner bushing on the headstock. While fitting the neck there are various little chips, likely from not letting the body cure again after sanding and polishing, along with not sanding the inside of the neck pocket, so the added paint isn't too snug.

The color is most like the actual color.


Rounded by hand fret ends. I polished the frets today. A couple of the minute chips around the neck pocket.

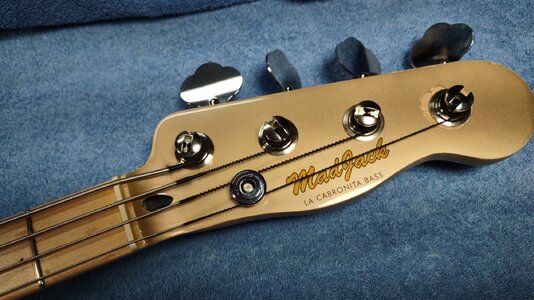
Headstock with chip out around the tuner.
 Strung it up today and installed the string tree.

Wired it up, nice and simple. I have the potentiometers and tone capacitors to tweak the tone if needed.
I can't do the set up just yet, as the neck needs an angle shim, to get the string action height to a useable level. That is in part due to the thickness of the Fender Hi-Mass Bridge, a common problem with this bridge.
As a sneak preview of what it will sound like, I did a little noodling around with the bass. It is very deep sounding with a bit of the semi-hollow resonance. roughly what I was after with this bass. During set-up I do some tweaking of the voice.
It's been a long hard battle to complete it. It's not without it's faults. Of course there is the blowout around the tuner bushing on the headstock. While fitting the neck there are various little chips, likely from not letting the body cure again after sanding and polishing, along with not sanding the inside of the neck pocket, so the added paint isn't too snug.
The color is most like the actual color.
Rounded by hand fret ends. I polished the frets today. A couple of the minute chips around the neck pocket.
Headstock with chip out around the tuner.
Wired it up, nice and simple. I have the potentiometers and tone capacitors to tweak the tone if needed.
I can't do the set up just yet, as the neck needs an angle shim, to get the string action height to a useable level. That is in part due to the thickness of the Fender Hi-Mass Bridge, a common problem with this bridge.
As a sneak preview of what it will sound like, I did a little noodling around with the bass. It is very deep sounding with a bit of the semi-hollow resonance. roughly what I was after with this bass. During set-up I do some tweaking of the voice.

Absolutely killer, if you ever tire of it (or the the peeler) I'll give them a good home 
What's next?
What's next?
Thank-you! I'll keep you in mind, but I don't see anything changing with these instruments anytime soon.Absolutely killer, if you ever tire of it (or the the peeler) I'll give them a good home
I may have some modified cheaper bass and guitar experiments I never bonded with going up for sale soon.
I'm still contemplating a few different builds, but the most prominent idea is something MM/SR-ish. Something like the Intro Series Stingray or sterling, but a little better build. I'm thinking of a P style body with an MM rout, in the MM location and rear routed controls. Possibly even a large pole J style split coil neck pickup. I haven't made my mind up yet.What's next?
I have one of the Sterling Joe Dart basses (2024 Crop). I got it, not for the signature model, I just liked the idea of a passive MM with flats. It's a really nice bass as is. It sounds great and plays well. I want to try something passive with a tone control, round wounds and an Alnico pickup.
This is probably the most outlandish/loud color combination I've ever considered, but I'm really liking this combination. My alternate (and easier option) to this would be a clear to opaque purple stain burst.
I got the neck shims in. I ended up using the .25° shim. I sanded it to fit the neck pocket firmly, without any protrusions. Worked perfectly. It's set up very nicely. I tried a few different pot/cap combinations and settled on the recommended 500KΩ audio taper pots with a .047µF cap. It's strung up with GHS Pressure Wound mediums.
It sounds good with my Ashdown CTM30 or LB30 tube amps, but really shines with my Fender Bassman or Rumbles. It's a very thick, full sound with just the right amount of treble and mids. Not quite as dark as a Tele bass, but darker than a P bass.
It sounds good with my Ashdown CTM30 or LB30 tube amps, but really shines with my Fender Bassman or Rumbles. It's a very thick, full sound with just the right amount of treble and mids. Not quite as dark as a Tele bass, but darker than a P bass.
Thoughts so far,
It's light weight. It's an Alder body, so light to begin with. Add to that it's a semi-hollow body, the wings are hollow, with a solid center block down the middle. That gives it the hollow, woody sound and resonance. This was expected and comes through sweetly.
The pickup location is a little more forward than a regular La Cabronita. The pickup is in the earlier '51-'56 single coil location. That gives it a little more bass-y voice, somewhat similar to the '72+ Tele Bass, but not as extreme.
The T.V. Jones Super'Tron Bridge Pickup (a guitar pickup) is the same as the Thunder'Blade Bridge Pickup, except the Super has a full cover on the face. I was after a little hotter signal and a deeper voice of the inductance of 2.64H. It's doing just as I was expecting, hot, fat bass voicing. It comes close to being too much, but not enough to want to change it out. I just turn down a smidge. Besides many of my favorite pickups in some of my other basses are a bit on the hot side too.
I started with the GHS Pressure Wound strings. With this hotter, darker toned bass, the lows really punched through hard. The treble was a bit too much for the voicing with this bass. I had a set of La 'Bella DTFs (760FL) I pulled from one of my Squier Sonic Precisions (which I replaced with a set of GHS Bright Flats, much more of what I was after for that bass). The La' Bella's gave it much more of the warmer tone I prefer. It might use to have a little more treble, but not as much as the Pressure Wounds had. I'm thinking I might give this one a set of TI Jazz Flats. This is the only bass I would consider for those strings.
Yesterday I did a little modification.
Recently I've been play thumb style for some softer lines. I was resting my fingers on the pickguard, but the location was a bit inconsistent and not very stable. I started looking into a tug bar to help with this. Last week I found a strip of oak falloff from another woodworking project. It was just a little bigger than a thumb rest/tug bar, so I made one from a small piece of it. I cut it to size, shaped it, drilled it, and sanded it out. I didn't fill the grain. I used a pre-stain treatment and gave it a couple coats of Walnut stain (from the Birchwood-Casey Refinish kit I got to do the last two project necks). After it dried I gave it about five coats of the Tru-Oil. The I polished it with the Stock Sheen and Conditioner and gave it a couple coats of Gunstock Wax, buffed out with a paper towel to five it a slight satiny finish. The pores in the grain gave it a nice natural texture and an aged type of look.

The kit I've finished two necks with so far. (Wax sold separately.) This bass and my previous Peeler P. I didn't use the stain on the necks. If properly sanded and following the directions, will give you a beautiful, silky smooth neck.

I made a single screw, wooden tug bar, similar to the '51-'56 tug bars. I intentionally left the grain unfilled, for a more natural look. Finished as described above.
The tug bar is work as planned, adding consistency to my hand placement and stability of more even thumb playing.
It's light weight. It's an Alder body, so light to begin with. Add to that it's a semi-hollow body, the wings are hollow, with a solid center block down the middle. That gives it the hollow, woody sound and resonance. This was expected and comes through sweetly.
The pickup location is a little more forward than a regular La Cabronita. The pickup is in the earlier '51-'56 single coil location. That gives it a little more bass-y voice, somewhat similar to the '72+ Tele Bass, but not as extreme.
The T.V. Jones Super'Tron Bridge Pickup (a guitar pickup) is the same as the Thunder'Blade Bridge Pickup, except the Super has a full cover on the face. I was after a little hotter signal and a deeper voice of the inductance of 2.64H. It's doing just as I was expecting, hot, fat bass voicing. It comes close to being too much, but not enough to want to change it out. I just turn down a smidge. Besides many of my favorite pickups in some of my other basses are a bit on the hot side too.
I started with the GHS Pressure Wound strings. With this hotter, darker toned bass, the lows really punched through hard. The treble was a bit too much for the voicing with this bass. I had a set of La 'Bella DTFs (760FL) I pulled from one of my Squier Sonic Precisions (which I replaced with a set of GHS Bright Flats, much more of what I was after for that bass). The La' Bella's gave it much more of the warmer tone I prefer. It might use to have a little more treble, but not as much as the Pressure Wounds had. I'm thinking I might give this one a set of TI Jazz Flats. This is the only bass I would consider for those strings.
Yesterday I did a little modification.
Recently I've been play thumb style for some softer lines. I was resting my fingers on the pickguard, but the location was a bit inconsistent and not very stable. I started looking into a tug bar to help with this. Last week I found a strip of oak falloff from another woodworking project. It was just a little bigger than a thumb rest/tug bar, so I made one from a small piece of it. I cut it to size, shaped it, drilled it, and sanded it out. I didn't fill the grain. I used a pre-stain treatment and gave it a couple coats of Walnut stain (from the Birchwood-Casey Refinish kit I got to do the last two project necks). After it dried I gave it about five coats of the Tru-Oil. The I polished it with the Stock Sheen and Conditioner and gave it a couple coats of Gunstock Wax, buffed out with a paper towel to five it a slight satiny finish. The pores in the grain gave it a nice natural texture and an aged type of look.
The kit I've finished two necks with so far. (Wax sold separately.) This bass and my previous Peeler P. I didn't use the stain on the necks. If properly sanded and following the directions, will give you a beautiful, silky smooth neck.
I made a single screw, wooden tug bar, similar to the '51-'56 tug bars. I intentionally left the grain unfilled, for a more natural look. Finished as described above.
The tug bar is work as planned, adding consistency to my hand placement and stability of more even thumb playing.
Last edited:
Alright. I'm not going to be the first one to gig this bass. A few of the musicians at church wanted to see and play it. Everyone loves it. The looks, the weight, the feel and the sound of it. The FOH sound engineer. The frequencies sit perfectly in the mix. He said it's one of the best sounding basses he's mixed.
This week's player is a young man getting ready to go to college next summer. A great multi-instrumentalist. I let him try it and he wanted to play it Sunday, so I said he could. He wants me to write up a quote for me to make one for him.

Just a quick snapshot on stage.
This week's player is a young man getting ready to go to college next summer. A great multi-instrumentalist. I let him try it and he wanted to play it Sunday, so I said he could. He wants me to write up a quote for me to make one for him.
Just a quick snapshot on stage.
Latest posts
-

-

-
 What I am finding out with regards to playing as I grow older
- Latest: Five or Six
-

