• TalkBass has been independent since 1998. Add your voice.
    Create a free account to reply to discussions, view embedded media, and browse with fewer display ads.
    Join freeLog in
    Want zero display ads or expanded classifieds tools? Compare plans.

La Cabronita Hueca Precision Build

MadJack

Supporting Member
Nov 4, 2013
1,241
6,181
Central Florida
Note, I'm doing this in this forum and not the Luthier's Corner since I'm not a luthier and I'm assembling a parts-caster.

La Cabronita Hueca: Hollow (Little) Bi***!

This will be my first unfinished body build. My previous builds have been from finished bodies. The most notable being my Dusty Hill/ John Bolin The Peeler Precision Tribute build.

I've been pondering a Cabronita Precision build for a while. While looking for a body for this build, I found a semi-hollow '51 P style body with rear control cavity from Rosser Guitars on eBay. I ordered one back in late January (2025). It's due to be completed in the next couple weeks.
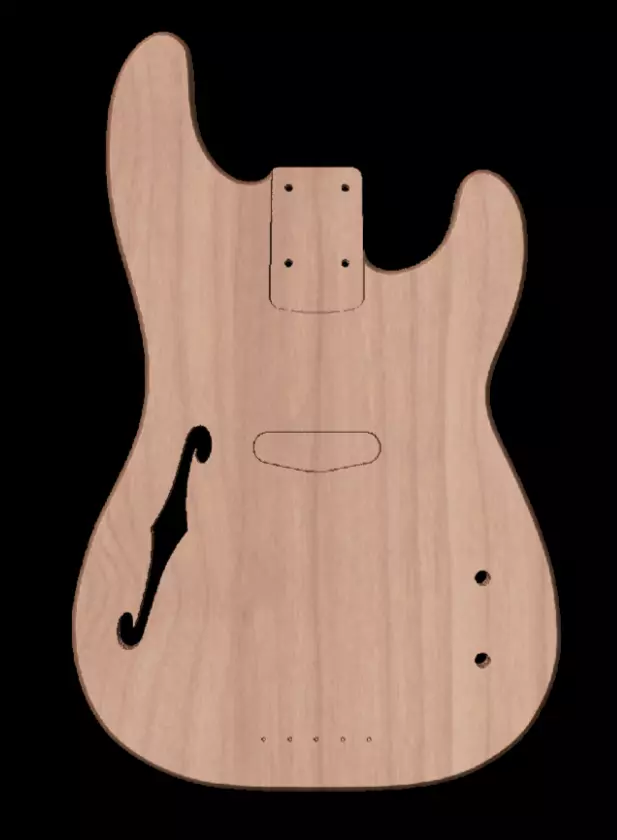
1740973175190.png

Digital representation by Rosser Guitars, North Carolina.

My plans are for a Shoreline Gold satin finish. This will should look almost like a beige finish with a bit of sparkle.

I got a Mighty Might Maple Precision Bass neck that was on clearance from StewMac. I'm stripping the thin satin poly finish and reshaping the headstock to a '51 P style. While the frets were pretty close to level, the fret ends were like a crosscut saw with the massive amount of fret sprout. I'm going to stain the neck to a more vintage shade and paint the headstock to match the body. The final finish will be a Tru-Oil and wax satin finish as I've done before on my Peeler P build. That neck is the smoothest playing neck that I've ever worked on. I've been working on the neck a little here and there.

I've ordered the finishing supplies from Oxford Guitar Supply in Canada, and the top coat will be Spray-Max 2K Satin Finish.

I got a Cream/Black/Cream Cabronita Precision Pickguard from WD Music/Pickguards.com. I got a custom rattlesnake vinyl wrap from InzaneSkins.com for a special looking pickguard. The wrap should be here tomorrow.

Pickguard Wrap.png
Digital representation from InzaneSkins.

I have a Fender Hi-Mass Bridge with Brass Saddles and other various hardware.

I'm planning on Hipshot HB3 tuning machines and a BT3 Bass Extender (D-Tuner).

The pickup will be a TV Jones ThunderTron Bridge pickup. I'm going with a bridge pickup, due to the slightly higher output and high inductance. I thought about the ThunderBlade/SuperTron, but the ThunderTron has a little more treble bite, without going too bright like the ThunderMags.

I should hopefully get the rest of the neck stripped and reshaped (maybe stained?), and the pickguard wrapped this week. I'll post up any updates.

I wanted to start this thread a couple weeks ago, but life gets in the way sometimes. All the issues were worked out for now.
 
Last edited:
[Psssst: putting the adjective before the noun in Spanish sounds a little poetic (not unlike "I sing the Body Electric" does), which may not be in line with what you meant to convey. "La Cabronita Hueca" is both more normal and tone-appropriate.]
As you can see, I never learned Spanish and that's what I get for using Google Translate.🥴

Corrections made, thank you.
 
In some countries, it isn't vulgar. It would just mean the hollow little goat. If you go to Mexico, don't call somebody that.

When traveling to a new Spanish speaking country, you have to listen carefully to figure out what is vulgar speech locally. There are only like two words that are swear words in every Spanish speaking country. Every country has some local ones in addition.
 
The pickguard vinyl wrap came in earlier. I applied it right away.

The printed sheet was similar to what I posted above. I used a Sharpie Marker and drew an outline approximately 1/2" around the outside of the pickguard onto the vinyl. I cut it out according to the outline.

I then peeled the plastic protective wrap off the pickguard and wiped it down with some isopropyl alcohol. I then peeled the backing paper from the vinyl and working from one side to the other, I applied the vinyl to the pickguard, being careful to prevent any air bubbles.

I then took my X-Acto knife with a fresh blade, I trimmed as close to the edge of the pickguard and the screw holes. I finished off with some 400 grit wet/dry sandpaper I cleaned up the final edges.

I now have an Eastern Diamondback Rattlesnake skin La Cabronita Precision Pickguard.

Pickguard Wrapped.jpg


I will be coating it with the 2K Satin clear coat, when the painting time comes around.

_____________________________________________

I also worked on the neck a bit today. I finished sanding the satin clear coat off the fretboard. I still need to do the backside and after I cut the shape, I'll do the headstock to prepare it for the color coat and satin finish.

Neck In Progress.jpg

You can see the outline on the headstock where it will be trimmed to shape.
 
The pickup will be a TV Jones ThunderTron Bridge pickup.
Zero margin for error then :)

ThunderTron has 51mm going pole to pole, standard P-bass single coil has 54mm pole to pole. 3mm may not sound like much but it's the difference between strings lining with poles and 'almost' lining with poles.

Hope your Fender bridge has the threaded saddles as that'll allow you to tweak the spacing. I wasted all sorts of time attempting to have a 20mm spacing bridge play nice with the Thunderblade in my Cabronita build, in the end I just ditched the 2 saddle bridge for the older style Hi Mass.
 
  • Like
Reactions: andronik
Zero margin for error then :)

ThunderTron has 51mm going pole to pole, standard P-bass single coil has 54mm pole to pole. 3mm may not sound like much but it's the difference between strings lining with poles and 'almost' lining with poles.

Hope your Fender bridge has the threaded saddles as that'll allow you to tweak the spacing. I wasted all sorts of time attempting to have a 20mm spacing bridge play nice with the Thunderblade in my Cabronita build, in the end I just ditched the 2 saddle bridge for the older style Hi Mass.
That was my initial concern, that the pole pieces would line up properly and not have any hot and cold spots.
 
As a custom Cabronita owner myself, happy to watch this project progress. :thumbsup:

Mine started as a standard issue MIM Cabronita. By the time I got done the only original part left was the body. After experimenting with/ TV Jones ThunderBlades [both bridge & neck versions] I landed on the Super'Tron [same exact pickup as the ThunderBlade except the chrome housing] neck position, due to the flat blades that emphasize the E & G strings, like the rest of my basses. The neck was replaced w/ an AllParts equivalent w/ a broke in nitro finish and True Oil applied to the worn area. By far the most harrowing mod was installing a custom 2 saddle bridge my dad made & drilling the body for the string ferrules. Happy to report that came out perfectly. The pg also came from WD but I beveled the top edge to match the rest.

Thrilled w/ the results and well worth the sweat equity. Good luck and can't wait to see yours.

IMG_6714.JPG


IMG_2469 2 copy.jpg
 
Last edited:
@kodiakblair , I wasn't aware of the pole spacing. I've had issues with pole spacing before on other projects, that I ended solving with blade style pups. 51mm would be a bit too tight.

@2saddleslab , I've seen that beauty before! 😍 One of many that have influenced my decision to build a Cabronita style bass.

I had been going back and forth over which model to use, either a Thunder'Tron or a Thunder'Blade/Super'Tron. I was about 85% settled on the Thunder'Tron, but either of the blade styles weren't out of the question. I'll likely go with the Super'Trons, as I like the full cover.

I take it, both of you use 500k Ω pots, as TV Jones recommends. This value will allow the proper amount of treble, but how about 1M Ω pots? I have thought about those, to allow more treble through (you can always dial it out, but you cannot add it, if it's not there.) Unfortunitely, any of my many regular parts sources don't carry the longshaft 1M Ω pots.
 
@MadJack

I wouldn't get too hung up on the 51mm pole to pole spacing, you won't experience string 'drop out' over just 1mm :)

Only mentioned it more from visual concerns than any effect on output :thumbsup: As I said strings give us wonderful straight lines but those lines will highlight anything that's a bit off. If you make the string spacing tighter it might show discrepancies down the fretboard edges. Same goes for the bridge or pickup, mount either just a wee bit +/- of 90 degrees and you'll spot it :confused:

Due diligence is the name of the game my friend. Double, triple check every line before making pilot holes. I got into the habit of printing out pickup/bridge dimension drawings, sticking them to 1/8" MDF and using them to find the optimal positions.
 
Late afternoon/early evening yesterday, I got the headstock cut and the rest of the neck stripped/sanded to 220 grit.

Headstock Cut.jpg

Next up for the neck will be a sanding with 320 wet/dry paper. Dust it off, then wipe it down with a damp towel and let it sit for about 10 minutes. This will raise any grain for sanding again, this time with 400. I'll repeat it again with 600 grit. After that, I can pre-stain treat it, then stain it to color. The face of the headstock will get the same treatment as the body to color match it to the body.
 
@kodiakblair , I wasn't aware of the pole spacing. I've had issues with pole spacing before on other projects, that I ended solving with blade style pups. 51mm would be a bit too tight.

@2saddleslab , I've seen that beauty before! 😍 One of many that have influenced my decision to build a Cabronita style bass.

I had been going back and forth over which model to use, either a Thunder'Tron or a Thunder'Blade/Super'Tron. I was about 85% settled on the Thunder'Tron, but either of the blade styles weren't out of the question. I'll likely go with the Super'Trons, as I like the full cover.

I take it, both of you use 500k Ω pots, as TV Jones recommends. This value will allow the proper amount of treble, but how about 1M Ω pots? I have thought about those, to allow more treble through (you can always dial it out, but you cannot add it, if it's not there.) Unfortunitely, any of my many regular parts sources don't carry the longshaft 1M Ω pots.
Thanks for the kind words. Happy to be even a small influence for these custom projects.

My 1st foray into TV Jones was replacing the [guitar] pickups in my Dean Stylist w/ Thunder'Trons. Luckily the pole spacing came out perfectly.

Dean Stylist.jpg


Having owned an original Gretsch blade pickup from the 70's, which I loved but finally broke I decided on the ThunderBlade for my 2 Warmoth builds. At first I used a ThunderBlade on my Cabronita but saw that the FCS used TV Jones Super'Trons, bridge position [curved blades] on their releases so decided to try that. The curved blades give an even response across all strings, which most players prefer. Turned out I prefer the flat blades [neck position] that emphasize the E&G strings [as I mentioned earlier] like all my other basses. Nice to have options.

Yes,I used the recommended 500k pots. Not sure what pots w/ other values would sound like though. She's plenty bright as is.

Oh, BTW, you'll have to join this auspicious club once you get this beauty complete. :thumbsup:
 
I've been working on the neck some more. I was originally thinking of applying a light stain to bring out some grain, but the wood on this one looks good without it.

Yesterday I finished dry sanding up to 400 grit paper. I then wiped it down with a damp cloth and waited 10 minutes for the grain to raise. I then sanded it with 600 grit paper. Wiped it again with the damp cloth, waited then finish sanded it with 800 grit paper.

Then I dusted it off and wiped it down with a tac cloth. Using an old cotton T-shirt I applied a light coat of Birchwood Casey Tru-Oil. I waited a couple hours and applied another light coat, and repeated for a third coat. I let that cure overnight.

This morning, I scuffed the oiled finish with fine steel wool (0000), to a satin finish. I have applied another light coat and through the rest of today, I'll apply two more coats and let it cure overnight again.

As it looks with today's first coat:

Neck In Progress (2).jpg

Neck In Progress (3).jpg

Tomorrow I'll scuff it again with the steel wool and apply a coat of Birchwood Casey Gunstock Wax. and then buff it out with a paper towel. This will leave a silky smooth satin finish that won't stick to a sweaty hand. I did the same to my Peeler Precision and it plays marvelously!

I did get notice that the body should ship next week. I'm looking forward to getting to work on that! :thumbsup:

Finishing Supplies.jpg
I think the hardest part is going to be waiting the month+ for the lacquer to properly cure.:eyebrow:
 
@MadJack, did you ever consider adding binding to that body? It will certainly add more work but it sure looks great on slabs.
I didn't. Being I'm not making the body and this is my first build and finish project, I'm trying to stay a little more basic. I wouldn't count it out on a future build, as I do plan on building more.
 
I didn't. Being I'm not making the body and this is my first build and finish project, I'm trying to stay a little more basic. I wouldn't count it out on a future build, as I do plan on building more.
Understood. Good to keep yer eyes on the prize.

Btw, nice choice for the color because a darker finish can tend to make the f hole disappear in certain lighting conditions, whereas a lighter color will allow it to be seen in all its glory. I learned that the hard way.
 
Last edited: